热门标签
热门文章
- 1小白用python处理excel文件-python处理excel文件
- 2华为IT助力浙江省教育考试院搭建高可靠业务系统
- 3数制转换的除留余数法的原理_除留取余
- 4山东大学RISC-V公共开放平台开发记录5_riscv-sbi-doc文件的合并
- 5elasticsearch源码解析笔记_elasticsearch源码分析
- 6ipv4手动设置网络的相关知识
- 7核密度估计-KDE_kde核密度估计
- 8微服务架构介绍
- 9Android studio:打开应用程序闪退的问题2.0_androidstudio中app闪退
- 10通俗易懂 悲观锁、乐观锁、可重入锁、自旋锁、偏向锁、轻量/重量级锁、读写锁、各种锁及其Java实现!_可重入锁和自旋锁
当前位置: article > 正文
Linux系统与windows系统rsync同步数据_rsync将window系统文件同步到linux
作者:IT小白 | 2024-05-18 09:54:32
赞
踩
rsync将window系统文件同步到linux
环境:
Linux:centos7.6 服务IP:11.11.31.227 需要传输的文件路径:/root/test
Windows:W10 服务IP:11.11.31.215 存放传输文件的文件夹:D:/www
1、服务器端安装、部署rsync
(1)rpm -ivh rsync-3.1.2-4.el7.x86_64.rpm
(2)vi /etc/rsyncd.passwd #里面内容:root:pwd@123
(3)chmod 600 /etc/rsyncd.passwd #给密码文件赋予读写权限
(4)
vi /etc/rsyncd.conf
uid=0
gid=0
max connections=10 #最大连接数
log file=/var/log/rsyncd.log
pid file=/var/run/rsyncd.pid
lock file=/var/run/rsyncd.lock
port=9940  #端口,可自行设置(需要注意的是,端口必须是在服务器开放端口区间范围内)
[chat]    #标识符,在客户端是需要使用,可自行设置
hosts=11.11.31.215  #客户端地址
comment=backup file
path=/root/test  #服务端需要同步的文件地址
read only = no
exclude=test
auth users=root
secrets file=/etc/rsyncd.passwd  #服务端配置的密码文件
- 1
- 2
- 3
- 4
- 5
- 6
- 7
- 8
- 9
- 10
- 11
- 12
- 13
- 14
- 15
- 16
(5)启动服务
[root@localhost test]# /usr/bin/rsync --daemon --config=/etc/rsyncd.conf   #启动rsync服务
[root@localhost test]# echo "/usr/bin/rsync --daemon --config=/etc/rsyncd.conf">>/etc/rc.local #设置开机自启动
[root@localhost test]# netstat -nlpt | grep 9940   查看端口
- 1
- 2
- 3
2、客户端安装、部署cwrsync
(1)找到安装路径的bin目录,将此目录加入到环境变量path中
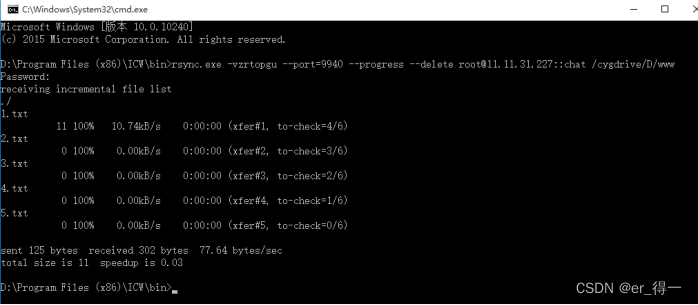
(2)进入cmd,输入命令:rsync.exe -vzrtopgu --port=9940 --progress --delete root@11.11.31.227::chat /cygdrive/D/www ,出现以下界面,输入密码即可传输文件:

(3)完善解决方案:
创建bat脚本“照片同步.bat”,并添加到任务计划中:
echo pwd@123|rsync.exe -vzrtopgu --port=9940 --progress --delete root@11.11.31.227::chat /cygdrive/D/webapp/rlsbjpg/DIC_PHOTOTYPE_EMPLOYEE
- 1
声明:本文内容由网友自发贡献,不代表【wpsshop博客】立场,版权归原作者所有,本站不承担相应法律责任。如您发现有侵权的内容,请联系我们。转载请注明出处:https://www.wpsshop.cn/w/IT小白/article/detail/587795
推荐阅读
相关标签


