热门标签
热门文章
- 1PageHelper循环依赖 com.github.pagehelper.autoconfigure.PageHelperAutoConfiguration_pagehelper循环依赖解决
- 2Flutter 封装官方【webview_flutter】,增加JSBridge回调_flutter jsbridge
- 3Vue实战(06)vue引入外部字体库_vue 项字体库
- 4纯CSS3文字效果推荐_css3 文字效果
- 5【吴恩达deeplearning.ai】基于ChatGPT API打造应用系统(上)_deeplearning.api
- 62020美赛E题O奖论文分析_2020美赛e题优秀论文
- 7python求巴特沃斯和高斯的低通滤波和高通滤波_高斯高通滤波python
- 8Unity3D 学习路线?_unity3d学习路线
- 9Unity中常用的数据结构_unity 数据结构
- 10拟合案例2:matlab实现分段函数拟合(分段点未知)及源码
当前位置: article > 正文
封装 Antd中Modal对话框内提交表单组件,开发效率翻倍_u-modal里面放置form表单
作者:Monodyee | 2024-02-16 06:53:52
赞
踩
u-modal里面放置form表单
业务背景:
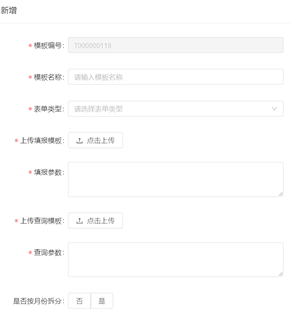
在业务管理系统的项目中,几乎每个页面都会出现增、删、改、提交等对话框,如下图所示:

如果每个弹出的对话框,都去拷贝a-tree-select、a-select、a-input、a-radio-group等表单项代码片段,重写add()、edit()、submit()、close()等方法;这会导致开发效率很低,因此,本次文档将描述如何封装常用的表单对话框,以备下次开发复用,极大提高工作效率,尽早下班。
1、首先引入对话框Modal的代码框架
该适合基本使用的代码框架包含两个部分:HTML代码块,JS代码块;其中JS代码块包含对话框宽度、标题自定义传参,对象赋值方法,增改接口,增改对应的函数。
<template>
<a-modal :title="title" :width="width" :visible="visible" :confirmLoading="confirmLoading" @ok="handleOk" @cancel="handleCancel" cancelText="关闭">
 将注入表单详细内容
  </a-modal>
</ template >
<script>
import pick from 'lodash.pick';
import { addDict, editDict} from '@/api/api';

export default {
    name: 'FormModal',
    props: {
      width:{
        type:Number,
        default: 600
      },
      title:{
        type:String,
        default: ‘操作’
      },
      labelCol:{
        type:Object,
        default: () => {
          return{
            xs: { span: 24 },
            sm: { span: 5 }
          }
        }
      },
      wrapperCol:{
        type:Object,
        default: () => {
          return{
            xs: { span: 24 },
            sm: { span: 16 }
          }
        }
      }
    },
    data () {
        return {
            visible: false,
            model: {},
            confirmLoading: false,
            form: this.$form.createForm(this)
         };
    },
    created () {},
    methods: {
        add () {
            this.edit({});
        },
        edit (record) {
            this.form.resetFields();
            this.model = Object.assign({}, record);
            this.visible = true;
            this.$nextTick(() => {
                this.form.setFieldsValue(
pick(this.model, 'dictName', 'dictCode', 'description'));
            });
        },
        // 确定
        handleOk () {
            const that = this;
            // 触发表单验证
            this.form.validateFields((err, values) => {
                if (!err) {
                    that.confirmLoading = true;
                    values.dictName = (values.dictName || '').trim();
                    let formData = Object.assign(this.model, values);
                    let obj;
                    console.log(formData);
                    if (!this.model.id) {
                        obj = addDict(formData);
                    } else {
                        obj = editDict(formData);
                    }
                    obj
                        .then(res => {
                            if (res.success) {
                                that.$message.success(res.message);
                                that.$emit('ok');
                            } else {
                                that.$message.warning(res.message);
                            }
                        })
                        .finally(() => {
                            that.confirmLoading = false;
                            that.close();
                        });
                }
            });
        },
        // 关闭
        handleCancel () {
            this.close();
        },
        close () {
            this.$emit('close');
            this.visible = false;
        }
    }
};
</script>
- 1
- 2
- 3
- 4
- 5
- 6
- 7
- 8
- 9
- 10
- 11
- 12
- 13
- 14
- 15
- 16
- 17
- 18
- 19
- 20
- 21
- 22
- 23
- 24
- 25
- 26
- 27
- 28
- 29
- 30
- 31
- 32
- 33
- 34
- 35
- 36
- 37
- 38
- 39
- 40
- 41
- 42
- 43
- 44
- 45
- 46
- 47
- 48
- 49
- 50
- 51
- 52
- 53
- 54
- 55
- 56
- 57
- 58
- 59
- 60
- 61
- 62
- 63
- 64
- 65
- 66
- 67
- 68
- 69
- 70
- 71
- 72
- 73
- 74
- 75
- 76
- 77
- 78
- 79
- 80
- 81
- 82
- 83
- 84
- 85
- 86
- 87
- 88
- 89
- 90
- 91
- 92
- 93
- 94
- 95
- 96
- 97
- 98
- 99
- 100
- 101
- 102
- 103
- 104
2、封装出单项表单组件,根据不同的传参确定表单项的输入类型
组件的详细入参如下:
  props: {
    itemOptions: {
      // 控件的基本参数
      type: Object,
      default: function () {
        return {
          type: 'text', // 控件类型
          defaultValue: '', // 默认值
          label: '控件名称', // 控件显示的文本
          value: '', // 控件的值
          size: '', // 控件大小
          placeholder: '' // 默认控件的空值文本
        };
      }
    }
  }
- 1
- 2
- 3
- 4
- 5
- 6
- 7
- 8
- 9
- 10
- 11
- 12
- 13
- 14
- 15
- 16
举个例子,当传入参数的控件类型type为text,组件内部的代码为:
    <template v-if="itemOptions.fieldName && itemOptions.type === 'text'">
        <a-form-item :label-col="labelCol" :wrapper-col="wrapperCol" :label="itemOptions.labelText">
          <j-input
           style="width: 100%"
            :size="itemOptions.size ? itemOptions.size : 'default'"
            :type="itemOptions.type ? itemOptions.type : 'like'"
            v-decorator="[
              itemOptions.fieldName,
              {
                initialValue: itemOptions.defaultValue ? itemOptions.defaultValue : '',
                rules: Array.isArray(itemOptions.rules) && itemOptions.rules.length > 0 ? itemOptions.rules : []
              }
            ]"
            :placeholder="itemOptions.placeholder? itemOptions.placeholder :`请输入${itemOptions.labelText}`"
            allowClear
          />
        </a-form-item>
    </template>
- 1
- 2
- 3
- 4
- 5
- 6
- 7
- 8
- 9
- 10
- 11
- 12
- 13
- 14
- 15
- 16
- 17
- 18
- 19
3.将封装的单项表单组件引入modal对话框内容部分
  <a-modal :title="title" :width="width" :visible="visible" :confirmLoading="confirmLoading" @ok="handleOk" @cancel="handleCancel" cancelText="关闭">
    <a-spin :spinning="confirmLoading">
      <a-form :form="form" ref="form">
         <template v-for="(item,index) in fieldOptions" :label-col="labelCol" :wrapper-col="wrapperCol" :label="item.labelText">
            <field-render :key="index" :itemOptions="item"/>
         </template>
      </a-form>
    </a-spin>
  </a-modal>
- 1
- 2
- 3
- 4
- 5
- 6
- 7
- 8
- 9
- 10
4、根据业务需求传入相应的fieldOptions参数即可,其余代码均可复用
之后的每一次调用只需要修改fieldOptions的内容就可以了,其他内容可保持不变,大大提高了生成对话框表单的效率。
举个fieldOptions赋值的例子:
computed: {
  fieldOptions(){
        return [
          {
            type: 'treeSelect',
            labelText: '归属机构',
            fieldName: 'orgId',
            treeData: this.selectData,
            rules: this.validatorRules.empty
          },
          {
            type: 'text',
            labelText: '项目名称',
            fieldName: 'projectName',
            rules: this.validatorRules.empty
          },
          {
            type: 'radio',
            labelText: '状态',
            fieldName: 'status',
            options: this.dict.status,
          }
        ]
      }
    }
- 1
- 2
- 3
- 4
- 5
- 6
- 7
- 8
- 9
- 10
- 11
- 12
- 13
- 14
- 15
- 16
- 17
- 18
- 19
- 20
- 21
- 22
- 23
- 24
- 25
最后,值得一提的是,上述代码块能将我一小时的开发时长缩短至20分钟,开发效率得以提升,后续我还会持续发布一系列封装常用功能组件的文章,并分享出来,希望能给陷入重复功能开发人士一点启发,可以早点下班回家,快乐生活~
声明:本文内容由网友自发贡献,不代表【wpsshop博客】立场,版权归原作者所有,本站不承担相应法律责任。如您发现有侵权的内容,请联系我们。转载请注明出处:https://www.wpsshop.cn/w/Monodyee/article/detail/91628
推荐阅读
相关标签


