- 1代码随想录算法训练营day50| 123.买卖股票的最佳时机III、188.买卖股票的最佳时机IV
- 2java导出excel(带图片)_java导出excel带图片
- 3遇到:TypeError: __init__() got an unexpected keyword argument ‘indices‘错误应该如何解决
- 4一款好用的AI工具——边界AICHAT
- 5Element实现二维展开列表(嵌套表)
- 6微信小程序-wx.createAnimation动画实现_wx.createanimation transformorigin
- 7乐视三合一摄像头和kinect_乐视三合一体感摄像头快评测,看看到底怎么玩?
- 8【计算机视觉】图像检索_图像检索综述
- 9MIPS架构_mip架构
- 10牛客小白月赛#59(A~F)_牛客小白月赛59
linux设备驱动模型一字符设备open系统调用流程_驱动中open
赞
踩
前言
要解决的问题:
- struct inode 和 struct file,cdev 和 inode的关系
- open系统调用是如何通过设备号来找到
一、open概述
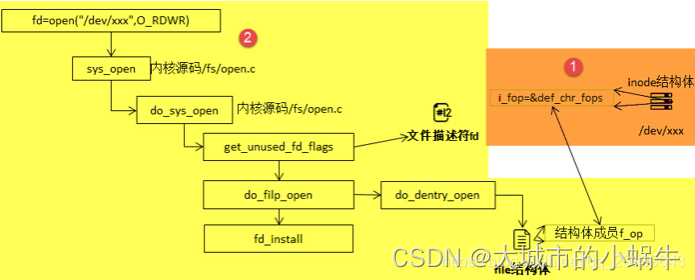
使用open函数打开设备文件,到底做了些什么工作?下图中列出了open函数执行的大致过程。


二、字符设备的注册
linux内核cdev_init系列函数。
内核中每个字符设备都对应一个 cdev 结构的变量,下面是它的定义:
struct cdev {
   struct kobject kobj;          // 每个 cdev 都是一个 kobject
   struct module *owner;       // 指向实现驱动的模块
   const struct file_operations *ops;   // 操纵这个字符设备文件的方法
   struct list_head list;       // 与 cdev 对应的字符设备文件的 inode->i_devices 的链表头
   dev_t dev;                   // 起始设备编号
   unsigned int count;       // 设备范围号大小
};
- 1
- 2
- 3
- 4
- 5
- 6
- 7
- 8
一个 cdev 一般它有两种定义初始化方式:静态的和动态的。
-
静态内存定义初始化:
struct cdev my_cdev; cdev_init(&my_cdev, &fops); my_cdev.owner = THIS_MODULE;- 1
- 2
- 3
-
动态内存定义初始化:
struct cdev *my_cdev = cdev_alloc(); my_cdev->ops = &fops; my_cdev->owner = THIS_MODULE;- 1
- 2
- 3
两种使用方式的功能是一样的,只是使用的内存区不一样,一般视实际的数据结构需求而定。
下面贴出了两个函数的代码,以具体看一下它们之间的差异。
struct cdev *cdev_alloc(void)
{
   struct cdev *p = kzalloc(sizeof(struct cdev), GFP_KERNEL);
   if (p) {
       INIT_LIST_HEAD(&p->list);
       kobject_init(&p->kobj, &ktype_cdev_dynamic);
   }
   return p;
}

void cdev_init(struct cdev *cdev, const struct file_operations *fops)
{
   memset(cdev, 0, sizeof *cdev);
   INIT_LIST_HEAD(&cdev->list);
   kobject_init(&cdev->kobj, &ktype_cdev_default);
   cdev->ops = fops;
}
- 1
- 2
- 3
- 4
- 5
- 6
- 7
- 8
- 9
- 10
- 11
- 12
- 13
- 14
- 15
- 16
- 17
由此可见,两个函数完成都功能基本一致,只是 cdev_init() 还多赋了一个 cdev->ops 的值。
初始化 cdev 后,需要把它添加到系统中去。为此可以调用 cdev_add() 函数。传入 cdev 结构的指针,起始设备编号,以及设备编号范围。
int cdev_add(struct cdev *p, dev_t dev, unsigned count)
{
   p->dev = dev;
   p->count = count;
   return kobj_map(cdev_map, dev, count, NULL, exact_match, exact_lock, p);
}
- 1
- 2
- 3
- 4
- 5
- 6
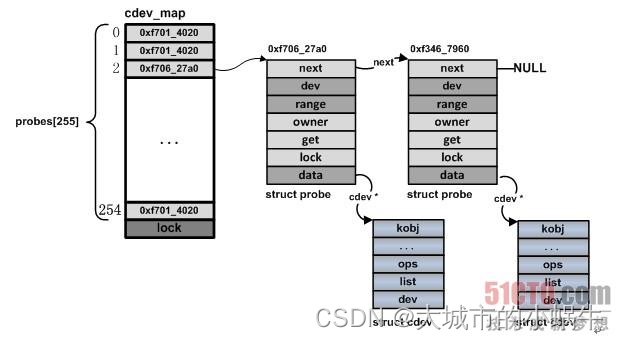
内核中所有都字符设备都会记录在一个 kobj_map 结构的 cdev_map 变量中。这个结构的变量中包含一个散列表用来快速存取所有的对象。kobj_map() 函数就是用来把字符设备编号和 cdev 结构变量一起保存到 cdev_map 这个散列表里。当后续要打开一个字符设备文件时,通过调用 kobj_lookup() 函数,根据设备编号就可以找到 cdev 结构变量,从而取出其中的 ops 字段。
kobj_map函数中哈希表的实现原理和前面注册分配设备号中的几乎完全一样,通过要加入系统的设备的主设备号major(major=MAJOR(dev))来获得probes数组的索引值i(i = major % 255),然后把一个类型为struct probe的节点对象加入到probes[i]所管理的链表中,如图2-6所示。其中struct probe所在的矩形块中的深色部分是我们重点关注的内容,记录了当前正在加入系统的字符设备对象的有关信息。其中,dev是它的设备号,range是从次设备号开始连续的设备数量,data是一void *变量,指向当前正要加入系统的设备对象指针p。图2-6展示了两个满足主设备号major % 255 = 2的字符设备通过调用cdev_add之后,cdev_map所展现出来的数据结构状态。

所以,简单地说,设备驱动程序通过调用cdev_add把它所管理的设备对象的指针嵌入到一个类型为struct probe的节点之中,然后再把该节点加入到cdev_map所实现的哈希链表中。
对系统而言,当设备驱动程序成功调用了cdev_add之后,就意味着一个字符设备对象已经加入到了系统,在需要的时候,系统就可以找到它。对用户态的程序而言,cdev_add调用之后,就已经可以通过文件系统的接口呼叫到我们的驱动程序。
当一个字符设备驱动不再需要的时候(比如模块卸载),就可以用 cdev_del() 函数来释放 cdev 占用的内存。
void cdev_del(struct cdev *p)
{
   cdev_unmap(p->dev, p->count);
   kobject_put(&p->kobj);
}
- 1
- 2
- 3
- 4
- 5
其中 cdev_unmap() 调用 kobj_unmap() 来释放 cdev_map 散列表中的对象。kobject_put() 释放 cdev 结构本身。
二、创建inode
设备文件通常在开机启动时自动创建的,不过,我们仍然可以使用命令mknod来创建一个新的设备文件,命令的基本语法如下:
mknod 设备名 设备类型 主设备号 次设备号
当我们使用上述命令,创建了一个字符设备文件时,实际上就是创建了一个设备节点inode结构体,并且将该设备的设备编号记录在成员i_rdev,将成员i_fop指针指向了def_chr_fops结构体。这就是mknod负责的工作内容,具体代码见如
命令mknod最终会调用init_special_inode函数,由于我们创建的是字符设备,因此,会执行第22~23行的代码。这样就完成了上图的内容。
static struct inode *shmem_get_inode(struct super_block *sb, const struct inode *dir,umode_t mode, dev_t dev, unsigned long flags)
{
	inode = new_inode(sb);
	if (inode) {
		......
		switch (mode & S_IFMT) {
			default:
			inode->i_op = &shmem_special_inode_operations;
			 init_special_inode(inode, mode, dev);
			 break;
			 ......
		 }
	 } else
	 	shmem_free_inode(sb);
		 return inode;
	 }
	 void init_special_inode(struct inode *inode, umode_t mode, dev_t rdev)
	 {
		 inode->i_mode = mode;
		 if (S_ISCHR(mode)) {
		 inode->i_fop = &def_chr_fops;
		 inode->i_rdev = rdev;
	 }
 ....
 }
- 1
- 2
- 3
- 4
- 5
- 6
- 7
- 8
- 9
- 10
- 11
- 12
- 13
- 14
- 15
- 16
- 17
- 18
- 19
- 20
- 21
- 22
- 23
- 24
- 25
四、打开文件流程
当应用层通过open api打开一个文件,内核中究竟如何处理? 本身用来描述内核中对应open 系统调用的处理流程。
4.1 数据结构
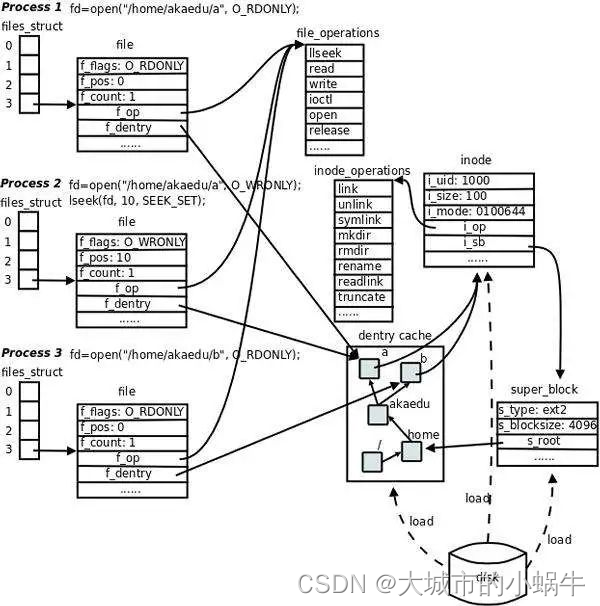
struct fdtable 一个进程可以打开很多文件, 内核用fdtable来管理这些文件。
include/linux/fdtable.h
struct fdtable {
    unsigned int max_fds;
    struct file __rcu **fd;      /* current fd array */
    unsigned long *close_on_exec;
    unsigned long *open_fds;
    unsigned long *full_fds_bits;
    struct rcu_head rcu;
};
fd: 文件描述符数组
open_fds: 为方便查找数组中的空闲项, 为该数组建立的位图
close_on_exec: 在打开的文件中, 有些文件时用于执行目的, 在执行完成之后应该自动关闭
- 1
- 2
- 3
- 4
- 5
- 6
- 7
- 8
- 9
- 10
- 11
- 12
struct files_struct 对于大多数进程, 打开文件的数量是有限的,一种优化的设计方式是为每个进程内置分配少量数目的文件描述符指针数组, 但进程需要更多的指针时, 再动态扩展。 为此, 进程并不直接使用fdtable, 而是使用files_struct结构体, 作为task_struct的一个域.fdt指向进程实际使用的fdtable。 对于大多数进程来说, 打开文件的梳理并不会很多, 这时候无需另外分配空间, 直接指向内嵌的结构, 即fdtab域。
/*
 * Open file table structure
 */
struct files_struct {
  /*
   * read mostly part
   */
    atomic_t count;
    bool resize_in_progress;
    wait_queue_head_t resize_wait;

    struct fdtable __rcu *fdt;
    struct fdtable fdtab;
  /*
   * written part on a separate cache line in SMP
   */
    spinlock_t file_lock ____cacheline_aligned_in_smp;
    unsigned int next_fd;
    unsigned long close_on_exec_init[1];
    unsigned long open_fds_init[1];
    unsigned long full_fds_bits_init[1];
    struct file __rcu * fd_array[NR_OPEN_DEFAULT];
};
- 1
- 2
- 3
- 4
- 5
- 6
- 7
- 8
- 9
- 10
- 11
- 12
- 13
- 14
- 15
- 16
- 17
- 18
- 19
- 20
- 21
- 22
- 23
struct file每个打开的文件都会对应一个file结构体, 进程通过它对文件进行操作。
include/linux/fs.h
struct file {
    union {
        struct llist_node   fu_llist;
        struct rcu_head     fu_rcuhead;
    } f_u;
    struct path     f_path;
    struct inode        *f_inode;   /* cached value */
    const struct file_operations    *f_op;

    /*
     * Protects f_ep_links, f_flags.
     * Must not be taken from IRQ context.
     */
    spinlock_t      f_lock;
    enum rw_hint        f_write_hint;
    atomic_long_t       f_count;
    unsigned int        f_flags;
    fmode_t         f_mode;
    struct mutex        f_pos_lock;
    loff_t          f_pos;
    struct fown_struct  f_owner;
    const struct cred   *f_cred;
    struct file_ra_state    f_ra;

    u64         f_version;
#ifdef CONFIG_SECURITY
    void            *f_security;
#endif
    /* needed for tty driver, and maybe others */
    void            *private_data;

#ifdef CONFIG_EPOLL
    /* Used by fs/eventpoll.c to link all the hooks to this file */
    struct list_head    f_ep_links;
    struct list_head    f_tfile_llink;
#endif /* #ifdef CONFIG_EPOLL */
    struct address_space    *f_mapping;
    errseq_t        f_wb_err;
    errseq_t        f_sb_err; /* for syncfs */
} __randomize_layout

f_path: 文件路径
f_op: 指向文件操作表, read/write等操作都会调用这里的回调
f_mapping: 指向文件地址空间描述符
f_pos: 当前文件的偏移值
- 1
- 2
- 3
- 4
- 5
- 6
- 7
- 8
- 9
- 10
- 11
- 12
- 13
- 14
- 15
- 16
- 17
- 18
- 19
- 20
- 21
- 22
- 23
- 24
- 25
- 26
- 27
- 28
- 29
- 30
- 31
- 32
- 33
- 34
- 35
- 36
- 37
- 38
- 39
- 40
- 41
- 42
- 43
- 44
- 45
- 46
struct inode
VFS inode包含文件访问权限、属主、组、大小、生成时间、访问时间、最后修改时间等信息。它是linux管理文件系统的最基本单位,也是文件系统连接任何子目录、文件的桥梁。inode结构中的静态信息取自物理设备上的文件系统,由文件系统指定的函数填写,它只存在于内存中,可以通过inode缓存访问。虽然每个文件都有相应的inode结点,但是只有在需要的时候系统才会在内存中为其建立相应的inode数据结构,建立的inode结构将形成一个链表,我们可以通过遍历这个链表去得到我们需要的文件结点,VFS也为已分配的inode构造缓存和哈希表,以提 高系统性能。inode结构中的struct inode_operations *i_op为我们提供了一个inode操作列表,通过这个列表提供的函数我们可以对VFS inode结点进行各种操作。每个inode结构都有一个i结点号i_ino,在同一个文件系统中每个i结点号是唯一的
struct inode {
	struct list_headi_hash;
	struct list_headi_list;
	struct list_headi_dentry;
	struct list_headi_dirty_buffers;
	unsigned longi_ino; /*每一个inode都有一个序号,经由super block结构和其序号,我们可以很轻易的找到这个inode。*/
	atomic_t i_count; /*在Kernel里,很多的结构都会记录其reference count,以确保如果某个结构正在使用,它不会被不小心释放掉,i_count就是其reference count。*/
	kdev_t i_dev; /* inode所在的device代码 */
	umode_t i_mode; /* inode的权限 */
	nlink_t i_nlink; /* hard link的个数 */
	uid_t i_uid; /* inode拥有者的id */
	gid_t i_gid; /* inode所属的群组id */
	kdev_t i_rdev; /* 如果inode代表的是device的话,那此字段将记录device的代码 */
	...............
}
- 1
- 2
- 3
- 4
- 5
- 6
- 7
- 8
- 9
- 10
- 11
- 12
- 13
- 14
- 15
4.2 处理流程
4.2.1 open系统调用
整体调用栈
#3  0xffffffff81218174 in do_filp_open (dfd=dfd@entry=-100, pathname=pathname@entry=0xffff888004950000, op=op@entry=0xffffc90000173ee4) at fs/namei.c:3396
#4  0xffffffff81203cfd in do_sys_openat2 (dfd=-100, filename=<optimized out>, how=how@entry=0xffffc90000173f20) at fs/open.c:1168
#5  0xffffffff81205135 in do_sys_open (dfd=<optimized out>, filename=<optimized out>, flags=<optimized out>, mode=<optimized out>) at fs/open.c:1184
#6  0xffffffff819bf903 in do_syscall_64 (nr=<optimized out>, regs=0xffffc90000173f58) at arch/x86/entry/common.c:46
#7  0xffffffff81a0007c in entry_SYSCALL_64 () at arch/x86/entry/entry_64.S:120
- 1
- 2
- 3
- 4
- 5
当我们在用户空间调用open之后,会产生一个软中断,然后通过系统调用进入内核空间。通过系统调用号,我们就可以跳转到该中断例程的入口地址
SYSCALL_DEFINE3(open, const char __user *, filename, int, flags, int, mode)
{
	long ret;
	/*检查是否应该不考虑用户层传递的标志、总是强行设置
	O_LARGEFILE标志。如果底层处理器的字长不是32位,就是这种情况*/
	if (force_o_largefile())
	flags |= O_LARGEFILE;
	/*实际工作*/
	ret = do_sys_open(AT_FDCWD, filename, flags, mode);
	/* avoid REGPARM breakage on x86: */
	asmlinkage_protect(3, ret, filename, flags, mode);
	return ret;
}
- 1
- 2
- 3
- 4
- 5
- 6
- 7
- 8
- 9
- 10
- 11
- 12
- 13
我们看下*SYSCALL_DEFINE3(open, const char __user , filename, int, flags, int, mode) 展开是怎么样的
#define SYSCALL_DEFINE3(name, ...) SYSCALL_DEFINEx(3, _##name, __VA_ARGS__)

再看下SYSCALL_DEFINEx
#define SYSCALL_DEFINEx(x, sname, ...)              \
__SYSCALL_DEFINEx(x, sname, __VA_ARGS__)

再看下__SYSCALL_DEFINEx
#define __SYSCALL_DEFINEx(x, name, ...)                 \
asmlinkage long sys##name(__SC_DECL##x(__VA_ARGS__))

这里对对应__SC_DECL3
#define __SC_DECL1(t1, a1)  t1 a1
#define __SC_DECL2(t2, a2, ...) t2 a2, __SC_DECL1(__VA_ARGS__)
#define __SC_DECL3(t3, a3, ...) t3 a3, __SC_DECL2(__VA_ARGS__)
这们一步步展开SYSCALL_DEFINE3(open, const char __user *, filename, int, flags, int, mode)代替进去,可以得到
SYSCALL_DEFINE3(open, const char __user *, filename, int, flags, int, mode)
= SYSCALL_DEFINEx(3, _##name, __VA_ARGS__)
=asmlinkage long sys_open(__SC_DECL3(__VA_ARGS__))
=asmlinkage long sys_open(const char __user* filename, int flags, int mode)
这个才是真正的函数原型
- 1
- 2
- 3
- 4
- 5
- 6
- 7
- 8
- 9
- 10
- 11
- 12
- 13
- 14
- 15
- 16
- 17
- 18
- 19
- 20
在sys_open里面继续调用do_sys_open完成 open操作
long do_sys_open(int dfd, const char __user *filename, int flags, int mode)
{
	/*从进程地址空间读取该文件的路径名*/
	char *tmp = getname(filename);
	int fd = PTR_ERR(tmp);
	if (!IS_ERR(tmp)) {
		/*在内核中,每个打开的文件由一个文件描述符表示该描述符在特定于进程的数组中充当位置索引(数组是
		task_struct->files->fd_arry),该数组的元素包含了file结构,其中包括每个打开文件的所有必要信息。因此,调用下面
		函数查找一个未使用的文件描述符,返回的是上面说的数组的下标*/
		fd = get_unused_fd_flags(flags);
		if (fd >= 0) {
			/*fd获取成功则开始打开文件,此函数是主要完成打开功能的函数*/
			//如果分配fd成功,则创建一个file对象
			struct file *f = do_filp_open(dfd, tmp, flags, mode, 0);
			if (IS_ERR(f)) {
				put_unused_fd(fd);
				fd = PTR_ERR(f);
			}
		}
	}
} else {
		/*文件如果打开成功,调用fsnoTIfy_open()函数,根据inode所指定的信息进行打开
		函数(参数为f)将该文件加入到文件监控的系统中。该系统是用来监控文件被打开,创建,
		读写,关闭,修改等操作的*/
		fsnotify_open(f->f_path.dentry);
		/*将文件指针安装在fd数组中
		将struct file *f加入到fd索引位置处的数组中。如果后续过程中,有对该文件描述符的
		操作的话,就会通过查找该数组得到对应的文件结构,而后在进行相关操作。*/
		fd_install(fd, f);
	}
}
	putname(tmp);
	return fd;
}
- 1
- 2
- 3
- 4
- 5
- 6
- 7
- 8
- 9
- 10
- 11
- 12
- 13
- 14
- 15
- 16
- 17
- 18
- 19
- 20
- 21
- 22
- 23
- 24
- 25
- 26
- 27
- 28
- 29
- 30
- 31
- 32
- 33
- 34
该函数主要分为如下几个步骤来完成打开文件的操作:
1.将文件名参数从用户态拷贝至内核,调用函数get_name();
2.从进程的文件表中找到一个空闲的文件表指针,调用了函数get_unused_fd_flgas();
3.完成真正的打开操作,调用函数do_filp_open();
4.将打开的文件添加到进程的文件表数组中,调用函数fd_install();
getname函数主要的任务是将文件名filename从用户态拷贝至内核态
char * getname(const char __user * filename)
{
	char *tmp, *result;
	result = ERR_PTR(-ENOMEM);
	tmp = __getname(); //从内核缓存中分配空间;
	if (tmp)  {
		//将文件名从用户态拷贝至内核态;
		int retval = do_getname(filename, tmp);
		result = tmp;
		if (retval){
			__putname(tmp);
			result = ERR_PTR(retval);
		}
	}
	audit_getname(result);
	return result;
}
- 1
- 2
- 3
- 4
- 5
- 6
- 7
- 8
- 9
- 10
- 11
- 12
- 13
- 14
- 15
- 16
- 17
get_unused_fd_flags实际调用的是alloc_fd
#define get_unused_fd_flags(flags) alloc_fd(0, (flags))
/*
* allocate a file descriptor, mark it busy.
*/
int alloc_fd(unsigned start, unsigned flags)
{
	struct files_struct *files = current->files;//获得当前进程的files_struct 结构
	unsigned int fd;
	int error;
	struct fdtable *fdt;
	spin_lock(&files->file_lock);
	repeat:
	fdt = files_fdtable(files);
	fd = start;
	if (fd next_fd) //从上一次打开的fd的下一个fd开始搜索空闲的fd
		fd = files->next_fd;
	if (fd max_fds)//寻找空闲的fd,返回值为空闲的fd
		fd = find_next_zero_bit(fdt->open_fds->fds_bits,
	fdt->max_fds, fd);
	//如果有必要,即打开的fd超过max_fds,则需要expand当前进程的fd表;
	//返回值error<0表示出错,error=0表示无需expand,error=1表示进行了expand;
	error = expand_files(files, fd);
	if (error)
		goto out;

	/*
	* If we needed to expand the fs array we
	* might have blocked - try again.
	*/
	//error=1表示进行了expand,那么此时需要重新去查找空闲的fd;
	if (error)
		goto repeat;
	//设置下一次查找的起始fd,即本次找到的空闲的fd的下一个fd,记录在files->next_fd中;
	if (start <= files->next_fd)
	files->next_fd = fd + 1;
	FD_SET(fd, fdt->open_fds);
	if (flags & O_CLOEXEC)
		FD_SET(fd, fdt->close_on_exec);
	else
		FD_CLR(fd, fdt->close_on_exec);
	error = fd;
#if 1
/* Sanity check */
if (rcu_dereference(fdt->fd[fd]) != NULL) {
	printk(KERN_WARNING "alloc_fd: slot %d not NULL!\n", fd);
	rcu_assign_pointer(fdt->fd[fd], NULL);
}
#endif
out:
	spin_unlock(&files->file_lock);
	return error;
}
- 1
- 2
- 3
- 4
- 5
- 6
- 7
- 8
- 9
- 10
- 11
- 12
- 13
- 14
- 15
- 16
- 17
- 18
- 19
- 20
- 21
- 22
- 23
- 24
- 25
- 26
- 27
- 28
- 29
- 30
- 31
- 32
- 33
- 34
- 35
- 36
- 37
- 38
- 39
- 40
- 41
- 42
- 43
- 44
- 45
- 46
- 47
- 48
- 49
- 50
- 51
- 52
该函数为需要打开的文件在当前进程内分配一个空闲的文件描述符fd,该fd就是open()系统调用的返回值
do_filp_open函数的一个重要作用就是根据传递近来的权限进行分析,并且分析传递近来的路径名字,根据路径名逐个解析成dentry,并且通过dentry找到inode,inode就是记录着该文件相关的信息, 包括文件的创建时间和文件属性所有者等等信息,根据这些信息就可以找到对应的文件操作方法。在这个过程当中有一个临时的结构体用于保存在查找过程中的相关信息
do_file_open 函数的处理如下, 主要调用了path_openat 函数去执行真正的open 流程:
fs/namei.c

do_sys_open->do_sys_openat2->do_filp_open
struct file *do_filp_open(int dfd, struct filename *pathname,
        const struct open_flags *op)
{
    struct nameidata nd;
    int flags = op->lookup_flags;
    struct file *filp;

    set_nameidata(&nd, dfd, pathname);
    filp = path_openat(&nd, op, flags | LOOKUP_RCU);
    if (unlikely(filp == ERR_PTR(-ECHILD)))
        filp = path_openat(&nd, op, flags);
    if (unlikely(filp == ERR_PTR(-ESTALE)))
        filp = path_openat(&nd, op, flags | LOOKUP_REVAL);
    restore_nameidata();
    return filp;
}
- 1
- 2
- 3
- 4
- 5
- 6
- 7
- 8
- 9
- 10
- 11
- 12
- 13
- 14
- 15
- 16
- 17
- 18
- 19
path_openat: 执行open的核心流程
fs/namei.c

do_sys_open->do_sys_openat2->do_filp_open->path_openat

static struct file *path_openat(struct nameidata *nd,
            const struct open_flags *op, unsigned flags)
{
    struct file *file;
    int error;

    file = alloc_empty_file(op->open_flag, current_cred());          /*    1      */
    if (IS_ERR(file))
        return file;

    if (unlikely(file->f_flags & __O_TMPFILE)) {
        error = do_tmpfile(nd, flags, op, file);
    } else if (unlikely(file->f_flags & O_PATH)) {
        error = do_o_path(nd, flags, file);
    } else {
        const char *s = path_init(nd, flags);
        while (!(error = link_path_walk(s, nd)) &&                   /*      2        */
               (s = open_last_lookups(nd, file, op)) != NULL)        /*      3        */
            ;
        if (!error)
            error = do_open(nd, file, op);                          /*        4        */
        terminate_walk(nd);
    }
    if (likely(!error)) {
        if (likely(file->f_mode & FMODE_OPENED))
            return file;
        WARN_ON(1);
        error = -EINVAL;
    }
    fput(file);
    if (error == -EOPENSTALE) {
        if (flags & LOOKUP_RCU)
            error = -ECHILD;
        else
            error = -ESTALE;
    }
    return ERR_PTR(error);
}
(1) 申请 file 结构体, 并做初始化
(2) 找到路径的最后一个分量
(3) 对于最后一个分量进行处理, 这里面会去查找文件是否存在,如果不存在则看条件创建
(4) 执行open的最后步骤, 例如调用open 回调
- 1
- 2
- 3
- 4
- 5
- 6
- 7
- 8
- 9
- 10
- 11
- 12
- 13
- 14
- 15
- 16
- 17
- 18
- 19
- 20
- 21
- 22
- 23
- 24
- 25
- 26
- 27
- 28
- 29
- 30
- 31
- 32
- 33
- 34
- 35
- 36
- 37
- 38
- 39
- 40
- 41
- 42
- 43
- 44
- 45
- 46
我们使用的open函数在内核中对应的是sys_open函数,sys_open函数又会调用do_sys_open函数。在do_sys_open函数中,首先调用函数get_unused_fd_flags来获取一个未被使用的文件描述符fd,该文件描述符就是我们最终通过open函数得到的值。紧接着,又调用了do_filp_open函数,该函数通过调用函数get_empty_filp得到一个新的file结构体,之后的代码做了许多复杂的工作,如解析文件路径,查找该文件的文件节点inode等,直接来到了函do_dentry_open函数,如下所示
fs/open.c

do_sys_open->do_sys_openat2->do_filp_open->path_openat->do_open->vfs_open

int vfs_open(const struct path *path, struct file *file)
{
    file->f_path = *path;
    return do_dentry_open(file, d_backing_inode(path->dentry), NULL);
}


static int do_dentry_open(struct file *f,
              struct inode *inode,
              int (*open)(struct inode *, struct file *))
{
    static const struct file_operations empty_fops = {};
    int error;

    path_get(&f->f_path);
    f->f_inode = inode;
    f->f_mapping = inode->i_mapping;
    f->f_wb_err = filemap_sample_wb_err(f->f_mapping);
    f->f_sb_err = file_sample_sb_err(f);                  /*            1          */

    if (unlikely(f->f_flags & O_PATH)) {
        f->f_mode = FMODE_PATH | FMODE_OPENED;
        f->f_op = &empty_fops;
        return 0;
    }

    if (f->f_mode & FMODE_WRITE && !special_file(inode->i_mode)) {
        error = get_write_access(inode);
        if (unlikely(error))
            goto cleanup_file;
        error = __mnt_want_write(f->f_path.mnt);
        if (unlikely(error)) {
            put_write_access(inode);
            goto cleanup_file;
        }
        f->f_mode |= FMODE_WRITER;
    }

    /* POSIX.1-2008/SUSv4 Section XSI 2.9.7 */
    if (S_ISREG(inode->i_mode) || S_ISDIR(inode->i_mode))
        f->f_mode |= FMODE_ATOMIC_POS;

    f->f_op = fops_get(inode->i_fop);                /*取该文件节点inode的成员变量i_fop*/
    if (WARN_ON(!f->f_op)) {
        error = -ENODEV;
        goto cleanup_all;
    }

    error = security_file_open(f);
    if (error)
        goto cleanup_all;

    error = break_lease(locks_inode(f), f->f_flags);
    if (error)
        goto cleanup_all;

    /* normally all 3 are set; ->open() can clear them if needed */
    f->f_mode |= FMODE_LSEEK | FMODE_PREAD | FMODE_PWRITE;
    if (!open)
        open = f->f_op->open;
    if (open) {
        error = open(inode, f);                      /*               3            */
        if (error)
            goto cleanup_all;
    }
    f->f_mode |= FMODE_OPENED;
    if ((f->f_mode & (FMODE_READ | FMODE_WRITE)) == FMODE_READ)
        i_readcount_inc(inode);
    if ((f->f_mode & FMODE_READ) &&
         likely(f->f_op->read || f->f_op->read_iter))
        f->f_mode |= FMODE_CAN_READ;
    if ((f->f_mode & FMODE_WRITE) &&
         likely(f->f_op->write || f->f_op->write_iter))
        f->f_mode |= FMODE_CAN_WRITE;

    f->f_write_hint = WRITE_LIFE_NOT_SET;
    f->f_flags &= ~(O_CREAT | O_EXCL | O_NOCTTY | O_TRUNC);

    file_ra_state_init(&f->f_ra, f->f_mapping->host->i_mapping);

    /* NB: we're sure to have correct a_ops only after f_op->open */
    if (f->f_flags & O_DIRECT) {
        if (!f->f_mapping->a_ops || !f->f_mapping->a_ops->direct_IO)
            return -EINVAL;
    }
    /*
     * XXX: Huge page cache doesn't support writing yet. Drop all page
     * cache for this file before processing writes.
     */
    if ((f->f_mode & FMODE_WRITE) && filemap_nr_thps(inode->i_mapping))
        truncate_pagecache(inode, 0);
    return 0;

cleanup_all:
    if (WARN_ON_ONCE(error > 0))
        error = -EINVAL;
    fops_put(f->f_op);
    if (f->f_mode & FMODE_WRITER) {
        put_write_access(inode);
        __mnt_drop_write(f->f_path.mnt);
    }
cleanup_file:
    path_put(&f->f_path);
    f->f_path.mnt = NULL;
    f->f_path.dentry = NULL;
    f->f_inode = NULL;
    return error;
}

def_chr_fops结构体(位于内核源码/fs/char_dev.c文件)
const struct file_operations def_chr_fops = {
	.open = chrdev_open,
	.llseek = noop_llseek,
};
(1) (2) 设置file结构体的一些成员
(3) 找到open 回调, 并执行
以上代码中的使用fops_get函数来获取该文件节点inode的成员变量i_fop,在上图中我们使用mknod创建字符设备文件时,将def_chr_fops结构体赋值给了该设备文件inode的i_fop成员。到了这里,我们新建的file结构体的成员f_op就指向了def_chr_fops。
- 1
- 2
- 3
- 4
- 5
- 6
- 7
- 8
- 9
- 10
- 11
- 12
- 13
- 14
- 15
- 16
- 17
- 18
- 19
- 20
- 21
- 22
- 23
- 24
- 25
- 26
- 27
- 28
- 29
- 30
- 31
- 32
- 33
- 34
- 35
- 36
- 37
- 38
- 39
- 40
- 41
- 42
- 43
- 44
- 45
- 46
- 47
- 48
- 49
- 50
- 51
- 52
- 53
- 54
- 55
- 56
- 57
- 58
- 59
- 60
- 61
- 62
- 63
- 64
- 65
- 66
- 67
- 68
- 69
- 70
- 71
- 72
- 73
- 74
- 75
- 76
- 77
- 78
- 79
- 80
- 81
- 82
- 83
- 84
- 85
- 86
- 87
- 88
- 89
- 90
- 91
- 92
- 93
- 94
- 95
- 96
- 97
- 98
- 99
- 100
- 101
- 102
- 103
- 104
- 105
- 106
- 107
- 108
- 109
- 110
- 111
- 112
- 113
- 114
- 115
- 116
- 117
- 118
- 119
- 120
- 121
最终,会执行def_chr_fops中的open函数,也就是chrdev_open函数,可以理解为一个字符设备的通用初始化函数,根据字符设备的设备号,找到相应的字符设备,从而得到操作该设备的方法,代码实现如下。

chrdev_open函数(位于内核源码/fs/char_dev.c文件)
static int chrdev_open(struct inode *inode, struct file *filp)
{
	const struct file_operations *fops;
	struct cdev *p;
	struct cdev *new = NULL;
	int ret = 0;
	spin_lock(&cdev_lock);
	p = inode->i_cdev;
	 if (!p) {
		 struct kobject *kobj;
		 int idx;
		 spin_unlock(&cdev_lock);
		 kobj = kobj_lookup(cdev_map, inode->i_rdev, &idx);
	if (!kobj)
		 return -ENXIO;
	new = container_of(kobj, struct cdev, kobj);
	spin_lock(&cdev_lock);
	 /* Check i_cdev again in case somebody beat us to it while
	 we dropped the lock.
	*/
	 p = inode->i_cdev;
	 if (!p) {
		 inode->i_cdev = p = new;
		 list_add(&inode->i_devices, &p->list);
		 new = NULL;
	 } else if (!cdev_get(p))
		 ret = -ENXIO;
	 } else if (!cdev_get(p))
		 ret = -ENXIO;
	 spin_unlock(&cdev_lock);
	 cdev_put(new);
	 if (ret)
		 return ret;
	 ret = -ENXIO;
	 fops = fops_get(p->ops);
	if (!fops)
		 goto out_cdev_put;
	 replace_fops(filp, fops);
	 if (filp->f_op->open) {
		 ret = filp->f_op->open(inode, filp);
		 if (ret)
		 	goto out_cdev_put;
	}
	 return 0;
	 out_cdev_put:
	 cdev_put(p);
	 return ret;
 }
- 1
- 2
- 3
- 4
- 5
- 6
- 7
- 8
- 9
- 10
- 11
- 12
- 13
- 14
- 15
- 16
- 17
- 18
- 19
- 20
- 21
- 22
- 23
- 24
- 25
- 26
- 27
- 28
- 29
- 30
- 31
- 32
- 33
- 34
- 35
- 36
- 37
- 38
- 39
- 40
- 41
- 42
- 43
- 44
- 45
- 46
- 47
- 48
在Linux内核中,使用结构体cdev来描述一个字符设备。在以上代码中的第14行,inode->i_rdev中保存了字符设备的设备编号,通过函数kobj_lookup函数便可以找到该设备文件cdev结构体的kobj成员,再通过函数container_of便可以得到该字符设备对应的结构体cdev。函数container_of的作用就是通过一个结构变量中一个成员的地址找到这个结构体变量的首地址。同时,将cdev结构体记录到文件节点inode中的i_cdev,便于下次打开该文件。继续阅读第36~45行代码,我们可以发现,函数chrdev_open最终将该文件结构体file的成员f_op替换成了cdev对应的ops成员,并执行ops结构体中的open函数。
最后,调用上图的fd_install函数,完成文件描述符和文件结构体file的关联,之后我们使用对该文件描述符fd调用read、write函数,最终都会调用file结构体对应的函数,实际上也就是调用cdev结构体中ops结构体内的相关函数


