从源码开始编译Xilinx VCU中的vcu_gst_app_vcu xilinx example
赞
踩
前言
最近开始研究Xilinx ZCU106的开发板,里面的测试用例均是用petalinux编译工程生成的vcu_gst_app应用程序,且petalinux现在版本的recipes-apps目录下只有.bb文件,没有保存源码,想要自己研究,在github上下载下来之后编译还是挺麻烦的,网上找到的资料也比较少,所以记录一下,防止大家踩坑。
一、vcu_gst_app是什么?
vcu_gst_app是一个基于GStreamer框架的命令行多线程Linux应用程序,要求以纯文本形式提供输入配置文件(input.cfg)。Xilinx提供的官方例程功能Display,Stream-out,Stream-in大多数都是用的这个程序来实现。
二、编译步骤
1.下载源码
整个应用程序由四部分组成,分别是vcu-gst-app,vcu-apm-lib,vcu-gst-lib,vcu-video-lib。需要在官方github上下载对应的源码包。
链接: https://github.com/Xilinx/
我也打包了一份方便下载:链接: 资源包
下载以下文件:
2.交叉编译库文件
需要将vcu_apm_lib,vcu_gst_lib,vcu_video_lib编译成库供vcu_gst_app使用,这里以vcu_gst_lib为例,其余两个库的编译方法相同。
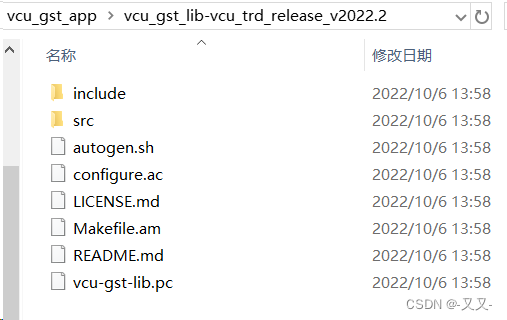
解压后的文件:

执行命令:
sudo ./autogen.sh --host=aarch64-xilinx-linux
- 1
然后会在当前目录下生成configure,Makefile文件。
再执行命令:
mkdir out
sudo ./configure --host=aarch64-xilinx-linux --prefix=/当前绝对路径/out/
- 1
- 2
指定最后生成库文件的目录,然后就是要手动修改Makefile和libtool,否则编译会报错,诸如找不到文件(cannot find),交叉编译有问题(Relocations in generic ELF)。这一步还要配合petalinux工程编译出来的SDK,很多依赖文件都是来自于工程编译生成的SDK中。
Makefile中主要是把SDK中的头文件路径,交叉编译工具,一些宏定义和命令做一些修改,具体如下:
INCLUDES += -I/petalinux工程路径/images/linux/sdk/sysroots/cortexa72-cortexa53-xilinx-linux/usr/include/ \
		-I/petalinux工程路径/images/linux/sdk/sysroots/cortexa72-cortexa53-xilinx-linux/usr/include/gstreamer-1.0/ \
		-I/petalinux工程路径/images/linux/sdk/sysroots/cortexa72-cortexa53-xilinx-linux/usr/include/drm \
		-I/petalinux工程路径/images/linux/sdk/sysroots/cortexa72-cortexa53-xilinx-linux/usr/include/glib-2.0 \
		-I/petalinux工程路径/images/linux/sdk/sysroots/cortexa72-cortexa53-xilinx-linux/usr/lib/glib-2.0/include
CC = /petalinux工程路径/images/linux/sdk/sysroots/x86_64-petalinux-linux/usr/bin/aarch64-xilinx-linux/aarch64-xilinx-linux-gcc
CFLAGS = -g -O2 -Wall -D__aarch64__ -D__LP64__
VCU_GST_CFLAGS_PKG_CONFIG = $(pkg-config --cflags gstreamer-1.0 gstreamer-plugins-base-1.0 vcu-video-lib)
VCU_GST_LIBS_PKG_CONFIG = $(pkg-config --libs gstreamer-1.0 gstreamer-plugins-base-1.0 gstreamer-video-1.0 vcu-video-lib)
- 1
- 2
- 3
- 4
- 5
- 6
- 7
- 8
- 9
修改完成后,执行命令
sudo make
- 1
最后提示:

原因是链接工具libtool中的编译工具链没有改,还是默认的gcc。
解决方法:打开libtool文件,找到CC所在位置,改成需要的交叉编译工具链,注意:要用SDK中source environment-setup-cortexa72-cortexa53-xilinx-linux之后的echo $CC中的路径和命令行配置,否则还是会编不过。
# A language specific compiler.
CC="/petalinux工程路径/images/linux/sdk/sysroots/x86_64-petalinux-linux/usr/bin/aarch64-xilinx-linux/aarch64-xilinx-linux-gcc -mcpu=cortex-a72.cortex-a53 -march=armv8-a+crc -fstack-protector-strong -O2 -D_FORTIFY_SOURCE=2 -Wformat -Wformat-security -Werror=format-security --sysroot=/petalinux工程路径/images/linux/sdk/sysroots/cortexa72-cortexa53-xilinx-linux"
- 1
- 2
改完后再次执行
sudo make
- 1
即可成功编译通过

再执行
sudo make install
- 1
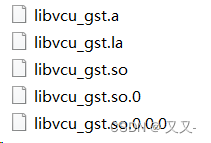
即可在当前目录的out/下生成库文件

3.交叉编译工程源码
按照上面步骤,依次把其余两个库文件编译出来,这里我选择用静态库来做编译,将它们放在同一个文件夹下:

整个工程目录如下:
.
├── include
│   ├── apm_lib_include
│   │   ├── perfapm.h
│   │   ├── uio_common.h
│   │   ├── uio_perfmon.h
│   │   └── uio_perfmon_hw.h
│   ├── configs.h
│   ├── gst_lib_include
│   │   ├── vgst_config.h
│   │   ├── vgst_err.h
│   │   ├── vgst_lib.h
│   │   ├── vgst_pipeline.h
│   │   ├── vgst_split_pipeline.h
│   │   └── vgst_utils.h
│   ├── vcu_gst_app.h
│   └── video_lib_include
│       ├── drm_helper.h
│       ├── gpio_utils.h
│       ├── helper.h
│       ├── mediactl_helper.h
│       ├── v4l2_subdev_helper.h
│       ├── vcap_csi.h
│       ├── vcap_csi_int.h
│       ├── vcap_hdmi_int.h
│       ├── vcap_quad_csi.h
│       ├── vcap_quad_csi_int.h
│       ├── vcap_scd_int.h
│       ├── vcap_sdi_int.h
│       ├── vcap_tpg.h
│       ├── vcap_tpg_int.h
│       ├── video.h
│       ├── video_int.h
│       ├── vlib_audio.h
│       └── xilinx-v4l2-controls.h
├── libs
│   ├── libvcu_apm.a
│   ├── libvcu_gst.a
│   └── libvcu_video.a
├── Makefile
└── src
    └── vcu_gst_app.c
- 1
- 2
- 3
- 4
- 5
- 6
- 7
- 8
- 9
- 10
- 11
- 12
- 13
- 14
- 15
- 16
- 17
- 18
- 19
- 20
- 21
- 22
- 23
- 24
- 25
- 26
- 27
- 28
- 29
- 30
- 31
- 32
- 33
- 34
- 35
- 36
- 37
- 38
- 39
- 40
- 41
- 42
接下来只要写个Makefile,或者写个长点的编译命令,把各种头文件、库文件和宏定义加上,即可编译出来vcu_gst_app,也可以自己改源码啦。
总结
以上就是今天要讲的内容,本文简单介绍了vcu_gst_app的交叉编译步骤,制作不易,多多包涵。


