热门标签
热门文章
- 1Prompt Engineering入门教学(看这一篇就够!)_prompt engineering教程
- 2群晖Nas笔记_filestation5 删除
- 3kafka的ack机制,幂等性_kafka的重试机制和ack机制
- 4视频汇聚EasyCVR平台视图库GA/T 1400协议与GB/T 28181协议的区别
- 5Python中异常处理传递性_python异常的传递性
- 6Git安装教程超详细(Windows系统)
- 7nginx 编译和安装ssl模块_nginx安装编译ssl
- 8单链表的基本操作(全)
- 9力扣算法刷题顺序_力扣刷题题目类型顺序
- 10真实场景的双目立体匹配(Stereo Matching)获取深度图详解
当前位置: article > 正文
aws 在ecs外部实例上运行gpu负载
作者:weixin_40725706 | 2024-05-30 23:05:24
赞
踩
aws 在ecs外部实例上运行gpu负载
- https://docs.amazonaws.cn/zh_cn/AmazonECS/latest/developerguide/ecs-gpu.html
- https://docs.amazonaws.cn/AWSEC2/latest/UserGuide/accelerated-computing-instances.html#gpu-instances
- https://docs.amazonaws.cn/AWSEC2/latest/UserGuide/install-nvidia-driver.html
- https://aws.amazon.com/cn/blogs/containers/running-gpu-based-container-applications-with-amazon-ecs-anywhere/
- https://github.com/aws/containers-roadmap/issues/88
ecs支持的gpu负载的实例类型包括p2、p3、g3、g4 和 g5
ecs提供了经过优化的gpu ami
- 预装了NVIDIA内核驱动和docker GPU运行时
注意事项
- 注册外部实例到ecs集群时,必须在脚本中添加
--enable-gpu - 在ecs代理中将
ECS_ENABLE_GPU_SUPPORT设置为true - 在容器定义中指定gpu资源,则ecs会分配gpu运行时
- nvidia需要在容器内设置环境变量才能正常运行,ecs设置
NVIDIA_VISIBLE_DEVICES环境变量值设置为ecs分配给容器的 GPU 设备 ID 列表
启动ec2实例并运行pytorch程序
启动g4dn.xlarge实例
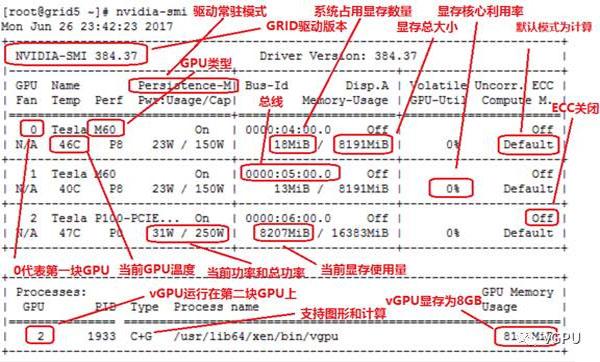
使用nvidia-smi
查看gpu基础信息
$ nvidia-smi
Thu Apr 13 16:13:29 2023
+-----------------------------------------------------------------------------+
| NVIDIA-SMI 525.85.12    Driver Version: 525.85.12    CUDA Version: 12.0     |
|-------------------------------+----------------------+----------------------+
| GPU  Name        Persistence-M| Bus-Id        Disp.A | Volatile Uncorr. ECC |
| Fan  Temp  Perf  Pwr:Usage/Cap|         Memory-Usage | GPU-Util  Compute M. |
|                               |                      |               MIG M. |
|===============================+======================+======================|
|   0  Tesla T4            On   | 00000000:00:1E.0 Off |                    0 |
| N/A   22C    P8     9W /  70W |      2MiB / 15360MiB |      0%      Default |
|                               |                      |                  N/A |
+-------------------------------+----------------------+----------------------+

+-----------------------------------------------------------------------------+
| Processes:                                                                  |
|  GPU   GI   CI        PID   Type   Process name                  GPU Memory |
|        ID   ID                                                   Usage      |
|=============================================================================|
|  No running processes found                                                 |
+-----------------------------------------------------------------------------+
- 1
- 2
- 3
- 4
- 5
- 6
- 7
- 8
- 9
- 10
- 11
- 12
- 13
- 14
- 15
- 16
- 17
- 18
- 19
- 20
- 21
参数解释

查看全部设备
$ nvidia-smi -L
GPU 0: Tesla T4 (UUID: GPU-0bef2a14-5ece-86c0-e4f8-ef82122a1172)
- 1
- 2
查看系统拓扑
$ nvidia-smi topo --matrix
        GPU0    CPU Affinity    NUMA Affinity
GPU0     X      0-3             N/A

Legend:

  X    = Self
  SYS  = Connection traversing PCIe as well as the SMP interconnect between NUMA nodes (e.g., QPI/UPI)
  NODE = Connection traversing PCIe as well as the interconnect between PCIe Host Bridges within a NUMA node
  PHB  = Connection traversing PCIe as well as a PCIe Host Bridge (typically the CPU)
  PXB  = Connection traversing multiple PCIe bridges (without traversing the PCIe Host Bridge)
  PIX  = Connection traversing at most a single PCIe bridge
  NV#  = Connection traversing a bonded set of # NVLinks
- 1
- 2
- 3
- 4
- 5
- 6
- 7
- 8
- 9
- 10
- 11
- 12
- 13
使用pytorch运行负载
python pip install torch==1.8.1+cu111 torchvision==0.9.1+cu111 torchaudio==0.8.1 -f https://download.pytorch.org/whl/torch_stable.html -i https://pypi.tuna.tsinghua.edu.cn/simple/ some-package --trusted-host mirrors.aliyun.com
- 1
打印详细i信息
// main.py
import torch
print(torch.__version__)
print(torch.cuda.is_available())
print(torch.cuda.device_count())
print(torch.cuda.device(0))
print(torch.cuda.get_device_name(0))
output:
1.8.1+cu111
True
1
<torch.cuda.device object at 0x7fd0dace8510>
Tesla T4
- 1
- 2
- 3
- 4
- 5
- 6
- 7
- 8
- 9
- 10
- 11
- 12
- 13
示例程序
https://github.com/pytorch/examples
git clone git@github.com:pytorch/examples.git
- 1
优化ami上的docker环境
docker上的nvidia运行时参数如下
$ cat /etc/docker/daemon.json
{
    "runtimes": {
        "nvidia": {
            "path": "nvidia-container-runtime",
            "runtimeArgs": []
        }
    }
}
- 1
- 2
- 3
- 4
- 5
- 6
- 7
- 8
- 9
本地测试
# nvidia-smi是nvidia 的系统管理界面
docker run --rm --gpus all nvidia/cuda:11.0.3-base-ubuntu20.04 nvidia-smi
# 指定gpu参数
docker run --rm --gpus '"device=1,2"' nvidia/cuda nvidia-smi --query-gpu=uuid --format=csv
docker run --rm --runtime=nvidia \
    -e NVIDIA_VISIBLE_DEVICES=1,2 \
    nvidia/cuda nvidia-smi --query-gpu=uuid --format=csv
# 启用所有gpu
docker run --rm --runtime=nvidia \
    -e NVIDIA_VISIBLE_DEVICES=all nvidia/cuda:11.0.3-base-ubuntu20.04 nvidia-smi
# 查询uuid并使用
nvidia-smi -i 3 --query-gpu=uuid --format=csv
docker run --gpus device=GPU-18a3e86f-4c0e-cd9f-59c3-55488c4b0c24 \
     nvidia/cuda nvidia-smi
- 1
- 2
- 3
- 4
- 5
- 6
- 7
- 8
- 9
- 10
- 11
- 12
- 13
- 14
在ecs中的任务定义
目前fargate不支持gpu负载
https://github.com/aws/containers-roadmap/issues/88
mnist示例
https://github.com/pytorch/examples/tree/main/mnist
$ tree
main.py
requirements.txt
dockerfile
- 1
- 2
- 3
- 4
本地构建镜像,最终大概有5g大小
FROM public.ecr.aws/docker/library/python:3.7
WORKDIR /test_load
COPY . .
run pip3 install -r requirements.txt -i https://pypi.douban.com/simple
entrypoint python
cmd main.py
- 1
- 2
- 3
- 4
- 5
- 6
上传到ecr,在任务定义中引用
{
  "containerDefinitions": [
    {
      "memory": 80,
      "essential": true,
      "name": "gpu",
      "image": "nvidia/cuda:11.0.3-base",
      "resourceRequirements": [
         {
           "type":"GPU",
           "value": "1"
         }
      ],
      "command": [
        "sh",
        "-c",
        "nvidia-smi"
      ],
      "cpu": 100
    }
  ],
  "family": "example-ecs-gpu"
}
- 1
- 2
- 3
- 4
- 5
- 6
- 7
- 8
- 9
- 10
- 11
- 12
- 13
- 14
- 15
- 16
- 17
- 18
- 19
- 20
- 21
- 22
- 23
将之前启动的本地实例加入ecs集群中
curl --proto "https" -o "/tmp/ecs-anywhere-install.sh" "https://amazon-ecs-agent.s3.cn-north-1.amazonaws.com.cn/ecs-anywhere-install-latest.sh"
bash /tmp/ecs-anywhere-install.sh --region "cn-north-1" --cluster "worktest" --activation-id "840527d1-4b24-45af-b1d3-bea6a39c140f" --activation-code "xxxxxxxx+bFbv" --enable-gpu
- 1
- 2
脚本内容
https://amazon-ecs-agent.s3.cn-north-1.amazonaws.com.cn/ecs-anywhere-install-latest.sh
- 1
如何对已断开连接的 Amazon ECS 代理进行问题排查?
https://repost.aws/zh-Hans/knowledge-center/ecs-agent-disconnected-linux2-ami
故障和解决
(1)配置额外凭证干扰脚本运行
外部实例不应具有本地定义的预配置实例凭据链,因为这会干扰注册脚本
哪怕配置实例角色都不行
level=warn time=2023-04-13T18:12:14Z msg="Not able to get EC2 Instance ID from IMDS, using EC2 Instance ID from saved state: ''" module=agent.go
level=info time=2023-04-13T18:12:14Z msg="Cluster was successfully restored" cluster="worktest"
level=warn time=2023-04-13T18:12:14Z msg="AppNet agent container tarball unavailable: /managed-agents/serviceconnect/ecs-service-connect-agent.interface-v1.tar" error="stat /managed-agents/serviceconnect/ecs-service-connect-agent.interface-v1.tar: no such file or directory"
level=warn time=2023-04-13T18:12:14Z msg="ServiceConnect Capability: No service connect capabilities were found for Appnet version:" image=""
level=info time=2023-04-13T18:12:14Z msg="Restored from checkpoint file" containerInstanceARN="arn:aws-cn:ecs:cn-north-1:xxxxxxx:container-instance/worktest/65a5fe8ed62643a7a28e52ececbe1d5c" cluster="worktest"
level=info time=2023-04-13T18:12:14Z msg="Fetching Instance ID Document has been disabled" module=client.go
level=info time=2023-04-13T18:12:14Z msg="Remaining mem: 15704" module=client.go
level=error time=2023-04-13T18:12:14Z msg="Unable to register as a container instance with ECS: InvalidParameterException: The identity document and identity document signature were not valid." module=client.go
level=error time=2023-04-13T18:12:14Z msg="Error re-registering container instance" error="InvalidParameterException: The identity document and identity document signature were not valid."
- 1
- 2
- 3
- 4
- 5
- 6
- 7
- 8
- 9
ssm会创建临时凭证,使用注册id作为识别码(因此实例本身不需要配置任何凭证)
# aws configure list
      Name                    Value             Type    Location
      ----                    -----             ----    --------
   profile                <not set>             None    None
access_key     ****************S262 shared-credentials-file
secret_key     ****************rSzM shared-credentials-file
    region                <not set>             None    None
# aws sts get-caller-identity  --region cn-north-1
{
    "Account": "xxxxxxx",
    "UserId": "AROAQRIBxxxIH3NQPIDG:mi-0b7270b56b35ac6cc",
    "Arn": "arn:aws-cn:sts::xxxxxxx:assumed-role/ecsExternalInstanceRole/mi-0b7270b56b35ac6cc"
}
- 1
- 2
- 3
- 4
- 5
- 6
- 7
- 8
- 9
- 10
- 11
- 12
- 13
清理环境
sudo systemctl stop ecs amazon-ssm-agent
sudo yum remove -y amazon-ecs-init amazon-ssm-agent
sudo rm -rf /var/lib/ecs /etc/ecs /var/lib/amazon/ssm /var/log/ecs /var/log/amazon/ssm
- 1
- 2
- 3
声明:本文内容由网友自发贡献,不代表【wpsshop博客】立场,版权归原作者所有,本站不承担相应法律责任。如您发现有侵权的内容,请联系我们。转载请注明出处:https://www.wpsshop.cn/w/weixin_40725706/article/detail/649066
推荐阅读
相关标签


