热门标签
热门文章
- 1机械键盘入门:教你如何正确选择机械键盘!学习&游戏两不误_黑轴用长程键还是短程键
- 2linux文件拷到光盘,制作本地yum源(以redhat5.8通过复制光盘文件到本地)
- 3纯CSS3实现柱状图的3D立体动画效果_3d酷炫柱状图css
- 4如何用java编写小游戏_java小游戏文字描述
- 5如何检查docker和docker compose是否已经安装?_怎么检查是否安装docker-compose成功
- 6【人工智能】VScode中使用ChatGPT之Bito插件_vscode中chgpt
- 7SAP Fiori Elements List Report Smart Table 列项目宽度计算的奥妙_fiori element list
- 8深度学习(19)——informer 详解(1)_informer实战
- 9[Unity][计时器][协程]协程计时器倒计时_unity协成被打断
- 10Kafka中的生产者如何处理消息发送失败的情况?_kafka消息发送失败重试机制
当前位置: article > 正文
Android开发:RecyclerView和Adapter实现瀑布流效果_瀑布流 adapter
作者:weixin_40725706 | 2024-02-15 10:39:35
赞
踩
瀑布流 adapter
要求:
将recycleview合入作业1的某个fragment中,实现tab页的列表项。
实现:
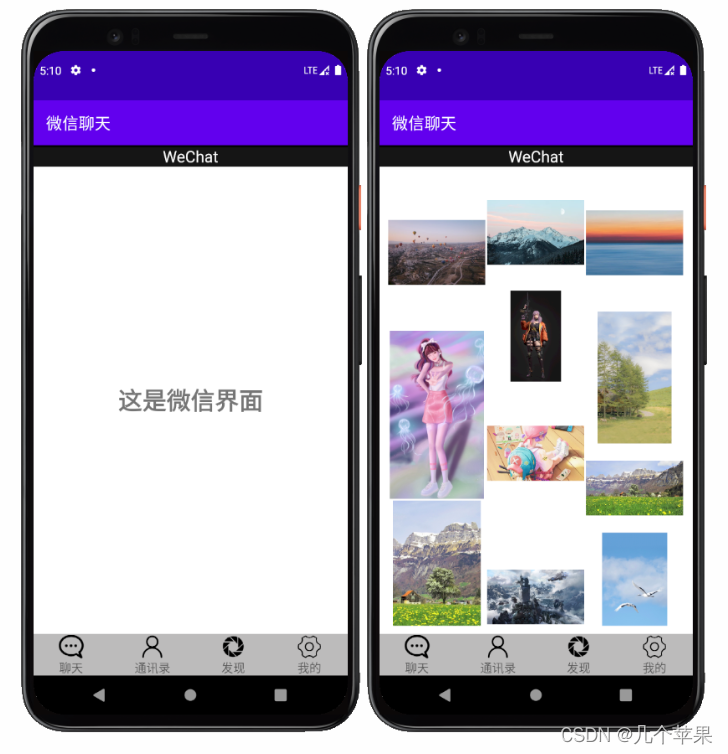
本次作业在第一次作业的基础上使用RecyclerView和Adapter在【发现】页面实现瀑布流效果。主要增加了配置文件item_friend.xml和与之对应的适配器FriendAdapter.java文件,接着在friendFragment.java文件上进行必要的功能实现,同时也要修改一下fragment_friend.xml文件。
代码:
fragment_friend.xml
<?xml version="1.0" encoding="utf-8"?>
<LinearLayout xmlns:android="http://schemas.android.com/apk/res/android"
    xmlns:tools="http://schemas.android.com/tools"
    android:layout_width="match_parent"
    android:layout_height="match_parent"
    android:orientation="vertical">

    <androidx.recyclerview.widget.RecyclerView
    android:id="@+id/recyclerview_friend"
    android:layout_width="match_parent"
    android:layout_height="wrap_content"
    android:overScrollMode="never"
    android:scrollbars="none"
    android:layout_margin="10dp"/>

</LinearLayout>
- 1
- 2
- 3
- 4
- 5
- 6
- 7
- 8
- 9
- 10
- 11
- 12
- 13
- 14
- 15
- 16
item_friend.xml
<?xml version="1.0" encoding="utf-8"?>
<LinearLayout xmlns:android="http://schemas.android.com/apk/res/android"
    android:layout_width="match_parent"
    android:layout_height="match_parent">

    <ImageView
        android:id="@+id/item_ImageView"
        android:layout_width="match_parent"
        android:layout_height="wrap_content"
        android:padding="1dp" />

</LinearLayout>
- 1
- 2
- 3
- 4
- 5
- 6
- 7
- 8
- 9
- 10
- 11
- 12
适配器FriendAdapter.java
public class FriendAdapter extends RecyclerView.Adapter<FriendAdapter.DataViewHolder>{
    private Context mContext;
    private RecyclerView recyclerView;
    private List<Integer> mList;
    private List<Integer> mHeight;


    public FriendAdapter(Context mContext, List<Integer> mList) {
        this.mContext = mContext;
        this.mList = mList;
    }


    public List<Integer> initHeight(){
        mHeight = new ArrayList<>();
        for (int i=0;i<mList.size();i++){
            mHeight.add((int) (Math.random()*300)+300);
        }
        return mHeight;
    }


    @Override
    public DataViewHolder onCreateViewHolder(ViewGroup parent, int viewType) {
        View view = LayoutInflater.from(mContext).inflate(R.layout.item_friend,null);

        view.setLayoutParams(new ViewGroup.LayoutParams(
                ViewGroup.LayoutParams.MATCH_PARENT,
                ViewGroup.LayoutParams.WRAP_CONTENT));
        DataViewHolder holder = new DataViewHolder(view);
        return holder;
    }

    @Override
    public void onBindViewHolder(DataViewHolder holder, int position) {
        ViewGroup.LayoutParams h = holder.iv_data.getLayoutParams();
        h.height = mHeight.get(position);

        holder.iv_data.setImageResource(mList.get(position));
    }

    @Override
    public int getItemCount() {
        return mList.size();
    }

    public static class DataViewHolder extends RecyclerView.ViewHolder{
        ImageView iv_data;
        public DataViewHolder(View itemView) {
            super(itemView);
            iv_data = (ImageView) itemView.findViewById(R.id.item_ImageView);
        }
    }

    @Override
    public void onAttachedToRecyclerView(RecyclerView recyclerView) {
        super.onAttachedToRecyclerView(recyclerView);
        this.recyclerView= recyclerView;
        initHeight();
    }

    @Override
    public void onDetachedFromRecyclerView(RecyclerView recyclerView) {
        super.onDetachedFromRecyclerView(recyclerView);
        this.recyclerView = null;
    }
}
- 1
- 2
- 3
- 4
- 5
- 6
- 7
- 8
- 9
- 10
- 11
- 12
- 13
- 14
- 15
- 16
- 17
- 18
- 19
- 20
- 21
- 22
- 23
- 24
- 25
- 26
- 27
- 28
- 29
- 30
- 31
- 32
- 33
- 34
- 35
- 36
- 37
- 38
- 39
- 40
- 41
- 42
- 43
- 44
- 45
- 46
- 47
- 48
- 49
- 50
- 51
- 52
- 53
- 54
- 55
- 56
- 57
- 58
- 59
- 60
- 61
- 62
- 63
- 64
- 65
- 66
- 67
friendFragment.java
public class friendFragment extends Fragment {

    private Context context;
    private List<Integer> mList = new ArrayList<Integer>();

    public friendFragment() {
    }

    @Override
    public View onCreateView(LayoutInflater inflater, ViewGroup container, Bundle savedInstanceState) {
        View view = inflater.inflate(R.layout.fragment_friend, container, false);

        context = view.getContext();
        InitImageList();

        RecyclerView recyclerView = view.findViewById(R.id.recyclerview_friend);
        FriendAdapter adapter = new FriendAdapter(context, mList);
        recyclerView.setAdapter(adapter);

        recyclerView.setLayoutManager(new StaggeredGridLayoutManager(3, StaggeredGridLayoutManager.VERTICAL));
        return view;
//        // Inflate the layout for this fragment
//        return inflater.inflate(R.layout.fragment_friend, container, false);
    }
}
- 1
- 2
- 3
- 4
- 5
- 6
- 7
- 8
- 9
- 10
- 11
- 12
- 13
- 14
- 15
- 16
- 17
- 18
- 19
- 20
- 21
- 22
- 23
- 24
- 25
运行效果

总结:
创建item.xml文件设置好图片摆放位置,在要实现瀑布流的Fragment页面添加RecyclerView控件,编写适配器Adapter,关联到Fragment页面。
声明:本文内容由网友自发贡献,不代表【wpsshop博客】立场,版权归原作者所有,本站不承担相应法律责任。如您发现有侵权的内容,请联系我们。转载请注明出处:https://www.wpsshop.cn/w/weixin_40725706/article/detail/83718
推荐阅读
相关标签


