
- 1Langflow系列教程之 05 如何安装 Langflow 并运行(教程含安装步骤)_langflow教程
- 2微服务Dubbo和SpringCloud架构设计、优劣 势⽐较_dubbo在微服务方面是否已经落后
- 3一个注解解决重复提交问题
- 4实验05 单元测试
- 5Linux Vim最全面的教程_linux vim怎么用
- 6LSTM微博评论情绪识别二分类项目jieba分词遇到的问题
- 7计算机网络实验Cisco Packet Tracer使用_packet tracer sign in using one of the following o
- 8可信执行环境(Trusted Execution Environment,TEE)
- 9MPI并行编程: 矩阵乘法,积分计算,PSPR排序_并行计算pspr
- 10Python 语音识别系列-实战学习之初识语音识别_语音识别实战
大模型应用开发框架 LangChain 学习笔记(二)_大模型开发训练营langchain
赞
踩
在上一篇笔记中,我们学习了 LangChain 中的一些基础概念:使用 LLMs 和 ChatModels 实现基本的聊天功能,使用 PromptTemplate 组装提示语,使用 Document loaders、Document transformers、Text embedding models、Vector stores 和 Retrievers 实现文档问答;然后,我们又学习了 LangChain 的精髓 Chain,以及 Chain 的三大特性:使用 Memory 实现 Chain 的记忆功能,使用 RetrievalQA 组合多个 Chain 再次实现文档问答,使用 Callbacks 对 Chain 进行调试;最后,我们学习了四个基础 Chain:LLMChain、TransformChain、SequentialChain 和 RouterChain,使用这四个 Chain 可以组装出更复杂的流程,其中 RouterChain 和 MultiPromptChain 为我们提出了一种新的思路,使用大模型来决策 Chain 的调用链路,可以动态地解决用户问题;更进一步我们想到,大模型不仅可以动态地选择调用 Chain,也可以动态地选择调用外部的函数,而且使用一些提示语技巧,可以让大模型变成一个推理引擎,这便是 Agent。
OpenAI 的插件功能
在学习 LangChain 的 Agent 之前,我们先来学习一下 OpenAI 的插件功能,这可以让我们对 Agent 的基本概念和工作原理有一个更深入的了解。
ChatGPT Plugins
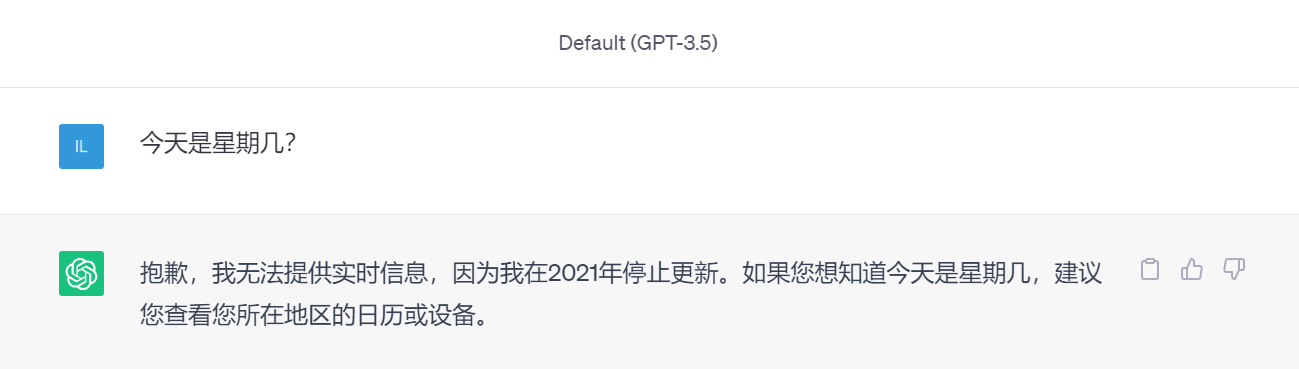
2023 年 3 月 23 日,OpenAI 重磅推出 ChatGPT Plugins 功能,引起了全球用户的热议。众所周知,GPT-3.5 是使用 2021 年之前的历史数据训练出来的大模型,所以它无法回答关于最新新闻和事件的问题,比如你问它今天是星期几,它只能让你自己去查日历:
不仅如此,ChatGPT 在处理数学问题时也表现不佳,而且在回答问题时可能会捏造事实,胡说八道;另一方面,虽然 ChatGPT 非常强大,但它终究只是一个聊天机器,如果要让它成为真正的私人助理,它还得帮助用户去做一些事情,解放用户的双手。引入插件功能后,就使得 ChatGPT 具备了这两个重要的能力:
- 访问互联网:可以实时检索最新的信息以回答用户问题,比如调用搜索引擎接口,获取和用户问题相关的新闻和事件;也可以访问用户的私有数据,比如公司内部的文档,个人笔记等,这样通过插件也可以实现文档问答;
- 执行任务:可以了解用户的意图,代替用户去执行任务,比如调用一些三方服务的接口订机票订酒店等;
暂时只有 GPT-4 才支持插件功能,所以要体验插件功能得有个 ChatGPT Plus 账号。截止目前为止,OpenAI 的插件市场中已经开放了近千个插件,如果我们想让 ChatGPT 回答今天是星期几,可以开启其中的 Wolfram 插件:
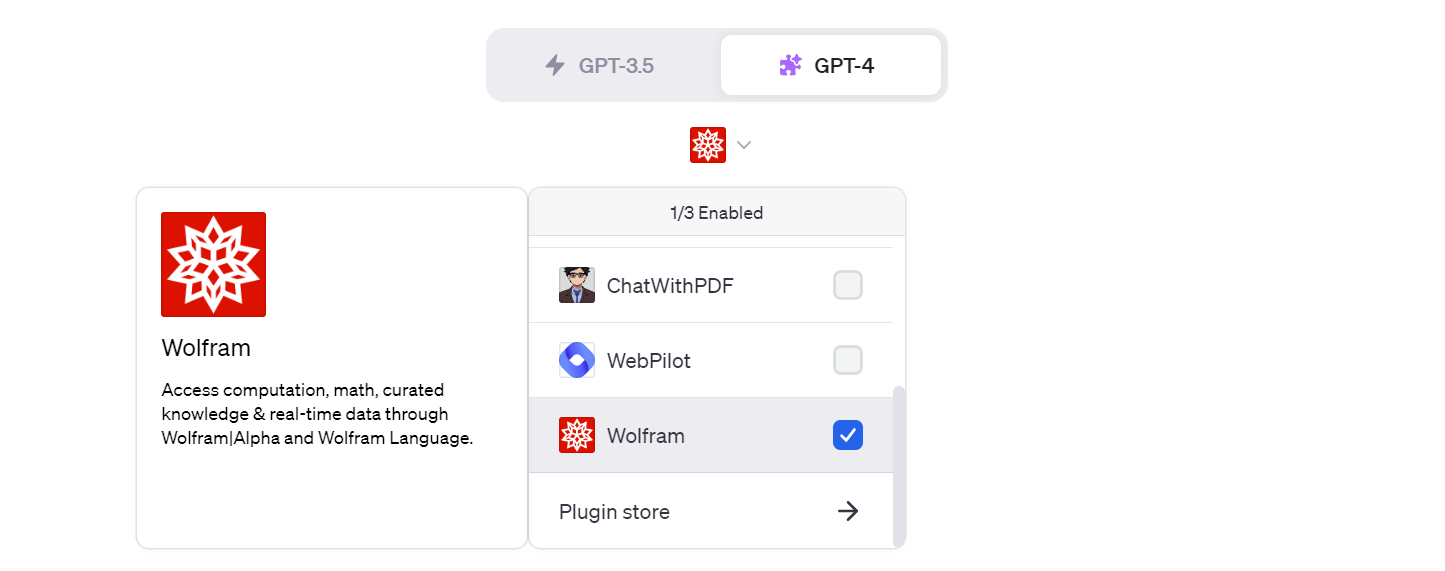
Wolfram|Alpha 是一个神奇的网站,建立于 2009 年,它是一个智能搜索引擎,它上知天文下知地理,可以回答关于数学、物理、化学、生命科学、计算机科学、历史、地理、音乐、文化、天气、时间等等方面的问题,它的愿景是 Making the world's knowledge computable,让世界的知识皆可计算。Wolfram 插件就是通过调用 Wolfram|Alpha 的接口来实现的,开启 Wolfram 插件后,ChatGPT 就能准确回答我们的问题了:

从对话的结果中可以看到 ChatGPT 使用了 Wolfram 插件,展开插件的调用详情还可以看到调用的请求和响应:

结合插件功能,ChatGPT 不再是一个简单的聊天对话框了,它有了一个真正的生态环境,网上有这样一个比喻,如果说 ChatGPT 是 AI 时代的 iPhone,那么插件就是 ChatGPT 的 App Store,我觉得这个比喻非常贴切。通过插件机制,ChatGPT 可以连接成千上万的第三方应用,向各个行业渗透,带给我们无限的想象力。
开发自己的插件
目前 ChatGPT 的插件功能仍然处于 beta 版本,OpenAI 还没有完全开放插件的开发功能,如果想要体验开发 ChatGPT 插件的流程,需要先 加入等待列表。
开发插件的步骤大致如下:
- ChatGPT 插件其实就是标准的 Web 服务,可以使用任意的编程语言开发,开发好插件服务之后,将其部署到你的域名下;
- 准备一个清单文件
.well-known/ai-plugin.json放在你的域名下,清单文件中包含了插件的名称、描述、认证信息、以及所有插件接口的信息等; - 在 ChatGPT 的插件中心选择
Develop your own plugin,并填上你的插件地址; - 开启新会话时,先选择并激活你的插件,然后就可以聊天了;如果 ChatGPT 认为用户问题需要调用你的插件(取决于插件和接口的描述),就会调用你在插件中定义的接口;
其中前两步应该是开发者最为关心的部分,官网提供了一个入门示例供我们参考,这个示例是一个简单的 TODO List 插件,可以让 ChatGPT 访问并操作我们的 TODO List 服务,我们就以这个例子来学习如何开发一个 ChatGPT 插件。
首先我们使用 Python 语言开发好 TODO List 服务,支持 TODO List 的增删改查。
然后准备一个插件的清单文件,对我们的插件进行一番描述,这个清单文件的名字必须是 ai-plugin.json,并放在你的域名的 .well-known 路径下,比如 https://your-domain.com/.well-known/ai-plugin.json。文件的内容如下:
| 1 2 3 4 5 6 7 8 9 10 11 12 13 14 15 16 17 |
|
清单中有些信息是用于展示在 OpenAI 的插件市场的,比如 name_for_human、description_for_human、logo_url、contact_email、legal_info_url 等,有些信息是要送给 ChatGPT 的,比如 name_for_model、description_for_model、api 等;送给 ChatGPT 的信息需要仔细填写,确保 ChatGPT 能理解你这个插件的用途,这样 ChatGPT 才会在对话过程中根据需要调用你的插件。
然后我们还需要准备插件的接口定义文件,要让 ChatGPT 知道你的插件都有哪些接口,每个接口的作用是什么,以及每个接口的入参和出参是什么。一般使用 OpenAPI 规范 来定义插件的接口,下面是一个简单的示例,定义了一个 getTodos 接口用于获取所有的 TODO List:
| 1 2 3 4 5 6 7 8 9 10 11 12 13 14 15 16 17 18 19 20 21 22 23 24 25 26 27 28 29 |
|
一切准备就绪后,就可以在 ChatGPT 的插件中心填上你的插件地址并调试了。
除了入门示例,官网还提供了一些其他的 插件示例,其中 Chatgpt Retrieval Plugin 是一个完整而复杂的例子,对我们开发真实的插件非常有参考价值。
当然,还有很多插件的内容没有介绍,比如 插件的最佳实践,用户认证 等,更多信息可以参考 OpenAI 的插件手册。
Function Calling
尽管 ChatGPT 的插件功能非常强大,但是它只能在 ChatGPT 页面中使用,这可能是出于 OpenAI 的私心,OpenAI 的野心很大,它对 ChatGPT 的定位,就是希望将其做成整个互联网的入口,其他的应用都对接到 ChatGPT 的生态中来。不过很显然,这种脑洞大开的想法有点太过超前了,其他的互联网厂商也不傻,谁都知道流量入口的重要性,怎么会轻易将自己的应用入口交给其他人呢?对于其他的互联网厂商来说,他们更希望将 ChatGPT 的能力(包括插件能力)集成到自己的应用中来。
2023 年 6 月 13 日,这种想法变成了可能,这一天,OpenAI 对 GPT 模型进行了一项重大更新,推出了 Function Calling 功能,在 Chat Completions API 中添加了新的函数调用能力,帮助开发者通过 API 的方式实现类似于 ChatGPT 插件的数据交互能力。
在 基于 ChatGPT 实现一个划词翻译 Chrome 插件 这篇笔记中,我们已经学习过 OpenAI 的 Chat Completions API,感兴趣的同学可以复习下。
使用 Function Calling 回答日期问题
更新后的 Chat Completions API 中添加了一个 functions 参数,用于定义可用的函数,就像在 ChatGPT 中开启插件一样,这里的函数就相当于插件,对于每一个函数,我们需要定义它的名称、描述以及参数信息,如下:
| 1 2 3 4 5 6 7 8 9 10 11 12 13 14 15 16 17 18 19 |
|
在上面的例子中,我们定义了一个名为 get_current_date() 的函数,用于获取今天的日期和星期信息,这个函数我们要提前实现好:
| 1 2 3 4 5 6 |
|
当 GPT 无法回答关于日期的问题时,就会自动地选择调用这个函数来进一步获取信息,Chat Completions API 的响应结果如下:
| 1 2 3 4 5 6 7 8 9 10 11 12 13 14 15 16 17 18 19 20 21 22 23 24 25 |
|
可以看到接口返回的 message.content 是空,反而多了一个 function_call 字段,这就说明 GPT 无法回答我们的问题,希望调用某个外部函数。为了方便我们调用外部函数,GPT 非常贴心地将函数名和参数都准备好了,我们只需要使用 globals().get() 拿到函数,再使用 json.loads() 拿到参数,然后直接调用即可:
| 1 2 3 4 5 |
|
拿到函数调用的结果之后,我们再一次调用 Chat Completions API,这一次我们将函数调用的结果和用户的问题一起放在 messages 中,注意将它的 role 设置为 function:
| 1 2 3 4 5 6 7 8 9 |
|
这样 GPT 就能成功回答我们的问题了:
| 1 2 3 4 5 6 7 8 9 10 11 12 13 14 15 16 17 18 19 20 21 |
|
多轮 Function Calling
有时候,只靠一个函数解决不了用户的问题,比如用户问 明天合肥的天气怎么样?,那么 GPT 首先需要知道明天的日期,然后再根据日期查询合肥的天气,所以我们要定义两个函数:
| 1 2 3 4 5 6 7 8 9 10 11 12 13 14 15 16 17 18 19 20 21 22 23 24 25 26 27 28 |
|
第一次调用 Chat Completions API 时,传入用户的问题:
| 1 2 3 |
|
接口返回了一个 function_call,希望我们去调用 get_current_date() 函数:
| 1 2 3 4 |
|
然后我们调用 get_current_date() 函数得到今天的日期,再次调用 Chat Completions API 时,传入函数的调用结果:
| 1 2 3 4 |
|
接口再次返回了一个 function_call,希望我们去调用 get_weather_info() 函数:
| 1 2 3 4 |
|
注意这里的 date 参数,上面我们通过 get_current_date() 得到今天的日期是 2023-08-20,而用户问的是明天合肥的天气,GPT 非常聪明地推导出明天的日期是 2023-08-21,可以说是非常优秀了,我们直接使用 GPT 准备好的参数调用 get_weather_info() 即可获得明天合肥的天气,再次调用 Chat Completions API:
| 1 2 3 4 5 |
|
通过不断的调用 Function Calling,最后准确地对用户的问题作出了回答:
| 1 |
|
除了能不断地返回 function_call 并调用函数外,GPT 还会主动尝试补充函数的参数。有时候,用户的问题不完整,缺少了函数的某个参数,比如用户问 明天的天气怎么样?,这时 GPT 并不知道用户所在的城市,它就会问 请问您所在的城市是哪里?,等待用户回答之后,才返回 get_weather_info() 函数以及对应的参数。
学习 LangChain Agent
学习完 OpenAI 的插件机制之后,我们再来学习 LangChain 的 Agent 就会发现有很多概念是相通的。我们从官方文档中的一个入门示例开始。
快速入门
我们知道,大模型虽然擅长推理,但是却不擅长算术和计数,比如问它单词 hello 是由几个字母组成的,它就有可能胡编乱造,我们可以定义一个函数 get_word_length() 帮助大模型来回答关于单词长度的问题。
入门示例的代码如下:
| 1 2 3 4 5 6 7 8 9 10 11 12 13 14 15 16 17 18 19 20 21 22 23 24 25 26 27 28 29 30 31 32 |
|
从上面的代码中我们可以注意到 Agent 有这么几个重要的概念:
- Tools - 希望被 Agent 执行的函数,被称为 工具,类似于 OpenAI 的插件,我们需要尽可能地描述清楚每个工具的功能,以便 Agent 能选择合适的工具;
- Agent - 经常被翻译成 代理,类似于 OpenAI 的 Function Calling 机制,可以帮我们理解用户的问题,然后从给定的工具集中选择能解决用户问题的工具,并交给 Agent Executor 执行;
- Agent Executor - Agent 执行器,它本质上是一个 Chain,所以可以和其他的 Chain 或 Agent Executor 进行组合;它会递归地调用 Agent 获取下一步的动作,并执行 Agent 中定义的工具,直到 Agent 认为问题已经解决,则递归结束,下面是整个过程的伪代码:
| 1 2 3 4 5 |
|
LangChain Agent 进阶
下面深入学习 LangChain Agent 的这几个概念。
使用工具
在入门示例中,我们使用 @tool 装饰器定义了一个工具:
| 1 2 3 4 |
|
工具的名称默认为方法名,工具的描述为方法的 doc_string,工具方法支持多个参数:
| 1 2 3 4 5 6 7 |
|
当工具方法有多个参数时,参数的描述就很重要,我们可以通过 args_schema 来传入一个 BaseModel,这是 Pydantic 中用于定义数据模型的基类:
| 1 2 3 4 5 6 7 8 9 10 11 |
|
LangChain 的代码中大量使用了 Pydantic 库,它提供了一种简单而强大的方式来验证和解析输入数据,并将其转换为类型安全的 Python 对象。
除了使用 @tool 装饰器,官方还提供了另外两种方式来定义工具。第一种是使用 Tool.from_function():
| 1 2 3 4 5 |
|
不过这个方法只支持接受一个字符串输入和一个字符串输出,如果工具方法有多个参数,必须得使用 StructuredTool.from_function():
| 1 2 3 4 5 |
|
同样,我们可以通过 args_schema 来传入一个 BaseModel 对方法的参数进行描述:
| 1 2 3 4 5 6 |
|
实际上查看 LangChain 的源码你就会发现,@tool 装饰器就是通过 Tool.from_function() 和 StructuredTool.from_function() 来实现的。
第二种定义工具的方法是直接继承 BaseTool 类:
| 1 2 3 4 5 6 7 8 9 10 11 12 13 14 15 |
|
当工具方法有多个参数时,我们就在 _run 方法上定义多个参数,同时使用 args_schema 对多个参数进行描述:
| 1 2 3 4 5 6 7 8 9 10 11 12 13 |
|
除了自己定义工具,LangChain 还内置了一些常用的工具,我们可以直接使用 load_tools() 来加载:
| 1 2 3 |
|
可以从 load_tools.py 源码中找到支持的工具列表。
Agent 类型
有些同学可能已经注意到,在示例代码中我们使用了 OpenAIFunctionsAgent,我们也可以使用 initialize_agent() 方法简化 OpenAIFunctionsAgent 的创建过程:
| 1 2 3 4 5 6 7 8 9 10 11 12 13 14 15 16 17 18 19 20 21 22 |
|
很显然,这个 Agent 是基于 OpenAI 的 Function Calling 实现的,它通过 format_tool_to_openai_function() 将 LangChain 的工具转换为 OpenAI 的 functions 参数。但是 Function Calling 机制只有 OpenAI 的接口才支持,而 LangChain 面对的是各种大模型,并不是所有的大模型都支持 Function Calling 机制,这是要专门训练的,所以 LangChain 的 Agent 还需要支持一种更通用的实现机制。根据所使用的策略,LangChain 支持 多种不同的 Agent 类型,其中最通用,也是目前最流行的 Agent 是基于 ReAct 的 Agent。
Zero-shot ReAct Agent
ReAct 这个词出自一篇论文 ReAct: Synergizing Reasoning and Acting in Language Models,它是由 Reason 和 Act 两个词组合而成,表示一种将 推理 和 行动 与大模型相结合的通用范式:
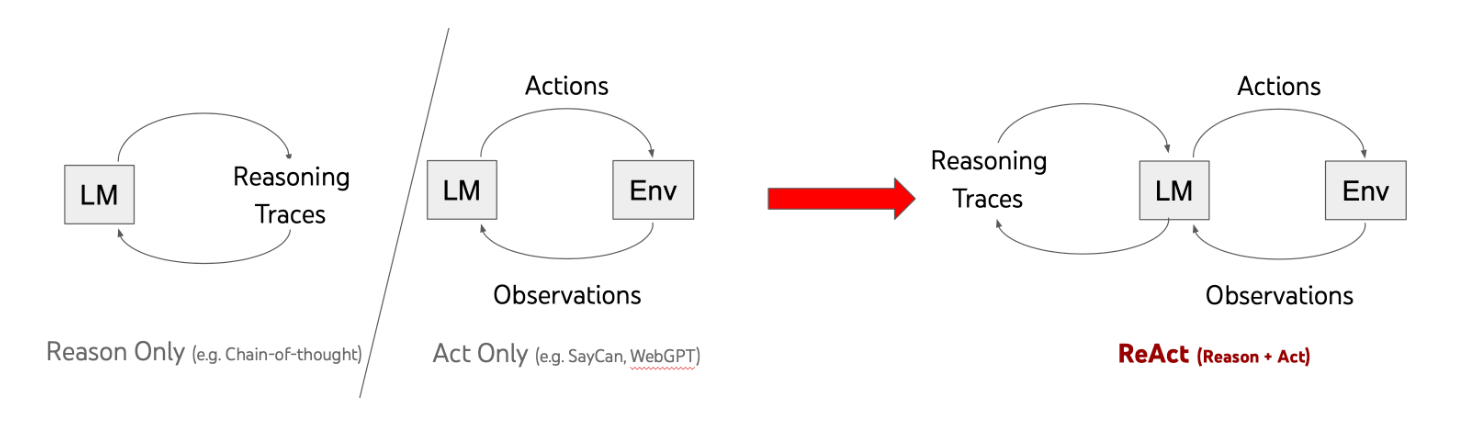
传统的 Reason Only 型应用(如 Chain-of-Thought Prompting)具备很强的语言能力,擅长通用文本的逻辑推断,但由于不会和外部环境交互,因此它的认知非常受限;而传统的 Act Only 型应用(如 WebGPT、SayCan、ACT-1)能和外界进行交互,解决某类特定问题,但它的行为逻辑较简单,不具备通用的推理能力。
ReAct 的思想,旨在将这两种应用的优势结合起来。针对一个复杂问题,首先使用大模型的推理能力制定出解决该问题的行动计划,这好比人的大脑,可以对问题进行分析思考;然后使用行动能力与外部源(例如知识库或环境)进行交互,以获取额外信息,这好比人的五官和手脚,可以感知世界,并执行动作;大模型对行动的结果进行跟踪,并不断地更新行动计划,直到问题被解决。通过这种模式,我们能基于大模型构建更为强大的 AI 应用,大名鼎鼎的 Auto-GPT 项目就是基于 ReAct 模式实现的。
LangChain 基于 ReAct 思想实现了一些 Agent,其中最简单的就是 Zero-shot ReAct Agent,我们将上面的 AgentType.OPENAI_FUNCTIONS 替换成 AgentType.ZERO_SHOT_REACT_DESCRIPTION 即可:
| 1 |
|
执行结果如下:
| 1 2 3 4 5 6 7 8 9 10 |
|
从输出结果可以一窥 Agent 的思考过程,包括三个部分:Thought 是由大模型生成的想法,是执行行动的依据;Action 是指大模型判断本次需要执行的具体动作;Observation 是执行动作后从外部获取的信息。
可以看到这个 Agent 没有 OpenAI 那么智能,它在计算单词长度时没有去掉左右的引号。
为了展示 Agent 思维链的强大之处,我们可以输入一个更复杂的问题:
| 1 |
|
要回答这个问题,Agent 必须先计算两个单词的长度,然后将两个长度相乘得到乘积,所以我们要在工具箱中加一个用于计算的工具,可以直接使用 LangChain 内置的 llm-math 工具:
| 1 2 3 4 5 6 7 |
|
运行结果如下:
| 1 2 3 4 5 6 7 8 9 10 11 12 13 14 15 16 17 18 |
|
针对最简单的 Zero-shot ReAct Agent,LangChain 提供了三个实现:
ZERO_SHOT_REACT_DESCRIPTION- 使用 LLMs 实现;CHAT_ZERO_SHOT_REACT_DESCRIPTION- 使用 ChatModels 实现;STRUCTURED_CHAT_ZERO_SHOT_REACT_DESCRIPTION- 上面两种 Agent 使用的工具都只支持输入简单的字符串,而这种 Agent 通过args_schema来生成工具的输入,支持在工具中使用多个参数;
Conversational ReAct Agent
和 Chain 一样,也可以给 Agent 增加记忆功能,默认情况下,Zero-shot ReAct Agent 是不具有记忆功能的,不过我们可以通过 agent_kwargs 参数修改 Agent 让其具备记忆功能。我们可以使用下面的技巧将 Agent 所使用的 Prompt 打印出来看看:
| 1 |
|
输出结果如下:
| 1 2 3 4 5 6 7 8 9 10 11 12 13 14 15 16 17 18 19 20 |
|
这个 Prompt 就是实现 ReAct 的核心,它实际上包括了三个部分。第一部分称为前缀(prefix),可以在这里加一些通用的提示语,并列出大模型可以使用的工具名称和描述:
| 1 2 3 4 |
|
第二部分称为格式化指令(format_instructions),内容如下:
| 1 2 3 4 5 6 7 8 9 10 |
|
这段指令让大模型必须按照 Thought/Action/Action Input/Observation 这种特定的格式来回答我们的问题,然后我们将 Observation 设置为停止词(Stop Word)。如果大模型返回的结果中有 Action 和 Action Input,就说明大模型需要调用外部工具获取进一步的信息,于是我们就去执行该工具,并将执行结果放在 Observation 中,接着再次调用大模型,这样我们每执行一次,就能得到大模型的一次思考过程,直到大模型返回 Final Answer 为止,此时我们就得到了最终结果。
第三部分称为后缀(suffix),包括两个占位符,{input} 表示用户输入的问题,{agent_scratchpad} 表示 Agent 每一步思考的过程,可以让 Agent 继续思考下去:
| 1 2 3 4 |
|
可以看到上面的 Prompt 中并没有考虑历史会话,如果要让 Agent 具备记忆功能,我们必须在 Prompt 中加上历史会话内容,我们将 prefix 修改成下面这样:
| 1 |
|
明确地指出这是一次和人类的会话。然后将 suffix 修改为:
| 1 2 3 4 5 |
|
我们在里面加上了 {chat_history} 占位符表示历史会话记录。由于引入了新的占位符,所以在 input_variables 中也需要加上 chat_history 变量,这个变量的内容会被 ConversationBufferMemory 自动替换,修改后的代码如下:
| 1 2 3 4 5 6 7 8 9 10 11 12 13 14 15 16 17 |
|
至此我们这个 Agent 就具备记忆功能了,可以将上面那个复杂问题拆分成三个小问题分别问它:
| 1 2 3 4 5 6 |
|
执行结果如下,可以看出在回答第三个问题时它记住了上面两轮对话的内容:
| 1 2 3 4 5 6 7 8 9 10 11 12 13 14 15 16 17 18 19 20 21 22 23 24 25 26 27 28 29 30 31 32 33 34 |
|
像上面这样给 Agent 增加记忆实在是太繁琐了,LangChain 于是内置了两种 Conversational ReAct Agent 来简化这个过程:
CONVERSATIONAL_REACT_DESCRIPTION- 使用 LLMs 实现;CHAT_CONVERSATIONAL_REACT_DESCRIPTION- 使用 ChatModels 实现;
使用 Conversational ReAct Agent 要简单得多,我们只需要准备一个 memory 参数即可:
| 1 2 3 4 5 6 7 8 9 10 11 |
|
ReAct DocStore Agent
和 Zero-shot ReAct Agent 一样,ReAct DocStore Agent 也是一个基于 ReAct 框架实现的 Agent。事实上,ReAct DocStore Agent 才是 ReAct 这篇论文 的标准实现,这个 Agent 必须包含两个指定工具:Search 用于调用 DocStore 搜索相关文档,Lookup 用于从搜索的文档中查询关键词信息。
Zero-shot ReAct Agent 更像是一个通用的 MRKL 系统,MRKL 的全称是模块化推理、知识和语言系统,它是一种模块化的神经符号架构,结合了大型语言模型、外部知识源和离散推理,它最初 由 AI21 Labs 提出,并实现了 Jurassic-X,对 MRKL 感兴趣的同学可以参考 这篇博客。
LangChain 目前貌似只实现了 Wikipedia 和 InMemory 两个 DocStore,下面的例子中我们使用 Wikipedia 来进行搜索:
| 1 2 3 4 5 6 7 8 9 10 11 12 13 14 15 16 17 |
|
然后创建一个类型为 AgentType.REACT_DOCSTORE 的 Agent,并提出一个问题:谁是当今美国总统?
| 1 2 3 4 |
|
运行结果如下:
| 1 2 3 4 5 6 7 8 9 10 |
|
Self-Ask Agent
Self-Ask Agent 是另一种基于 ReAct 框架的 Agent,它直接使用搜索引擎作为唯一的工具,工具名称必须叫做 Intermediate Answer,一般使用 Google 搜索来实现;Self-Ask 的原理来自于 这篇论文,通过下面的提示语技巧让大模型以 Follow up/Intermediate answer 这种固定的格式回答用户问题:
| 1 2 3 4 5 6 7 |
|
其中 Follow up 是我们需要搜索的内容,它类似于 Zero-shot ReAct Agent 里的 Action/Action Input,由于直接使用搜索引擎,所以不需要让大模型决定使用哪个工具和参数;Intermediate answer 是搜索的结果,它类似于 Zero-shot ReAct Agent 里的 Observation;经过不断的搜索,大模型最终得到问题的答案。
下面是使用 Self-Ask Agent 的示例,首先通过 SerpAPI 定义一个名为 Intermediate Answer 的工具:
| 1 2 3 4 5 6 7 8 |
|
然后创建一个类型为 AgentType.SELF_ASK_WITH_SEARCH 的 Agent,并提出一个问题:当今美国总统的出生日期是什么时候?
| 1 2 3 4 |
|
运行结果如下:
| 1 2 3 4 5 6 7 8 9 10 |
|
OpenAI Functions Agent
上面的几种 Agent 都是基于 ReAct 框架实现的,这虽然是一种比较通用的解决方案,但是当我们使用 OpenAI 时,OpenAI Functions Agent 才是我们的最佳选择,因为 ReAct 归根结底是基于提示工程的,执行结果有着很大的不确定性,OpenAI 的 Function Calling 机制相对来说要更加可靠。
在入门示例中,我们已经用到了 OpenAI Functions Agent 类型,这一节我们将学习另一种类型 OpenAI Multi Functions Agent。
OpenAI Functions Agent 的缺点是每次只能返回一个工具,比如我们的问题是 合肥和上海今天的天气怎么样?,OpenAI Functions Agent 第一次会返回一个函数调用 get_weather_info(city='合肥'),然后我们需要再调用一次,第二次又会返回一个函数调用 get_weather_info(city='上海'),最后 OpenAI 对两个结果进行总结得到最终答案。
很显然,这两次调用是可以并行处理的,如果 Agent 能一次性返回两次调用,这将大大提高我们的执行效率,这就是提出 OpenAI Multi Functions Agent 的初衷。
为了对比这两种 Agent 的区别,我们可以使用下面的技巧开启 LangChain 的调试模式:
| 1 2 3 |
|
然后使用同一个问题对两个 Agent 进行提问:
| 1 |
|
OpenAI Functions Agent 的运行结果如下:
| 1 2 3 4 5 6 7 8 9 10 11 12 13 14 15 16 17 18 19 20 21 22 23 24 25 26 27 28 29 30 31 32 33 34 35 36 37 38 39 40 41 42 43 44 45 46 47 48 49 50 51 52 53 54 55 56 57 58 59 60 61 62 63 64 65 66 67 68 69 70 71 72 |
|
可以看到 OpenAI Functions Agent 调了两次大模型,第一次大模型返回 get_word_length 函数计算单词 weekly-practice 的长度,第二次再次返回 get_word_length 函数计算单词 aneasystone 的长度。
而 OpenAI Multi Functions Agent 的执行结果如下:
| 1 2 3 4 5 6 7 8 9 10 11 12 13 14 15 16 17 18 19 20 21 22 23 24 25 26 27 28 29 30 31 32 33 34 35 36 37 38 39 40 41 42 43 44 45 46 47 48 49 50 51 52 |
|
可以看到 OpenAI Multi Functions Agent 调了一次大模型,返回了一个叫做 tool_selection 的工具,这个函数是 LangChain 特意构造的,它的参数是我们定义的多个工具,这样就使得 OpenAI 一次返回多个工具供我们调用。
Plan and execute Agent
上面所介绍的所有 Agent,本质上其实都是一样的:给定一组工具,然后大模型根据用户的输入一步一步地选择工具来执行,每一步的结果都用于决定下一步操作,直到问题被解决,像这种逐步执行的 Agent 被称为 Action Agent,它比较适合小型任务;如果要处理需要保持长期目标的复杂任务,使用 Action Agent 经常会出现推理跑偏的问题,这时就轮到 Plan and execute Agent 上场了。
Plan and execute Agent 会提前对问题制定好完整的执行计划,然后在不更新计划的情况下逐步执行,即先把用户的问题拆解成多个子任务,然后再执行各个子任务,直到用户的问题完全被解决:
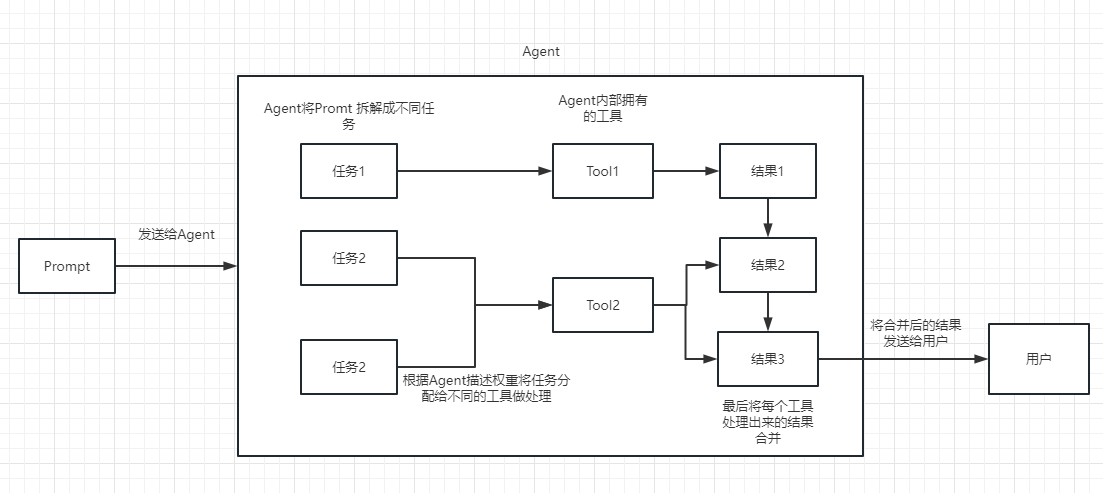
我们可以动态的选择工具或 Chain 来解决这些子任务,但更好的做法是使用 Action Agent,这样我们可以将 Action Agent 的动态性和 Plan and execute Agent 的计划能力相结合,对复杂问题的解决效果更好。
Plan and execute Agent 的思想来自开源项目 BabyAGI,相比于 Action Agent 所使用的 Chain-of-Thought Prompting,它所使用的是 Plan-and-Solve Prompting,感兴趣的同学可以阅读 Plan-and-Solve Prompting 的论文。
和之前的 Action Agent 一样,在使用 Plan and execute Agent 之前我们需要提前准备好工具列表,这里我们准备两个工具,一个搜索,一个计算:
| 1 2 3 4 5 6 7 8 9 10 11 12 13 14 15 16 17 18 19 |
|
接下来创建 Plan and execute Agent,它主要包括两个部分:planner 和 executor,planner 用于制定计划,将任务划分成若干个子任务,executor 用于执行计划,处理子任务,其中 executor 可以使用 Chain 或上面的任意 Action Agent 来实现。Plan and execute Agent 目前还是 LangChain 的实验功能,相应的实现在 langchain.experimental 模块下:
| 1 2 3 4 5 6 7 8 |
|
运行结果的第一步可以看到整个任务的执行计划:
| 1 2 3 4 5 6 |
|
然后是每个子任务的执行结果,首先是搜索 Leo DiCaprio's girlfriend:
| 1 2 3 4 5 6 7 8 9 10 11 12 13 14 |
|
搜到的这个新闻有点老了,得到结果是 Blake Lively,然后计算她的年龄:
| 1 2 3 4 5 6 7 8 9 10 11 12 13 14 15 16 17 18 19 20 21 22 23 |
|
然后使用数学工具计算年龄的 0.43 次方:
| 1 2 3 4 5 6 7 8 9 10 11 12 13 14 15 16 17 18 19 20 21 22 23 24 25 26 27 |
|
最后得到结果,润色后输出:
| 1 2 3 4 5 6 7 8 9 10 11 12 13 14 15 16 17 18 |
|
总结
在这篇笔记中,我们首先学习了 OpenAI 的插件和 Function Calling 机制,然后再对 Agent 的基本概念做了一个大概的了解,最后详细地学习了 LangChain 中不同的 Agent 类型,包括 Zero-shot ReAct Agent、Conversational ReAct Agent、ReAct DocStore Agent、Self-Ask Agent、OpenAI Functions Agent 和 Plan and execute Agent,这些 Agent 在使用上虽然大同小异,但每一种 Agent 都代表一种解决问题的思路,它们使用了不同的提示语技术:Chain-of-Thought Prompting 和 Plan-and-Solve Prompting。
从这里我们也可以看出提示语的重要性,由此也诞生了一门新的学科:提示工程(Prompt Engineering),这门学科专门研究如何开发和优化提示词,将大模型用于各种应用场景,提高大模型处理复杂任务的能力。LangChain 中内置了大量的提示词,我们将在下一篇笔记中继续学习它。
参考
- 70款ChatGPT插件评测:惊艳的开发过程与宏大的商业化愿景
- LangChain 中文入门教程
- LangChain初学者入门指南
- 解密Prompt系列12. LLM Agent零微调范式 ReAct & Self Ask
- Superpower LLMs with Conversational Agents
- 2023年新生代大模型Agents技术,ReAct,Self-Ask,Plan-and-execute,以及AutoGPT, HuggingGPT等应用
- LLM Powered Autonomous Agents
- 提示工程指南
更多
AI Agents
OpenAI Functions Chain
自从 OpenAI 推出 Function Calling 功能之后,LangChain 就积极地将其应用到自己的项目中,在 LangChain 的文档中,可以看到很多 OpenAI Functions 的身影。除了这篇笔记所介绍的 OpenAI Functions Agent 和 OpenAI Multi Functions Agent,OpenAI Functions 还可以用在 Chain 中,OpenAI Functions Chain 可以用来生成结构化的输出,在信息提取、文本标注等场景下非常有用。

