热门标签
当前位置: article > 正文
薄板样条插值(Thin plate splines)的实现与使用_薄板样条差值代码
作者:不正经 | 2024-02-22 05:50:46
赞
踩
薄板样条差值代码
最近项目用到了tps算法,opencv2封装的tps实现起来比较慢,于是用pytorch实现了一下,可以支持gpu加速,就很nice了,在这里记录一下!
1. 简介
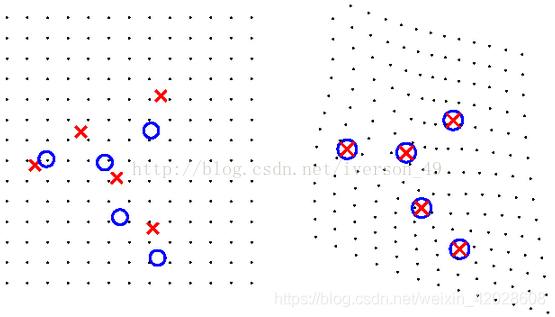
薄板样条函数(TPS)是一种很常见的插值方法。因为它一般都是基于2D插值,所以经常用在在图像配准中。在两张图像中找出N个匹配点,应用TPS可以将这N个点形变到对应位置,同时给出了整个空间的形变(插值)。

2. 实现
- opencv的tps使用
import cv2
import numpy as np
import random
import torch
from torchvision.transforms import ToTensor, ToPILImage

DEVICE = torch.device("cpu")

def choice3(img):
    '''
    产生波浪型文字
    :param img:
    :return:
    '''
    h, w = img.shape[0:2]
    N = 5
    pad_pix = 50
    points = []
    dx = int(w/ (N - 1))
    for i in range( N):
        points.append((dx * i,  pad_pix))
        points.append((dx * i, pad_pix + h))

    #加边框
    img = cv2.copyMakeBorder(img, pad_pix, pad_pix, 0, 0, cv2.BORDER_CONSTANT,
                             value=(int(img[0][0][0]), int(img[0][0][1]), int(img[0][0][2])))

    #原点
    source = np.array(points, np.int32)
    source = source.reshape(1, -1, 2)

    #随机扰动幅度
    rand_num_pos = random.uniform(20, 30)
    rand_num_neg = -1 * rand_num_pos

    newpoints = []
    for i in range(N):
        rand = np.random.choice([rand_num_neg, rand_num_pos], p=[0.5, 0.5])
        if(i == 1):
            nx_up = points[2 * i][0]
            ny_up = points[2 * i][1] + rand
            nx_down = points[2 * i + 1][0]
            ny_down = points[2 * i + 1][1] + rand
        elif (i == 4):
            rand = rand_num_neg if rand > 1 else rand_num_pos
            nx_up = points[2 * i][0]
            ny_up = points[2 * i][1] + rand
            nx_down = points[2 * i + 1][0]
            ny_down = points[2 * i + 1][1] + rand
        else:
            nx_up = points[2 * i][0]
            ny_up = points[2 * i][1]
            nx_down = points[2 * i + 1][0]
            ny_down = points[2 * i + 1][1]

        newpoints.append((nx_up, ny_up))
        newpoints.append((nx_down, ny_down))

    #target点
    target = np.array(newpoints, np.int32)
    target = target.reshape(1, -1, 2)

    #计算matches
    matches = []
    for i in range(1, 2*N + 1):
        matches.append(cv2.DMatch(i, i, 0))

    return source, target, matches, img

def norm(points_int, width, height):
	"""
	将像素点坐标归一化至 -1 ~ 1
    """
	points_int_clone = torch.from_numpy(points_int).detach().float().to(DEVICE)
	x = ((points_int_clone * 2)[..., 0] / (width - 1) - 1)
	y = ((points_int_clone * 2)[..., 1] / (height - 1) - 1)
	return torch.stack([x, y], dim=-1).contiguous().view(-1, 2)


class TPS(torch.nn.Module):

    def __init__(self):
        super().__init__()

    def forward(self, X, Y, w, h, device):

        """ 计算grid"""
        grid = torch.ones(1, h, w, 2, device=device)
        grid[:, :, :, 0] = torch.linspace(-1, 1, w)
        grid[:, :, :, 1] = torch.linspace(-1, 1, h)[..., None]
        grid = grid.view(-1, h * w, 2)

        """ 计算W, A"""
        n, k = X.shape[:2]
        device = X.device

        Z = torch.zeros(1, k + 3, 2, device=device)
        P = torch.ones(n, k, 3, device=device)
        L = torch.zeros(n, k + 3, k + 3, device=device)

        eps = 1e-9
        D2 = torch.pow(X[:, :, None, :] - X[:, None, :, :], 2).sum(-1)
        K = D2 * torch.log(D2 + eps)

        P[:, :, 1:] = X
        Z[:, :k, :] = Y
        L[:, :k, :k] = K
        L[:, :k, k:] = P
        L[:, k:, :k] = P.permute(0, 2, 1)

        Q = torch.solve(Z, L)[0]
        W, A = Q[:, :k], Q[:, k:]

        """ 计算U """
        eps = 1e-9
        D2 = torch.pow(grid[:, :, None, :] - X[:, None, :, :], 2).sum(-1)
        U = D2 * torch.log(D2 + eps)

        """ 计算P """
        n, k = grid.shape[:2]
        device = grid.device
        P = torch.ones(n, k, 3, device=device)
        P[:, :, 1:] = grid

        # grid = P @ A + U @ W
        grid = torch.matmul(P, A) + torch.matmul(U, W)
        return grid.view(-1, h, w, 2)

if __name__=='__main__':
    # 弯曲水平文本
    img = cv2.imread('data/test.jpg', cv2.IMREAD_COLOR)
    source, target, matches, img = choice3(img)
    # #opencv版tps
    # tps = cv2.createThinPlateSplineShapeTransformer()
    # tps.estimateTransformation(source, target, matches)
    # img = tps.warpImage(img)
    # cv2.imshow('test.png', img)
    # cv2.imwrite('test.png', img)
    # cv2.waitKey(0)

    #torch实现tps
    ten_img = ToTensor()(img).to(DEVICE)
    h, w = ten_img.shape[1], ten_img.shape[2]
    ten_source = norm(source, w, h)
    ten_target = norm(target, w, h)

    tps = TPS()
    warped_grid = tps(ten_target[None, ...], ten_source[None, ...], w, h, DEVICE)   #这个输入的位置需要归一化,所以用norm
    ten_wrp = torch.grid_sampler_2d(ten_img[None, ...], warped_grid, 0, 0)
    new_img_torch = np.array(ToPILImage()(ten_wrp[0].cpu()))

    cv2.imshow('test.png', new_img_torch)
    cv2.imwrite('test.png', new_img_torch)
    cv2.waitKey(0)
- 1
- 2
- 3
- 4
- 5
- 6
- 7
- 8
- 9
- 10
- 11
- 12
- 13
- 14
- 15
- 16
- 17
- 18
- 19
- 20
- 21
- 22
- 23
- 24
- 25
- 26
- 27
- 28
- 29
- 30
- 31
- 32
- 33
- 34
- 35
- 36
- 37
- 38
- 39
- 40
- 41
- 42
- 43
- 44
- 45
- 46
- 47
- 48
- 49
- 50
- 51
- 52
- 53
- 54
- 55
- 56
- 57
- 58
- 59
- 60
- 61
- 62
- 63
- 64
- 65
- 66
- 67
- 68
- 69
- 70
- 71
- 72
- 73
- 74
- 75
- 76
- 77
- 78
- 79
- 80
- 81
- 82
- 83
- 84
- 85
- 86
- 87
- 88
- 89
- 90
- 91
- 92
- 93
- 94
- 95
- 96
- 97
- 98
- 99
- 100
- 101
- 102
- 103
- 104
- 105
- 106
- 107
- 108
- 109
- 110
- 111
- 112
- 113
- 114
- 115
- 116
- 117
- 118
- 119
- 120
- 121
- 122
- 123
- 124
- 125
- 126
- 127
- 128
- 129
- 130
- 131
- 132
- 133
- 134
- 135
- 136
- 137
- 138
- 139
- 140
- 141
- 142
- 143
- 144
- 145
- 146
- 147
- 148
- 149
- 150
- 151
- 152
- 153
- 154
3. 效果
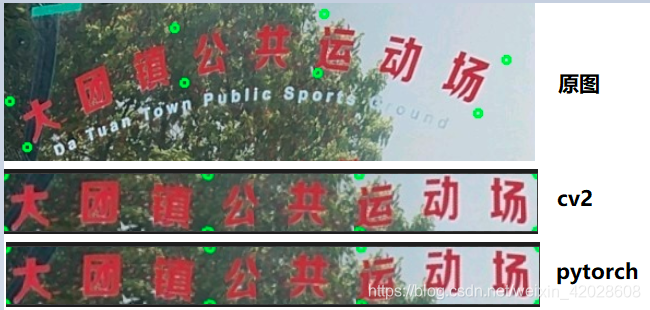
贴个效果图对比:


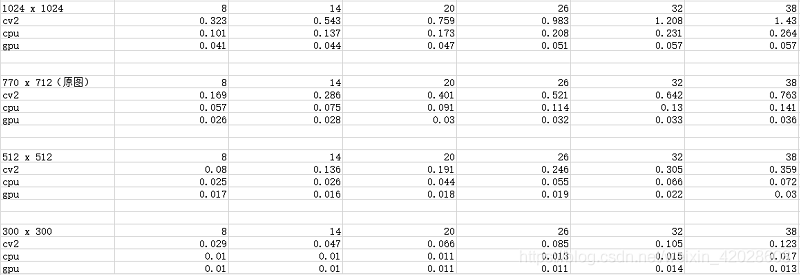
上图可以看出,pytorch实现与cv2的tps的效果完全对齐,所以重点看耗时,接下来贴耗时的对比图(差距还是蛮大的,图片越大差距越大)

如果对你有帮助的话,希望给个赞,谢谢~
参考1:TPS 薄板样条插值 python的opencv实现
注,这个参考可以初步了解使用cv2的tps使用,但是具体细节上还存在错误
参考2:薄板样条函数(Thin plate splines)的讨论与分析
参考3:数值方法——薄板样条插值(Thin-Plate Spline)
————————————————
版权声明:本文为CSDN博主「一只帅气的小菜鸡」的原创文章,遵循CC 4.0 BY-SA版权协议,转载请附上原文出处链接及本声明。
原文链接:https://blog.csdn.net/weixin_42028608/article/details/106128409
声明:本文内容由网友自发贡献,不代表【wpsshop博客】立场,版权归原作者所有,本站不承担相应法律责任。如您发现有侵权的内容,请联系我们。转载请注明出处:https://www.wpsshop.cn/w/不正经/article/detail/128787
推荐阅读
相关标签


