热门标签
热门文章
- 1国产、自研、开源数据库的选型与应用 DAMS 2020
- 2uiautomation:基于windows的ui自动化框架_uiautomation安装
- 3软件测试之测试用例和缺陷报告模板分享_软件测试测试问题记录模版
- 4紫光同创国产FPGA学习之Design Editor_紫光同创ide如何查看fpga的布局
- 5在neo4j桌面版中利用.dump文件将已构建的图数据库中的数据导入到新数据库中_neo4j使用db.dump
- 6Stable Diffusion API 调用实战:详细教程_serverless-stable-diffusion-api
- 7MATLAB初学者入门(19)—— 均值算法
- 8(面试版)大数据组件的区别总结(hive,hbase,spark,flink)_hive spark flink
- 9必备年终绩效工作总结模板
- 10论文笔记:UrbanGPT: Spatio-Temporal Large Language Models
当前位置: article > 正文
「Mybatis实战六」:Mybatis核心文件详解 - MyBatis常用配置typeAliases、mappers_mybatis typealiases
作者:不正经 | 2024-04-17 05:40:18
赞
踩
mybatis typealiases
一、MyBatis核心配置文件层级关系
本文代码在 Mybatis初体验:一小时从入门到运行你的第一个应用 所构建的基础代码结构之上,进行修改。想要了解 environments、properties 的用法,可参考文章:「Mybatis实战五」:Mybatis核心文件详解 - MyBatis常用配置environments、properties
-
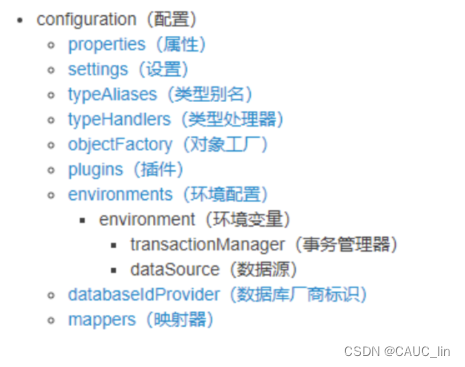
MyBatis 的配置文件包含了会深深影响 MyBatis 行为的设置和属性信息。
-
配置文档的顶层结构如下:

二、MyBatis常用配置解析
1、typeAliases标签
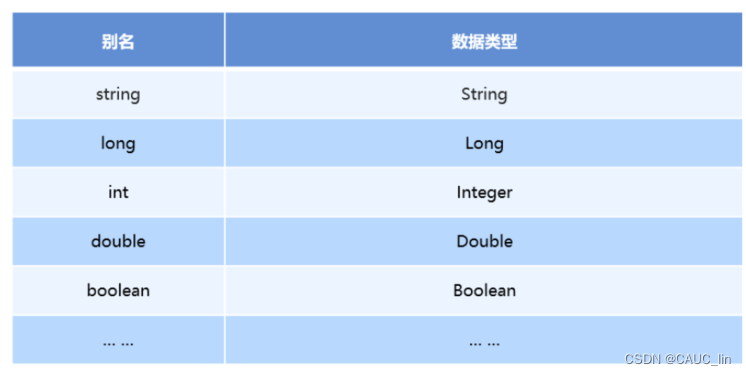
类型别名是为 Java 类型设置一个短的名字。
为了简化映射文件 Java 类型设置,mybatis框架为我们设置好的一些常用的类型的别名:

在写parametertype时,若需要使用这些类型,直接使用别名即可。
设置别名有两种方式,单起别名 和 批量起别名,具体见如下修改:
-
SqlMapConfig.xml修改
<?xml version="1.0" encoding="UTF-8" ?> <!DOCTYPE configuration PUBLIC "-//mybatis.org//DTD Config 3.0//EN" "http://mybatis.org/dtd/mybatis-3-config.dtd"> <configuration> <properties resource="jdbc.properties"></properties> <typeAliases> <!--方式一:给单个实体起别名--> <!-- <typeAlias type="domain.User" alias="user"></typeAlias>--> <!--方式二:批量起别名 别名就是类名,且不区分大小写--> <package name="domain"/> </typeAliases> <!--环境配置--> <environments default="mysql"> <!--使用mysql环境--> <environment id="mysql"> <!--使用jdbc事务管理亲--> <transactionManager type="JDBC"></transactionManager> <!-- 使用连接池--> <dataSource type="POOLED"> <property name="driver" value="${jdbc.driver}"/> <property name="url" value="${jdbc.url}"/> <property name="username" value="${jdbc.username}"/> <property name="password" value="${jdbc.password}"/> </dataSource> </environment> </environments> <!--加载映射配置--> <mappers> <mapper resource="UserMapper.xml"></mapper> </mappers> </configuration>- 1
- 2
- 3
- 4
- 5
- 6
- 7
- 8
- 9
- 10
- 11
- 12
- 13
- 14
- 15
- 16
- 17
- 18
- 19
- 20
- 21
- 22
- 23
- 24
- 25
- 26
- 27
- 28
- 29
- 30
- 31
- 32
- 33
- 34
- 35
- 36
- 37
注意排列顺序,需要按照前面写的配置文件层级顺序。
-
UserMapper.xml修改
<?xml version="1.0" encoding="UTF-8" ?> <!DOCTYPE mapper PUBLIC "-//mybatis.org//DTD Mapper 3.0//EN" "http://mybatis.org/dtd/mybatis-3-mapper.dtd"> <mapper namespace="user"> <!-- 查询所有用户 --> <select id="findAll" resultType="user"> select * from user </select> <!--新增用户--> <!--#{} : mybatis中的占位符,等同于JDBC中的 parameterType :指定接收到的参数类型 --> <insert id="save" parameterType="domain.User"> insert into user(username, birthday, sex, address) values (#{username}, #{birthday}, #{sex}, #{address}) </insert> <!-- 更新用户 --> <update id="update" parameterType="domain.User"> update user set username=#{username},birthday=#{birthday},sex=#{sex},address=#{address} where id=#{id} </update> <!--删除用户 java.lang.Integer--> <delete id="delete" parameterType="int"> delete from user where id = #{id} </delete> </mapper>- 1
- 2
- 3
- 4
- 5
- 6
- 7
- 8
- 9
- 10
- 11
- 12
- 13
- 14
- 15
- 16
- 17
- 18
- 19
- 20
- 21
- 22
- 23
- 24
- 25
- 26
- 27
- 28
- 29
- 30
-
测试

2、mappers标签
-
使用相对于类路径的资源引用,例如:
<mapper resource="xxx/userMapper.xml"/> -
使用完全限定资源定位符(URL),例如:
<mapper url="file:///xxx/mappers/userMapper.xml"/>下面两种mapper代理开发中使用
-
使用映射器接口实现类的完全限定类名,例如:
<mapper class="xxx.userMapper"/> -
将包内的映射器接口实现全部注册为映射器,例如:
<package name="xxx.mapper"/>
声明:本文内容由网友自发贡献,不代表【wpsshop博客】立场,版权归原作者所有,本站不承担相应法律责任。如您发现有侵权的内容,请联系我们。转载请注明出处:https://www.wpsshop.cn/w/不正经/article/detail/438485
推荐阅读
相关标签


