
- 1BurpSuite使用——HTTP_burpsuite内嵌浏览器,2024年最新算法题+网络安全_burpsuite2024
- 2小车前进程序c语言,单片机智能小车前进后退左转右转比赛程序
- 3多节点高可用Eureka集群与服务注册_eruaka
- 4考研系列-数据结构第二章、线性表
- 5CLIP改进工作串讲(上)
- 6车辆工程计算机发展前景,车辆工程专业就业方向有哪些 就业前景怎么样
- 7ROS2系统学习2---Ubuntu20.04下ROS2的安装_gpg key failed to connect to raw
- 8Python+OpenCV+dlib实现人脸识别_dlib opencv进行人脸识别
- 901背包问题-队列分支限界法-C++
- 10AI大模型探索之路-实战篇:智能化IT领域搜索引擎之知乎网站数据获取(流程优化)_ai大模型 提取网页信息
Java之NIO_nio java
赞
踩
简介
Java NIO(New IO)是从 Java 1.4 版本开始引入的一个新的 IO API,可以替代标准的 Java IO API 。它与原来的 IO 有同样的作用和目的,但是使用的方式完全不同,NIO 支持面向缓冲区的、基于通道的 IO 操作。NIO 将以更加高效的方式进行文件的读写操作。
Java NIO 与 IO 的主要区别
IO:面向流、阻塞

NIO:面向缓冲区、非阻塞、选择器

通道和缓冲区
Java NIO系统的核心在于:通道 (Channel) 和缓冲区 (Buffer)。通道表示打开到 IO 设备 (例如:文件、套接字) 的连接。若需要使用 NIO 系统,需要获取用于连接 IO 设备的通道以及用于容纳数据的缓冲区。然后操作缓冲区,对数据进行处理。简而言之,Channel 负责传输, Buffer 负责存储。
缓冲区
缓冲区是一个用于特定基本数据类型的容器。由 java.nio 包定义的,所有缓冲区都是 Buffer 抽象类的子类。主要用于与 NIO 通道进行交互,数据是从通道读入缓冲区,从缓冲区写入通道中的。
缓冲区的类型
Buffer 就像一个数组,可以保存多个相同类型的数据。根据数据类型不同 (boolean 除外) ,有以下 Buffer 常用子类:
- ByteBuffer
- CharBuffer
- ShortBuffer
- IntBuffer
- LongBuffer
- FloatBuffer
- DoubleBuffer
上述 Buffer 类他们都采用相似的方法进行管理数据,只是各自管理的数据类型不同而已。都是通过如下方法获取一个 Buffer 对象:
static XxxBuffer allocate (int capacity) : 创建一个容量为 capacity 的 XxxBuffer 对象
缓冲区的基本属性和重要概念

容量 (capacity) :
表示 Buffer 最大数据容量,缓冲区容量不能为负,并且创建后不能更改。
限制 (limit) :
第一个不应该读取或写入的数据的索引,即位于 limit 后的数据不可读写。缓冲区的限制不能为负,并且不能大于其容量。
位置 (position) :
下一个要读取或写入的数据的索引。缓冲区的位置不能为负,并且不能大于其限制。
标记和重置 (mark) :
标记是一个索引,通过 Buffer 中的 mark() 方法指定 Buffer 中一个特定的 position,之后可以通过调用 reset() 方法恢复到这个 position。
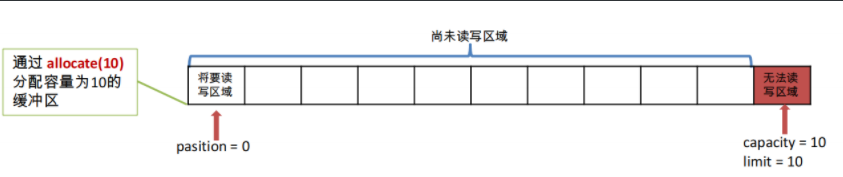
- 定义缓冲区并分配大小
@Test
    public void test(){
//        分配一个指定大小的缓冲区
        ByteBuffer byteBuffer = ByteBuffer.allocate(10);

        System.out.println("capacity:" + byteBuffer.capacity());
        System.out.println("limit:" + byteBuffer.limit());
        System.out.println("position:" + byteBuffer.position());
        System.out.println("mark:" + byteBuffer.mark());
    }
- 1
- 2
- 3
- 4
- 5
- 6
- 7
- 8
- 9
- 10
输出:
![[外链图片转存失败,源站可能有防盗链机制,建议将图片保存下来直接上传(img-V9ETnn2s-1629942285327)(https://s3-us-west-2.amazonaws.com/secure.notion-static.com/ae5b519c-ade6-437e-855f-e3ad13977f8a/Untitled.png)]](https://img-blog.csdnimg.cn/d7b7188a0f574063893e0b9f76ad55b9.png)
图例:
- 存放数据到缓冲区(写数据)

@Test
    public void test(){

        String str = "abcde";
//        分配一个指定大小的缓冲区
        ByteBuffer byteBuffer = ByteBuffer.allocate(10);
//        写数据
        byteBuffer.put(str.getBytes());

        System.out.println("capacity:" + byteBuffer.capacity());
        System.out.println("limit:" + byteBuffer.limit());
        System.out.println("position:" + byteBuffer.position());
        System.out.println("mark:" + byteBuffer.mark());
    }
- 1
- 2
- 3
- 4
- 5
- 6
- 7
- 8
- 9
- 10
- 11
- 12
- 13
- 14
输出:
![[外链图片转存失败,源站可能有防盗链机制,建议将图片保存下来直接上传(img-FsWUGMfG-1629942285330)(https://s3-us-west-2.amazonaws.com/secure.notion-static.com/30e9ff10-4f9a-4dde-8d1e-4dcdef075a68/Untitled.png)]](https://img-blog.csdnimg.cn/76eb52ddbafe42179f442ad485d576a0.png)
图例:

-
读取缓冲区数据(读数据)
@Test
public void test(){

    String str = "abcde";
    // 分配一个指定大小的缓冲区
    ByteBuffer byteBuffer = ByteBuffer.allocate(10);
    // 写数据
    byteBuffer.put(str.getBytes());

    // 读取数据
    // 切换到读数据模式
    byteBuffer.flip();
    // 定义读取长度的 byte 数组
    byte[] dst = new byte[byteBuffer.limit()];
    // 利用 get 方法读取缓冲区中的数据
    byteBuffer.get(dst);
    // 打印
    System.out.println(new String(dst, 0, dst.length));
    System.out.println("capacity:" + byteBuffer.capacity());
    System.out.println("limit:" + byteBuffer.limit());
    System.out.println("position:" + byteBuffer.position());
    System.out.println("mark:" + byteBuffer.mark());
}
- 1
- 2
- 3
- 4
- 5
- 6
- 7
- 8
- 9
- 10
- 11
- 12
- 13
- 14
- 15
- 16
- 17
- 18
- 19
- 20
- 21
- 22
- 23
输出:
![[外链图片转存失败,源站可能有防盗链机制,建议将图片保存下来直接上传(img-Nw8UVb4W-1629942285333)(https://s3-us-west-2.amazonaws.com/secure.notion-static.com/0d495c5b-3bf4-4f42-a16a-89c6bf7340f2/Untitled.png)]](https://img-blog.csdnimg.cn/b6de26a2888b4f1d836db70a8562a774.png?x-oss-process=image/watermark,type_ZmFuZ3poZW5naGVpdGk,shadow_10,text_Q1NETiBAbTBfNTU3NDA5MDQ=,size_19,color_FFFFFF,t_70,g_se,x_16)
图例:

-
可重复读(重置 position 位置)
@Test public void test(){ String str = "abcde"; // 分配一个指定大小的缓冲区 ByteBuffer byteBuffer = ByteBuffer.allocate(10); // 写数据 byteBuffer.put(str.getBytes()); // 读取数据 // 切换到读数据模式 byteBuffer.flip(); // 定义读取长度的 byte 数组 byte[] dst = new byte[byteBuffer.limit()]; // 利用 get 方法读取缓冲区中的数据 byteBuffer.get(dst); System.out.println( "第一次读:" + new String(dst, 0, dst.length)); // 重复读 byteBuffer.rewind(); byte[] dst2 = new byte[byteBuffer.limit()]; byteBuffer.get(dst2); // 打印 System.out.println("第二次读:" + new String(dst2, 0, dst.length)); byteBuffer.rewind(); System.out.println("capacity:" + byteBuffer.capacity()); System.out.println("limit:" + byteBuffer.limit()); System.out.println("position:" + byteBuffer.position()); System.out.println("mark:" + byteBuffer.mark()); }- 1
- 2
- 3
- 4
- 5
- 6
- 7
- 8
- 9
- 10
- 11
- 12
- 13
- 14
- 15
- 16
- 17
- 18
- 19
- 20
- 21
- 22
- 23
- 24
- 25
- 26
- 27
- 28
- 29
- 30
- 31
- 32
输出:

-
清空缓冲区(注意:缓冲区中的数据依然存在,只是处于 “被遗忘” 状态)
// 清空缓冲区 byteBuffer.clear(); System.out.println("capacity:" + byteBuffer.capacity()); System.out.println("limit:" + byteBuffer.limit()); System.out.println("position:" + byteBuffer.position()); System.out.println("mark:" + byteBuffer.mark());- 1
- 2
- 3
- 4
- 5
- 6
- 7

-
mark 方法和 reset 方法
使用 mark 方法标记,然后再使用 reset 方法回到标记点
@Test public void test(){ String str = "abcde"; // 分配一个指定大小的缓冲区 ByteBuffer byteBuffer = ByteBuffer.allocate(10); // 写数据 byteBuffer.put(str.getBytes()); // 读取数据 // 切换到读数据模式 byteBuffer.flip(); // 定义读取长度的 byte 数组 byte[] dst = new byte[byteBuffer.limit()]; // 利用 get 方法读取缓冲区中的数据(读取2个字节) byteBuffer.get(dst, 0, 2); System.out.println( "第一次读:" + new String(dst, 0, 2)); System.out.println("position:" + byteBuffer.position()); // 标记 byteBuffer.mark(); // 再读取两个字节 byteBuffer.get(dst, 2, 2); System.out.println( "第二次读:" + new String(dst, 0, 4)); System.out.println("position:" + byteBuffer.position()); // reset() byteBuffer.reset(); System.out.println("position after reset:" + byteBuffer.position()); }- 1
- 2
- 3
- 4
- 5
- 6
- 7
- 8
- 9
- 10
- 11
- 12
- 13
- 14
- 15
- 16
- 17
- 18
- 19
- 20
- 21
- 22
- 23
- 24
- 25
- 26
- 27
- 28
- 29
- 30
- 31
输出:

- 其他方法
- hasRemaining() :查看缓冲区是否还有剩余的数据
- remaining() :查看缓冲区还有几个剩余数据
// 查看缓冲区还有几个剩余的数据 if(byteBuffer.hasRemaining()){ System.out.println("剩余数量" + byteBuffer.remaining()); }- 1
- 2
- 3
- 4
直接缓冲区和非直接缓冲区
字节缓冲区要么是直接的,要么是非直接的。如果为直接字节缓冲区,则 Java 虚拟机会尽最大努力直接在此缓冲区上执行本机 I/O 操作。也就是说,在每次调用基础操作系统的一个本机 I/O 操作之前(或之后),虚拟机都会尽量避免将缓冲区的内容复制到中间缓冲区中(或从中间缓冲区中复制内容)。
- 非直接缓冲区

- 直接缓冲区

缺点:耗费资源
创建直接缓冲区
方法1:调用此类的 allocateDirect() 工厂方法来创建。
特点:此方法返回的缓冲区进行分配和取消分配所需成本通常高于非直接缓冲区。直接缓冲区的内容可以驻留在常规的垃圾回收堆之外,因此,它们对应用程序的内存需求量造成的影响可能并不明显。所以,建议将直接缓冲区主要分配给那些易受基础系统的本机 I/O 操作影响的大型、持久的缓冲区。一般情况下,最好仅在直接缓冲区能在程序性能方面带来明显好处时分配它们。
@Test
public void test1(){
    // 分配直接缓存区
    ByteBuffer byteBuffer = ByteBuffer.allocateDirect(1024);

    // 判断是否是直接缓冲区
    System.out.println("is allocateDirect?   " + byteBuffer.isDirect());
}
- 1
- 2
- 3
- 4
- 5
- 6
- 7
- 8
输出:

方法2:通过 FileChannel 的 map() 方法 将文件区域直接映射到内存中来创建。
特点:该方法返回 MappedByteBuffer 。Java 平台的实现有助于通过 JNI 从本机代码创建直接字节缓冲区。如果以上这些缓冲区中的某个缓冲区实例指的是不可访问的内存区域,则试图访问该区域不会更改该缓冲区的内容,并且将会在访问期间或稍后的某个时间导致抛出不确定的异常。
通道
由 java.nio.channels 包定义的。Channel 表示 IO 源与目标打开的连接。Channel 类似于传统的“流”。只不过 Channel 本身不能直接访问数据,Channel 只能与 Buffer 进行交互。
了解 Java 程序对磁盘数据进行读写的方法演进

早期操作系统 IO 接口由 CPU 独立负责,当发起大量 IO 请求,会导致 CUP 的占用率高。

后来操作系统做了改进,在内存和 IO 接口间,建立了 DMA 总线(直接存储器存储)。当 Java 程序实现 IO 接口发送读写请求时,DMA 会先向 CPU 申请权限,申请成功后,IO 操作将全权由 DMA 负责。当大型的程序申请大量读写请求时,申请了大量的 DMA 总线,会导致总线冲突。

-
了解 Java 程序对磁盘数据进行读写的方法演进
[外链图片转存失败,源站可能有防盗链机制,建议将图片保存下来直接上传(img-dVPiFsWp-1629942684268)(https://s3-us-west-2.amazonaws.com/secure.notion-static.com/c380a871-c25b-44a9-826d-ac551f381e23/Untitled.png)]
早期操作系统 IO 接口由 CPU 独立负责,当发起大量 IO 请求,会导致 CUP 的占用率高。
[外链图片转存失败,源站可能有防盗链机制,建议将图片保存下来直接上传(img-SewZ37cs-1629942684270)(https://s3-us-west-2.amazonaws.com/secure.notion-static.com/980050ba-ecc1-4b74-a93a-c5e6b74d6923/Untitled.png)]
后来操作系统做了改进,在内存和 IO 接口间,建立了 DMA 总线(直接存储器存储)。当 Java 程序实现 IO 接口发送读写请求时,DMA 会先向 CPU 申请权限,申请成功后,IO 操作将全权由 DMA 负责。当大型的程序申请大量读写请求时,申请了大量的 DMA 总线,会导致总线冲突。
[外链图片转存失败,源站可能有防盗链机制,建议将图片保存下来直接上传(img-xzASNd0k-1629942684271)(https://s3-us-west-2.amazonaws.com/secure.notion-static.com/db678d22-17d2-4750-b6a7-2bc524d9a5da/Untitled.png)]
后来操作系统做了改进,使用通道。通道是一个完全独立的处理器,附属于 CPU,专门用来 IO 操作,不需要向 CPU 申请权限。那么当由大量读写请求时,这种方法的效率会高一些,因为 CPU 的利用率高了。
通道用于源节点和目标节点之间的连接,在 Java NIO 中负责缓冲区中数据的传输。Channal 本身不存储数据,因此需要配合缓冲区进行传输。
通道的主要实现类
-
java.nio.channals.Channals 接口:
FileChannal:用于读取、写入、映射和操作文件的通道。
SocketChannal:通过 UDP 读写网络中的数据通道。
ServerSocketChannal:通过 TCP 读写网络中的数据。
DatagramChannal:可以监听新进来的 TCP 连接,对每一个新进来的连接都会创建一个 SocketChannel。
获取通道
方法1:
    获取通道的一种方式是对支持通道的对象调用 getChannel() 方法。支持通道的对象有:

    本地 IO:

    1. FileInputStream / FileOutputStream
    2. RandomAccessFile

    网络 IO:

    1. Socket
    2. ServerSocket
    3. DatagramSocket
- 1
- 2
- 3
- 4
- 5
- 6
- 7
- 8
- 9
- 10
- 11
- 12
方法2:在 JDK 1.7 中的 NIO.2 针对各个通道提供了静态方法:open()
方法3:在 JDK 1.7 中的 NIO.2 的 Files 工具类的 newByteChannal()
代码实现
使用非直接缓冲区(完成文件复制)
    @Test
    public void ChannalTest() {
        FileInputStream fis = null;
        FileOutputStream fos = null;
        FileChannel inChannal = null;
        FileChannel outChannal = null;
        try {
            fis = new FileInputStream("src/1.jpg");
            fos = new FileOutputStream("src/2.jpg");

            // 获取通道
            inChannal = fis.getChannel();
            outChannal = fos.getChannel();

            // 分配指定大小的缓冲区
            ByteBuffer buffer = ByteBuffer.allocate(1024);

            // 将通道中的数据存入缓冲区
            while (inChannal.read(buffer) != -1){
                //  切换读取数据的模式
                buffer.flip();
                // 将缓冲区中的数据写入通道
                outChannal.write(buffer);
                // 清空缓存区
                buffer.clear();
            }
        } catch (IOException e) {
            e.printStackTrace();
        } finally {
            // 关闭通道和流
            if (outChannal != null){
                try {
                    outChannal.close();
                } catch (IOException e) {
                    e.printStackTrace();
                }
            }
            if (inChannal != null){
                try {
                    inChannal.close();
                } catch (IOException e) {
                    e.printStackTrace();
                }
            }
            if (fos != null){
                try {
                    fos.close();
                } catch (IOException e) {
                    e.printStackTrace();
                }
            }
            if (fis != null){
                try {
                    fis.close();
                } catch (IOException e) {
                    e.printStackTrace();
                }
            }
        }
    }
- 1
- 2
- 3
- 4
- 5
- 6
- 7
- 8
- 9
- 10
- 11
- 12
- 13
- 14
- 15
- 16
- 17
- 18
- 19
- 20
- 21
- 22
- 23
- 24
- 25
- 26
- 27
- 28
- 29
- 30
- 31
- 32
- 33
- 34
- 35
- 36
- 37
- 38
- 39
- 40
- 41
- 42
- 43
- 44
- 45
- 46
- 47
- 48
- 49
- 50
- 51
- 52
- 53
- 54
- 55
- 56
- 57
- 58
- 59
- 60
使用直接缓冲区(完成文件复制)
- 创建方式1:
直接字节缓冲区可以通过调用此类的 allocateDirect() 工厂方法来创建。此方法返回的缓冲区进行分配和取消分配所需成本通常高于非直接缓冲区。直接缓冲区的内容可以驻留在常规的垃圾回收堆之外,因此,它们对应用程序的内存需求量造成的影响可能并不明显。所以,建议将直接缓冲区主要分配给那些易受基础系统的本机 I/O 操作影响的大型、持久的缓冲区。一般情况下,最好仅在直接缓冲区能在程序性能方面带来明显好处时分配它们。
- 创建方式2:
也可以通过 FileChannel 的 map() 方法 将文件区域直接映射到内存中来创建。该方法返回 MappedByteBuffer 。Java 平台的实现有助于通过 JNI 从本机代码创建直接字节缓冲区。如果以上这些缓冲区中的某个缓冲区实例指的是不可访问的内存区域,则试图访问该区域不会更改该缓冲区的内容,并且将会在访问期间或稍后的某个时间导致抛出不确定的异常。
@Test
 public void ChannalTest2() throws IOException {
     FileChannel inChannal = FileChannel.open(Paths.get("src/1.jpg"), StandardOpenOption.READ);
     // StandardOpenOption.CREATE_NEW 存在就报错,不存在就创建
     FileChannel outChannal = FileChannel.open(Paths.get("src/2.jpg"), StandardOpenOption.WRITE, StandardOpenOption.READ, StandardOpenOption.CREATE_NEW);

     // 内存映射文件
     MappedByteBuffer inMappedByteBuf = inChannal.map(FileChannel.MapMode.READ_ONLY, 0, inChannal.size());
     MappedByteBuffer outMappedByteBuf = outChannal.map(FileChannel.MapMode.READ_WRITE, 0, inChannal.size());

     // 直接对缓冲区进行数据的读写操作
     byte[] dst = new byte[inMappedByteBuf.limit()];
     inMappedByteBuf.get(dst);   // 从 inMappedByteBuf get 到 dst 中
     outMappedByteBuf.put(dst);  // 从 dst 中 put 到 outMappedByteBuf 去

     // 关闭
     inChannal.close();
     outChannal.close();
 }
- 1
- 2
- 3
- 4
- 5
- 6
- 7
- 8
- 9
- 10
- 11
- 12
- 13
- 14
- 15
- 16
- 17
- 18
- 19
通道间的数据传输
使用的也是直接缓存区,通过 transferFrom / transferTo 来实现。演示文件复制:
@Test
public void ChannalTest3() throws IOException {
    FileChannel inChannal = FileChannel.open(Paths.get("src/1.jpg"), StandardOpenOption.READ);
    FileChannel outChannal = FileChannel.open(Paths.get("src/3.jpg"), StandardOpenOption.WRITE, StandardOpenOption.READ, StandardOpenOption.CREATE_NEW);

    // inChannal.transferTo(0, inChannal.size(), outChannal);
    outChannal.transferFrom(inChannal, 0, inChannal.size());

    inChannal.close();
    outChannal.close();
}
- 1
- 2
- 3
- 4
- 5
- 6
- 7
- 8
- 9
- 10
- 11
分散与聚集
分散读取:将通道中的数据分散到多个缓冲区中。注意是按照缓冲区的顺序,从 Channel 中读取的数据依次将 Buffer 填满。

聚集写入:将多个缓冲区中的数据聚集到通道中。注意是按照缓冲区的顺序,写入 position 和 limit 之间的数据到 Channel 。

@Test
public void ChannalTest4() throws IOException {

    // 分散读取
    RandomAccessFile raf1 = new RandomAccessFile("src/test.txt", "rw");
    FileChannel channel1 = raf1.getChannel();

    ByteBuffer buffer1 = ByteBuffer.allocate(100);
    ByteBuffer buffer2 = ByteBuffer.allocate(200);
    ByteBuffer buffer3 = ByteBuffer.allocate(1024);

    ByteBuffer[] buffers = {buffer1, buffer2, buffer3};
    channel1.read(buffers);

    for (ByteBuffer byteBuffer:
         buffers) {
        byteBuffer.flip();
    }

    System.out.println("buffer1——————————————————————————————————————————");
    System.out.println(new String(buffers[0].array(), 0, buffers[0].limit()));
    System.out.println("buffer2——————————————————————————————————————————");
    System.out.println(new String(buffers[1].array(), 0, buffers[1].limit()));
    System.out.println("buffer3——————————————————————————————————————————");
    System.out.println(new String(buffers[2].array(), 0, buffers[2].limit()));

    // 聚集写入
    RandomAccessFile raf2 = new RandomAccessFile("src/new_test.txt", "rw");
    FileChannel channel2 = raf2.getChannel();

    channel2.write(buffers);

    channel1.close();
    channel2.close();
}
- 1
- 2
- 3
- 4
- 5
- 6
- 7
- 8
- 9
- 10
- 11
- 12
- 13
- 14
- 15
- 16
- 17
- 18
- 19
- 20
- 21
- 22
- 23
- 24
- 25
- 26
- 27
- 28
- 29
- 30
- 31
- 32
- 33
- 34
- 35
输出:

写入内容:

字符集
编码:字符串 ——>字节数组
解码:字节数组 ——>字符串
示例:将“现在加班中!”字符串按照 GBK 的格式编码和解码
@Test
public void Test2() throws CharacterCodingException {

    // 设置字符集
    Charset gbk = Charset.forName("GBK");

    // 获取编码器和解码器
    CharsetEncoder ce = gbk.newEncoder();
    CharsetDecoder cd = gbk.newDecoder();

    CharBuffer cBuf = CharBuffer.allocate(1024);
    cBuf.put("现在加班中!");
    cBuf.flip();

    // 编码
    ByteBuffer bBuf = ce.encode(cBuf);

    for (int i = 0; i < 12; i++) {
        System.out.println(bBuf.get());
    }

    // 解码
    bBuf.flip();
    CharBuffer cBuf2 = cd.decode(bBuf);
    System.out.println(cBuf2);
}
- 1
- 2
- 3
- 4
- 5
- 6
- 7
- 8
- 9
- 10
- 11
- 12
- 13
- 14
- 15
- 16
- 17
- 18
- 19
- 20
- 21
- 22
- 23
- 24
- 25
- 26
输出:

NIO 的非阻塞式网络通信
阻塞和非阻塞
传统 IO
传统的 IO 流都是阻塞式的。也就是说,当一个线程调用 read() 或 write()时,该线程被阻塞,直到有一些数据被读取或写入,该线程在此期间不能执行其他任务。因此,在完成网络通信进行 IO 操作时,由于线程会阻塞,所以服务器端必须为每个客户端都提供一个独立的线程进行处理,当服务器端需要处理大量客户端时,性能急剧下降。

NIO
Java NIO 是非阻塞模式的。当线程从某通道进行读写数据时,若没有数据可用时,该线程可以进行其他任务。线程通常将非阻塞 IO 的空闲时间用于在其他通道上执行 IO 操作,所以单独的线程可以管理多个输入和输出通道。因此,NIO 可以让服务器端使用一个或有限几个线程来同时处理连接到服务器端的所有客户端。

使用 NIO 完成网络通信
三个核心:
1、通道:负责连接
2、缓冲区:负责数据的存储
3、选择器:是非阻塞 IO 的核心,是 SelectableChannle 对象的多路复用器,Selector 可以同时监控多个 SelectableChannel 的 IO 状况,也就是说,利用 Selector 可使一个单独的线程管理多个 Channel 。
-
阻塞式
- 阻塞式 NIO 网络通信示例:
import org.junit.Test; import java.io.IOException; import java.net.InetSocketAddress; import java.nio.ByteBuffer; import java.nio.channels.FileChannel; import java.nio.channels.ServerSocketChannel; import java.nio.channels.SocketChannel; import java.nio.file.Paths; import java.nio.file.StandardOpenOption; public class TestBlockingNIO { // 客户端 @Test public void client() throws IOException { // 获取通道 SocketChannel socketChannel = SocketChannel.open(new InetSocketAddress("127.0.0.1", 9898)); FileChannel inChannel = FileChannel.open(Paths.get("src/test.txt"), StandardOpenOption.READ); // 分配缓冲区 ByteBuffer buffer = ByteBuffer.allocate(1024); // 读取本地文件,发送到服务的 while (inChannel.read(buffer) != -1){ buffer.flip(); socketChannel.write(buffer); buffer.clear(); } // 关闭通道 inChannel.close(); socketChannel.close(); } // 服务端 @Test public void server() throws IOException { // 获取通道 ServerSocketChannel serverSocketChannel = ServerSocketChannel.open(); FileChannel outChannel = FileChannel.open(Paths.get("src/new_test.txt"), StandardOpenOption.WRITE, StandardOpenOption.CREATE); // 绑定端口号 serverSocketChannel.bind(new InetSocketAddress(9898)); // 获取客户端连接的通道 SocketChannel socketChannel = serverSocketChannel.accept(); // 分配指定大小的缓冲区 ByteBuffer buffer = ByteBuffer.allocate(1024); // 接受客户端数据,保存到本地 while(socketChannel.read(buffer) != -1){ buffer.flip(); outChannel.write(buffer); buffer.clear(); } // 关闭通道 socketChannel.close(); serverSocketChannel.close(); outChannel.close(); } }- 1
- 2
- 3
- 4
- 5
- 6
- 7
- 8
- 9
- 10
- 11
- 12
- 13
- 14
- 15
- 16
- 17
- 18
- 19
- 20
- 21
- 22
- 23
- 24
- 25
- 26
- 27
- 28
- 29
- 30
- 31
- 32
- 33
- 34
- 35
- 36
- 37
- 38
- 39
- 40
- 41
- 42
- 43
- 44
- 45
- 46
- 47
- 48
- 49
- 50
- 51
- 52
- 53
- 54
- 55
- 56
- 57
- 58
- 59
- 60
- 61
- 62
- 63
-
非阻塞式
-
选择器 (Selector) 的应用
1、创建 Selector:使用 Selector.open() 方法
2、向选择器注册通道:使用 SelectableChannel.register(Selector sel, int ops) 方法,其中 ops 是指选择器对通道的监听事件,可以使用 SelectionKey 类的四个常量:
读:intOP_READ (1)
写:intOP_WRITE (4)
连接:intOP_CONNECT(8)
接收:intOP_ACCEPT(16)
-
SelectionKey
表示 SelectableChannel 和 Selector 之间的注册关系。每次向选择器注册通道时就会选择一个事件(选择键)。选择键包含两个表示为整数值的操作集。操作集的每一位都表示该键的通道所支持的一类可选择操作。
-
非阻塞式 NIO 示例:
import org.junit.Test; import java.io.IOException; import java.net.InetSocketAddress; import java.nio.ByteBuffer; import java.nio.channels.SelectionKey; import java.nio.channels.Selector; import java.nio.channels.ServerSocketChannel; import java.nio.channels.SocketChannel; import java.util.Date; import java.util.Iterator; import java.util.Scanner; public class TestNonBlockingNIO { // 客户端 @Test public void client() throws IOException { // 获取通道 SocketChannel sChannel = SocketChannel.open(new InetSocketAddress("127.0.0.1", 9898)); // 切换成非阻塞模式 sChannel.configureBlocking(false); // 分配缓存区域 ByteBuffer buf = ByteBuffer.allocate(1024); // 发送数据 Scanner scan = new Scanner(System.in); while (scan.hasNext()){ String str = scan.next(); buf.put((new Date() + ":" + str).getBytes()); buf.flip(); sChannel.write(buf); buf.clear(); } // 关闭通道 sChannel.close(); } // 服务端 @Test public void server() throws IOException { // 获取通道 ServerSocketChannel ssChannel = ServerSocketChannel.open(); // 切换成非阻塞模式 ssChannel.configureBlocking(false); // 绑定端口 ssChannel.bind(new InetSocketAddress(9898)); // 获取选择器 Selector selector = Selector.open(); // 将通道注册到选择器上,并指定事件 ssChannel.register(selector, SelectionKey.OP_ACCEPT); // 轮询式获取选择器上准备就绪的事件 while (selector.select() > 0){ // 获取当前选择器中所有注册的“选择键(已就绪的监听事件)” Iterator<SelectionKey> iterator = selector.selectedKeys().iterator(); while (iterator.hasNext()){ // 获取准备“就绪”的事件 SelectionKey sk = iterator.next(); // 判断具体是什么事件准备就绪 if (sk.isAcceptable()){ // 若“接收就绪”,获取客户端连接 SocketChannel sChannel = ssChannel.accept(); // 切换非阻塞模式 sChannel.configureBlocking(false); // 将该通道注册到选择器上 sChannel.register(selector, SelectionKey.OP_READ); }else if (sk.isReadable()){ // 获取当前选择器上“读就绪”状态的通道 SocketChannel sChannel = (SocketChannel) sk.channel(); // 读取数据 ByteBuffer buf = ByteBuffer.allocate(1024); int len = 0; while((len = sChannel.read(buf)) > 0 ){ buf.flip(); System.out.println(new String(buf.array(), 0, len)); buf.clear(); } } // 取消选择键 iterator.remove(); } } } }- 1
- 2
- 3
- 4
- 5
- 6
- 7
- 8
- 9
- 10
- 11
- 12
- 13
- 14
- 15
- 16
- 17
- 18
- 19
- 20
- 21
- 22
- 23
- 24
- 25
- 26
- 27
- 28
- 29
- 30
- 31
- 32
- 33
- 34
- 35
- 36
- 37
- 38
- 39
- 40
- 41
- 42
- 43
- 44
- 45
- 46
- 47
- 48
- 49
- 50
- 51
- 52
- 53
- 54
- 55
- 56
- 57
- 58
- 59
- 60
- 61
- 62
- 63
- 64
- 65
- 66
- 67
- 68
- 69
- 70
- 71
- 72
- 73
- 74
- 75
- 76
- 77
- 78
- 79
- 80
- 81
- 82
- 83
- 84
- 85
- 86
- 87
- 88
- 89
- 90
- 91
- 92
- 93
- 94
- 95
- 96
- 97
- 98
-

