
热门标签
热门文章
- 1探秘ChatGPT PHP版:一款高效轻巧的AI问答神器
- 22024年PMP证书的含金量有多高?对于企业来说有多大的价值?_pmp好考吗,有多大的价值?
- 3微服务·数据一致-事务与分布式事务_区块链 数据库 并发控制
- 42024年超详细的Python3学习路径规划_python路径规划
- 5基于C6748 DSP+FPGA MIMO雷达验证系统模块化设计与实现_dsp+fpga 雷达主板
- 6【日常记录】【JS】前端预览图片的两种方式,Base64预览和blob预览_js base64格式图片 预览
- 7已解决com.jayway.jsonpath.PathNotFoundException异常的正确解决方法,亲测有效!!!
- 8MAC系统格式化后的U盘在WIN系统上不显示盘符的解决办法_苹果电脑格式化u盘后windows不能用
- 9将知识图谱融合在大模型文章生成上_知识图谱和大模型结合
- 10Retinex算法的C++/opencv实现_c++给定如下所示的低光图像(图3),对齐进行retinex修复,输出得到的反射图。注意:同
当前位置: article > 正文
PVE硬件直通之强制IOMMU分组_pve iommu分组
作者:你好赵伟 | 2024-06-06 06:44:48
赞
踩
pve iommu分组
检查是否直接支持IOMMU分组
下面 以SATA控制器为例,看pci设备是否可以直接支持IOMMU分组
/* 打印pci设备详细信息*/
lspci -vv
/* 找到SATA controller 段落*/
16:00.1 SATA controller: Advanced Micro Devices, Inc. [AMD] Device 43eb (prog-if 01 [AHCI 1.0])
        Subsystem: ASMedia Technology Inc. Device 1062
        Flags: bus master, fast devsel, latency 0, IRQ 34, IOMMU group 8
        Memory at fcf80000 (32-bit, non-prefetchable) [size=128K]
        Expansion ROM at fcf00000 [disabled] [size=512K]
        Capabilities: [50] MSI: Enable+ Count=1/1 Maskable- 64bit+
        Capabilities: [78] Power Management version 3
        Capabilities: [80] Express Legacy Endpoint, MSI 00
        Capabilities: [100] Advanced Error Reporting
        /* 检查是否存在Capabilities: Access Control Services*/
        Capabilities: [2a0] Access Control Services
        Kernel driver in use: vfio-pci
        Kernel modules: ahci

- 1
- 2
- 3
- 4
- 5
- 6
- 7
- 8
- 9
- 10
- 11
- 12
- 13
- 14
- 15
- 16
如果设备信息中支持ACS(Access Control Services),便可直接通过设置开启IOMMU分组。若不支持ACS,需要更新内核,关闭ACS检查,开启IOMMU分组。
由于PCIe设备是支持P2P传输的,这也就意味着同一个PCIe交换开关连接下不同终端可以在不流经RootComplex的情况下互相通信。若使用过程中不希望P2P直接通信又不采取相关措施,则该漏洞很有可能被无意或有意触发,使得某些EP收到无效、非法甚至恶意的访问请求,从而引发一系列潜在问题。ACS协议提供了一种机制,能够决定一个TLP被正常路由、阻塞或重定向。在SR-IOV系统中,还能防止属于VI或者不同SI的设备Function之间直接通信。通过在交换节点上开启ACS服务,可以禁止P2P发送,强迫交换节点将所有地址的访问请求送到RootComplex,从而避开P2P访问中的风险。ACS可以应用于PCIe桥、交换节点以及带有VF的PF等所有具有调度功能的节点,充当一个看门人的角色。
配置IOMMU分组
编辑/etc/modules文件,将如下模块加入文件中
vi /etc/modules

# /etc/modules: kernel modules to load at boot time.
#
# This file contains the names of kernel modules that should be loaded
# at boot time, one per line. Lines beginning with "#" are ignored.
vfio
vfio_iommu_type1
vfio_pci
vfio_virqfd
- 1
- 2
- 3
- 4
- 5
- 6
- 7
- 8
- 9
- 10
编辑/etc/default/grub文件,修改内容详见注释
vi /etc/default/grub

# If you change this file, run 'update-grub' afterwards to update
# /boot/grub/grub.cfg.
# For full documentation of the options in this file, see:
#   info -f grub -n 'Simple configuration'

GRUB_DEFAULT=0
GRUB_TIMEOUT=5
GRUB_DISTRIBUTOR=`lsb_release -i -s 2> /dev/null || echo Debian`
# 在原始GRUB_CMDLINE_LINUX_DEFAULT后加入amd_iommu=on pcie_acs_override=downstream,multifunction
# 若是intel的cpu则将amd_iommu改为intel_iommu即可
# GRUB_CMDLINE_LINUX_DEFAULT="quiet"
GRUB_CMDLINE_LINUX_DEFAULT="quiet amd_iommu=on pcie_acs_override=downstream,multifunction"
GRUB_CMDLINE_LINUX=""
GRUB_DISABLE_OS_PROBER=false
# Uncomment to enable BadRAM filtering, modify to suit your needs
# This works with Linux (no patch required) and with any kernel that obtains
# the memory map information from GRUB (GNU Mach, kernel of FreeBSD ...)
#GRUB_BADRAM="0x01234567,0xfefefefe,0x89abcdef,0xefefefef"

# Uncomment to disable graphical terminal (grub-pc only)
#GRUB_TERMINAL=console

# The resolution used on graphical terminal
# note that you can use only modes which your graphic card supports via VBE
# you can see them in real GRUB with the command `vbeinfo'
#GRUB_GFXMODE=640x480

# Uncomment if you don't want GRUB to pass "root=UUID=xxx" parameter to Linux
#GRUB_DISABLE_LINUX_UUID=true

# Uncomment to disable generation of recovery mode menu entries
#GRUB_DISABLE_RECOVERY="true"

# Uncomment to get a beep at grub start
#GRUB_INIT_TUNE="480 440 1"
- 1
- 2
- 3
- 4
- 5
- 6
- 7
- 8
- 9
- 10
- 11
- 12
- 13
- 14
- 15
- 16
- 17
- 18
- 19
- 20
- 21
- 22
- 23
- 24
- 25
- 26
- 27
- 28
- 29
- 30
- 31
- 32
- 33
- 34
- 35
- 36
- 37
更新grub引导和ramfs
# 更新grub引导
update-grub
# 更新ramfs
update-initramfs -u -k all
- 1
- 2
- 3
- 4
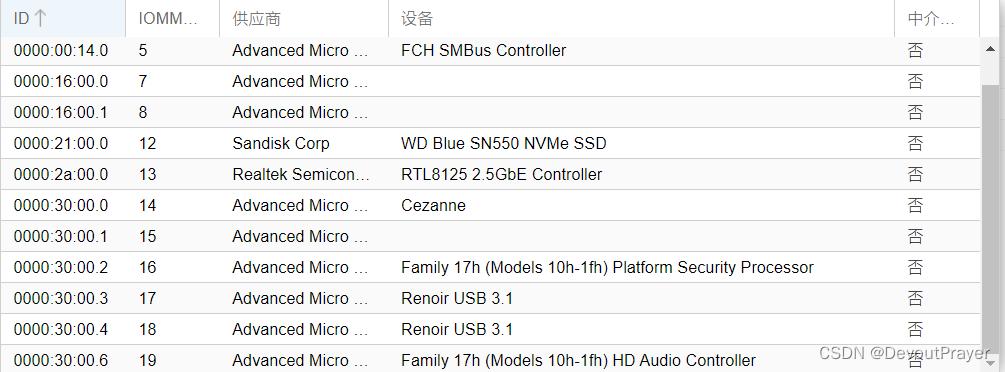
如若正常,所有设备均有独立IOMMU Group 编号
不直接支持的需要更新内核
提供自己编译好的pve-kernel 6.1.6 百度云链接
将上述文件复制到pve中,执行如下命令更新内核,重启即可。
# 更新内核
dpkg -i *.deb
- 1
- 2
参考
声明:本文内容由网友自发贡献,不代表【wpsshop博客】立场,版权归原作者所有,本站不承担相应法律责任。如您发现有侵权的内容,请联系我们。转载请注明出处:https://www.wpsshop.cn/w/你好赵伟/article/detail/679940
推荐阅读
相关标签

