
热门标签
热门文章
- 1mysql utf8mb4_0900_ai_ci_mysql utf8mb4_0900_ai_ci 转utf8mb4_general_ci
- 2[车联网安全自学篇] Android安全之剪贴板+键盘缓存+UI界面+自动截屏敏感信息挖掘_android系统定义剪切板权限
- 3键盘键值对照表_按键f11对应350
- 4人工智能大语言模型微调技术:SFT 监督微调、LoRA 微调方法、P-tuning v2 微调方法、Freeze 监督微调方法_最新微调算法
- 5浏览器兼容_edge浏览器兼容性问题,错误代码:STATUS_
- 6ad绘制PCB入门及快捷键_ad16快捷键怎么设置
- 7【MacOS】下载安装Android Studio、JDK、SDK以及环境变量配置2024年教程
- 8远程入侵原装乘用车(中)
- 9(微信开发)PHP curl模拟登陆教务系统查询成绩查询课表实现微信查成绩差课表功能_qsbiplrswq
- 10容器式jekins+docker打包发布部署项目_jks 发布docker
当前位置: article > 正文
从前慢-微信小程序
作者:小丑西瓜9 | 2024-03-20 16:24:59
赞
踩
从前慢-微信小程序
微信小程序

1 微信小程序介绍

微信⼩程序,简称⼩程序,英⽂名 Mini Program ,是⼀种不
需要下载安装即可使⽤的应⽤,它实现
了应⽤“触⼿可及”的梦想,⽤⼾扫⼀扫或搜⼀下即可打开应⽤
- 1
- 2
- 3
1.1.1 为什么是微信小程序
1 微信有海量⽤⼾,⽽且粘性很⾼,在微信⾥开发产品更容
易触达⽤⼾;
2  推⼴app 或公众号的成本太⾼。
3 开发适配成本低。
4 容易⼩规模试错,然后快速迭代。
5 跨平台。
- 1
- 2
- 3
- 4
- 5
- 6
1.1.2 微信⼩程序历史
2016年1⽉11⽇,微信之⽗张⼩⻰时隔多年的公开亮相,解读
了微信的四⼤价值观。张⼩⻰指出,越来越多产品通过公众
号来做,因为这⾥开发、获取⽤⼾和传播成本更低。拆分出
来的服务号并没有提供更好的服务,所以微信内部正在研究新
的形态,叫「微信⼩程序」 需要注意的是,之前是叫做 应⽤号
2016年9⽉21⽇,微信⼩程序正式开启内测。在微信⽣态下,
触⼿可及、⽤完即⾛的微信⼩程序引起⼴泛关注。腾讯云正式
上线微信⼩程序解决⽅案,提供⼩程序在云端服务器的技术⽅案。
2017年1⽉9⽇,微信推出的“⼩程序”正式上线。“⼩程序”是
⼀种⽆需安装,即可使⽤的⼿机“应⽤”。不需要像往常⼀样
下载App,⽤户在微信中“⽤完即⾛”。
- 1
- 2
- 3
- 4
- 5
- 6
- 7
- 8
- 9
- 10
- 11
1.1.3 疯狂的微信小程序
1 微信⽉活已经达到10.82亿。其中55岁以上的⽤⼾
也达到6300万
2 信息传达数达到450亿,较去年增⻓18%;视频通话4
.1亿次,增⻓100%
3 ⼩程序覆盖超过200+⾏业,交易额增⻓超过6倍,服
务1000亿+⼈次,创造出了5000亿+的商业价值
- 1
- 2
- 3
- 4
- 5
- 6
1.1.4 还有其他的小程序不容忽视
1 ⽀付宝⼩程序
2 百度⼩程序
3 QQ⼩程序
4 今⽇头条 + 抖⾳⼩程序
- 1
- 2
- 3
- 4
2 环境准备
注册账号
建议使用全新的邮箱,没有注册过其他小程序或者公
众号的。
访问注册⻚⾯(https://mp.weixin.qq.com/wxopen/waregister?action=step1),
耐⼼完成注册即可。


获取APPID
由于后期调⽤微信⼩程序的接⼝等功能,需要索取开发
者的⼩程序中的 APPID ,所以在注册成功后,可登录,
然后获取APPID。

登录(https://mp.weixin.qq.com/),成功后可看到如下界⾯
然后复制你的APPID,悄悄的保存起来,不要给别⼈看到。
- 1
- 2
- 3
- 4
- 5
- 6
- 7
- 8
- 9
- 10
- 11
- 12
- 13
- 14


2.1 开发⼯具
下载地址
https://developers.weixin.qq.com/miniprogram/dev/devtools/download.html
- 1
- 2

微信⼩程序⾃带开发者⼯具,集 开发 预览 调试 发布 于⼀
⾝的 完整环境。
但是由于编码的体验不算好,因此 建议使⽤ vs code + 微
信小程序编辑工具 来实现编码
vs code 负责敲代码, 微信编辑工具 负责预览
- 1
- 2
- 3
- 4
- 5
3 第⼀个微信⼩程序
注意 第⼀次登录的时候 需要扫码登录
- 1

新建⼩程序项⽬
- 1

填写项⽬信息
- 1

成功
- 1

4 微信开发者工具介绍
详细的使⽤,可以查看官⽹
https://developers.weixin.qq.com/miniprogram/dev/devtools/devtools.html
- 1
- 2

5 小程序结构目录
⼩程序框架的⽬标是通过尽可能简单、⾼效的⽅式让开发者可
以在微信中开发具有原⽣APP体验的服务。
⼩程序框架提供了⾃⼰的视图层描述语⾔ WXML 和 WXSS ,
以及 JavaScript ,并在视图层与逻
辑层间提供了数据传输和事件系统,让开发者能够专注于
数据与逻辑。
- 1
- 2
- 3
- 4
- 5
- 6
5.1 小程序⽂件结构和传统web对比
| 结构 | 传统web | 微信⼩程序 |
|---|---|---|
| 结构 | HTML | WXML |
| 样式 | CSS | WXSS |
| 逻辑 | Javascript | Javascript |
| 配置 | ⽆ | JSON |
通过以上对⽐得出,传统web 是三层结构。⽽微信⼩程序 是四层结构,多了⼀层 配置.json
- 1
5.2. 基本的项目目录

6 小程序配置文件
个⼩程序应⽤程序会包括最基本的两种配置⽂件。⼀种是全局
的 app.json 和 ⻚⾯⾃⼰的page.json
注意:配置文件中不能出现注释
- 1
- 2
- 3
6.1 全局配置app.json
app.json 是当前⼩程序的全局配置,包括了⼩程序的所有
⻚⾯路径、界⾯表现、⽹络超时时间、底部 tab 等。普通快
速启动项⽬⾥边的 app.json 配置
- 1
- 2
- 3

字段的含义
1 pages 字段⸺⽤于描述当前⼩程序所有⻚⾯路径,这是为
了让微信客⼾端知道当前你的⼩程序
⻚⾯定义在哪个⽬录。
2 window 字段⸺定义⼩程序所有⻚⾯的顶部背景颜⾊,⽂
字颜⾊定义等。
3 完整的配置信息请参考 app.json配置(https://developers.weixin.qq.com/miniprogram/dev/reference/configuration/app.html)
- 1
- 2
- 3
- 4
- 5
- 6
- 7
6.1.1 tabbar

6.1.2 页面配置page.json
这⾥的 page.json 其实⽤来表⽰⻚⾯⽬录下的 page.json 这类和
⼩程序⻚⾯相关的配置。
开发者可以独⽴定义每个⻚⾯的⼀些属性,如顶部颜⾊、是否允
许下拉刷新等等。
⻚⾯的配置只能设置 app.json 中部分 window 配置项的内容,⻚
⾯中配置项会覆盖 app.json
的 window 中相同的配置项
- 1
- 2
- 3
- 4
- 5
- 6
- 7

6.1.3 sitemap 配置-了解即可
⼩程序根⽬录下的 sitemap.json ⽂件⽤于配置⼩程序
及其⻚⾯是否允许被微信索引。
- 1
- 2
7 模板语法
WXML(WeiXin Markup Language)是框架设计的
⼀套标签语⾔,结合基础组件、事件系统,可以构
建出⻚⾯的结构。
- 1
- 2
- 3
7.1 模板语法
7.1.1 普通写法
<view> {{ message }} </view>

Page({
  data: {
    message: 'Hello MINA!'
 }
})
- 1
- 2
- 3
- 4
- 5
- 6
- 7
7.1.2 组件属性
<view id="item-{{id}}"> </view>

Page({
  data: {
    id: 0
 }
})
- 1
- 2
- 3
- 4
- 5
- 6
- 7
7.1.3 bool类型
不要直接写 checked=false,其计算结果是⼀个字符串
<checkbox checked="{{false}}"> </checkbox>
- 1
- 2
7.2 运算
7.2.1 三元运算
<view hidden="{{flag ? true : false}}"> Hidden </view>
- 1
7.2.2 算数运算
<view> {{a + b}} + {{c}} + d </view>

Page({
  data: {
    a: 1,
    b: 2,
    c: 3
 }
})
- 1
- 2
- 3
- 4
- 5
- 6
- 7
- 8
- 9
7.2.3 逻辑判断
<view wx:if="{{length > 5}}"> </view>
- 1
7.2.4 字符串运算
<view>{{"hello" + name}}</view>

Page({
  data:{
    name: 'MINA'
 }
})
- 1
- 2
- 3
- 4
- 5
- 6
- 7
7.2.5 注意
花括号和引号之间如果有空格,将最终被解析成为字符串
- 1
7.3 列表渲染
7.3.1 wx:for
项的变量名默认为 item wx:for--item 可以指定数
组当前元素的变量名
下标变量名默认为 index wx:for--index 可以指定数
组当前下标的变量名
wx:key ⽤来提⾼数组渲染的性能
wx:key 绑定的值 有如下选择
1 string 类型,表⽰ 循环项中的唯⼀属性 如
list:[{id:0,name:"炒饭"},{id:1,name:"炒面"}]
wx:key="id"

2 保留字 *this ,它的意思是 item 本⾝ ,*this 代表的必须是
 唯⼀的字符串和数组。
list:[1,2,3,4,5]
wx:key="*this"

代码:
<view wx:for="{{array}}" wx:key="id">
 {{index}}: {{item.message}}
</view>

Page({
  data: {
    array: [{
      id:0,
      message: 'foo',
   }, {
      id:1,
      message: 'bar'
   }]
 }
})

- 1
- 2
- 3
- 4
- 5
- 6
- 7
- 8
- 9
- 10
- 11
- 12
- 13
- 14
- 15
- 16
- 17
- 18
- 19
- 20
- 21
- 22
- 23
- 24
- 25
- 26
- 27
- 28
- 29
- 30
- 31
7.3.2 block
渲染⼀个包含多节点的结构块 block最终不会变成真正的dom元素
<block wx:for="{{[1, 2, 3]}}" wx:key="*this" >
  <view> {{index}}: </view>
  <view> {{item}} </view>
</block>
- 1
- 2
- 3
- 4
- 5
7.4 条件渲染
7.4.1 wx:if
在框架中,使⽤ wx:if="{{condition}}" 来判断是否需要
渲染该代码块:

<view wx:if="{{false}}">1</view>
<view wx:elif="{{true}}">2</view>
<view wx:else>3</view>
- 1
- 2
- 3
- 4
- 5
- 6
7.4.2 hidden
<view hidden="{{condition}}"> True </view>

类似 wx:if
频繁切换 ⽤ hidden
不常使⽤ ⽤ wx:if
- 1
- 2
- 3
- 4
- 5
7.4.3 代码演示
//Page Object
Page({
  data: {
    msg: "hello mina",
    num: 10000,
    isGirl: false,
    person: {
      age: 74,
      height: 145,
      weight: 200,
      name: "富婆"
    },
    isChecked:false,
    list:[
      {
        id:0,
        name:"猪八戒"
      },
      {
        id:1,
        name:"天蓬元帅"
      },
      {
        id:2,
        name:"悟能"
      }
    ]
  }
});
- 1
- 2
- 3
- 4
- 5
- 6
- 7
- 8
- 9
- 10
- 11
- 12
- 13
- 14
- 15
- 16
- 17
- 18
- 19
- 20
- 21
- 22
- 23
- 24
- 25
- 26
- 27
- 28
- 29
- 30
<!--
  1 text 相当于以前web中的 span标签 行内元素  不会换行
  2 view 相当于以前web中的 div标签 块级元素  会换行
  3 checkbox 以前的复选框标签
 -->
<!-- <text>1</text>
<text>2</text>
<view>1</view>
<view>2</view> -->

<!-- 1 字符串 -->
<view> {{msg}} </view>
<!-- 2 数字类型 -->
<view>{{num}}</view>
<!-- 3 bool类型  -->
<view> 是否是伪娘: {{isGirl}} </view>
<!-- 4 object类型 -->
<view>{{person.age}}</view>
<view>{{person.height}}</view>
<view>{{person.weight}}</view>
<view>{{person.name}}</view>

<!-- 5 在标签的属性中使用 -->
<view data-num="{{num}}"> 自定义属性</view>

<!--
  6 使用bool类型充当属性 checked
    1 字符串和 花括号之间一定不要存在空格 否则会导致识别失败
      以下写法就是错误的示范
         <checkbox checked="       {{isChecked}}"> </checkbox>

 -->
<view>
  <checkbox checked="{{isChecked}}"> </checkbox>
</view>


<!--
  7 运算 => 表达式
    1 可以在花括号中 加入 表达式 --  “语句”
    2 表达式
      指的是一些简单 运算 数字运算 字符串 拼接  逻辑运算。。
      1 数字的加减。。
      2 字符串拼接
      3 三元表达式
    3 语句
      1 复杂的代码段
        1 if else
        2 switch
        3 do while 。。。。
        4 for 。。。
 -->
<view>{{1+1}}</view>

<view>{{'1'+'1'}}</view>

<view>{{ 11%2===0 ? '偶数' : '奇数' }}</view>


<!--
  8 列表循环
    1 wx:for="{{数组或者对象}}"  wx:for-item="循环项的名称"  wx:for-index="循环项的索引"
    2 wx:key="唯一的值" 用来提高列表渲染的性能
      1 wx:key 绑定一个普通的字符串的时候 那么这个字符串名称 肯定是 循环数组 中的 对象的 唯一属性
      2 wx:key ="*this"  就表示 你的数组 是一个普通的数组  *this 表示是 循环项
        [1,2,3,44,5]
        ["1","222","adfdf"]
    3 当出现 数组的嵌套循环的时候 尤其要注意  以下绑定的名称 不要重名
        wx:for-item="item" wx:for-index="index"
    4 默认情况下 我们 不写
       wx:for-item="item" wx:for-index="index"
       小程序也会把 循环项的名称 和 索引的名称 item 和 index
       只有一层循环的话 (wx:for-item="item" wx:for-index="index") 可以省略

  9 对象循环
    1 wx:for="{{对象}}" wx:for-item="对象的值"  wx:for-index="对象的属性"
    2 循环对象的时候 最好把 item和index的名称都修改一下
      wx:for-item="value"  wx:for-index="key"

 -->
 <view>
   <view
  wx:for="{{list}}"
  wx:for-item="item"
  wx:for-index="index"
  wx:key="id"
   >
     索引:{{index}}
     --
     值:{{item.name}}
   </view>
 </view>

 <view>
   <view>对象循环</view>
   <view
  wx:for="{{person}}"
  wx:for-item="value"
  wx:for-index="key"
  wx:key="age"
  >
     属性:{{key}}
     --
     值:{{value}}
   </view>
 </view>

 <!--
   10 block
    1 占位符的标签
    2 写代码的时候 可以看到这标签存在
    3 页面渲染 小程序会把它移除掉
  -->

  <view>
    <block
   wx:for="{{list}}"
   wx:for-item="item"
   wx:for-index="index"
   wx:key="id"
   class="my_list"
    >
      索引:{{index}}
      --
      值:{{item.name}}
    </block>
  </view>


  <!--
    11 条件渲染
      1 wx:if="{{true/false}}"
        1 if , else , if else
        wx:if
        wx:elif
        wx:else
      2 hidden
        1 在标签上直接加入属性 hidden
        2 hidden="{{true}}"

      3 什么场景下用哪个
        1 当标签不是频繁的切换显示 优先使用 wx:if
          直接把标签从 页面结构给移除掉
        2 当标签频繁的切换显示的时候 优先使用 hidden
          通过添加样式的方式来切换显示
          hidden 属性 不要和 样式 display一起使用
   -->

   <view>
     <view>条件渲染</view>
     <view wx:if="{{true}}">显示</view>
     <view wx:if="{{false}}">隐藏</view>

     <view wx:if="{{flase}}">1</view>
     <view wx:elif="{{flase}}">2 </view>
     <view wx:else> 3 </view>

     <view>---------------</view>
     <view hidden >hidden1</view>
     <view hidden="{{false}}" >hidden2</view>

     <view>-----000-------</view>
     <view wx:if="{{false}}">wx:if</view>
     <view hidden  style="display: flex;" >hidden</view>
   </view>
- 1
- 2
- 3
- 4
- 5
- 6
- 7
- 8
- 9
- 10
- 11
- 12
- 13
- 14
- 15
- 16
- 17
- 18
- 19
- 20
- 21
- 22
- 23
- 24
- 25
- 26
- 27
- 28
- 29
- 30
- 31
- 32
- 33
- 34
- 35
- 36
- 37
- 38
- 39
- 40
- 41
- 42
- 43
- 44
- 45
- 46
- 47
- 48
- 49
- 50
- 51
- 52
- 53
- 54
- 55
- 56
- 57
- 58
- 59
- 60
- 61
- 62
- 63
- 64
- 65
- 66
- 67
- 68
- 69
- 70
- 71
- 72
- 73
- 74
- 75
- 76
- 77
- 78
- 79
- 80
- 81
- 82
- 83
- 84
- 85
- 86
- 87
- 88
- 89
- 90
- 91
- 92
- 93
- 94
- 95
- 96
- 97
- 98
- 99
- 100
- 101
- 102
- 103
- 104
- 105
- 106
- 107
- 108
- 109
- 110
- 111
- 112
- 113
- 114
- 115
- 116
- 117
- 118
- 119
- 120
- 121
- 122
- 123
- 124
- 125
- 126
- 127
- 128
- 129
- 130
- 131
- 132
- 133
- 134
- 135
- 136
- 137
- 138
- 139
- 140
- 141
- 142
- 143
- 144
- 145
- 146
- 147
- 148
- 149
- 150
- 151
- 152
- 153
- 154
- 155
- 156
- 157
- 158
- 159
- 160
- 161
- 162
- 163
- 164
- 165
- 166
- 167
8 小程序事件的绑定
⼩程序中绑定事件,通过bind关键字来实现。
如 bindtap bindinput bindchange 等
不同的组件⽀持不同的事件,具体看组件的说明即可。
- 1
- 2
- 3
8.1 wxml
<input bindinput="handleInput" />
- 1
8.2 page
Page({
  // 绑定的事件
  handleInput: function(e) {
    console.log(e);
    console.log("值被改变了");
 }
})
- 1
- 2
- 3
- 4
- 5
- 6
- 7
8.3 特别注意
1 绑定事件时不能带参数 不能带括号 以下为错误写法
<input bindinput="handleInput(100)" />

2 事件传值 通过标签⾃定义属性的⽅式 和 value
<input bindinput="handleInput" data-item="100" />

3 事件触发时获取数据
 handleInput: function(e) {
   // {item:100}
  console.log(e.currentTarget.dataset)

   // 输入框的值
  console.log(e.detail.value);
}
- 1
- 2
- 3
- 4
- 5
- 6
- 7
- 8
- 9
- 10
- 11
- 12
- 13
- 14
8.4 代码演示
// pages/demo04/demo04.js
Page({
  data: {
    num: 0
  },
  // 输入框的input事件的执行逻辑
  handleInput(e) {
    // console.log(e.detail.value );
    this.setData({
      num: e.detail.value
    })
  },
  // 加 减 按钮的事件
  handletap(e) {
    // console.log(e);
    // 1 获取自定义属性 operation
    const operation = e.currentTarget.dataset.operation;
    this.setData({
      num: this.data.num + operation
    })
  }
})
- 1
- 2
- 3
- 4
- 5
- 6
- 7
- 8
- 9
- 10
- 11
- 12
- 13
- 14
- 15
- 16
- 17
- 18
- 19
- 20
- 21
- 22
<!--
  1 需要给input标签绑定 input事件
    绑定关键字 bindinput
  2 如何获取 输入框的值
    通过事件源对象来获取
    e.detail.value
  3 把输入框的值 赋值到 data当中
    不能直接
      1 this.data.num=e.detail.value
      2 this.num=e.detail.value
    正确的写法
      this.setData({
        num:e.detail.value
      })
  4 需要加入一个点击事件
      1 bindtap
      2 无法在小程序当中的 事件中 直接传参
      3 通过自定义属性的方式来传递参数
      4 事件源中获取 自定义属性
 -->
<input type="text" bindinput="handleInput" />
<button bindtap="handletap" data-operation="{{1}}" >+</button>
<button bindtap="handletap" data-operation="{{-1}}">-</button>
<view>
  {{num}}
</view>
- 1
- 2
- 3
- 4
- 5
- 6
- 7
- 8
- 9
- 10
- 11
- 12
- 13
- 14
- 15
- 16
- 17
- 18
- 19
- 20
- 21
- 22
- 23
- 24
- 25
- 26
9 样式WXSS
WXSS( WeiXin Style Sheets )是⼀套样式语⾔,⽤于
描述 WXML 的组件样式。
与 CSS 相⽐,WXSS 扩展的特性有:
响应式⻓度单位 rpx
样式导⼊
- 1
- 2
- 3
- 4
- 5
9.1 尺寸单位
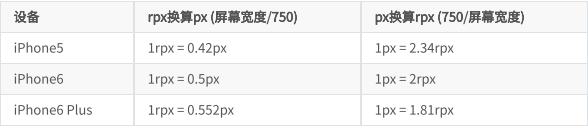
rpx(responsive pixel):可以根据屏幕宽度进⾏⾃适应。规定屏
幕宽为 750rpx 。如在iPhone6 上,屏幕宽度为 375px ,共有
750个物理像素,则 750rpx = 375px = 750物理像素 ,
1rpx = 0.5px = 1物理像素 。
- 1
- 2
- 3
- 4
建议: 开发微信⼩程序时设计师可以⽤ iPhone6 作为视
觉稿的标准。
使⽤步骤:
1 确定设计稿宽度 pageWidth
2 计算⽐例 750rpx = pageWidth px ,
因此 1px=750rpx/pageWidth 。
3 在less⽂件中,只要把设计稿
中的 px => 750/pageWidth rpx 即可。
- 1
- 2
- 3
- 4
- 5
- 6
- 7
- 8
/*
1 小程序中 不需要主动来引入样式文件
2 需要把页面中某些元素的单位 由 px 改成 rpx
  1 设计稿 750x
    750 px = 750 rpx
    1 px = 1 rpx
  2 把屏幕宽度 改成 375px
    375 px = 750 rpx
    1 px = 2rpx
    1rpx = 0.5px
3 存在一个设计稿 宽度 414 或者 未知 page
  1 设计稿 page 存在一个元素 宽度 100px
  2 拿以上的需求 去实现 不同宽度的页面适配

  page px = 750 rpx
  1 px = 750 rpx / page
  100 px = 750 rpx * 100 / page
  假设  page =  375px
4 利用 一个属性 calc属性  css 和 wxss 都支持 一个属性
  1 750 和 rpx 中间不要留空格
  2 运算符的两边也不要留空格
 */

 view{
   /* width: 200rpx; */
   height: 200rpx;
   font-size: 40rpx;
   background-color: aqua;
  /* 以下代码写法是错误  */
  /*  width:750 rpx * 100 / 375 ;  */
  width:calc(750rpx * 100 / 375);
 }
- 1
- 2
- 3
- 4
- 5
- 6
- 7
- 8
- 9
- 10
- 11
- 12
- 13
- 14
- 15
- 16
- 17
- 18
- 19
- 20
- 21
- 22
- 23
- 24
- 25
- 26
- 27
- 28
- 29
- 30
- 31
- 32
- 33
9.2 样式导⼊
wxss中直接就⽀持,样式导⼊功能。
也可以和 less中的导⼊混⽤。
使⽤ @import 语句可以导⼊外联样式表,只⽀持相对路径。
- 1
- 2
- 3
⽰例代码:
/** common.wxss **/
.small-p {
  padding:5px;
}

/** app.wxss **/
@import "common.wxss";
.middle-p {
  padding:15px;
}
- 1
- 2
- 3
- 4
- 5
- 6
- 7
- 8
- 9
- 10
- 11
9.3 选择器
特别需要注意的是 ⼩程序 不⽀持通配符 * 因此以下代码⽆效!
*{
    margin:0;
    padding:0;
    box-sizing:border-box;
}
- 1
- 2
- 3
- 4
- 5
- 6
⽬前⽀持的选择器有:
- 1

9.4 小程序中使用less
原⽣⼩程序不⽀持 less ,其他基于⼩程序的框架⼤体都
⽀持,如 wepy , mpvue , taro 等。
但是仅仅因为⼀个less功能,⽽去引⼊⼀个框架,肯定
是不可取的。因此可以⽤以下⽅式来实现
1 编辑器是 vscode
2 安装插件 easy less
- 1
- 2
- 3
- 4
- 5
- 6
3 在vs code的设置中加⼊如下,配置
"less.compile": {
     "outExt":       ".wxss"
}

4 在要编写样式的地⽅,新建 less ⽂件,如 index.less ,然后
正常编辑即可。
- 1
- 2
- 3
- 4
- 5
- 6
- 7
/* 1 定义less变量 */
@color:yellow;
text{
  /* 2 使用变量 */
  color:@color;
}

view{
  .vie1{
    text{
      color: red;
    }
  }
}

/* 导入 */
@import "../../styles/reset.less";
view{
  color: @themeColor;
}
.main{
  /*
  1 less中 支持 两种注释  多行  单行
  2 wxss 不能写 单行注释 因为 写了 和没写是一样!!!
   */
  /* font-size: 200px; */
  // font-size: 400px;
}


编译后生成以下内容
/* 1 定义less变量 */
text {
  /* 2 使用变量 */
  color: yellow;
}
view .vie1 text {
  color: red;
}
/* 导入 */
view {
  color: green;
}
.main {
  /*
  1 less中 支持 两种注释  多行  单行
  2 wxss 不能写 单行注释 因为 写了 和没写是一样!!!
   */
  /* font-size: 200px; */
}
- 1
- 2
- 3
- 4
- 5
- 6
- 7
- 8
- 9
- 10
- 11
- 12
- 13
- 14
- 15
- 16
- 17
- 18
- 19
- 20
- 21
- 22
- 23
- 24
- 25
- 26
- 27
- 28
- 29
- 30
- 31
- 32
- 33
- 34
- 35
- 36
- 37
- 38
- 39
- 40
- 41
- 42
- 43
- 44
- 45
- 46
- 47
- 48
- 49
- 50
- 51
10 常见组件
重点讲解⼩程序中常⽤的布局组件
view,text,rich--text,button,image,navigator,icon,swiper,radio,checkbox。等
- 1
- 2
10.1 view
代替 原来的 div 标签
<view hover-class="h-class">
点击我试试
</view>
- 1
- 2
- 3
- 4
10.2 text
1 ⽂本标签
2 只能嵌套text
3 ⻓按⽂字可以复制(只有该标签有这个功能)
4 可以对空格 回⻋ 进⾏编码
- 1
- 2
- 3
- 4

<text selectable="{{false}}" decode="{{false}}">
普 通
</text>
- 1
- 2
- 3
10.3 image
1 图⽚标签,image组件默认宽度320px、⾼度240px
2 ⽀持懒加载
- 1
- 2
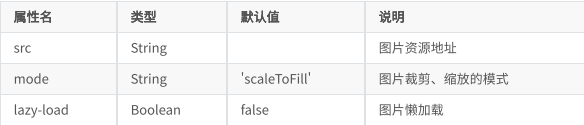
mode 有效值:
mode 有13种模式,其中4种是缩放模式,9种是裁剪模式。
- 1
- 2

image{
  box-sizing: border-box;
  border: 1px solid red;

  width: 300px;
  height: 200px;
}
- 1
- 2
- 3
- 4
- 5
- 6
- 7
<!--
  image 图片标签
  1 src 指定要加载的图片的路径
    图片存在默认的宽度和高度 320 * 240      原图大小是 200 * 100
  2 mode 决定 图片内容 如何 和 图片标签 宽高 做适配
    1 scaleToFill 默认值 不保持纵横比缩放图片,使图片的宽高完全拉伸至填满 image 元素
    2 aspectFit 保持宽高比 确保图片的长边 显示出来   页面轮播图 常用
    3 aspectFill 保持纵横比缩放图片,只保证图片的 短 边能完全显示出来。  少用
    4 widthFix 以前web的图片的 宽度指定了之后 高度 会自己按比例来调整   常用
    5 bottom。。 类似以前的backgroud-position
  3 小程序当中的图片 直接就支持 懒加载  lazy-load
    1 lazy-load 会自己判断 当 图片 出现在 视口  上下 三屏的高度 之内的时候  自己开始加载图片
 -->
 <image mode="bottom" lazy-load src="https://tva2.sinaimg.cn/large/007DFXDhgy1g51jlzfb4lj305k02s0sp.jpg" />
- 1
- 2
- 3
- 4
- 5
- 6
- 7
- 8
- 9
- 10
- 11
- 12
- 13
- 14
- 15
- 16
10.4 swiper
微信内置轮播图组件
- 1

默认宽度 100% ⾼度 150px
- 1

10.4.1 swiper
滑块视图容器。
- 1
10.4.2 swiper-item
滑块
默认宽度和⾼度都是100%
- 1
- 2
/* pages/demo10/demo10.wxss */
swiper {
  width: 100%;
  /* height: calc(100vw * 352 /  1125); */
  height: 31.28vw;
}
image {
  width: 100%;
}
- 1
- 2
- 3
- 4
- 5
- 6
- 7
- 8
- 9
- 10
<!--
  1 轮播图外层容器 swiper
  2 每一个轮播项 swiper-item
  3 swiper标签 存在默认样式
    1 width 100%
    2 height 150px    image 存在默认宽度和高度 320 * 240
    3 swiper 高度 无法实现由内容撑开
  4 先找出来 原图的宽度和高度 等比例 给swiper 定 宽度和高度
    原图的宽度和高度  1125 * 352 px
    swiper 宽度 / swiper  高度 =  原图的宽度  /  原图的高度
    swiper  高度  =  swiper 宽度 *  原图的高度 / 原图的宽度
    height: 100vw * 352 /  1125
  5 autoplay 自动轮播
  6 interval 修改轮播时间
  7 circular 衔接轮播
  8 indicator-dots 显示 指示器 分页器 索引器
  9 indicator-color 指示器的未选择的颜色
  10 indicator-active-color 选中的时候的指示器的颜色
 -->
<swiper autoplay interval="1000" circular indicator-dots indicator-color="#0094ff" indicator-active-color="#ff0094">
    <swiper-item> <image mode="widthFix" src="//gw.alicdn.com/imgextra/i1/44/O1CN013zKZP11CCByG5bAeF_!!44-0-lubanu.jpg" /> </swiper-item>
    <swiper-item> <image mode="widthFix" src="//aecpm.alicdn.com/simba/img/TB1CWf9KpXXXXbuXpXXSutbFXXX.jpg_q50.jpg" /> </swiper-item>
    <swiper-item> <image mode="widthFix" src="//gw.alicdn.com/imgextra/i2/37/O1CN01syHZxs1C8zCFJj97b_!!37-0-lubanu.jpg" /> </swiper-item>
</swiper>
- 1
- 2
- 3
- 4
- 5
- 6
- 7
- 8
- 9
- 10
- 11
- 12
- 13
- 14
- 15
- 16
- 17
- 18
- 19
- 20
- 21
- 22
- 23
- 24
- 25
10.5 navigator
导航组件 类似超链接标签
- 1
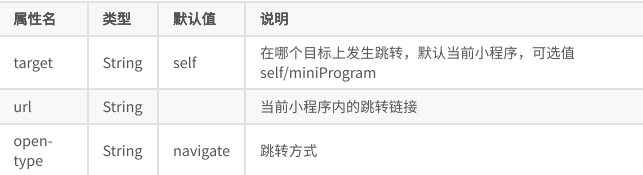
open-type 有效值:
- 1

<!--
  导航组件 navigator
  0 块级元素 默认会换行  可以直接加宽度和高度
  1 url 要跳转的页面路径  绝对路径 相对路径
  2 target 要跳转到当前的小程序 还是其他的小程序的页面
    self 默认值 自己 小程序的页面
    miniProgram 其他的小程序的页面
  3 open-type 跳转的方式
    1 navigate 默认值 	保留当前页面,跳转到应用内的某个页面,但是不能跳到 tabbar 页面
    2 redirect	关闭当前页面,跳转到应用内的某个页面,但是不允许跳转到 tabbar 页面。
    3 switchTab	跳转到 tabBar 页面,并关闭其他所有非 tabBar 页面
    4 reLaunch	关闭所有页面,打开到应用内的某个页面
 -->

 <navigator url="/pages/demo10/demo10"> 轮播图页面 </navigator>
 <navigator url="/pages/index/index"> 直接跳转到 tabbar页面 </navigator>
 <navigator open-type="redirect" url="/pages/demo10/demo10">  轮播图页面 redirect </navigator>
 <navigator open-type="switchTab" url="/pages/index/index">  switchTab直接跳转到 tabbar页面 </navigator>
 <navigator open-type="reLaunch" url="/pages/index/index">  reLaunch 可以随便跳 </navigator>
- 1
- 2
- 3
- 4
- 5
- 6
- 7
- 8
- 9
- 10
- 11
- 12
- 13
- 14
- 15
- 16
- 17
- 18
- 19
- 20
10.6 rich-text
富文本标签
可以将字符串解析成 对应标签,类似 vue中 v--html 功能
- 1
- 2

// 1 index.wxml 加载 节点数组 <rich-text nodes="{{nodes}}" bindtap="tap"></rich-text> // 2 加载 字符串 <rich-text nodes='<img src="https://developers.weixin.qq.com/miniprogram/assets/images/head_global_z_@all.p ng" alt="">'></rich-text> // index.js Page({ data: { nodes: [{ name: 'div', attrs: { class: 'div_class', style: 'line-height: 60px; color: red;' }, children: [{ type: 'text', text: 'Hello World!' }] }] }, tap() { console.log('tap') } })
- 1
- 2
- 3
- 4
- 5
- 6
- 7
- 8
- 9
- 10
- 11
- 12
- 13
- 14
- 15
- 16
- 17
- 18
- 19
- 20
- 21
- 22
- 23
- 24
- 25
- 26
- 27
10.6.1 nodes属性
nodes 属性⽀持 字符串 和 标签节点数组
- 1
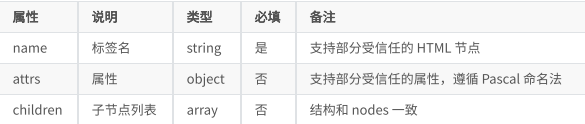
⽂本节点:type = text
- 1

nodes 不推荐使⽤ String 类型,性能会有所下降。
rich--text 组件内屏蔽所有节点的事件。
attrs 属性不⽀持 id ,⽀持 class 。
name 属性⼤⼩写不敏感。
如果使⽤了不受信任的 HTML 节点,该节点及其所有
⼦节点将会被移除。
img 标签仅⽀持⽹络图⽚。
- 1
- 2
- 3
- 4
- 5
- 6
- 7
// pages/demo12/demo12.js Page({ data: { // 1 标签字符串 最常用的 // html:'<div class="tpl-wrapper" data-tpl-id="m_h_v31icon_1" style="margin-top: -10px;"><div view-name="DFrameLayout" style="display: flex; overflow: hidden; height: 160px; width: 375px; place-self: flex-start; position: relative;"><div view-name="DView" style="display: flex; overflow: hidden; background-color: rgb(255, 255, 255); margin-top: 9px; height: 100%; width: 100%; top: 0px; left: 0px; position: absolute;"></div><div view-name="HImageView" style="display: flex; overflow: hidden; height: 100%; width: 100%; position: absolute;"><div style="width: 100%; height: 100%; background-image: url("https://gw.alicdn.com/tps/TB155AUPpXXXXajXVXXXXXXXXXX-1125-480.png_.webp"); background-repeat: no-repeat; background-position: center center; background-size: contain;"></div></div><div view-name="DLinearLayout" aria-label="天猫" style="display: flex; overflow: hidden; width: 61px; height: 67px; margin-left: 10px; margin-top: 13px; -webkit-box-orient: vertical; flex-direction: column; top: 0px; left: 0px; position: absolute;"><div view-name="HGifView" style="display: flex; overflow: hidden; width: 61px; height: 48px;"><div style="width: 100%; height: 100%; background-repeat: no-repeat; background-position: center center; background-size: contain; background-image: url("https://gw.alicdn.com/tfs/TB1Wxi2trsrBKNjSZFpXXcXhFXa-183-144.png_.webp");"></div></div><div view-name="DTextView" style="display: inline-block; overflow: hidden; font-size: 11px; height: auto; margin-top: 5px; text-align: center; color: rgb(102, 102, 102); width: 61px; text-overflow: ellipsis; white-space: nowrap; line-height: 14px;">天猫</div></div><div view-name="DLinearLayout" aria-label="聚划算" style="display: flex; overflow: hidden; width: 61px; height: 67px; margin-left: 83.5px; margin-top: 13px; -webkit-box-orient: vertical; flex-direction: column; top: 0px; left: 0px; position: absolute;"><div view-name="HGifView" style="display: flex; overflow: hidden; width: 61px; height: 48px;"><div style="width: 100%; height: 100%; background-repeat: no-repeat; background-position: center center; background-size: contain; background-image: url("https://img.alicdn.com/tfs/TB10UHQaNjaK1RjSZKzXXXVwXXa-183-144.png?getAvatar=1_.webp");"></div></div><div view-name="DTextView" style="display: inline-block; overflow: hidden; font-size: 11px; height: auto; margin-top: 5px; text-align: center; color: rgb(102, 102, 102); width: 61px; text-overflow: ellipsis; white-space: nowrap; line-height: 14px;">聚划算</div></div><div view-name="DLinearLayout" aria-label="天猫国际" style="display: flex; overflow: hidden; width: 61px; height: 67px; margin-left: 157px; margin-top: 13px; -webkit-box-orient: vertical; flex-direction: column; top: 0px; left: 0px; position: absolute;"><div view-name="HGifView" style="display: flex; overflow: hidden; width: 61px; height: 48px;"><div style="width: 100%; height: 100%; background-repeat: no-repeat; background-position: center center; background-size: contain; background-image: url("https://gw.alicdn.com/tfs/TB11rTqtj7nBKNjSZLeXXbxCFXa-183-144.png?getAvatar=1_.webp");"></div></div><div view-name="DTextView" style="display: inline-block; overflow: hidden; font-size: 11px; height: auto; margin-top: 5px; text-align: center; color: rgb(102, 102, 102); width: 61px; text-overflow: ellipsis; white-space: nowrap; line-height: 14px;">天猫国际</div></div><div view-name="DLinearLayout" aria-label="外卖" style="display: flex; overflow: hidden; width: 61px; height: 67px; margin-left: 230.5px; margin-top: 13px; -webkit-box-orient: vertical; flex-direction: column; top: 0px; left: 0px; position: absolute;"><div view-name="HGifView" style="display: flex; overflow: hidden; width: 61px; height: 48px;"><div style="width: 100%; height: 100%; background-repeat: no-repeat; background-position: center center; background-size: contain; background-image: url("https://gw.alicdn.com/tps/TB1eXc7PFXXXXb4XpXXXXXXXXXX-183-144.png?getAvatar=1_.webp");"></div></div><div view-name="DTextView" style="display: inline-block; overflow: hidden; font-size: 11px; height: auto; margin-top: 5px; text-align: center; color: rgb(102, 102, 102); width: 61px; text-overflow: ellipsis; white-space: nowrap; line-height: 14px;">外卖</div></div><div view-name="DLinearLayout" aria-label="天猫超市" style="display: flex; overflow: hidden; width: 61px; height: 67px; margin-left: 304px; margin-top: 13px; -webkit-box-orient: vertical; flex-direction: column; top: 0px; left: 0px; position: absolute;"><div view-name="HGifView" style="display: flex; overflow: hidden; width: 61px; height: 48px;"><div style="width: 100%; height: 100%; background-repeat: no-repeat; background-position: center center; background-size: contain; background-image: url("https://gw.alicdn.com/tfs/TB1IKqDtpooBKNjSZFPXXXa2XXa-183-144.png_.webp");"></div></div><div view-name="DTextView" style="display: inline-block; overflow: hidden; font-size: 11px; height: auto; margin-top: 5px; text-align: center; color: rgb(102, 102, 102); width: 61px; text-overflow: ellipsis; white-space: nowrap; line-height: 14px;">天猫超市</div></div><div view-name="DLinearLayout" aria-label="充值中心" style="display: flex; overflow: hidden; width: 61px; height: 67px; margin-left: 10px; margin-top: 84px; -webkit-box-orient: vertical; flex-direction: column; top: 0px; left: 0px; position: absolute;"><div view-name="HGifView" style="display: flex; overflow: hidden; width: 61px; height: 48px;"><div style="width: 100%; height: 100%; background-repeat: no-repeat; background-position: center center; background-size: contain; background-image: url("https://gw.alicdn.com/tfs/TB1o0FLtyMnBKNjSZFoXXbOSFXa-183-144.png_.webp");"></div></div><div view-name="DTextView" style="display: inline-block; overflow: hidden; font-size: 11px; height: auto; margin-top: 5px; text-align: center; color: rgb(102, 102, 102); width: 61px; text-overflow: ellipsis; white-space: nowrap; line-height: 14px;">充值中心</div></div><div view-name="DLinearLayout" aria-label="飞猪旅行" style="display: flex; overflow: hidden; width: 61px; height: 67px; margin-left: 83.5px; margin-top: 84px; -webkit-box-orient: vertical; flex-direction: column; top: 0px; left: 0px; position: absolute;"><div view-name="HGifView" style="display: flex; overflow: hidden; width: 61px; height: 48px;"><div style="width: 100%; height: 100%; background-repeat: no-repeat; background-position: center center; background-size: contain; background-image: url("https://gw.alicdn.com/tfs/TB15nKhtpkoBKNjSZFEXXbrEVXa-183-144.png?getAvatar=1_.webp");"></div></div><div view-name="DTextView" style="display: inline-block; overflow: hidden; font-size: 11px; height: auto; margin-top: 5px; text-align: center; color: rgb(102, 102, 102); width: 61px; text-overflow: ellipsis; white-space: nowrap; line-height: 14px;">飞猪旅行</div></div><div view-name="DLinearLayout" aria-label="领金币" style="display: flex; overflow: hidden; width: 61px; height: 67px; margin-left: 157px; margin-top: 84px; -webkit-box-orient: vertical; flex-direction: column; top: 0px; left: 0px; position: absolute;"><div view-name="HGifView" style="display: flex; overflow: hidden; width: 61px; height: 48px;"><div style="width: 100%; height: 100%; background-repeat: no-repeat; background-position: center center; background-size: contain; background-image: url("https://gw.alicdn.com/tfs/TB1BqystrZnBKNjSZFrXXaRLFXa-183-144.png?getAvatar=1_.webp");"></div></div><div view-name="DTextView" style="display: inline-block; overflow: hidden; font-size: 11px; height: auto; margin-top: 5px; text-align: center; color: rgb(102, 102, 102); width: 61px; text-overflow: ellipsis; white-space: nowrap; line-height: 14px;">领金币</div></div><div view-name="DLinearLayout" aria-label="拍卖" style="display: flex; overflow: hidden; width: 61px; height: 67px; margin-left: 230.5px; margin-top: 84px; -webkit-box-orient: vertical; flex-direction: column; top: 0px; left: 0px; position: absolute;"><div view-name="HGifView" style="display: flex; overflow: hidden; width: 61px; height: 48px;"><div style="width: 100%; height: 100%; background-repeat: no-repeat; background-position: center center; background-size: contain; background-image: url("https://gw.alicdn.com/tfs/TB1CMf4tlnTBKNjSZPfXXbf1XXa-183-144.png?getAvatar=1_.webp");"></div></div><div view-name="DTextView" style="display: inline-block; overflow: hidden; font-size: 11px; height: auto; margin-top: 5px; text-align: center; color: rgb(102, 102, 102); width: 61px; text-overflow: ellipsis; white-space: nowrap; line-height: 14px;">拍卖</div></div><div view-name="DLinearLayout" aria-label="分类" style="display: flex; overflow: hidden; width: 61px; height: 67px; margin-left: 304px; margin-top: 84px; -webkit-box-orient: vertical; flex-direction: column; top: 0px; left: 0px; position: absolute;"><div view-name="HGifView" style="display: flex; overflow: hidden; width: 61px; height: 48px;"><div style="width: 100%; height: 100%; background-repeat: no-repeat; background-position: center center; background-size: contain; background-image: url("https://gw.alicdn.com/tfs/TB18P98tyQnBKNjSZFmXXcApVXa-183-144.png?getAvatar=1_.webp");"></div></div><div view-name="DTextView" style="display: inline-block; overflow: hidden; font-size: 11px; height: auto; margin-top: 5px; text-align: center; color: rgb(102, 102, 102); width: 61px; text-overflow: ellipsis; white-space: nowrap; line-height: 14px;">分类</div></div></div></div>' // 2 对象数组 html:[ { // 1 div标签 name属性来指定 name:"div", // 2 标签上有哪些属性 attrs:{ // 标签上的属性 class style class:"my_div", style:"color:red;" }, // 3 子节点 children 要接收的数据类型和 nodes第二种渲染方式的数据类型一致 children:[ { name:"p", attrs:{}, // 放文本 children:[ { type:"text", text:"hello" } ] } ] } ] } })
- 1
- 2
- 3
- 4
- 5
- 6
- 7
- 8
- 9
- 10
- 11
- 12
- 13
- 14
- 15
- 16
- 17
- 18
- 19
- 20
- 21
- 22
- 23
- 24
- 25
- 26
- 27
- 28
- 29
- 30
- 31
- 32
- 33
- 34
<!--
  rich-text 富文本标签
  1 nodes属性来实现
    1 接收标签字符串
    2 接收对象数组
 -->
 <rich-text nodes="{{html}}"></rich-text>
- 1
- 2
- 3
- 4
- 5
- 6
- 7
- 8
10.7 button
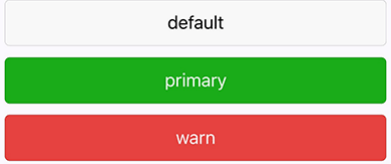
<button
  type="default"
  size="{{defaultSize}}"
  loading="{{loading}}"
  plain="{{plain}}">
 default
</button>
- 1
- 2
- 3
- 4
- 5
- 6
- 7

size 的合法值
- 1

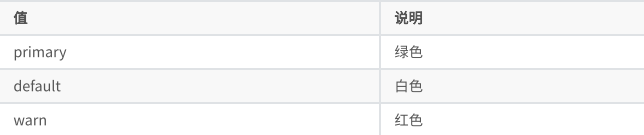
type 的合法值
- 1
form-type 的合法值
- 1

open-type 的合法值
- 1

// pages/demo13/demo13.js
Page({
  // 获取用户的手机号码信息
  getPhoneNumber(e){
    console.log(e);
  },
  // 获取用户个人信息
  getUserInfo(e){
    console.log(e);
  }
})
- 1
- 2
- 3
- 4
- 5
- 6
- 7
- 8
- 9
- 10
- 11
<!--
  button 标签
  1 外观的属性
    1 size 控制按钮的大小
      1 default 默认大小
      2 mini 小尺寸
    2 type 用来控制按钮的颜色
      1 default 灰色
      2 primary 绿色
      3 warn 红色
    3 plain  按钮是否镂空,背景色透明
    4 loading 文字前显示正在等待图标
 -->
 <button>默认按钮</button>
 <button size="mini">  mini 默认按钮</button>
 <button type="primary"> primary 按钮</button>
 <button type="warn"> warn 按钮</button>
 <button type="warn" plain> plain 按钮</button>
 <button type="primary" loading> loading 按钮</button>

 <!--

  button 开发能力
  open-type:
  1 contact 直接打开  客服对话功能  需要在微信小程序的后台配置   只能够通过真机调试来打开
  2 share 转发当前的小程序 到微信朋友中   不能把小程序 分享到 朋友圈
  3 getPhoneNumber 获取当前用户的手机号码信息 结合一个事件来使用  不是企业的小程序账号 没有权限来获取用户的手机号码
    1 绑定一个事件 bindgetphonenumber
    2 在事件的回调函数中  通过参数来获取信息
    3 获取到的信息  已经加密过了
      需要用户自己待见小程序的后台服务器,在后台服务器中进行解析 手机号码,返回到小程序中 就可以看到信息了
  4 getUserInfo 获取当前用户的个人信息
    1 使用方法 类似 获取用户的手机号码
    2 可以直接获取 不存在加密的字段
  5 launchApp 在小程序当中 直接打开 app
    1 需要现在 app中 通过app的某个链接 打开 小程序
    2 在小程序 中 再通过 这个功能 重新打开 app
    3 找到 京东的app 和 京东的小程序
  6 openSetting 打开小程序内置的 授权页面
    1 授权页面中 只会出现 用户曾经点击过的 权限
  7 feedback 打开 小程序内置的 意见反馈页面
    1 只能够通过真机调试来打开

  -->
<button open-type="contact">contact</button>
<button open-type="share">share</button>
<button open-type="getPhoneNumber" bindgetphonenumber="getPhoneNumber">getPhoneNumber</button>
<button open-type="getUserInfo" bindgetuserinfo="getUserInfo">getUserInfo</button>
<button open-type="launchApp">launchApp</button>
<button open-type="openSetting">openSetting</button>
<button open-type="feedback">feedback</button>
- 1
- 2
- 3
- 4
- 5
- 6
- 7
- 8
- 9
- 10
- 11
- 12
- 13
- 14
- 15
- 16
- 17
- 18
- 19
- 20
- 21
- 22
- 23
- 24
- 25
- 26
- 27
- 28
- 29
- 30
- 31
- 32
- 33
- 34
- 35
- 36
- 37
- 38
- 39
- 40
- 41
- 42
- 43
- 44
- 45
- 46
- 47
- 48
- 49
- 50
- 51
- 52
10.8 icon


代码:
Page({
  data: {
    iconSize: [20, 30, 40, 50, 60, 70],
    iconType: [
      'success', 'success_no_circle', 'info', 'warn', 'waiting', 'cancel',
'download', 'search', 'clear'
   ],
    iconColor: [
      'red', 'orange', 'yellow', 'green', 'rgb(0,255,255)', 'blue', 'purple'
   ],
 }
})

wxml
<view class="group">
  <block wx:for="{{iconSize}}">
    <icon type="success" size="{{item}}"/>
  </block>
</view>
<view class="group">
  <block wx:for="{{iconType}}">
    <icon type="{{item}}" size="40"/>
  </block>
</view>
<view class="group">
  <block wx:for="{{iconColor}}">
    <icon type="success" size="40" color="{{item}}"/>
  </block>
</view>
- 1
- 2
- 3
- 4
- 5
- 6
- 7
- 8
- 9
- 10
- 11
- 12
- 13
- 14
- 15
- 16
- 17
- 18
- 19
- 20
- 21
- 22
- 23
- 24
- 25
- 26
- 27
- 28
- 29
- 30
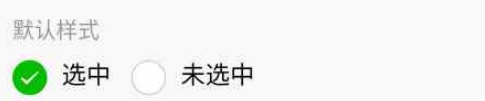
10.9 radio
可以通过 color属性来修改颜色
需要搭配 radio-group ⼀起使⽤
- 1
- 2
// pages/demo15/demo15.js
Page({
  data: {
    gender: ""
  },
  handleChange(e){
    // 1 获取单选框中的值
    let gender=e.detail.value;
    // 2 把值 赋值给 data中的数据
    this.setData({
      // gender:gender
      gender
    })
  }
})
- 1
- 2
- 3
- 4
- 5
- 6
- 7
- 8
- 9
- 10
- 11
- 12
- 13
- 14
- 15
<!--
  radio 单选框
  1 radio标签 必须要和 父元素 radio-group来使用
  2 value 选中的单选框的值
  3 需要给 radio-group 绑定 change事件
  4 需要在页面中显示 选中的值
 -->
 <radio-group bindchange="handleChange">
   <radio color="red" value="male">男</radio>
   <radio color="red" value="female" >女</radio>
 </radio-group>

 <view>您选中的是:{{gender}}</view>
- 1
- 2
- 3
- 4
- 5
- 6
- 7
- 8
- 9
- 10
- 11
- 12
- 13
- 14
- 15
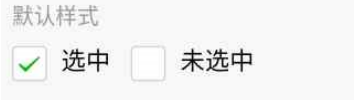
10.10 checkbox
可以通过 color属性来修改颜色
需要搭配 checkbox-group ⼀起使⽤
- 1
- 2
// pages/demo16/demo16.js
Page({
  data: {
    list:[
      {
        id:0,
        name:"声明:本文内容由网友自发贡献,不代表【wpsshop博客】立场,版权归原作者所有,本站不承担相应法律责任。如您发现有侵权的内容,请联系我们。转载请注明出处:https://www.wpsshop.cn/w/小丑西瓜9/article/detail/274998
推荐阅读
相关标签
Copyright © 2003-2013 www.wpsshop.cn 版权所有,并保留所有权利。

