
热门标签
热门文章
- 1Maven详细安装配置(图文)+使用方法 速通教程_maven安装及配置教程
- 2java arraylist 数据库,关于java:在Android中的SQLite数据库中保存ArrayList
- 3C语言数字图像处理(六):低通滤波器和高通滤波器_数字低通滤波器
- 4Moviepy模块之裁剪、合并_moviepy 视频合并
- 5600W个微信红包封面,人人都能领取到!!!
- 6globalmapper如何选取图像上的点_python 图像处理:一福变五福
- 7腾讯云TencentOS Server镜像系统兼容性及内核版本说明_tencentos-3.1镜像下载
- 8Dockerfile详解_dockerfile文件详解
- 9Chat GPT提示词(prompt )入门指南_chatgpt prompt
- 10Sublime Text3配置Node.js开发环境_sublime text3 配置 nodejs 开发环境
当前位置: article > 正文
微信小程序如何获取用户头像昵称_微信小程序获取头像昵称
作者:小丑西瓜9 | 2024-02-15 20:41:43
赞
踩
微信小程序获取头像昵称
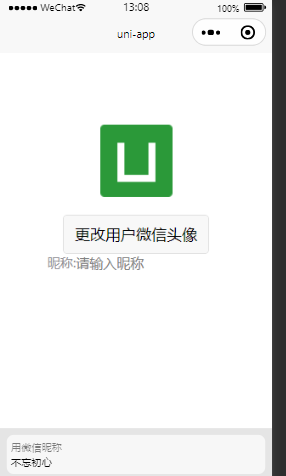
微信小程序登录用户头像昵称已经不支持支持获取,因为用户的scope.userInfo权限已经回收,可以使用昵称头像填写进行完善用户信息,按照官方推荐会显示用户在微信的头像和昵称,本文介绍一下实现方案.最终实现效果:修改头像会默认显示微信头像,修改昵称时会默认显示用户的昵称.

实现代码:
<template>
	<view class="content">
		<image class="user_img" :src="userImg"></image>
		<view class="text-area">
			<button type="default" open-type="chooseAvatar" @chooseavatar="getUserImg">更改用户微信头像</button>
		</view>
		<view class="nick_class">
			<text class="title">昵称:</text>
			<input type="nickname" class="weui-input" placeholder="请输入昵称"/>
		</view>
	</view>
</template>

<script>
	export default {
		data() {
			return {
				userImg:"../../static/logo.png"
			}
		},
		onLoad() {

		},
		methods: {
			wxLogin(){
				wx.login({
				  success (res) {
				    if (res.code) {
				      //发起网络请求
				     console.log("登录成功返回信息"+JSON.stringify(res))
				    } else {
				      console.log('登录失败!' + res.errMsg)
				    }
				  }
				})
			},
			decryptPhoneNumber(res){
				console.log(res)
			},
			getUserInfo(){
				wx.getUserInfo({
				  success: function(res) {
				  console.log("授权返回的用户信息:"+JSON.stringify(res))
				  }
				})
			},
			getUserImg(res){
				console.log("获取用户头像:"+JSON.stringify(res.detail.avatarUrl)),
				uni.uploadFile({
					url: 'http://127.0.0.1:8080/aliyun/uploadImg', //仅为示例,非真实的接口地址
					filePath: res.detail.avatarUrl,
					name: 'multipartFile',
					formData: {
						'user': 'test'
					},
					success: (uploadFileRes) => {
						console.log("上传返回信息:"+JSON.stringify(uploadFileRes.data))
						let responseInfo=JSON.parse(uploadFileRes.data)
						if(responseInfo.code == 200){
							this.userImg=responseInfo.data,
							console.log("图片上传地址:"+this.userImg)
						}else{
							uni.showToast({
								title:"图片上传失败,请重试!",
								duration:3000
							})
						}

					}
				});
				// 上传图片
				// uni.chooseImage({
				// 	success: (chooseImageRes) => {
				// 		const tempFilePaths = chooseImageRes.tempFilePaths;
				// 		console.log("微信选择头像信息:"+tempFilePaths)

				// 	}
				// });
			},
			// 获取用户微信运动步数
			getRunData(){
				wx.getWeRunData({
				  success (res) {
					  console.log("获取运动信息:"+JSON.stringify(res))
				    // 拿 encryptedData 到开发者后台解密开放数据
				    const encryptedData = res.encryptedData
				    // 或拿 cloudID 通过云调用直接获取开放数据
				    // const cloudID = res.cloudID
				  }
				})

			}

		}
	}
</script>

<style>
	.content {
		display: flex;
		flex-direction: column;
		align-items: center;
		justify-content: center;

	}

	.user_img {
		height: 200rpx;
		width: 200rpx;
		margin-top: 200rpx;
		margin-left: auto;
		margin-right: auto;
		margin-bottom: 50rpx;
	}

	.text-area {
		display: flex;
		justify-content: center;
	}

	.title {
		font-size: 36rpx;
		color: #8f8f94;
	}
	.nick_class{
		display: flex;
		flex-direction: row;
	}
</style>

- 1
- 2
- 3
- 4
- 5
- 6
- 7
- 8
- 9
- 10
- 11
- 12
- 13
- 14
- 15
- 16
- 17
- 18
- 19
- 20
- 21
- 22
- 23
- 24
- 25
- 26
- 27
- 28
- 29
- 30
- 31
- 32
- 33
- 34
- 35
- 36
- 37
- 38
- 39
- 40
- 41
- 42
- 43
- 44
- 45
- 46
- 47
- 48
- 49
- 50
- 51
- 52
- 53
- 54
- 55
- 56
- 57
- 58
- 59
- 60
- 61
- 62
- 63
- 64
- 65
- 66
- 67
- 68
- 69
- 70
- 71
- 72
- 73
- 74
- 75
- 76
- 77
- 78
- 79
- 80
- 81
- 82
- 83
- 84
- 85
- 86
- 87
- 88
- 89
- 90
- 91
- 92
- 93
- 94
- 95
- 96
- 97
- 98
- 99
- 100
- 101
- 102
- 103
- 104
- 105
- 106
- 107
- 108
- 109
- 110
- 111
- 112
- 113
- 114
- 115
- 116
- 117
- 118
- 119
- 120
- 121
- 122
- 123
- 124
- 125
- 126
- 127
- 128
- 129
补充:上面更换头像时需要点击按钮,但是有的场景中需要直接点击图片进行更换图片,但是open-type="chooseAvatar"只能放到button按钮上,这里将一下实现方案,简单的办法就是用button包裹住image,需要处理的问题是如何将按钮背景置为透明,可以使用plain属性,另外需要去除边框,设置border-color:white即可.相关内容如下:
<button  open-type="chooseAvatar" plain="true" style="border-color:white;">
		<image :src="fromdata.userImg"  click="chooseImg()"></image>
</button>
- 1
- 2
- 3
帮朋友推荐一个好玩的小程序,有兴趣可以看一下:

参考内容:
用户信息接口调整说明,官方头像昵称填写规范
声明:本文内容由网友自发贡献,不代表【wpsshop博客】立场,版权归原作者所有,本站不承担相应法律责任。如您发现有侵权的内容,请联系我们。转载请注明出处:https://www.wpsshop.cn/w/小丑西瓜9/article/detail/86802
推荐阅读
相关标签

