- 1类和面向对象习题_25. 下列有关构造方法描述正确的是(c )。 a、所有类都必须定义一个构造方法 b、构
- 2自定义axios配置多个ip_axios 2个地址
- 3万字总结——常见的八大排序算法(插入排序、希尔排序、选择排序、堆排序、冒泡排序、快速排序、归并排序、计数排序)_常见排序算法有哪些
- 4python的flask解决xss攻击漏洞_flask xss漏洞
- 5计算机组成原理(第一章)_假定计算机m1和m2具有相同的指令集体系结构
- 6运行python警告:FutureWarning: elementwise comparison failed; returning scalar instead, but in the future_futurewarning: elementwise comparison failed; retu
- 7【工具使用】——MSF使用_使用MSF抓取用户密码_msf读取windows密码
- 8深度揭秘:代理IP的工作原理及其在网络安全中的关键角色
- 9面试指南之如何介绍做过的项目_面试中怎么描述技术服务于业务
- 10NLP超详细新手快速入门上手篇(1)常用函数_自然语言处理(nlp)训练器怎么用
DolphinScheduler 3.1.0 海豚集群部署配置_海豚采集binlog
赞
踩
文章目录
- DolphinScheduler 3.1.0 部署过程
- 1. JDK1.8环境准备
- 2. 下载安装包
- 3. 上传安装包并解压
- 4. Dolphinscheduler用户要sudo权限,免密配置
- 5. 修改配置文件
- 6. 修改元数据配置文件
- 7. 安装MySQL数据库
- 8. 登录并创建用户
- 9. mysql建库
- 10. 海豚初始化数据库
- 11. 格式转换 dos2unix
- 12. 安装dolphinscheduler集群
- 13. HDFS上添加目录,给到指定用户(dolphinscheduler)
- 14. 将hdfs-site,core-site传到api,alert,worker,master下(所有节点都要操作)
- 15. 修改common.properties,同步至到api,alert,worker 的conf 目录下(所有节点都要操作)
- 16. crontab认证配置格式如下(所有节点都配置)
- 17. 替换hive相关包master/worker/api模块下的(所有节点都要替换)
- 18. 注解掉 worker-server/bin目录下的 start.sh 中的信息(所有节点都要修改)
- 19. 导入工作流需要修改mysql中的源id信息
- 20. 海豚登录默认用户密码
- 21. 资源中心模块
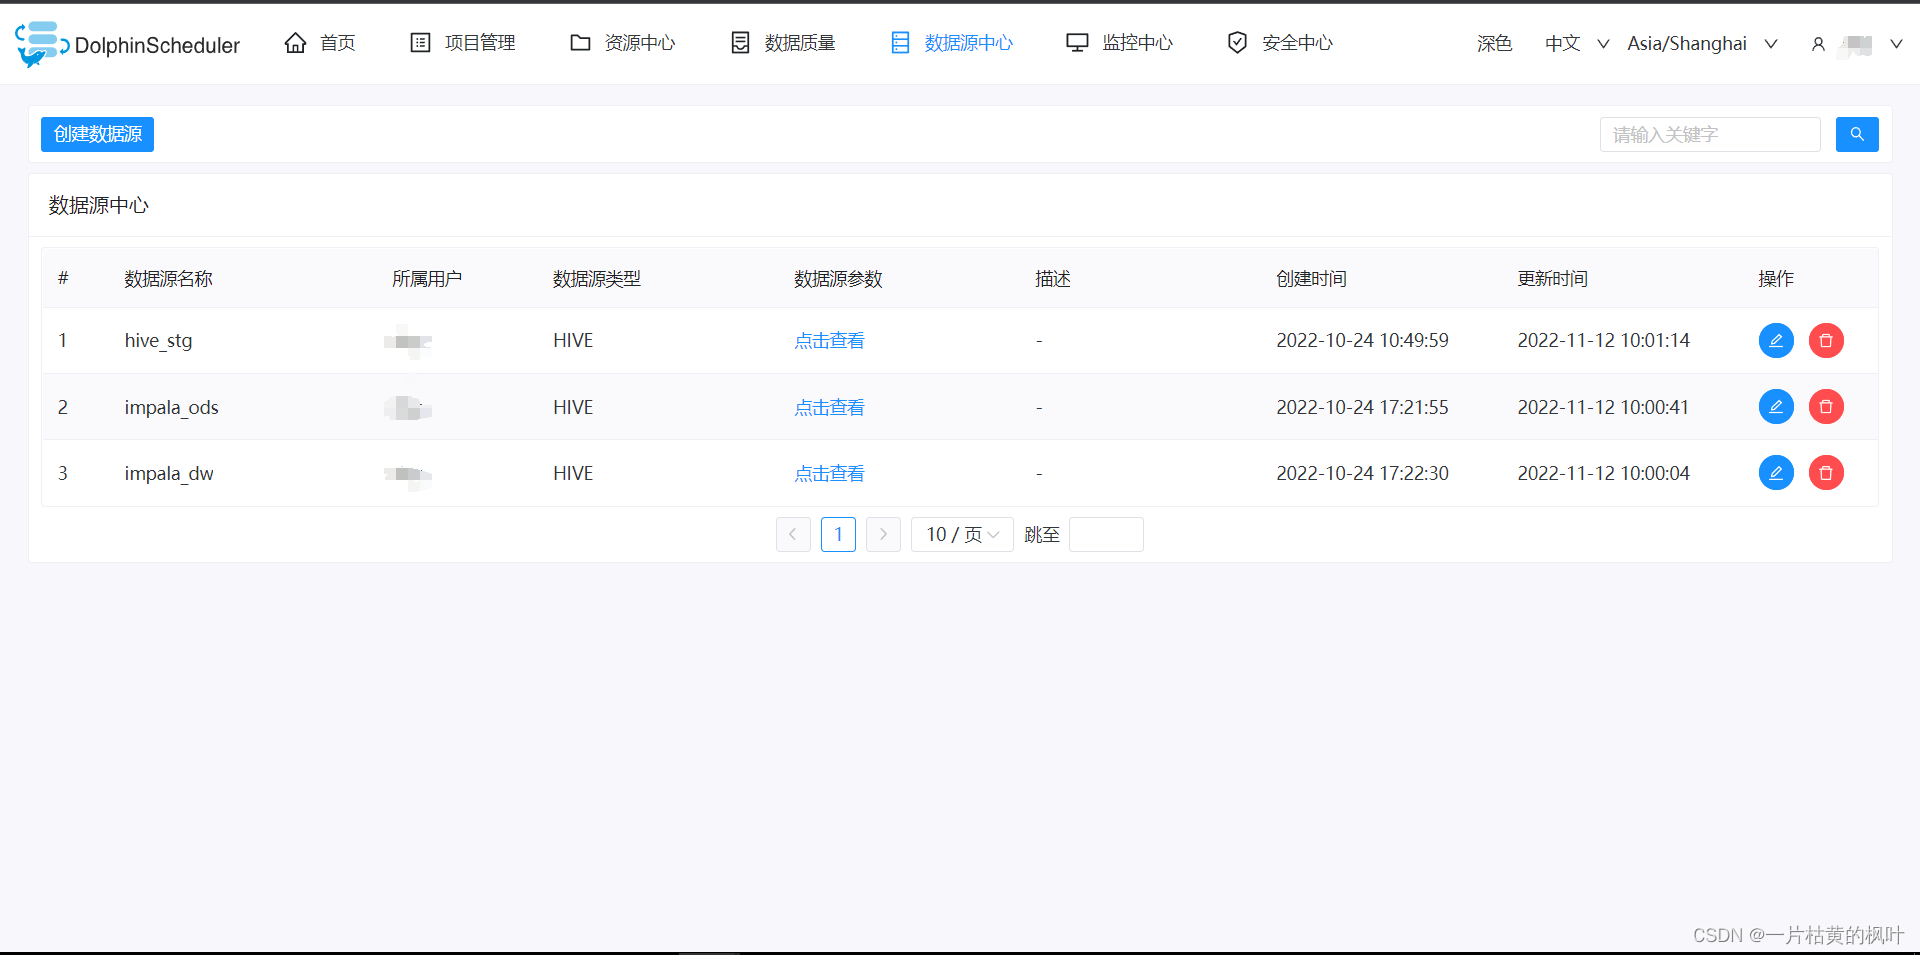
- 22. 数据源配置
- 23. 添加Sqoop脚本执行本地所需依赖包(所有节点都配置)
- 24. 工作流迁移问题(依赖节点问题)
- 25. 定时任务设置问题,需要替换包
- 26. 告警配置
DolphinScheduler 3.1.0 部署过程
1. JDK1.8环境准备
三台服务器都要安装
2. 下载安装包
3. 上传安装包并解压
解压安装包
sudo tar -zxvf apache-dolphinscheduler-3.1.1-SNAPSHOT-bin.tar.gz -C /opt/module/
将安装目录的所属用户给配好的免密用户
sudo chown dolphinscheduler:dolphinscheduler -R apache-dolphinscheduler-3.1.1-SNAPSHOT-bin
切换用户
su - dolphinscheduler
- 1
- 2
- 3
- 4
- 5
- 6
4. Dolphinscheduler用户要sudo权限,免密配置
创建海豚用户并且给予sudo权限
 groupadd dolphinscheduler
 useradd -g dolphinscheduler dolphinscheduler

vim /etc/sudoers
配置如下内容,保存退出
dolphinscheduler    ALL=(ALL)       ALL
dolphinscheduler    ALL=(ALL)       NOPASSWD:NOPASSWD:ALL
- 1
- 2
- 3
- 4
- 5
- 6
- 7
免密配置:服务器各台节点之间要互相免密
生成当前用户的秘钥文件:ssh-keygen -t rsa
然后将生成的公钥文件内容写到目标机.ssh/authorized_keys文件中,OK
海豚所在每台节点之间都要互相免密
普通用户建立免密要注意权限 700,否则也不会成功

5. 修改配置文件
/opt/module/dolphinscheduler-3.1.0_standalone/bin/env
[dolphinscheduler@gateway02 bin]$ vim install.sh
ips="192.168.8.1,192.168.8.2,192.168.8.3,192.168.8.4,192.168.8.5"
ips=${ips:-"cdh212,cdh213,cdh214"}
sshPort=${sshPort:-"22"}
masters=${masters:-"cdh214,cdh213"}
workers=${workers:-"cdh212:default,cdh213:default,cdh214:default"}
alertServer=${alertServer:-"cdh213"}
apiServers=${apiServers:-"cdh214"}
installPath=${installPath:-"/opt/module/dolphinscheduler-3.1.0_cluster"}
deployUser=${deployUser:-"dolphinscheduler"}
zkRoot=${zkRoot:-"/dolphinscheduler_3_1_0"}
- 1
- 2
- 3
- 4
- 5
- 6
- 7
- 8
- 9
- 10
- 11
- 12
6. 修改元数据配置文件
[dolphinscheduler@gateway02 env]$ vim dolphinscheduler_env.sh
# JAVA_HOME, will use it to start DolphinScheduler server
export JAVA_HOME= /dsg/public/jdk1.8.0_281/

# Database related configuration, set database type, username and password
export DATABASE=mysql
export SPRING_PROFILES_ACTIVE=${DATABASE}
export SPRING_DATASOURCE_URL="jdbc:mysql://10.84.34.214:3306/dolphinscheduler_3_1_1?useUnicode=true&characterEncoding=UTF-8"
export SPRING_DATASOURCE_USERNAME=dolphinscheduler
export SPRING_DATASOURCE_PASSWORD=Dsg_1234


# DolphinScheduler server related configuration
export SPRING_CACHE_TYPE=${SPRING_CACHE_TYPE:-none}
export SPRING_JACKSON_TIME_ZONE=${SPRING_JACKSON_TIME_ZONE:-Asia/Shanghai}
export MASTER_FETCH_COMMAND_NUM=${MASTER_FETCH_COMMAND_NUM:-10}

# Registry center configuration, determines the type and link of the registry center
export REGISTRY_TYPE=${REGISTRY_TYPE:-zookeeper}
export REGISTRY_ZOOKEEPER_CONNECT_STRING=${REGISTRY_ZOOKEEPER_CONNECT_STRING:-cdh207:2181,cdh208:2181,cdh209:2181}

# Tasks related configurations, need to change the configuration if you use the related tasks.
export HADOOP_HOME=${HADOOP_HOME:-/opt/cloudera/parcels/CDH/lib/hadoop}
export HADOOP_CONF_DIR=${HADOOP_CONF_DIR:-/etc/hadoop}
export SPARK_HOME1=${SPARK_HOME1:-/opt/cloudera/parcels/CDH/lib/spark}
# export SPARK_HOME2=${SPARK_HOME2:-/opt/soft/spark2}
# export PYTHON_HOME=${PYTHON_HOME:-/opt/soft/python}
export HIVE_HOME=${HIVE_HOME:-/opt/cloudera/parcels/CDH/lib/hive}
export FLINK_HOME=${FLINK_HOME:-/opt/cloudera/parcels/FLINK/lib/flink}
# export DATAX_HOME=${DATAX_HOME:-/opt/soft/datax}
# export SEATUNNEL_HOME=${SEATUNNEL_HOME:-/opt/soft/seatunnel}
# export CHUNJUN_HOME=${CHUNJUN_HOME:-/opt/soft/chunjun}

export PATH=$HADOOP_HOME/bin:$SPARK_HOME1/bin:$SPARK_HOME2/bin:$PYTHON_HOME/bin:$JAVA_HOME/bin:$HIVE_HOME/bin:$FLINK_HOME/bin:$DATAX_HOME/bin:$SEATUNNEL_HOME/bin:$CHUNJUN_HOME/bin:$PATH

- 1
- 2
- 3
- 4
- 5
- 6
- 7
- 8
- 9
- 10
- 11
- 12
- 13
- 14
- 15
- 16
- 17
- 18
- 19
- 20
- 21
- 22
- 23
- 24
- 25
- 26
- 27
- 28
- 29
- 30
- 31
- 32
- 33
- 34
7. 安装MySQL数据库
- 数据库版本支持mysql5.7,mysql8.0(建议安装8.0版本)。
- 如有漏洞检测要求,需要将数据库小版本更新到最新。
- 本文提供root用户安装和普通用户安装两种方式。
- 现场尽量选择二进制安装,,因为可以选择data数据文件目录 。
- mysql 8.0版本默认打开binlog日志,如安装dataxone单机版本可以关掉binlog,或设置日志定期删除,避免出现日志过大占用磁盘问题。
8. 登录并创建用户
1、 初始化数据库完成时,打印的日志最后一行会生成临时密码,使用临时密码登录。
mysql> alter user root@'localhost' identified with mysql_native_password by '新密码';
mysql> flush privileges;
- 1
- 2
2、 创建数据库dolphinscheduler用户。
$ /dolphinscheduler/liutt/mysql_db/bin/mysql -u root -p '新密码'
mysql> set global validate_password.policy='LOW';      #低强度密码,可选设置
mysql> set global validate_password.length=4;        #密码长度最低4位,可选设置
mysql> create user dolphinscheduler@'%' identified with mysql_native_password by 'xxxx';
mysql> create user dolphinscheduler@'localhost' identified with mysql_native_password by 'xxxx';
- 1
- 2
- 3
- 4
- 5
3、 为dolphinscheduler用户赋予访问数据库权限。
mysql> grant all privileges on *.* to dolphinscheduler@'localhost';
mysql> grant all privileges on *.* to dolphinscheduler@'%';
mysql> flush privileges;
- 1
- 2
- 3
4、 测试用dsg用户登录数据库。
$ mysql -h192.xxx.x.xx -P3307 -udolphinscheduler -p
9. mysql建库
create user dolphinscheduler@'%' identified with mysql_native_password by 'dolphinscheduler';
create user dolphinscheduler@'%' identified with mysql_native_password by 'dolphinscheduler';
create user dolphinscheduler@'172.xx.x.xxx' identified with mysql_native_password by 'dolphinscheduler';
grant all privileges on *.* to dolphinscheduler@'localhost';
grant all privileges on *.* to dolphinscheduler@'%';
grant all privileges on *.* to dolphinscheduler@'172.xx.x.xxx';
flush privileges;
- 1
- 2
- 3
- 4
- 5
- 6
- 7
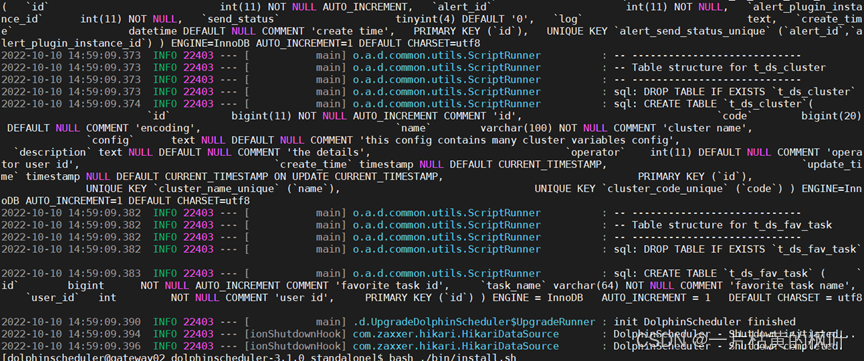
10. 海豚初始化数据库
如果使用 MySQL 需要手动下载 mysql-connector-java 驱动 (8.0.16) 并移动到 DolphinScheduler 的每个模块的 libs 目录下,其中包括 :
- api-server/libs
- alert-server/libs
- master-server/libs
- worker-server/libs
不然会报错 Caused by: java.lang.IllegalStateException: Cannot load driver class: com.mysql.cj.jdbc.Driver
11. 格式转换 dos2unix
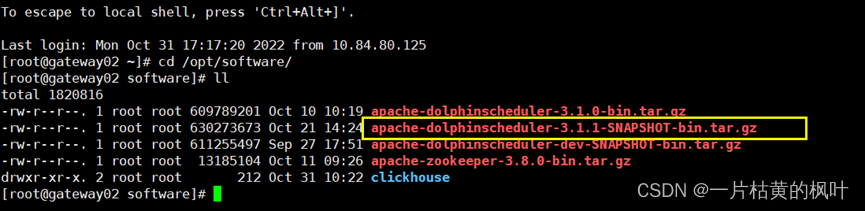
命令:修改过的安装包(apache-dolphinscheduler-3.1.1-SNAPSHOT-bin.tar.gz)由于windows和linux格式不一致问题,需要修改格式。
sudo yum install -y dos2unix
将当前目录所有文件格式都转为unix:find . -type f -exec dos2unix {} ;
修改一个文件的格式命令:
直接在各节点海豚主目录下执行修改所有文件即可
最后执行 tools/bin/upgrade-schema.sh 如下图所示
12. 安装dolphinscheduler集群
bash ./bin/install.sh
- 1
13. HDFS上添加目录,给到指定用户(dolphinscheduler)
在HDFS上添加对应目录,并将权限给到海豚用户,并在对应配置文件中添加资源路径
在master/worker/api/alert conf/common. properties 文件中路径信息对应

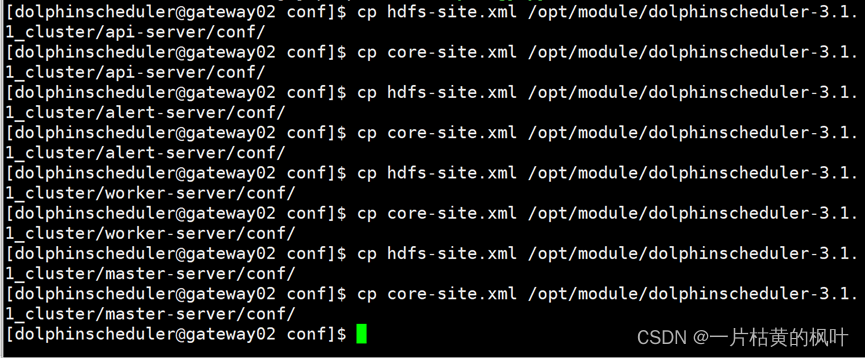
14. 将hdfs-site,core-site传到api,alert,worker,master下(所有节点都要操作)
15. 修改common.properties,同步至到api,alert,worker 的conf 目录下(所有节点都要操作)
#本地工作目录,用于存放临时文件
data.basedir.path=/tmp/dolphinscheduler_3.1.1
resource.storage.type=HDFS
#资源文件存储路径
resource.storage.upload.base.path=/user/rtassets/dolphinscheduler_3.1.1
resource.aws.access.key.id=minioadmin
resource.aws.secret.access.key=minioadmin
resource.aws.region=cn-north-1
resource.aws.s3.bucket.name=dolphinscheduler
resource.aws.s3.endpoint=http://localhost:9000
resource.alibaba.cloud.access.key.id=<your-access-key-id>
resource.alibaba.cloud.access.key.secret=<your-access-key-secret>
resource.alibaba.cloud.region=cn-hangzhou
resource.alibaba.cloud.oss.bucket.name=dolphinscheduler
resource.alibaba.cloud.oss.endpoint=https://oss-cn-hangzhou.aliyuncs.com
# 如果存储类型为HDFS,需要配置拥有对应操作权限的用户
resource.hdfs.root.user=hdfs
resource.hdfs.fs.defaultFS=hdfs://nameservice1:8020
hadoop.security.authentication.startup.state=true
java.security.krb5.conf.path=/etc/krb5.conf
login.user.keytab.username=rtassets@CINDASC.COM
login.user.keytab.path=/home/rtassets/rtassets.keytab
kerberos.expire.time=2
resource.manager.httpaddress.port=8088
yarn.resourcemanager.ha.rm.ids=192.168.xx.xx,192.168.xx.xx
yarn.application.status.address=http://ds1:%s/ws/v1/cluster/apps/%s
yarn.job.history.status.address=http://ds1:19888/ws/v1/history/mapreduce/jobs/%s
datasource.encryption.enable=false
datasource.encryption.salt=!@#$%^&*
data-quality.jar.name=dolphinscheduler-data-quality-dev-SNAPSHOT.jar
#不清楚这个参数
support.hive.oneSession=false
sudo.enable=true
development.state=false
alert.rpc.port=50052
conda.path=/opt/anaconda3/etc/profile.d/conda.sh
task.resource.limit.state=false
ml.mlflow.preset_repository=https://github.com/apache/dolphinscheduler-mlflow
ml.mlflow.preset_repository_version="main"
- 1
- 2
- 3
- 4
- 5
- 6
- 7
- 8
- 9
- 10
- 11
- 12
- 13
- 14
- 15
- 16
- 17
- 18
- 19
- 20
- 21
- 22
- 23
- 24
- 25
- 26
- 27
- 28
- 29
- 30
- 31
- 32
- 33
- 34
- 35
- 36
- 37
- 38
- 39
16. crontab认证配置格式如下(所有节点都配置)
Crontab定时配置 :crontab -e
10 9,10 * * * kinit -kt /home/rtassets/rtassets.keytab rtassets@CINDASC.COM
- 1
- 2
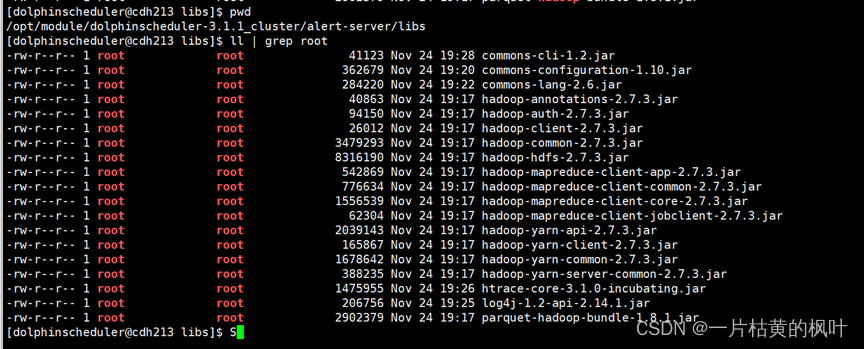
17. 替换hive相关包master/worker/api模块下的(所有节点都要替换)
需要如下包:(如下所示的包是适配apache-dolphinscheduler-3.1.1-SNAPSHOT-bin.tar.gz)
连接数据源没问题,跑hiveClient不会出现版本不匹配问题
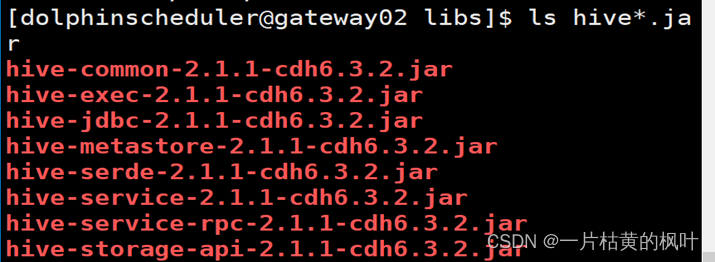
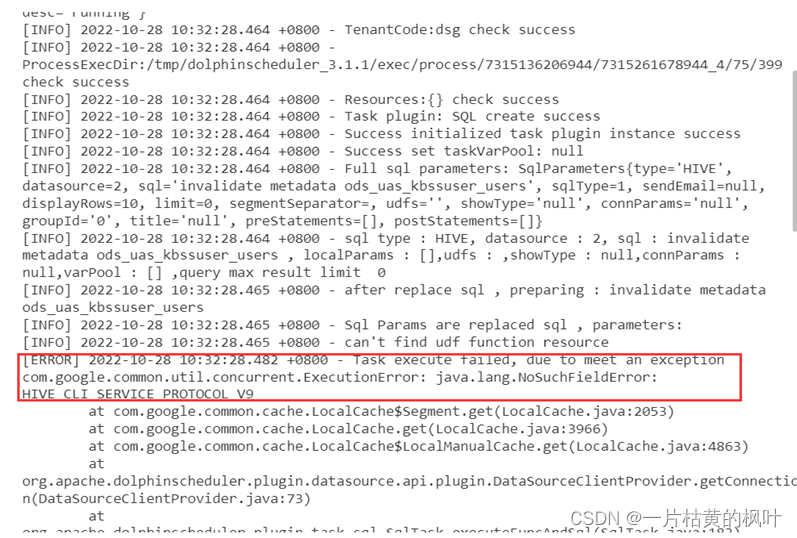
如下是包版本冲突出现的问题,需要修改如上图所示的包
版本冲突错误:
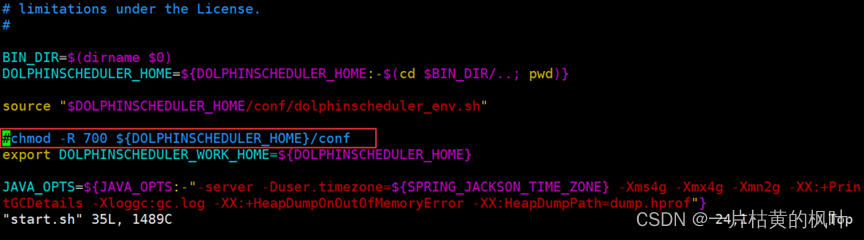
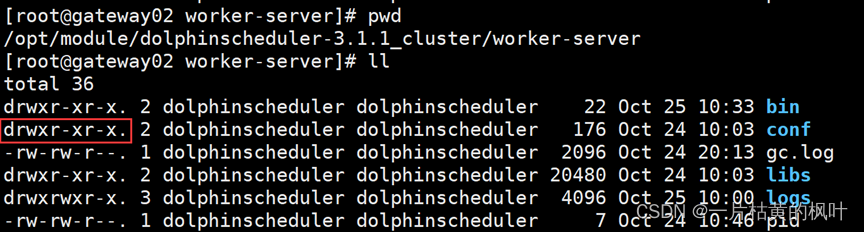
18. 注解掉 worker-server/bin目录下的 start.sh 中的信息(所有节点都要修改)
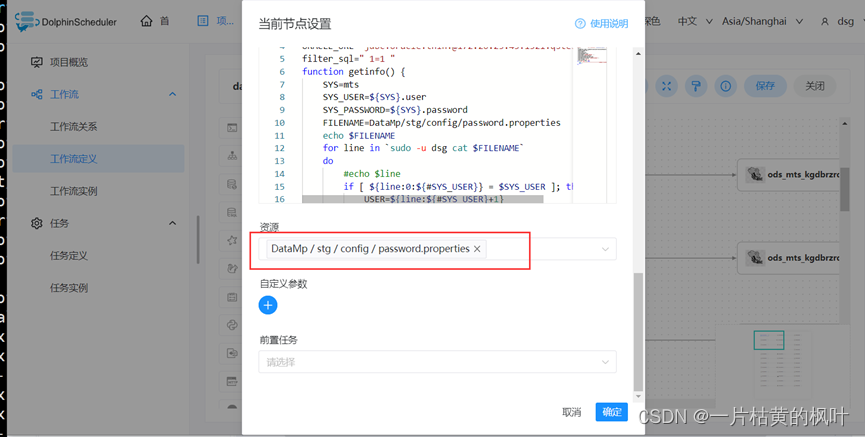
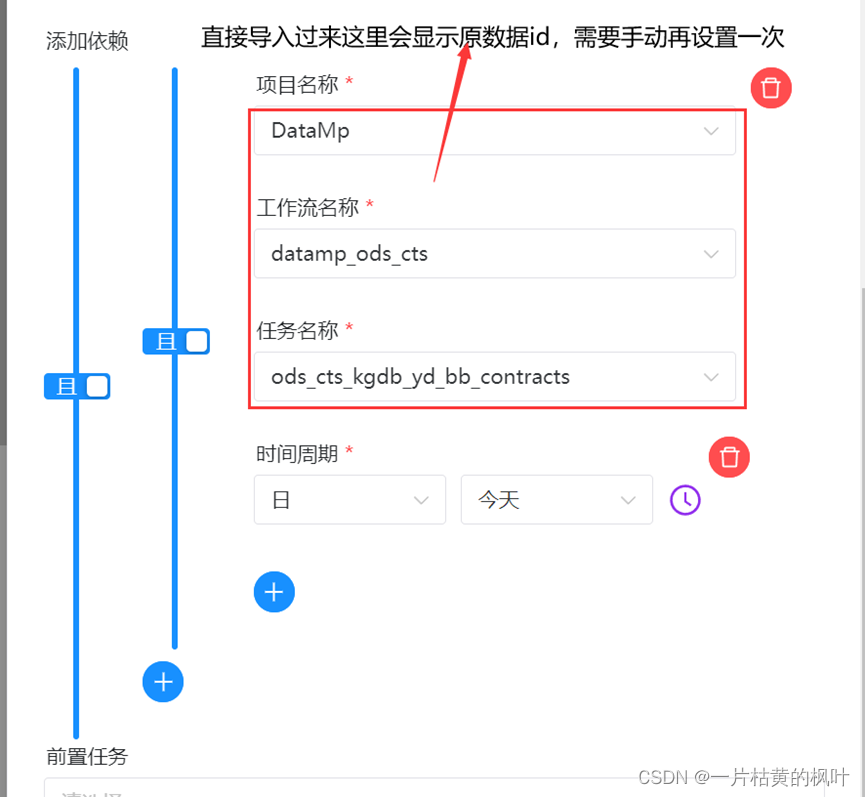
19. 导入工作流需要修改mysql中的源id信息
修改MySQL中的源端信息表 t_ds_resources
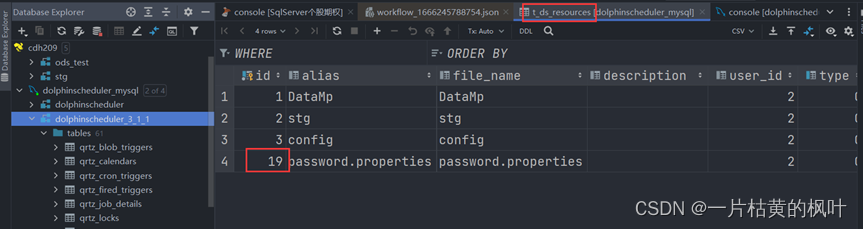
在海豚上导入工作流的时候,如果没有修改id,那么导入的工作流里面的不会识别资源目录,并且跑任务的时候也会识别不到id。(如下图是修改id后导入工作流自动识别,如果导入后没有识别资源目录,说明没有识别到id,运行起来有问题)
20. 海豚登录默认用户密码
admin
dolphinscheduler123
登陆后需要创建租户,用户。海豚租户名称需要和本地keytab认证的用户名称保持一致。租户对应下的用户名称没有要求。
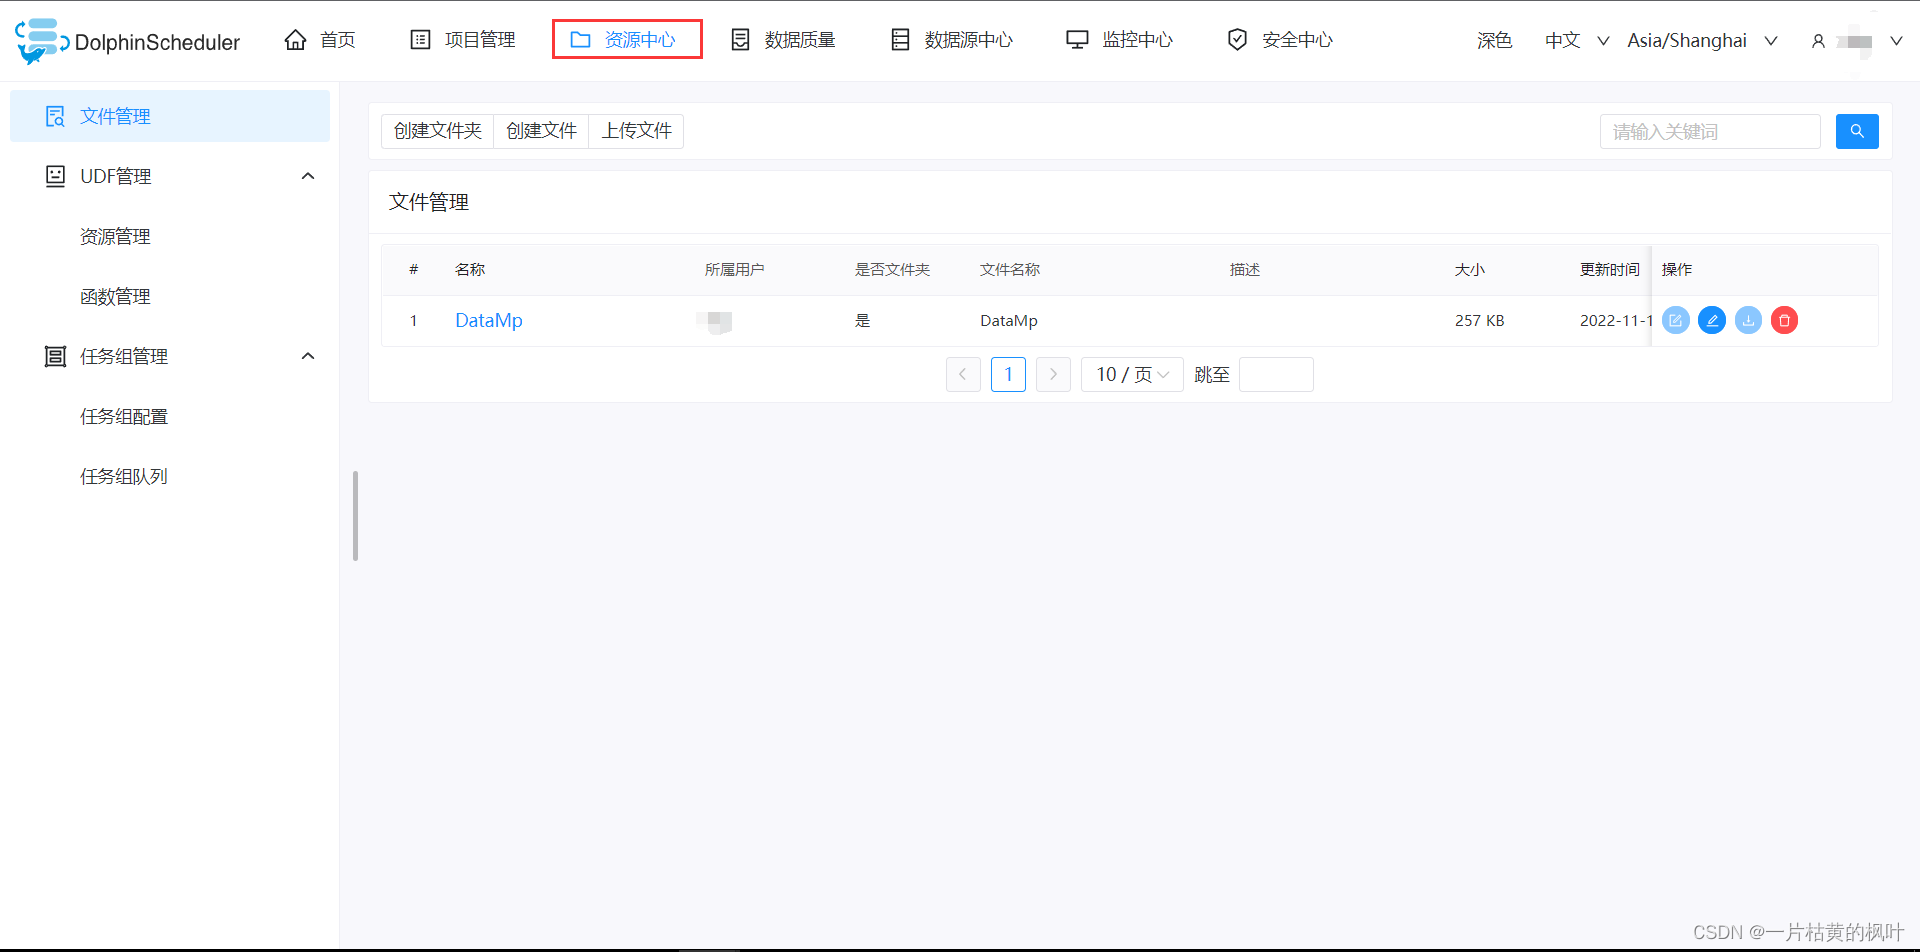
21. 资源中心模块
22. 数据源配置
jdbc连接参数
{“KrbServiceName”:“hive”,“KrbAuthType”:“2”}
23. 添加Sqoop脚本执行本地所需依赖包(所有节点都配置)
如下图所示
否则执行回报如下错误
24. 工作流迁移问题(依赖节点问题)
由于生产环境资源问题,ods层工作流之间配置成串行执行,包括dwd层的也依赖ods层,目前海豚在工作流导出再导如过程,依赖节点元数据id会发生改变,导致从测试环境导出的工作流再导入生产环境,无法运行起来,所以在生产环境中的DEPENDENT类型节点需要手动再设置一次
25. 定时任务设置问题,需要替换包
为了解决定时任务在定义了参数以后,不能调度的问题, 替换掉了每台服务器各个模块下的 jar:dolphinscheduler-service-3.1.1-SNAPSHOT.jar
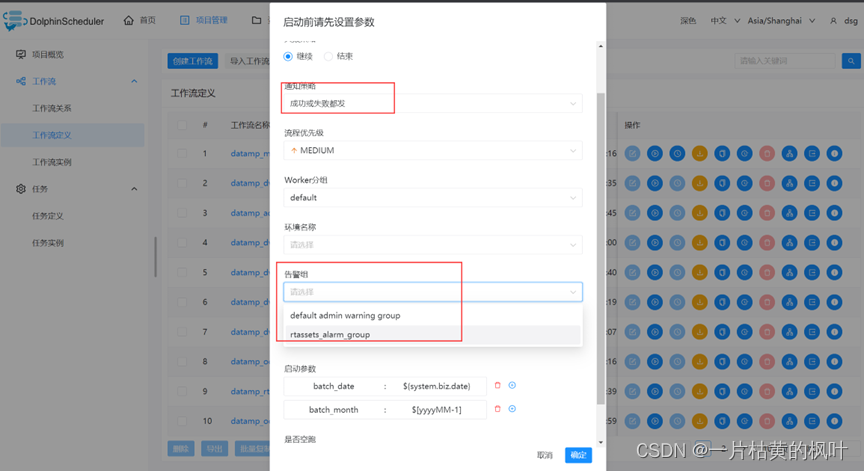
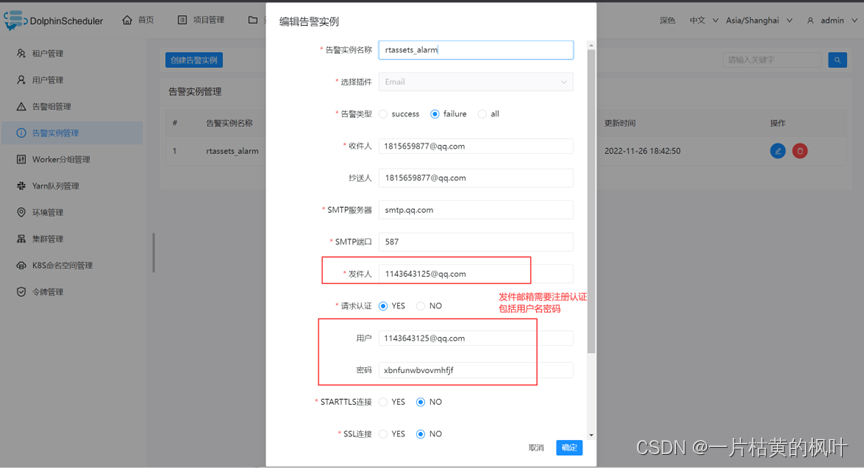
26. 告警配置
告警是在213上布置的,所以在213下设置相关包即可,否则会在web页面告警实例中出现无法找到告警组件的情况。
需要如下图所示包:所属用户所属组改成海豚用户
Admin用户下,创建告警实例
然后创建告警组,选中该实例
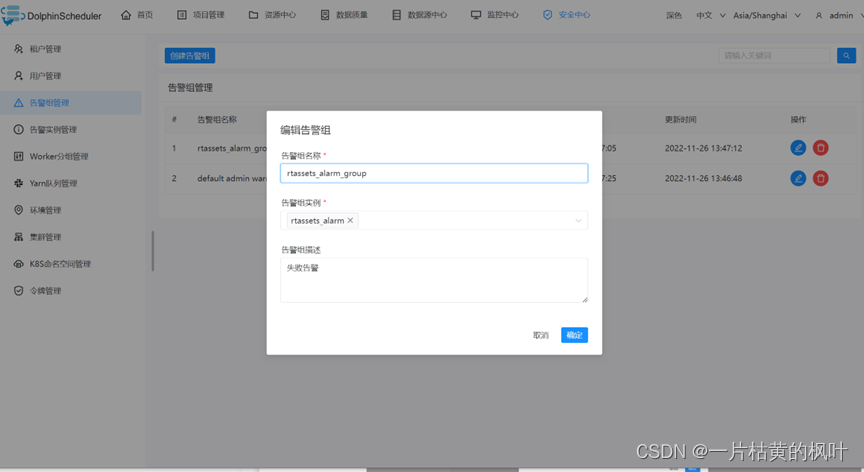
然后在运行时选择告警租和策略