
热门标签
当前位置: article > 正文
开源模型破局OpenAI服务限制,15分钟灵活搭建RAG和Agent应用
作者:小舞很执着 | 2024-07-02 03:27:55
赞
踩
开源模型破局OpenAI服务限制,15分钟灵活搭建RAG和Agent应用
简介: 今天,我们做了两个实验,目标在15分钟内,完成下载社区的开源模型,部署成API,替换LlamaIndex中RAG和LangChain中OpenAI接口Agent的最佳实践,并取得符合预期的结果。
实验一
实验目标:Qwen2+Ollama+LlamaIndex实现RAG应用
实验时长:15分钟
运行设备:Mac,CPU,GPU均可
环境安装:****
pip install llama-index llama_index.llms.ollama llama-index-embeddings-huggingface modelscope
- 1
复制模型路径,创建名为“ModelFile”的meta文件,内容如下:
FROM /mnt/workspace/qwen2-7b-instruct-q5_k_m.gguf
# set the temperature to 0.7 [higher is more creative, lower is more coherent]
PARAMETER temperature 0.7
PARAMETER top_p 0.8
PARAMETER repeat_penalty 1.05
TEMPLATE """{{ if and .First .System }}<|im_start|>system
{{ .System }}<|im_end|>
{{ end }}<|im_start|>user
{{ .Prompt }}<|im_end|>
<|im_start|>assistant
{{ .Response }}"""
# set the system message
SYSTEM """
You are a helpful assistant.
"""
- 1
- 2
- 3
- 4
- 5
- 6
- 7
- 8
- 9
- 10
- 11
- 12
- 13
- 14
- 15
使用ollama create命令创建自定义模型并运行
ollama create myqwen2 --file ./ModelFile
ollama run myqwen2
- 1
- 2
然后运行如下RAG代码:
from llama_index.core import VectorStoreIndex, SimpleDirectoryReader, Settings
from llama_index.core.embeddings import resolve_embed_model
from llama_index.llms.ollama import Ollama
import sys
# load doc qwen2 readme
documents = SimpleDirectoryReader("/mnt/workspace/content").load_data()
# bge embedding model
Settings.embed_model = resolve_embed_model("local:/mnt/workspace/bge-base-en-v1.5")
# ollama
Settings.llm = Ollama(model="myqwen2", request_timeout=30.0)
# create index
index = VectorStoreIndex.from_documents(documents)
# Either way we can now query the index
query_engine = index.as_query_engine()
response = query_engine.query("What is the maximum context length supported by Qwen2?")
print(response)

- 1
- 2
- 3
- 4
- 5
- 6
- 7
- 8
- 9
- 10
- 11
- 12
- 13
- 14
- 15
- 16
Output

实验二
实验目标:Qwen2+Ollama+Langchain实现Agent应用
实验时长:15分钟
运行设备:Mac,CPU,GPU均可
环境安装:
****
pip install langchain_openai langchain langchain_experimental
- 1
模型下载:
使用modelscope-cli下载qwen2模型:
modelscope download --model=qwen/Qwen2-7B-Instruct-GGUF --local_dir . qwen2-7b-instruct-q5_k_m.gguf
- 1
运行Qwen2(本地文件,也可以直接用ollama hub)
复制模型路径,创建名为“ModelFile”的meta文件,内容如下:
from langchain_experimental.agents.agent_toolkits import create_pandas_dataframe_agent
from langchain_openai import ChatOpenAI
import pandas as pd
# 下载csv文件
df = pd.read_csv(
    "https://raw.githubusercontent.com/pandas-dev/pandas/main/doc/data/titanic.csv"
)
agent = create_pandas_dataframe_agent(
    ChatOpenAI(api_key='ollama', # ollama 不需要使用真实的API key
        base_url = 'http://127.0.0.1:11434/v1',
        model="myqwen2"),
    df,
    verbose=True,
    allow_dangerous_code=True
)
agent.invoke("how many rows are there?")
- 1
- 2
- 3
- 4
- 5
- 6
- 7
- 8
- 9
- 10
- 11
- 12
- 13
- 14
- 15
- 16
使用ollama create命令创建自定义模型并运行
ollama create myqwen2 --file ./ModelFile
ollama run myqwen2
- 1
- 2
运行如下function call 代码(代码解释器):
from langchain_experimental.agents.agent_toolkits import create_pandas_dataframe_agent
from langchain_openai import ChatOpenAI
import pandas as pd
# 下载csv文件
df = pd.read_csv(
    "https://raw.githubusercontent.com/pandas-dev/pandas/main/doc/data/titanic.csv"
)
agent = create_pandas_dataframe_agent(
    ChatOpenAI(api_key='ollama', # ollama 不需要使用真实的API key
        base_url = 'http://127.0.0.1:11434/v1',
        model="myqwen2"),
    df,
    verbose=True,
    allow_dangerous_code=True
)
agent.invoke("how many rows are there?")
- 1
- 2
- 3
- 4
- 5
- 6
- 7
- 8
- 9
- 10
- 11
- 12
- 13
- 14
- 15
- 16
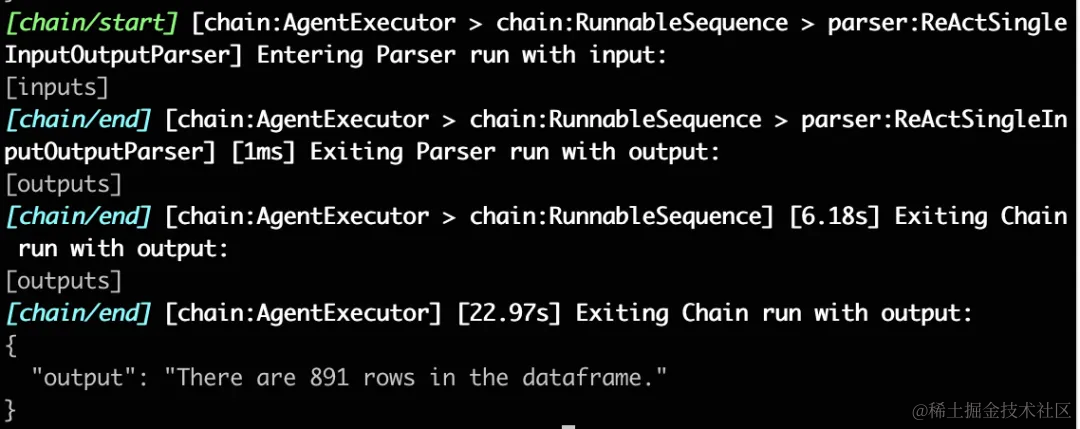
Output
声明:本文内容由网友自发贡献,不代表【wpsshop博客】立场,版权归原作者所有,本站不承担相应法律责任。如您发现有侵权的内容,请联系我们。转载请注明出处:https://www.wpsshop.cn/w/小舞很执着/article/detail/778459
推荐阅读
相关标签

