- 1测试Ocr工具IronOCR
- 2YOLOv8 升级之路:GhostNetV2 主干网络解析与实操
- 3TF-IDF介绍及Python实现文本聚类_python tfidf
- 4如何使用Springboot集成华为云OCR服务,实现文字识别的功能?_ocrclient client = ocrclient.newbuilder()
- 5政安晨:【示例演绎】【Python】【Google/JAX】—— 专为高性能与大规模机器学习设计
- 6如何成为一名正义黑客?你应该学习什么?_ethical hacker golf ball diver cheese sculptor
- 7大模型和向量数据库怎么搭建 RAG 系统?Step by step 例子来了。
- 8计算机视觉_high-level的视觉任务
- 9Meta开源的LLaMa到底好不好用?最全测评结果来了
- 10Attentional Feature Fusion 注意力特征融合_注意力融合
【python开发】安装&配置&启动+数据库管理+表管理+数据行管理+python操作Mysql及相关安全的问题
赞
踩
一、安装&启动
1、安装
https://downloads.mysql.com/archives/community/,进入网址后选择合适的版本,具体配置过程并不会(找人帮忙装的)
2、测试
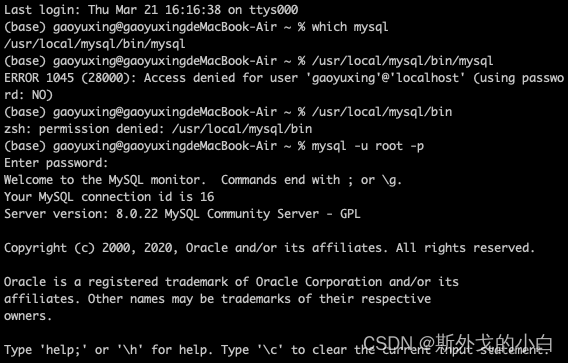
安装好之后打开终端,输入which mysql,回车查看mysql安装路径/usr/local/mysql/bin/mysql,然后输入/usr/local/mysql/bin,进入到mysql中,输入mysql -u root -p,弹出输入密码的提示,然后输入mysql密码,这就已经启动了mysql。
如果需要启动mysql,只需要打开终端输入mysql -u root -p,如果不使用mysql了就可以输入exit退出系统。
3、设置和修改root密码
window系统中默认的root账号没有密码,如果想为账户设定密码,可以在登陆之后执行命令:set password = password(“root123”),但这个前提是能够进得去数据库,要么数据库本来就没密码要么就是知道原来密码但是要设定新的密码。
忘记密码时:
(1)修改配置文件,在【mysql】节点下添加skip-grant-tables = 1;
(2)重启mysql,再次登陆时,不需要密码直接可以进去了,重启指令:[win] net stop mysql、net start mysql,[Mac] study mysql.server restart;
(3)重庆之后无需密码就可登陆 mysql -u -root -p;
(4)进入数据库后执行修改密码命令: use mysql;点击回车后执行update user set authentication_string = password(‘新密码’), password_last_changed = now() where user = ‘root’。
(5)退出并再次修改配置文件,删除[mysql]节点下的skip-grant-tables =1
(6)再次重启,以后就可以使用密码登陆了。
注:sql语句中–代表注释。
二、数据库管理
安装之后,可以通过指令让Mysql作出一些文件操作。
1、内置客户端操作
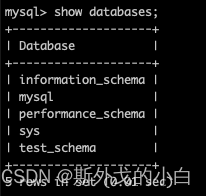
(1)查看当前所有的数据库(show databases);
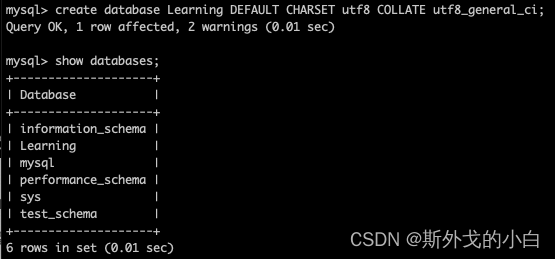
(2)创建数据库:create database learn(数据库名);
但是当我们在定义一个数据库的时候往往会同时定义好它的编码规则,因此命令可以写作:create database learning
(数据库名)DEFAULT CHARSET utf8 COLLATE utf8_general_ci;
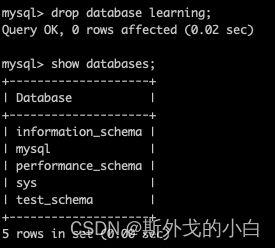
(3)删除数据库:drop database learning(数据库名);
(4)进入数据库/使用数据库:use database test_shcema(数据库名);
(5)查看数据库下包含的表:show tables;

(6)退出:exit
退出指令exit并不需要封号,如果需要退出本命令行,只需要输入\c即可。
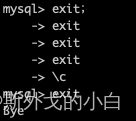
2、用python操作mysql的代码
用python来操控mysql时,代码跟内置代码有些许不同,python命令如下:
(1)连接Mysql
import pymysql


#连接mysql(用到了网络编程socket)

conn = pymysql.connect(
    host='127.0.0.1',
    #port = 3306,
    user='root',
    password='12345678',
    database='test_schema',
    charset='utf8'
)


#构造游标,通过游标来操控mysql
cursor = conn.cursor()
- 1
- 2
- 3
- 4
- 5
- 6
- 7
- 8
- 9
- 10
- 11
- 12
- 13
- 14
- 15
- 16
- 17
(2)参看数据库
#通过游标发送命令
cursor.execute('show databases')
#通过游标来获取mysql的返回值
result = cursor.fetchall()
print(result)
#(('information_schema',), ('mysql',), ('performance_schema',), ('sys',), ('test_schema',))
- 1
- 2
- 3
- 4
- 5
- 6
(3)创建数据库
需要注意的是,如果是查询的话,使用cursor.fetchall()即可,如果是需要增删改就需要用到conn.commit()
cursor.execute("create database learing default charset utf8 collate utf8_general_ci")
#增删改查都需要用conn.commit()指令
conn.commit()


#通过游标发送命令
cursor.execute('show databases')
#通过游标来获取mysql的返回值
result = cursor.fetchall()
print(result)
#(('information_schema',), ('learing',), ('mysql',), ('performance_schema',), ('sys',), ('test_schema',))
- 1
- 2
- 3
- 4
- 5
- 6
- 7
- 8
- 9
- 10
- 11
(4)删除数据库
cursor.execute("drop database learing")
conn.commit()

cursor.execute('show databases')
result1 = cursor.fetchall()
print(result1)
#(('information_schema',), ('mysql',), ('performance_schema',), ('sys',), ('test_schema',))
- 1
- 2
- 3
- 4
- 5
- 6
- 7
(5)查询数据库中的表
cursor.execute('use test_schema')
cursor.execute('show tables')
result2 = cursor.fetchall()
print(result2)
#()
- 1
- 2
- 3
- 4
- 5
三、表管理
1、内置客户端操作
在本文中不再介绍常见的数据类型(整数、字符串),因为之前的博客中有详细记录。
(1)use 数据库 + show tables
在对表table进行操作之前,必须先打开数据库use+数据库名。

(2)创建表格
create table 表名(
列名 类型,
列名 类型,
列名 类型
)default charset=utf8;
mysql> create table tb1(
    -> id int,
    -> name varchar(16)
    -> ) default charset=utf8;
- 1
- 2
- 3
- 4
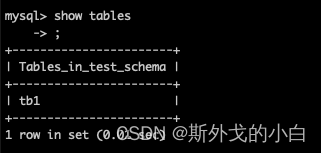
1)设置字段是否能为空值
比如name 设置为“不能为空值“,email设置为“可以为空值“。
mysql> create table tb2(
    -> id int,
    -> name varchar(16) not null,
    -> email varchar(32) null,
    -> age int
    -> )default charset=utf8;
- 1
- 2
- 3
- 4
- 5
- 6
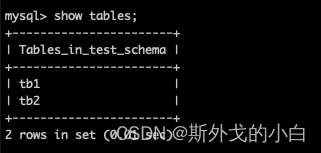
2)设置字段的默认值
mysql> create table tb3(
    -> id int,
    -> name varchar(16) not null,
    -> email varchar(32) not null,
    -> age int default 3
    -> )default charset=utf8;
- 1
- 2
- 3
- 4
- 5
- 6
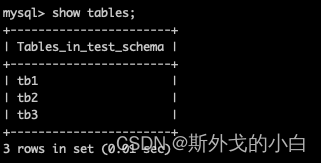
3)设置字段为主键
mysql> create table tb4(
    -> id  int primary key,
    -> name varchar(16) not null,
    -> email varchar(32) null,
    -> age int default 3
    -> )default charset=utf8;
- 1
- 2
- 3
- 4
- 5
- 6
4)设置字段为自增长
主键一般用于表示当前这条数据的ID编号(类似于人的身份证),需要我们自己维护一个不重复的值,而这又是比较繁琐的操作,所以在数据库中一般会将主键和自增相结合。
mysql> create table tb5(
    -> id int not null auto_increment primary key,
    -> name varchar(16) not null,
    -> email varchar(32) null,
    -> age int default 3
    -> )default charset=utf8;
- 1
- 2
- 3
- 4
- 5
- 6
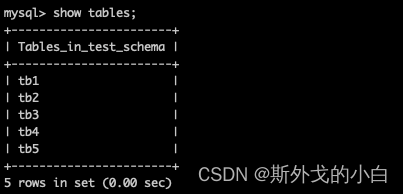
注:一个表只能由一个自增长列,一般是主键
5)删除表
drop table 表名
6)清空表
delete from 表名
truncate 表名(速度快,但是无法撤销)
(3)修改表
1)添加列
alter table 表名 add 列名 类型;
alter table 表名 add 列名 类型 default 默认值;
alter table 表名 add 列名 类型 not null default 默认值;
alter table 表名 add 列名 类型 not null primary key auto_increment;
- 1
- 2
- 3
- 4
- 5
我们查看表字段的属性,然后进行修改
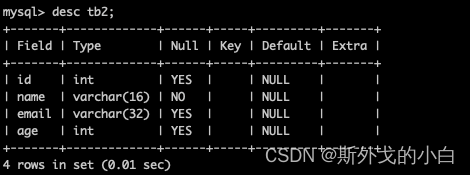
增加一个pwd字段,设置为不能为空值
alter table tb2 add pwd varchar(64) not null;
然后再去查看表字段属性:
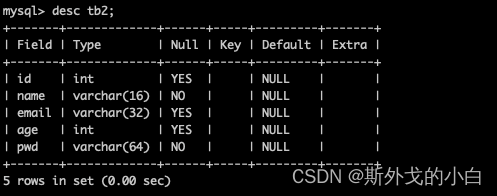
2)删除列
alter table 表名 drop column 列名;
alter table tb2 drop column pwd;
- 1
3)修改列属性和名称
alter table 表名 change 原列名 新列名 新类型;
alter table tb2 change id id1 int not null primary key auto_increment;
- 1
4)修改列 设置默认值
alter table 表名 alter 列名 set default 默认值;
alter table tb2 alter age set default 20;
- 1
5)删除列的默认值
alter table 表名 alter 列名 drop default;
alter table tb2 alter age drop default;
- 1
6)添加主键
alter table 表名 add primary key(id);
Alter table tb3 add primary key(id);
- 1
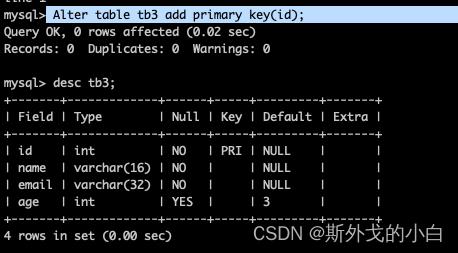
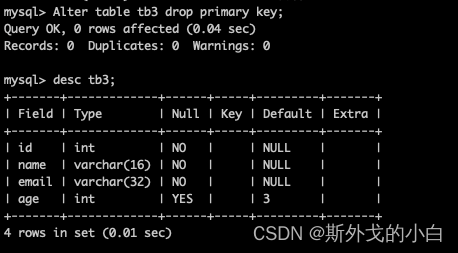
7)删除主键
alter table 表名 drop primary key;
Alter table tb3 drop primary key;
- 1
(4)数据类型:文本
1)text
text用于保存变长的大字符串,最多储存65535个字符,一般情况下长文本会用text类型,例如:新闻和文章。
mysql> create table L1(
    -> id int not null auto_increment primary key,
    -> title varchar(128),
    -> context text
    -> )default charset=utf8;
- 1
- 2
- 3
- 4
- 5
2)mediumtext
中文本,可以保存16777215个字符串。
3)longtext
长文本,最多可以保存4294967295个字符串。
(5)数据类型:时间
1)datetime
原样子输入原样输出;
2)timestap
timestap吧客户端插入的时间从当前时区转化为UTC(世界标准时间)进行存储,查询时,将其又转化为客户端当前的时并进行返回。而datetime不做任何改变,原杨输出和输入。
mysql> create table L2(
    -> id int not null auto_increment primary key,
    -> Dd datetime,
    -> Tt timestamp
    -> )default charset=utf8;
- 1
- 2
- 3
- 4
- 5
插入数据
insert into L2(dd,tt) values ("2025-11-11 10:45:40", "2025-11-11 10:45:40");
- 1

可以看出:datetime和timestamp格式下,输出的时间是一样单,但是当我们改了时区后Tt显示的时间将会有变化。
mysql> show variables like '%time_zone%';
+------------------+--------+
| Variable_name    | Value  |
+------------------+--------+
| system_time_zone | CST    |
| time_zone        | SYSTEM |
+------------------+--------+
2 rows in set (0.02 sec)
- 1
- 2
- 3
- 4
- 5
- 6
- 7
- 8
当我们改变系统时区后再次去看时间数据的时候就会发现,timestap和datetime返回的数值不同了。
mysql> set time_zone='+0:00';
Query OK, 0 rows affected (0.00 sec)

mysql> show variables like '%time_zone%';
+------------------+--------+
| Variable_name    | Value  |
+------------------+--------+
| system_time_zone | CST    |
| time_zone        | +00:00 |
+------------------+--------+
2 rows in set (0.00 sec)

mysql> select * from L2;
+----+---------------------+---------------------+
| id | Dd                  | Tt                  |
+----+---------------------+---------------------+
|  1 | 2025-11-11 10:45:40 | 2025-11-11 02:45:40 |
+----+---------------------+---------------------+
1 row in set (0.00 sec)
- 1
- 2
- 3
- 4
- 5
- 6
- 7
- 8
- 9
- 10
- 11
- 12
- 13
- 14
- 15
- 16
- 17
- 18
- 19
2、python代码操作
conn = pymysql.connect(
    host='localhost',
    #port = 3306,
    user='root',
    password='12345678',
    database='test_schema',
    charset='utf8'
)


#构造游标,通过游标来操控mysql
cursor = conn.cursor()


#进入数据库创建表
cursor.execute('use test_schema')


sql = """
create table L_(
id int not null primary key auto_increment,
title varchar(128),
content text,
ctime datetime
)default charset=utf8;
"""

cursor.execute(sql)
conn.commit()


cursor.execute('show tables')
result2 = cursor.fetchall()
print(result2)
#(('L1',), ('L2',), ('L_',), ('tb1',), ('tb2',), ('tb3',), ('tb4',), ('tb5',))
- 1
- 2
- 3
- 4
- 5
- 6
- 7
- 8
- 9
- 10
- 11
- 12
- 13
- 14
- 15
- 16
- 17
- 18
- 19
- 20
- 21
- 22
- 23
- 24
- 25
- 26
- 27
- 28
- 29
- 30
- 31
- 32
- 33
- 34
- 35
- 36
四、数据行
当数据库和数据表创建完成之后,就需要对数据表中的内容进行增删改查了。
1、内置客户端操作
数据行操作的相关指令如下:
(1)新增数据
insert into 表名(列名,列名,列名) values(值,值,值)
insert into tb5(name, age) values('高宇星','18')
insert into tb5(name, age) values('朱朱','20'),('alex', '26')
insert into tb5 values('7','豪哼','22'),('8','你好', '27') --省掉列名之后,将数据对应输入
- 1
- 2
- 3
(2)删除数据
delete from 表名
delete from 表名 where 条件
delete from tb5
delete from tb5 where age='30'
- 1
- 2
(3)修改数据
update 表名 set 列名=值;
update 表名 set 列名=值 where 条件;
update tb5 set name='美女'; --将姓名这一列全部都改成美女
update tb5 set name='宇宙超级无敌大美女' where id=1;
update tb5 set age=age+1 where id=3;
update tb5 set name=concat(name,'123') where id=4; --concat一个函数,可以拼接字符
- 1
- 2
- 3
- 4
(4)查询数据
select * from 表名;
select 列名,列名,列名 from 表名;
select 列名,列名 as 别名,别名 from 表名;
select * from 表名 where 条件;
select * from tb5;
select id,name,age from tb5;
select id,name as N,age from tb5;    --name列字段会变为N
select id,name as N,age,111 from tb5;  --字段111本来时没有的,但是在查询的时候会多出一个字段,名字为111,数据为空
- 1
- 2
- 3
- 4
2、python代码操作
python执行命令增删改查
import pymysql


#连接Mysql,自动执行use test_schema--进入指定数据库
conn = pymysql.connect(
    host='localhost',
    user='root',
    password='12345678',
    database='test_schema',
    charset='utf8'
)

cursor = conn.cursor()


#1、新增
cursor.execute("insert into tb5(name, age) values('高宇星', 18)")
conn.commit()

cursor.execute('select * from tb5')
print(cursor.fetchall())


#2、删除
cursor.execute('delete from tb5 where id=9')
conn.commit()

#3、修改
cursor.execute('update tb5 set name="xx" where id=10')
conn.commit()

#4、查询
cursor.execute('select * from tb5')
data = cursor.fetchall()
print(data)
# ((10, 'xx', 18), (11, '高宇星', 18))


#关闭连接
conn.close()
- 1
- 2
- 3
- 4
- 5
- 6
- 7
- 8
- 9
- 10
- 11
- 12
- 13
- 14
- 15
- 16
- 17
- 18
- 19
- 20
- 21
- 22
- 23
- 24
- 25
- 26
- 27
- 28
- 29
- 30
- 31
- 32
- 33
- 34
- 35
- 36
- 37
- 38
- 39
- 40
- 41
案例:实现一个用户管理系统
先使用Mysql自带的客户端创建相关数据库和表结构(相当于先创建好Excel结构),然后再在程序中执行编写相应的功能,实现 注册、登录等功能。
在终端使用mysql语言创建了表格users
mysql> use test_schema;
Reading table information for completion of table and column names
You can turn off this feature to get a quicker startup with -A

Database changed
mysql> create table users(
    -> id int not null primary key auto_increment,
    -> name varchar(32),
    -> password varchar(64)
    -> )default charset=utf8;
Query OK, 0 rows affected, 1 warning (0.03 sec)
- 1
- 2
- 3
- 4
- 5
- 6
- 7
- 8
- 9
- 10
- 11
在pycharm中编写执行代码
import pymysql


def register():
    print("用户注册")

    user = input("请输入用户名:")
    password = input("请输入密码:")

    #连接指定数据
    conn = pymysql.connect(
        host='localhost',
        user='root',
        password='12345678',
        database='test_schema',
        charset='utf8'
    )
    cursor = conn.cursor()

    #执行SQL语句(有sql注入风险)
    sql = 'insert into users(name, password) values("{}","{}")'.format(user, password)
    cursor.execute(sql)
    conn.connect()

    #关闭数据库
    cursor.close()
    conn.close()

    print("注册成功,用户名:{}, 密码:{}".format(user, password))


def login():
    print("用户登录")

    user = input("请输入用户名:")
    password = input("请输入密码:")

    # 连接指定数据
    conn = pymysql.connect(
        host='localhost',
        user='root',
        password='12345678',
        database='test_schema',
        charset='utf8'
    )
    cursor = conn.cursor()

    #执行sql语句(有sql注入风险)
    sql = "select * from users where name='{}' and password='{}'".format(user, password)
    cursor.execute(sql)
    result = cursor.fetchone() #去获取一条数据

    if result:
        print("登录成功", result)
    else:
        print("登录失败")


def run():
    choice = input("1.注册;2.登录,请输入:")
    if choice == '1':
        register()
    elif choice == '2':
        login()
    else:
        print("输入错误")


if __name__ == '__main__':
    run()
- 1
- 2
- 3
- 4
- 5
- 6
- 7
- 8
- 9
- 10
- 11
- 12
- 13
- 14
- 15
- 16
- 17
- 18
- 19
- 20
- 21
- 22
- 23
- 24
- 25
- 26
- 27
- 28
- 29
- 30
- 31
- 32
- 33
- 34
- 35
- 36
- 37
- 38
- 39
- 40
- 41
- 42
- 43
- 44
- 45
- 46
- 47
- 48
- 49
- 50
- 51
- 52
- 53
- 54
- 55
- 56
- 57
- 58
- 59
- 60
- 61
- 62
- 63
- 64
- 65
- 66
- 67
- 68
- 69
- 70
- 71
- 72
- 73
- 74
在执行程序的时候,选择1选项进行注册,然后在输入三条数据后查看users表
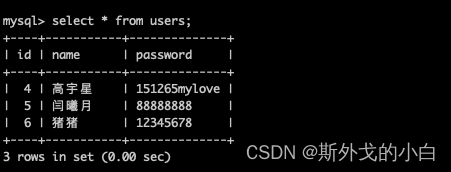
由此可以看到三个账户的信息。
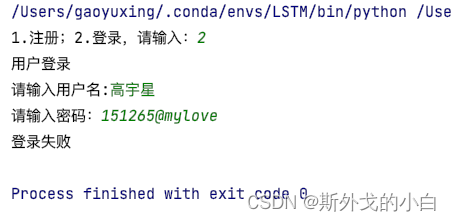
接着我们选择登录选项,在输入信息后从数据表中查询,看看是否是正确的信息,如果fetchone返回数据的话就是正确的,可以正常登录的,返回数据None的话,就说明数据不正确,无法成功登录。

五、关于SQL注入
如果客户在输入sql语句时,把name赋值为’or 1=1–即使输入错误的密码也会通过验证,这就是SQL注入问题。
因为拼接起来的SQL语句为:
select * from users where name = ''or 1=1 --' and password='123''
- 1
这样查询语句的含义就变成了查询name为空值或者 1=1 的数据 ‘–’在sql语句中是注释的意思后面的and就没有任何作用了,所以fetchone可以返回数据,并且通过验证登录成功。
那么如何在python中避免sql注入的问题呢?
切记不要使用python的字符串格式化,而是要用pymysql中的execute方法,并把formate方法改为占位符方法。
def login():
    print("用户登录")

    user = input("请输入用户名:")
    password = input("请输入密码:")

    # 连接指定数据
    conn = pymysql.connect(
        host='localhost',
        user='root',
        password='12345678',
        database='test_schema',
        charset='utf8'
    )
    cursor = conn.cursor()

    #执行sql语句(有sql注入风险)
    #sql = "select * from users where name='{}' and password='{}'".format(user, password)
    #cursor.execute(sql)
    cursor.execute("select * from users where name=%(name)s and password=%(pwd)s", {'name':user, 'pwd':password})
    result = cursor.fetchone() #去获取一条数据

    if result:
        print("登录成功", result)
    else:
        print("登录失败")
- 1
- 2
- 3
- 4
- 5
- 6
- 7
- 8
- 9
- 10
- 11
- 12
- 13
- 14
- 15
- 16
- 17
- 18
- 19
- 20
- 21
- 22
- 23
- 24
- 25
- 26
因为使用sql语句可以自动格式化并检查是否有非法的其他字符,而且代码内部会做转译。


