- 1【面试经】数据分析 or 数据开发面试必备思路,面试官都会这样问。_数据开发岗位面试
- 2零基础转行Linux云计算运维工程师获得20万年薪的超级学习技巧_linux云计算运维工程师培训教程
- 3AI视频教程下载:使用ChatGPT进行市场营销
- 416行python画朵玫瑰_python画很多束玫瑰
- 5电销机器人电话机器人系统部署freeswich安装
- 6为什么很多企业会需要IT人才外包?_计算机为什么会产生外包人员这个形式
- 7FPGA block RAM和distributed RAM区别(以及xilinx 7系列CLB资源)
- 8elasticsearch查询操作(语句方式)_es模糊查询语句_elasticsearch 模糊查询
- 9Window安装并配置Mysql_windows mysql 配置文件
- 10python——飞机大战游戏(下载模块,知识点,图片)_python 飞机大战
采用LoRA方法微调llama3大语言模型_llama3预训练
赞
踩
前言
因为上篇文章点赞数超过1,所以今天继续更新llama3微调方法。先介绍一下如何与本地llama3模型交互,再介绍如何使用torchtune和LoRA方式微调llama3,最后介绍一下如何用torchtune与llama3模型交互。
一、Llama3模型简介
目前llama3开源的模型有Meta-Llama-3-8B、Meta-Llama-3-8B-Instruct、Meta-Llama-3-70B和Meta-Llama-3-70B-Instruct。这里Meta-Llama-3-8B是参数规模为80亿的预训练模型(pretrained model),Meta-Llama-3-8B-Instruct是80亿参数经过指令微调的模型(instruct fine-tuned model);对应的,后两个模型就是对应700亿参数的预训练和指令微调模型。那么,预训练模型和指令微调模型有什么区别呢?我们来跟她们对话一下就明白了。
1.下载llama3源码到linux服务器
git clone https://github.com/meta-llama/llama3.git
2.安装依赖
最好先用anaconda创建一个专门为微调模型准备的python虚拟环境,然后运行命令:
cd llama3
pip install -e .
3.测试预训练模型Meta-Llama-3-8B
torchrun --nproc_per_node 1 example_text_completion.py
–ckpt_dir Meta-Llama-3-8B/
–tokenizer_path Meta-Llama-3-8B/tokenizer.model
–max_seq_len 128 --max_batch_size 4
参数解释:
–ckpt_dir 模型权重所在文件夹路径,一般后缀为.pt、.pth或.safetensors
–tokenizer_path 分词器路径,必须带上分词器名称,例如tokenizer.model
–max_seq_len 输出的最大序列长度,这个在预训练模型的调用中是必带参数
–max_batch_size 每个批次包含的最大样本数
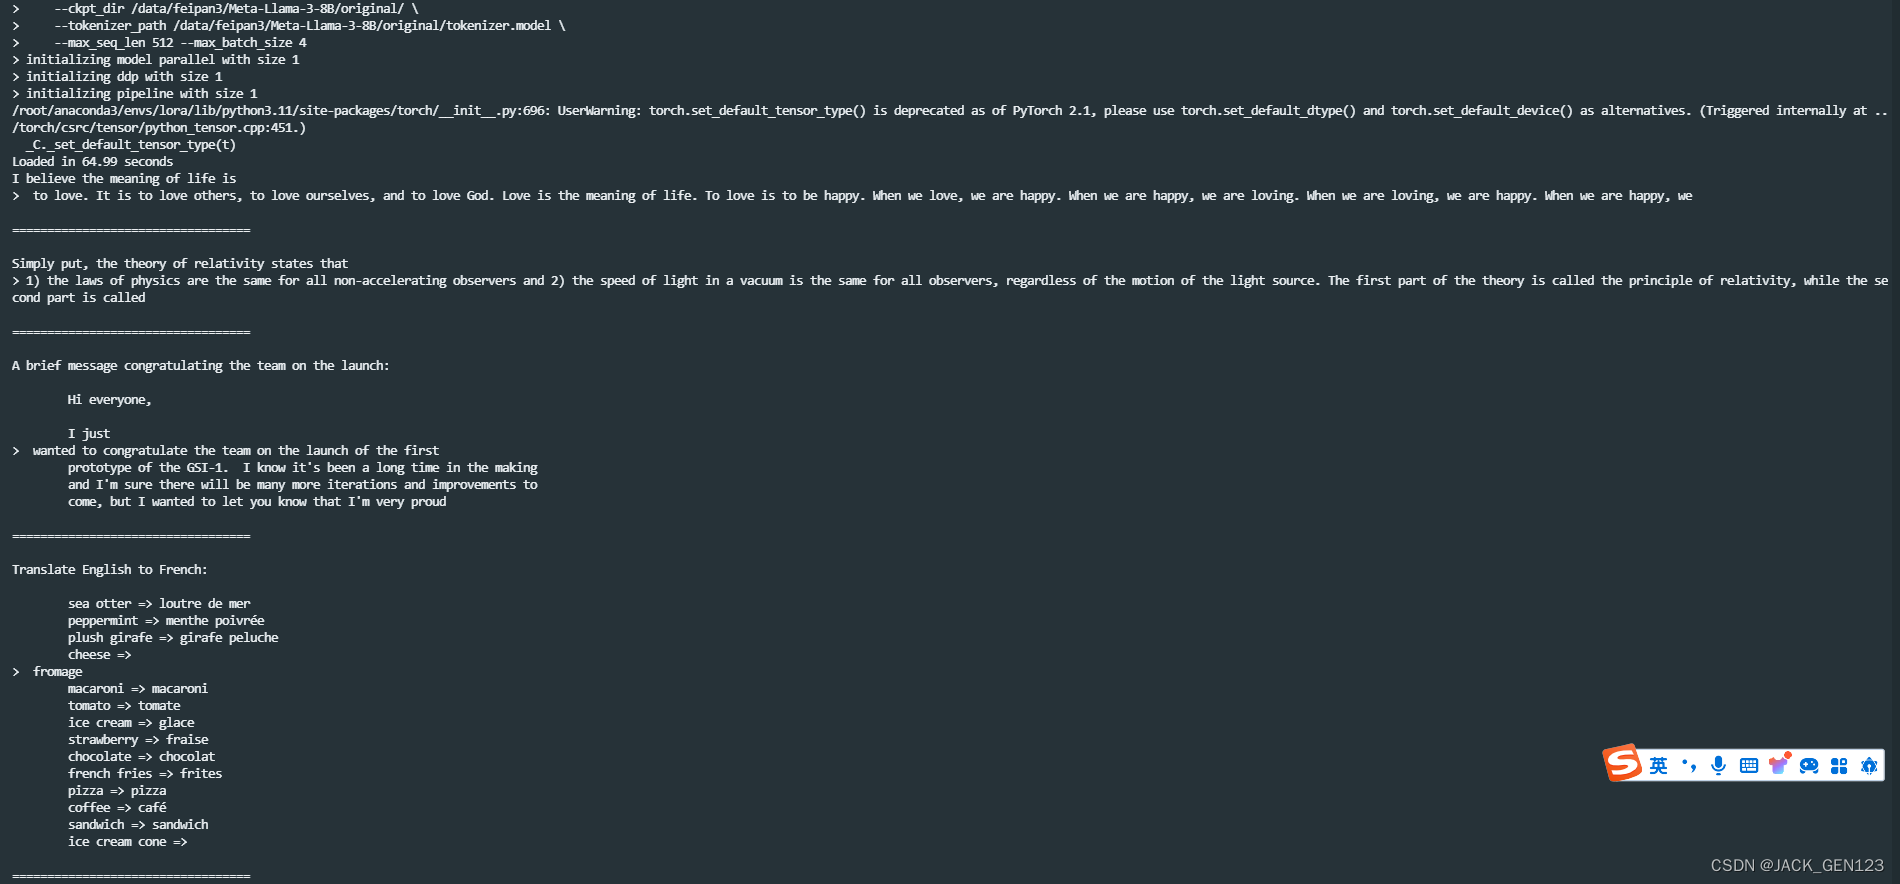
下图是模型的输出结果,当我输入英文"I believe the meaning of life is"时,模型会输出"to love. It is to love others, to love ourselves, and to love God. Love is the meaning of life blablabla"。

很明显,预训练模型Meta-Llama3-8B是对用户输入的一个续写。
4.测试指令微调模型Meta-Llama3-8B-Instruct
torchrun --nproc_per_node 1 example_chat_completion.py
–ckpt_dir /data/jack/Meta-Llama-3-8B-Instruct/original/
–tokenizer_path /data/jack/Meta-Llama-3-8B-Instruct/original/tokenizer.model
–max_seq_len 512 --max_batch_size 4
参数解释:
–max_seq_len 输出的最大序列长度,这个对指令微调模型是可选参数,不设置指令微调模型也会在问答中自动停止输出
如上图所示,Meta-Llama-3-8B-Instruct模型面对用户的提问,会给出合适的回答。
5.小结
Meta-Llama-3-8B是针对用户输入的一个续写,跟Transformer架构的模型在预训练过程中的下一词汇预测很相似;Meta-Llama-3-8B-Instruct是可以回答用户提问的模型。因此,在选择LoRA微调的基底模型时,大部分情况应当选择指令词微调模型。
二、LoRA微调Llama3
1.引入库
在切换到anaconda或venv的python环境后:
pip install torchtune
2.编写配置文件
如果下载了torchtune仓库的源码,可以从中拷贝出对应的recipe文件,文件夹的相对路径为:
torchtune\recipes\configs\llama3
# Model Arguments
model:
  _component_: torchtune.models.llama3.lora_llama3_8b
  lora_attn_modules: ['q_proj', 'v_proj']
  apply_lora_to_mlp: False
  apply_lora_to_output: False
  lora_rank: 8
  lora_alpha: 16

# Tokenizer
tokenizer:
  _component_: torchtune.models.llama3.llama3_tokenizer
  path: /data/jack/Meta-Llama-3-8B-Instruct/original/tokenizer.model

checkpointer:
  _component_: torchtune.utils.FullModelMetaCheckpointer
  checkpoint_dir: /data/jack/Meta-Llama-3-8B-Instruct/original/
  checkpoint_files: [
    consolidated.00.pth
  ]
  recipe_checkpoint: null
  output_dir: /data/jack/Meta-Llama-3-8B-Instruct/
  model_type: LLAMA3
resume_from_checkpoint: False

# Dataset and Sampler
dataset:
  _component_: torchtune.datasets.alpaca_cleaned_dataset
  train_on_input: True
seed: null
shuffle: True
batch_size: 2

# Optimizer and Scheduler
optimizer:
  _component_: torch.optim.AdamW
  weight_decay: 0.01
  lr: 3e-4
lr_scheduler:
  _component_: torchtune.modules.get_cosine_schedule_with_warmup
  num_warmup_steps: 100

loss:
  _component_: torch.nn.CrossEntropyLoss

# Training
epochs: 1
max_steps_per_epoch: null
gradient_accumulation_steps: 64
compile: False

# Logging
output_dir: /data/jack/torchtune_test/lora_finetune_output
metric_logger:
  _component_: torchtune.utils.metric_logging.DiskLogger
  log_dir: ${output_dir}
log_every_n_steps: 1
log_peak_memory_stats: False

# Environment
device: cuda
dtype: bf16
enable_activation_checkpointing: True

# Profiler (disabled)
profiler:
  _component_: torchtune.utils.profiler
  enabled: False
- 1
- 2
- 3
- 4
- 5
- 6
- 7
- 8
- 9
- 10
- 11
- 12
- 13
- 14
- 15
- 16
- 17
- 18
- 19
- 20
- 21
- 22
- 23
- 24
- 25
- 26
- 27
- 28
- 29
- 30
- 31
- 32
- 33
- 34
- 35
- 36
- 37
- 38
- 39
- 40
- 41
- 42
- 43
- 44
- 45
- 46
- 47
- 48
- 49
- 50
- 51
- 52
- 53
- 54
- 55
- 56
- 57
- 58
- 59
- 60
- 61
- 62
- 63
- 64
- 65
- 66
- 67
- 68
这里解释一下各个参数:
tokenizer下的path 这个一定要填写你下载的基底模型的分词器路径
checkpointer下的checkpoint_dir 填写你要微调的基底模型的存放文件夹路径
checkpointer下的checkpoint_files 基底模型文件名(一个或多个)
dataset下的_component_ 填写现有的或自定义的数据集类名
loss下的_component_ 填写训练过程中的损失函数,默认是交叉熵损失
epochs(发音:一剖克斯) 训练轮次,可以先设置为1试一下
下命令进行微调:
tune run lora_finetune_single_device --config ./8B_lora_single_device_custom.yaml
3.LoRA训练的产物
结束训练后,在输出文件夹中会产出一个合并了lora和基底模型权重的新模型meta_model_0.pt,也会产出一个独立的lora权重文件adapter_0.pt。
三、测试新模型效果
1.编写配置文件
# Model arguments
model:
  _component_: torchtune.models.llama3.llama3_8b

checkpointer:
  _component_: torchtune.utils.FullModelMetaCheckpointer
  checkpoint_dir: /data/feipan3/Meta-Llama-3-8B-Instruct/
  checkpoint_files: [meta_model_0.pt]
  output_dir: /data/feipan3/Meta-Llama-3-8B-Instruct/
  model_type: LLAMA3

device: cuda
dtype: bf16

seed: 5678

# Tokenizer arguments
tokenizer:
  _component_: torchtune.models.llama3.llama3_tokenizer
  path: /data/feipan3/Meta-Llama-3-8B-Instruct/original/tokenizer.model

# Generation arguments; defaults taken from gpt-fast
prompt: "Give three tips for staying healthy."
max_new_tokens: 512
temperature: 0.6 # 0.8 and 0.6 are popular values to try
top_k: 300

quantizer: null
- 1
- 2
- 3
- 4
- 5
- 6
- 7
- 8
- 9
- 10
- 11
- 12
- 13
- 14
- 15
- 16
- 17
- 18
- 19
- 20
- 21
- 22
- 23
- 24
- 25
- 26
- 27
- 28
2.运行配置文件:
tune run generate --config generation_custom.yaml
我的问题是“给出保持健康的三条建议”,得到输出结果:
总结
本文主要介绍了如何用torchtune工具微调Llama3,详细介绍了如何设置配方文件,如何运行以及最后如何进行效果验证。本文点赞超过2个,下一期继续更新如何准备微调数据集。


