- 1[附源码]Java计算机毕业设计SSM航空订票系统
- 2Spring boot Druid 多数据源JDBC和注解事务_mybatisplus druid多数据源
- 3GitHub打不开解决办法
- 4python获取app信息的库_python爬取 “得到” App 电子书信息
- 5【SQL】一文详解嵌入式SQL(建议收藏)_嵌入式sql编程
- 6零基础手把手教你如何使用Laf免费玩转Midjourney
- 7安全模型和业务安全体系_ipdrr 安全模型
- 8零基础入门:使用Python pyWinAuto自动化你的Windows任务_windows pyton automatic
- 9QProgressBar+中间显示文本
- 10你必须要掌握的大数据计算技术,都在这了
语义分割:基于openCV和深度学习(二)_opencv 语义分割
赞
踩
语义分割:基于openCV和深度学习(二)
Semantic segmentation in images with OpenCV
开始吧-打开segment.py归档并插入以下代码:
Semantic segmentation with
OpenCV and deep learning
import the necessary packages
import numpy as np
import argparse
import
imutils
import time
import cv2
从输入必要的依赖包开始。对于这个脚本,推荐OpenCV 3.4.1或更高版本。可以按照一个安装教程进行操作—只要确保在执行步骤时指定要下载和安装的OpenCV版本。还需要安装OpenCV便利功能包imutils-只需使用pip安装该包:
Semantic segmentation with
OpenCV and deep learning
$ pip install --upgrade imutils
如果使用的是Python虚拟环境,不要忘记在使用pip安装imutils之前使用work-on命令! 接下来,分析一下命令行参数:
Semantic segmentation with
OpenCV and deep learning
#construct the argument parse and parse the arguments
ap = argparse.ArgumentParser()
ap.add_argument("-m", “–model”, required=True,
help=“path
to deep learning segmentation model”)
ap.add_argument("-c", “–classes”, required=True,
help=“path
to .txt file containing class labels”)
ap.add_argument("-i", “–image”, required=True,
help=“path
to input image”)
ap.add_argument("-l", “–colors”, type=str,
help=“path
to .txt file containing colors for labels”)
ap.add_argument("-w", “–width”, type=int, default=500,
help=“desired
width (in pixels) of input image”)
args = vars(ap.parse_args())
此脚本有五个命令行参数,其中两个是可选的:
–模型:深入学习语义分割模型的途径。
–类:包含类标签的文本文件的路径。
–图像:的输入图像文件路径。 -
-颜色:颜色文本文件的可选路径。如果没有指定文件,则将为每个类分配随机颜色。
–宽度:可选的所需图像宽度。默认情况下,该值为500像素。
如果不熟悉argparse和命令行参数的概念,一定要阅读这篇深入介绍命令行参数的博客文章。 接下来,来分析类标签文件和颜色:
Semantic segmentation with
OpenCV and deep learning
#load the class label names
CLASSES = open(args[“classes”]).read().strip().split("\n")
if a colors file was supplied, load it from disk
if args[“colors”]:
COLORS = open(args[“colors”]).read().strip().split("\n")
COLORS
= [np.array(c.split(",")).astype(“int”) for c in COLORS]
COLORS = np.array(COLORS, dtype=“uint8”)
otherwise, we need to randomly generate RGB colors for
each class
#label
else:
#initialize a list of colors to represent each class label in
the mask (starting with ‘black’ for the
background/unlabeled
#regions)
np.random.seed(42)
COLORS
= np.random.randint(0, 255, size=(len(CLASSES) - 1, 3),
dtype=“uint8”)
COLORS
= np.vstack([[0, 0, 0], COLORS]).astype(“uint8”)
从提供的文本文件中将类加载到内存中,该文件的路径包含在命令行args字典(第23行)中。
如果文本文件中为每个类标签提供了一组预先指定的颜色(每行一个),将它们加载到内存中(第26-29行)。否则,为每个标签随机生成颜色(第33-40行)。
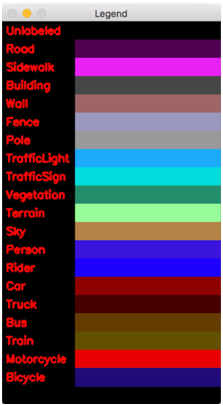
出于测试目的(并且由于有20个类),使用OpenCV绘图函数创建一个漂亮的颜色查找图例:
Semantic segmentation with
OpenCV and deep learning
#initialize the legend visualization
legend = np.zeros(((len(CLASSES) * 25) + 25, 300, 3), dtype=“uint8”)
loop over the class names + colors
for (i, (className, color)) in enumerate(zip(CLASSES,
COLORS)):
draw the class name + color on the legend
color =
[int© for c in color]
cv2.putText(legend, className, (5, (i * 25) + 17),
cv2.FONT_HERSHEY_SIMPLEX,
0.5, (0, 0, 255), 2)
cv2.rectangle(legend, (100, (i * 25)), (300, (i * 25) + 25),
tuple(color), -1)
生成一个图例可视化,就可以很容易地可视化地将类标签与颜色关联起来。图例由类标签及其旁边的彩色矩形组成。这是通过创建画布(第43行)和使用循环动态构建图例(第46-52行)快速创建的。本文中介绍了绘画基础知识。
结果如下:

Figure 2: Our deep learning semantic segmentation class color legend generated with OpenCV.
下一个区块将进行深度学习细分:
Semantic segmentation with OpenCV and deep learning
#load our serialized model from disk
print("[INFO] loading model…")
net =
cv2.dnn.readNet(args[“model”])
#load the input image, resize it, and construct a blob from it,
but keeping mind mind that the original input image
dimensions
#ENet was trained on was 1024x512
image = cv2.imread(args[“image”])
image =
imutils.resize(image, width=args[“width”])
blob = cv2.dnn.blobFromImage(image, 1 / 255.0, (1024, 512), 0,
swapRB=True,
crop=False)
#perform a forward pass using the segmentation model
net.setInput(blob)
start =
time.time()
output = net.forward()
end =
time.time()
#show the amount of time inference took
print("[INFO] inference took {:.4f} seconds".format(end - start))
为了使用Python和OpenCV对图像进行深入的语义分割:
加载模型(第56行)。构造一个blob(第61-64行),在这篇博客文章中使用的ENet模型是在1024×512分辨率的输入图像上训练的,将在这里使用相同的方法。可以在这里了解更多关于OpenCV的blob是如何工作的。将blob设置为网络的输入(第67行),并执行神经网络的前向传递(第69行)。用时间戳将forward pass语句括起来。将经过的时间打印到第73行的终端。
在脚本的其余行中,将生成一个颜色映射,覆盖在原始图像上。每个像素都有一个对应的类标签索引,能够在屏幕上看到语义分割的结果。
首先,需要从输出中提取卷维度信息,然后计算类图和颜色掩码:
Semantic segmentation with
OpenCV and deep learning
#infer the total number of classes along with the spatial dimensions
of the mask image via the shape of the output array
(numClasses,
height, width) = output.shape[1:4]
our
output class ID map will be num_classes x height x width in
size, so we take the argmax to find the class label
with the
#largest probability for each and every (x, y)-coordinate in the
image
classMap
= np.argmax(output[0], axis=0)
#given the class ID map, we can map each of the class IDs to its
corresponding color
mask = COLORS[classMap]
在第77行确定输出体积的空间维度。接下来,让找到输出卷的每个(x,y)-坐标的概率最大的类标签索引(第83行)。这就是现在所知道的类映射,它包含每个像素的类索引。 给定类ID索引,可以使用NumPy数组索引“神奇地”(更不用说超级高效地)查找每个像素(第87行)对应的可视化颜色。彩色mask版将透明地覆盖在原始图像上。 让完成脚本:
Semantic segmentation with OpenCV and deep learning
resize the mask and class map such that its dimensions match the
original size of the input image (we’re not using the
class map
#here for anything else but this is how you would resize it just in
case you wanted to extract specific pixels/classes)
mask =cv2.resize(mask, (image.shape[1],
image.shape[0]),
interpolation=cv2.INTER_NEAREST)
classMap
= cv2.resize(classMap, (image.shape[1],
image.shape[0]),
interpolation=cv2.INTER_NEAREST)
perform a weighted combination of the input image with
the mask to
#form an output visualization
output = ((0.4 * image) + (0.6 * mask)).astype(“uint8”)
show the input and output images
cv2.imshow(“Legend”, legend)
cv2.imshow(“Input”, image)
cv2.imshow(“Output”, output)
cv2.waitKey(0)
调整掩码和类映射的大小,使它们与输入图像(第93-96行)具有完全相同的维度。为了保持原始的类id/mask值,使用最近邻插值而不是三次、二次等插值是非常重要的。 现在大小是正确的,创建了一个“透明的颜色覆盖”,通过覆盖的原始图像(第100行)的遮罩。这使能够轻松地可视化分割的输出。关于透明覆盖层以及如何构建它们的更多信息,可以在本文中找到。最后,图例和原始+输出图像显示在第103-105行的屏幕上。
单图像分割结果
在使用本节中的命令之前,请确保获取此博客文章的“下载”。为了方便起见,在zip文件中提供了模型+相关文件、图像和Python脚本。在终端中提供的命令行参数对于复制结果很重要。如果不熟悉命令行参数,请在此处了解它们。准备好后,打开一个终端并导航到项目,然后执行以下命令:
Semantic segmentation with
OpenCV and deep learning
$python segment.py --model enet-cityscapes/enet-model.net \
–classes enet-cityscapes/enet-classes.txt \
–colors
enet-cityscapes/enet-colors.txt \
–image images/example_01.png
[INFO]
loading model…
[INFO] inference took 0.2100
seconds

图3:OpenCV的语义分割显示了道路、人行道、人、自行车、交通标志等等!
注意分割的精确程度-它清楚地分割类并准确地识别人和自行车(自动驾驶汽车的安全问题)。道路,人行道,汽车,甚至树叶都被识别出来了。
尝试另一个示例,只需将–image命令行参数更改为不同的图像:
Semantic segmentation with
OpenCV and deep learning
$
python segment.py --model enet-cityscapes/enet-model.net \
–classes enet-cityscapes/enet-classes.txt \
–colors
enet-cityscapes/enet-colors.txt \
–image images/example_02.jpg
[INFO]
loading model…
[INFO] inference took 0.1989
seconds
在这里插入图片描述
图4中的结果展示了这个语义分割模型的准确性和清晰性。汽车、道路、树木和天空都有清晰的标记。下面是另一个例子:
Semantic segmentation with
OpenCV and deep learning
$
python segment.py --model enet-cityscapes/enet-model.net \
–classes enet-cityscapes/enet-classes.txt \
–colors
enet-cityscapes/enet-colors.txt \
–image images/example_03.png
[INFO]
loading model…
[INFO] inference took 0.1992
seconds

上图是一个更复杂的场景,但ENet仍然可以分割走在车前的人。不幸的是,该模型错误地将道路分类为人行道,但可能是因为人们在人行道上行走。最后一个例子:
Semantic segmentation with
OpenCV and deep learning
$
python segment.py --model enet-cityscapes/enet-model.net \
–classes enet-cityscapes/enet-classes.txt \
–colors
enet-cityscapes/enet-colors.txt \
–image images/example_04.png
[INFO]
loading model…
[INFO] inference took 0.1916
seconds

通过ENet发送的最终图像显示了模型如何在道路、人行道、树叶、人物等其他场景类别中清晰地分割卡车与汽车。


