
- 1web前端之HTML全部笔记(包含html5)
- 2【大数据Hive】hive 优化策略之job任务优化_在hive中优化job的进程是
- 3STM32传感器外设集--语音识别模块(LD3320)_ld3320原理
- 42856. 仰望星空_第1行: 两个由空格分开的整数,w 和 h。 * 第2到h+1行: 每一行包含w个"*"或者".",
- 5推荐几款代码AI助手_fitten code 通义灵码
- 6什么是Apollo自动驾驶平台?_自动驾驶阿波罗
- 76. 模数转换器ADC_adc1->jdr1
- 8python可视化界面设计器_可视化界面
- 9【Python-Spark(大规模数据)】
- 10这个全面对标 OpenAI 的国产大模型,性能已达 90% GPT-4_国内平替openai大模型
使用Stable Diffusion和PyTorch创建艺术二维码_stable diffusion 二维码
赞
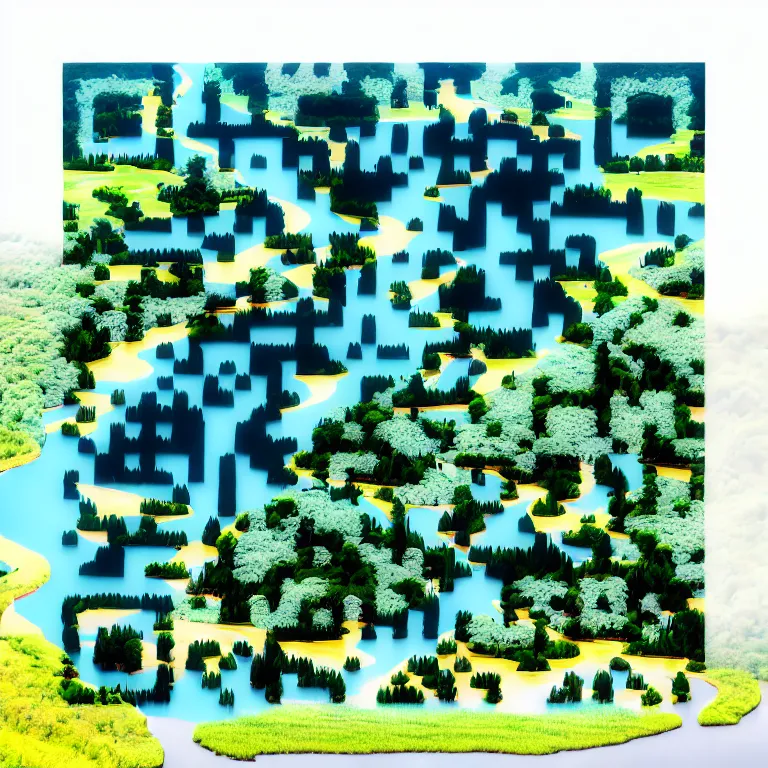
踩
本文将介绍如何使用Stable Diffusion和PyTorch创建AI生成的艺术二维码。
微信搜索关注《Python学研大本营》,加入读者群,分享更多精彩

简介:
在本文中将介绍如何利用Stable Diffusion和PyTorch的能力来创建AI生成的QR码艺术。通过将这些技术相结合,可以生成独特的、具有视觉吸引力的艺术作品,其中包含QR码,为艺术作品增添了互动元素。

1.了解Stable Diffusion和PyTorch:
稳定扩散(Stable Diffusion)是一种用于图像处理和计算机视觉的技术,可对图像进行可控转换。另一方面,PyTorch是一种流行的深度学习框架,提供了搭建和训练神经网络的工具。通过结合这两项技术,可以创建一个强大的管道,用于生成AI艺术作品。
2.安装所需的软件包:
为了开始工作,需要安装必要的软件包。这些软件包对于处理二维码和图像处理至关重要。
pip -q install diffusers transformers accelerate torch xformers qrcode
同时还需要支持Nvidia GPU的系统。如果正在使用Google Colab,可以将TPU设置为运行时。它将为进程启用Nvidia GPU。可以在google colab中使用以下命令来检查GPU是否启用。
!nvidia-smi
用户将得到如下输出:
- +-----------------------------------------------------------------------------+
- | NVIDIA-SMI 525.85.12 Driver Version: 525.85.12 CUDA Version: 12.0 |
- |-------------------------------+----------------------+----------------------+
- | GPU Name Persistence-M| Bus-Id Disp.A | Volatile Uncorr. ECC |
- | Fan Temp Perf Pwr:Usage/Cap| Memory-Usage | GPU-Util Compute M. |
- | | | MIG M. |
- |===============================+======================+======================|
- | 0 Tesla T4 Off | 00000000:00:04.0 Off | 0 |
- | N/A 61C P8 10W / 70W | 0MiB / 15360MiB | 0% Default |
- | | | N/A |
- +-------------------------------+----------------------+----------------------+
- +-----------------------------------------------------------------------------+
- | Processes: |
- | GPU GI CI PID Type Process name GPU Memory |
- | ID ID Usage |
- |=============================================================================|
- | No running processes found |
- +-----------------------------------------------------------------------------

3.导入库
- import torch
- from PIL import Image
- import qrcode
- from pathlib import Path
- from multiprocessing import cpu_count
- import requests
- import io
- import os
- from PIL import Image
- from diffusers import (
- StableDiffusionPipeline,
- StableDiffusionControlNetImg2ImgPipeline,
- ControlNetModel,
- DDIMScheduler,
- DPMSolverMultistepScheduler,
- DEISMultistepScheduler,
- HeunDiscreteScheduler,
- EulerDiscreteScheduler,
- )
4.从链接生成QR码:
通过使用qrcode软件包并指定所需的参数(例如纠错和方框大小),可以创建编码特定信息的QR码。
- qrcode_generator = qrcode.QRCode(
- version=1,
- error_correction=qrcode.ERROR_CORRECT_H,
- box_size=10,
- border=4,
- )
5.创建ControlNet对象,使用预训练模型
- controlnet = ControlNetModel.from_pretrained(
- "DionTimmer/controlnet_qrcode-control_v1p_sd15", torch_dtype=torch.float16
- )
6.创建稳定的扩散管道
- pipe = StableDiffusionControlNetImg2ImgPipeline.from_pretrained(
- "runwayml/stable-diffusion-v1-5",
- controlnet=controlnet,
- safety_checker=None,
- torch_dtype=torch.float16,
- ).to("cuda")
pipe.enable_xformers_memory_efficient_attention()
7.用于调整图像大小的附加功能
- def resize_for_condition_image(input_image: Image.Image, resolution: int):
- input_image = input_image.convert("RGB")
- W, H = input_image.size
- k = float(resolution) / min(H, W)
- H *= k
- W *= k
- H = int(round(H / 64.0)) * 64
- W = int(round(W / 64.0)) * 64
- img = input_image.resize((W, H), resample=Image.LANCZOS)
- return img
8.Sampler的字典
- SAMPLER_MAP = {
- "DPM++ Karras SDE": lambda config: DPMSolverMultistepScheduler.from_config(config
- "DPM++ Karras": lambda config: DPMSolverMultistepScheduler.from_config(config, use
- "Heun": lambda config: HeunDiscreteScheduler.from_config(config),
- "Euler": lambda config: EulerDiscreteScheduler.from_config(config),
- "DDIM": lambda config: DDIMScheduler.from_config(config),
- "DEIS": lambda config: DEISMultistepScheduler.from_config(config),
- }
pipe.scheduler = SAMPLER_MAP[sampler](pipe.scheduler.config)
9.试验不同参数:
为了达到理想的艺术效果,可以尝试使用不同的参数,例如扩散强度、推理步数和引导尺度。这些参数可对最终输出产生重大影响,并允许进行创意性探索。
- qr_code_content: str = "https://www.linkedin.com/in/zeel-sheladiya-772513176/"
- prompt: str = "A beautiful nature and river surrounded by the flamigos"
- negative_prompt: str = "ugly, disfigured, low quality, blurry, nsfw"
- guidance_scale: float = 7.5
- controlnet_conditioning_scale: float = 1.3
- strength: float = 0.9
- seed: int = 5392011833
- init_image: Image.Image | None = None
- qrcode_image: Image.Image | None = None
- use_qr_code_as_init_image = True
- sampler = "DPM++ Karras SDE"
generator = torch.manual_seed(seed) if seed != -1 else torch.Generator()
- if qr_code_content != "" or qrcode_image.size == (1, 1):
- print("Generating QR Code from content")
- qr = qrcode.QRCode(
- version=1,
- error_correction=qrcode.constants.ERROR_CORRECT_H,
- box_size=10,
- border=4,
- )
- qr.add_data(qr_code_content)
- qr.make(fit=True)
- qrcode_image = qr.make_image(fill_color="black", back_color="white")
- qrcode_image = resize_for_condition_image(qrcode_image, 768)
- else:
- print("Using QR Code Image")
- qrcode_image = resize_for_condition_image(qrcode_image, 768)
10.从链接生成QR码
init_image = qrcode_image
11.创建AI生成的QR码艺术
- out = pipe(
- prompt=prompt,
- negative_prompt=negative_prompt,
- image=qrcode_image,
- control_image=qrcode_image, # 类型:忽略
- width=768, # 类型:忽略
- height=768, # 类型:忽略
- guidance_scale=float(guidance_scale),
- controlnet_conditioning_scale=float(controlnet_conditioning_scale), # type: i
- generator=generator,
- strength=float(strength),
- num_inference_steps=40,
12.输出:
out.images[0].show()
结论:
通过结合Stable Diffusion、PyTorch和QR码,可以开启AI生成艺术的新领域。通过进一步的实验和探索,艺术家和开发人员可以突破创造力的界限,创造出引人入胜的互动艺术作品,从而吸引和启发观众。二维码的使用为艺术作品增添了互动元素,使观众可以通过扫描二维码获取更多信息或内容。
总之,Stable Diffusion、PyTorch和QR码的结合为生成AI艺术品提供了一个强大的流程。通过利用这些技术,艺术家和开发人员可以创造出独特的、具有视觉吸引力的艺术作品,并将互动元素融入其中。随着进一步的实验和探索,AI生成艺术的可能性是无限的,可以期待在未来看到更多创新和迷人的艺术作品。
推荐书单

IT BOOK 多得(点击查看5折活动书单) https://u.jd.com/psx2y1M
《PyTorch深度学习简明实战》
本书针对深度学习及开源框架——PyTorch,采用简明的语言进行知识的讲解,注重实战。全书分为4篇,共19章。深度学习基础篇(第1章~第6章)包括PyTorch简介与安装、机器学习基础与线性回归、张量与数据类型、分类问题与多层感知器、多层感知器模型与模型训练、梯度下降法、反向传播算法与内置优化器。计算机视觉篇(第7章~第14章)包括计算机视觉与卷积神经网络、卷积入门实例、图像读取与模型保存、多分类问题与卷积模型的优化、迁移学习与数据增强、经典网络模型与特征提取、图像定位基础、图像语义分割。自然语言处理和序列篇(第15章~第17章)包括文本分类与词嵌入、循环神经网络与一维卷积神经网络、序列预测实例。生成对抗网络和目标检测篇(第18章~第19章)包括生成对抗网络、目标检测。
本书适合人工智能行业的软件工程师、对人工智能感兴趣的学生学习,同时也可作为深度学习的培训教程。
《PyTorch深度学习简明实战》![]() https://item.jd.com/13512395.html
https://item.jd.com/13512395.html
精彩回顾
微信搜索关注《Python学研大本营》,加入读者群
访问【IT今日热榜】,发现每日技术热点

