- 1Thinkphp--in-sqlinjection
- 2如何使用 MySQL Workbench 自动生成 ER 图、同步更新远程数据库 - MySQL Workbench 使用教程_mysql workbench er图
- 32024不可不会的StableDiffusion之变分自编码器(三)_stable diffusion vae_encoder vae_decoder
- 4OPC UA与IEC61499 在分布式智能电网中的应用
- 5【已解决】Docker启动MySQL容器失败:STATUS:‘ Exited (1) 2 minutes ago ‘,远程连接MySQL连不上问题
- 6交换机常用功能配置案例总结_交换机配置案例
- 7python图形化界面设计gui,用python做图形用户界面_python gui界面设计
- 8有这六种大学拍照搜题学习工具,学习起来事半功倍 #其他#经验分享_网页在线图片搜题
- 9AI工具合集!一共600+覆盖全行业,除了ChatGPT,那你也会喜欢这些其他的AI工具_lunalabsai
- 10怎么将多个select的结果合并成一张表
Stable Diffusion XL优化终极指南_stable-diffusion-xl-base-1.0
赞
踩
如何在自己的显卡上获得SDXL的最佳质量和性能,以及如何选择适当的优化方法和工具,这一让GenAI用户倍感困惑的问题,业内一直没有一份清晰而详尽的评测报告可供参考。直到全栈开发者Félix San出手。
在本文中,Félix介绍了相关SDXL优化的方法论、基础优化、Pipeline优化以及组件和参数优化。值得一提的是,基于实测表现,他高度评价并推荐了由硅基流动研发的图片/视频推理加速引擎OneDiff,“I just wanted to say that onediff is the fastest of them all! so great job!!(我只想说,OneDiff是所有图像推理引擎中最快的!非常棒的工作!!)”
由于本文内容相当扎实,篇幅相对较长,不过,他很贴心地提醒读者,可以直接翻到末尾看结论。
感谢Félix出色的专业评测报告。关于Stable Diffusion XL优化指南,读这一篇就够了。
(本文由OneFlow编译发布,转载请联系授权。原文:https://www.felixsanz.dev/articles/ultimate-guide-to-optimizing-stable-diffusion-xl)
本文将介绍Stable Diffusion XL优化,旨在尽可能减少内存使用的同时实现最优性能,从而加快图像生成速度。我们将能够仅用4GB内存生成SDXL图像,因此可以使用低端显卡。
由于本文以脚本/开发为导向,因此将使用Hugging Face的diffusers库。即便如此,了解不同的优化技术及其相互作用将有助于我们在各种应用中充分利用这些技术,例如Automatic1111的Stable Diffusion webUI,尤其是ComfyUI。
本文可能显得冗长而深奥,但你无需一次性阅读完毕。我的目标是让读者了解各种现存的优化技术,并教会你何时以及如何使用和组合它们,尽管其中一些技术本身就已经有了实质性的差异。
你也可以直接跳到结论部分,其中包括所有测试的总结表格,以及针对追求质量、速度或内存受限条件下运行推理时的建议。
作者 | Félix San
OneFlow编译
翻译|宛子琳、杨婷
1
方法论
在测试中,我使用了RunPod平台,在Secure Cloud上生成了一个GPU Pod,配备了RTX 3090显卡。尽管Secure Cloud的费用略高于Community Cloud($0.44/h vs $0.29/h),但对于测试来说,它似乎更合适。
该实例生成于EU-CZ-1区域,拥有24GB的VRAM(GPU)、32 个vCPU(AMD EPYC 7H12)和125GB的RAM(CPU和RAM值并不重要)。至于模板,我使用RunPod PyTorch 2.1(runpod/pytorch:2.1.0-py3.10-cuda11.8.0-devel-ubuntu22.04),这是一个基础模板,没有其他额外内容。因为我们将对其进行更改,所以PyTorch的版本并不重要,但该模板提供了Ubuntu、Python 3.10和CUDA 11.8作为标准配置。只需两次点击并等待30秒,我们就已经准备好所需的一切。
如果你要在本地运行模型,请确保已安装Python 3.10和CUDA或等效平台(本文将使用CUDA)。
所有测试都是在虚拟环境中进行的:
创建虚拟环境
python -m venv .venv激活虚拟环境
- # Unix
- source .venv/bin/activate
- # Windows
- .venv\Scripts\activate
安装所需库:
- pip install torch torchvision --index-url https://download.pytorch.org/whl/cu118
- pip install transformers accelerate diffusers
测试包括生成4张图片,并比较不同的优化技术,其中一些我相信你以前可能没有见过。这些不同主题的图像是使用stabilityai/stable-diffusion-xl-base-1.0模型生成的,仅使用一个正向提示和一个固定种子。其余参数将保持默认值:无负向提示,1024x1024尺寸,CFG值为5,步数为50(采样步数)。
提示和种子
- queue = []
- # Photorealistic portrait (Portrait)
- queue.extend([{
- 'prompt': '3/4 shot, candid photograph of a beautiful 30 year old redhead woman with messy dark hair, peacefully sleeping in her bed, night, dark, light from window, dark shadows, masterpiece, uhd, moody',
- 'seed': 877866765,
- }])
- # Creative interior image (Interior)
- queue.extend([{
- 'prompt': 'futuristic living room with big windows, brown sofas, coffee table, plants, cyberpunk city, concept art, earthy colors',
- 'seed': 5567822456,
- }])
- # Macro photography (Macro)
- queue.extend([{
- 'prompt': 'macro shot of a bee collecting nectar from lavender flowers',
- 'seed': 2257899453,
- }])
- # Rendered 3D image (3D)
- queue.extend([{
- 'prompt': '3d rendered isometric fiji island beach, 3d tile, polygon, cartoony, mobile game',
- 'seed': 987867834,
- }])

以下是默认生成的图像:


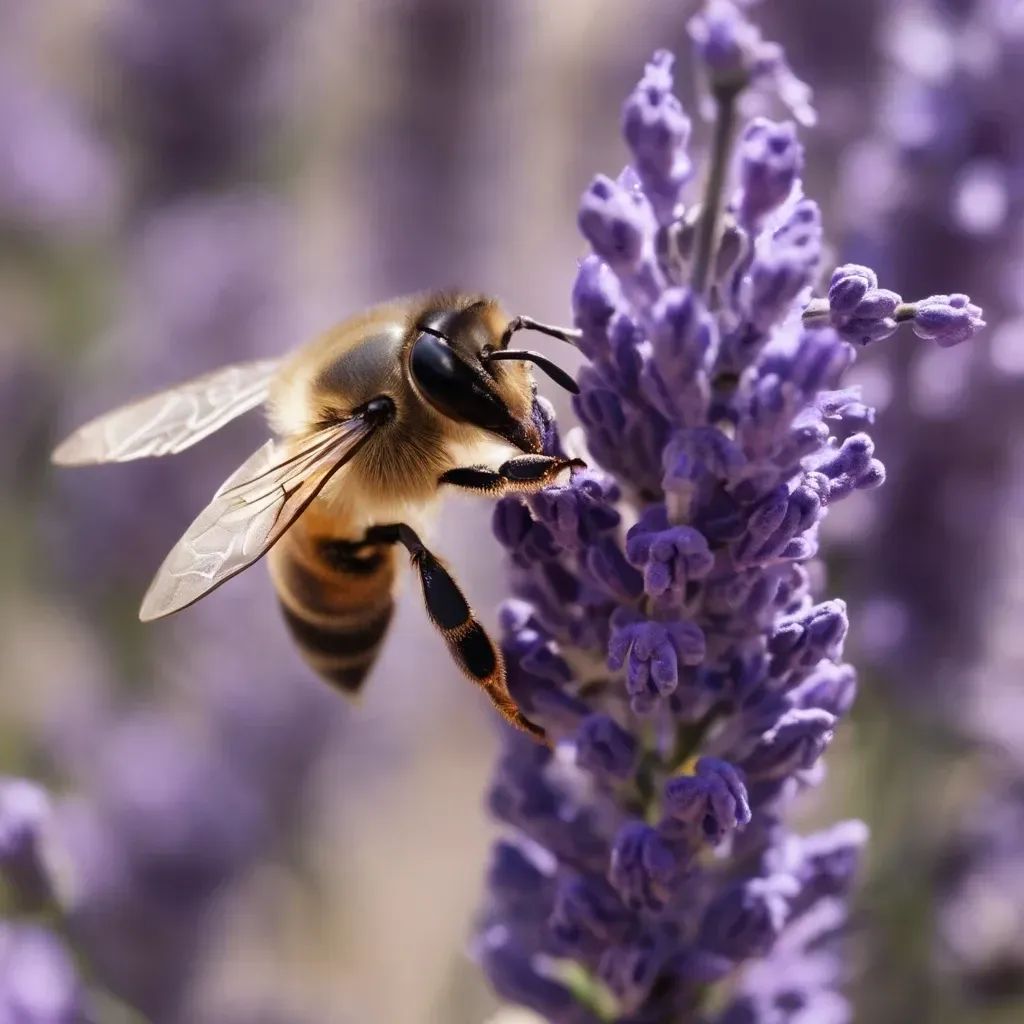

<左右滑动查看更多图片>
以下是对比测试的结果:
-
图像的感知质量(希望我是位优秀的评判者)。
-
生成每张图像所需的时间,以及总编译时间(如果有的话)。
-
使用的最大内存量。
每项测试都运行了5次,并使用平均值进行比较。
时间测量采用了以下结构:
- from time import perf_counter
- # Import libraries
- # import ...
-
-
- # Define prompts
- # queue = []
- # queue.extend ...
-
-
- for i, generation in enumerate(queue, start=1):
- # We start the counter
- image_start = perf_counter()
-
-
- # Generate and save image
- # ...
-
-
- # We stop the counter and save the result
- generation['total_time'] = perf_counter() - image_start
-
-
- # Print the generation time of each image
- images_totals = ', '.join(map(lambda generation: str(round(generation['total_time'], 1)), queue))
- print('Image time:', images_totals)
-
-
- # Print the average time
- images_average = round(sum(generation['total_time'] for generation in queue) / len(queue), 1)
- print('Average image time:', images_average)

为了找出所使用的最大内存量,文件末尾包含以下语句:
- max_memory = round(torch.cuda.max_memory_allocated(device='cuda') / 1000000000, 2)
- print('Max. memory used:', max_memory, 'GB')
每个测试中包含的内容都是所需的最小代码。虽然每个测试都有自己的结构,但代码大致如下。
- # Load the model on the graphics card
- pipe = AutoPipelineForText2Image.from_pretrained(
- 'stabilityai/stable-diffusion-xl-base-1.0',
- use_safetensors=True,
- torch_dtype=torch.float16,
- variant='fp16',
- ).to('cuda')
-
-
- # Create a generator
- generator = torch.Generator(device='cuda')
-
-
- # Start a loop to process prompts one by one
- for i, generation in enumerate(queue, start=1):
- # Assign the seed to the generator
- generator.manual_seed(generation['seed'])
-
-
- # Create the image
- image = pipe(
- prompt=generation['prompt'],
- generator=generator,
- ).images[0]
-
-
- # Save the image
- image.save(f'image_{i}.png')

为了使测试更真实且减少耗时,所有测试都将使用FP16优化。
其中许多测试使用了diffusers库中的pipeline,以便抽象复杂性并使代码更清晰简洁。当测试需要时,抽象级别会降低,但最终我们一直会使用该库提供的方法。另外,模型始终以safetensors格式加载,使用use_safetensors=True属性。
文章中显示的图像尺寸最大为512x512,以便浏览,但你可以在新标签页/窗口中打开图像,查看其原始大小。
你可以在GitHub上的文章存储库(github.com/felixsanz/felixsanz_dev)中找到所有单独的测试文件。
让我们开始吧!
2
基本优化
CUDA和PyTorch版本
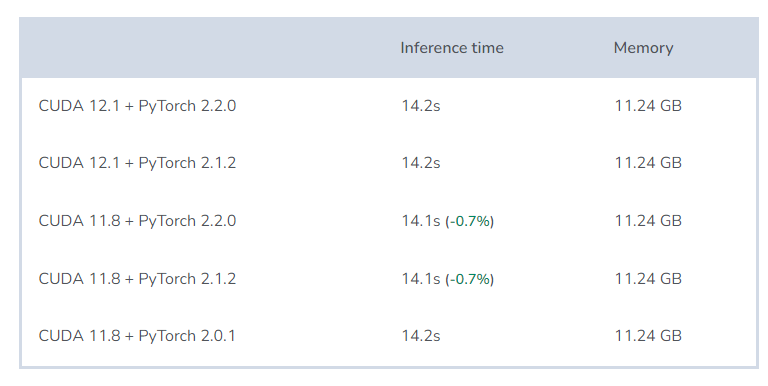
我进行该测试是想知道使用CUDA 11.8或CUDA 12.1之间是否存在差异,以及在不同版本的PyTorch(始终在2.0以上)之间可能存在的差异。
测试结果:
结论:
真令人失望,它们的性能没什么区别。差异是如此之小,也许如果我做更多的测试,这一差异可能会消失。
何时使用:关于该使用哪个版本,我仍然有一个理论:CUDA版本11.8发布的时间更长,理论上讲,该版本的库和应用程序性能会优于更新的版本。另一方面,对于PyTorch而言,版本越新,它应该提供的功能也就越多,包含的bug也就越少。因此,即使只是心理作用,我也会坚持选择CUDA 11.8 + PyTorch 2.2.0。
注意力机制
过去,注意机制必须通过安装xFormers或FlashAttention等库来进行优化。
如果你好奇为什么本文没有提及上述优化,那是因为已无必要。自PyTorch 2.0发布以来,通过各种实现(如上文中提到的这两种),以上算法的优化已经被集成到库里面。PyTorch会根据输入和正在使用的硬件进行适当的实现。
FP16
默认情况下,Stable Diffusion XL使用32 bit浮点格式(FP32)来表示其所处理和执行计算的数字。
一个显而易见的问题:能否降低精度?答案是肯定的。通过使用参数torch_dtype=torch.float16,模型会以半精度浮点格式(FP16)加载到内存中。为了避免不断进行这种转换,我们可以直接下载以FP16格式分发的模型变体。只需包括variant='fp16'参数即可。
- pipe = AutoPipelineForText2Image.from_pretrained(
- 'stabilityai/stable-diffusion-xl-base-1.0',
- use_safetensors=True,
- torch_dtype=torch.float16,
- variant='fp16',
- ).to('cuda')
-
-
- generator = torch.Generator(device='cuda')
-
-
- for i, generation in enumerate(queue, start=1):
- generator.manual_seed(generation['seed'])
-
-
- image = pipe(
- prompt=generation['prompt'],
- generator=generator,
- ).images[0]
-
-
- image.save(f'image_{i}.png')

测试结果:


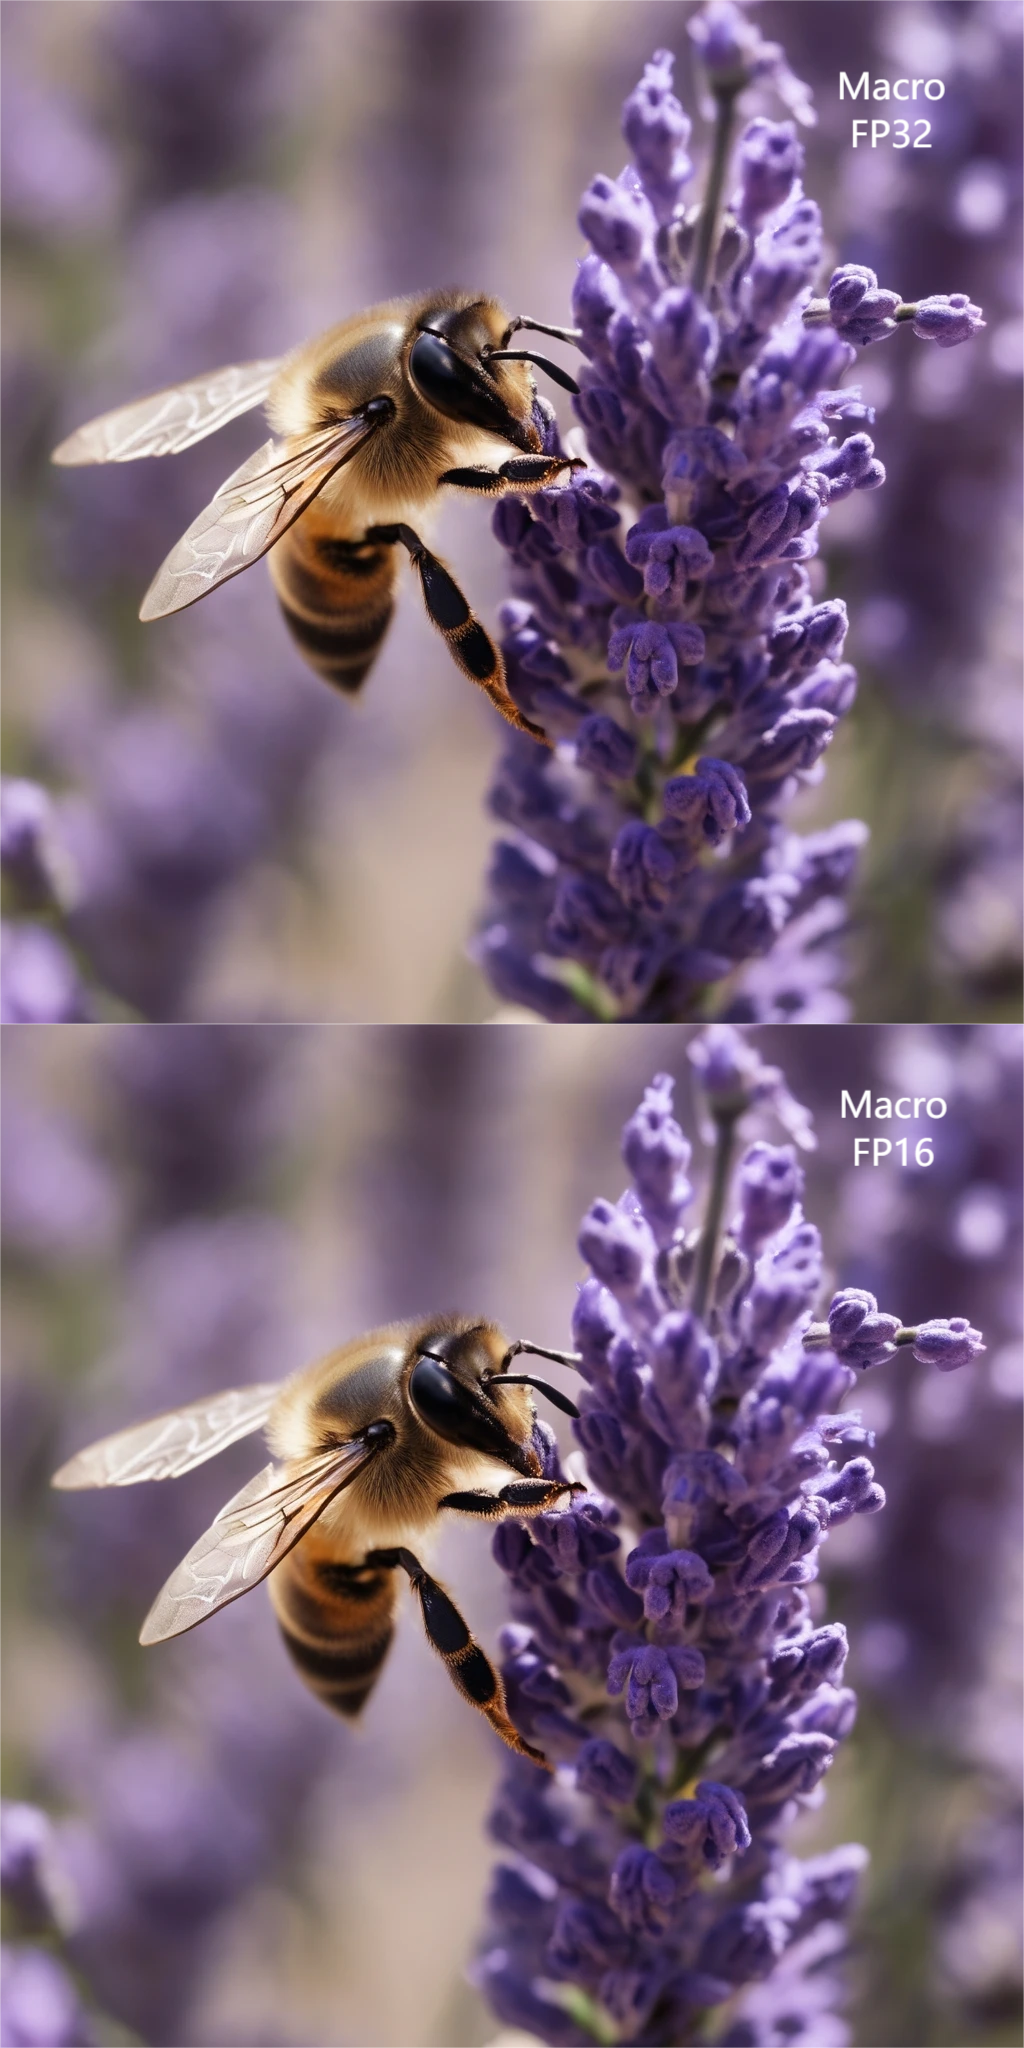

<左右滑动查看更多图片>

结论:
通过使用半精度的数字,内存占用大幅降低,计算速度也显著提高。
唯一的“不足”是生成图像质量的降低,但实际上几乎不可能看到任何区别,因为FP16足够了。
此外,多亏了variant='fp16' 参数,我们节省了磁盘空间,因为该变体占用的空间只有原来的一半(5GB 而不是 10GB)。
何时使用:随时可用。
TF32
TensorFloat-32是介于FP32和FP16之间的一种格式,以使一些NVIDIA显卡(如A100或H100)来使用张量核心执行计算。它使用与FP32相同的bit来表示指数,使用与FP16相同的bit来表示小数部分。
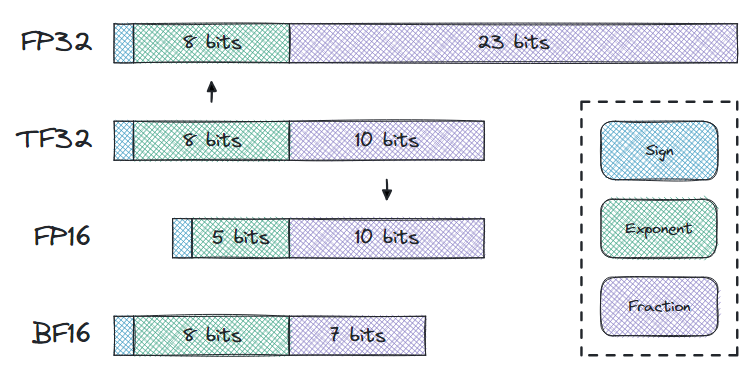
尽管在我们的测试平台(RTX 3090)中无法使用此格式进行计算,但出乎意料的是,有一些十分奇特的事发生。
有两个属性用于激活此数字格式:torch.backends.cudnn.allow_tf32(默认情况下已激活)和torch.backends.cuda.matmul.allow_tf32(应手动激活)。第一个属性启用了由cuDNN执行的卷积操作中的TF32,而第二个属性则启用了矩阵乘法操作中的TF32。
torch.backends.cudnn.allow_tf32属性默认启用,与你的显卡是什么无关,这样的设定有点奇怪。如果我们将该属性禁用,对其赋值False ,让我们看看会发生什么。
- torch.backends.cudnn.allow_tf32 = False
- # it's already disabled by default
- # torch.backends.cuda.matmul.allow_tf32 = False
-
-
- pipe = AutoPipelineForText2Image.from_pretrained(
- 'stabilityai/stable-diffusion-xl-base-1.0',
- use_safetensors=True,
- torch_dtype=torch.float16,
- variant='fp16',
- ).to('cuda')
-
-
- generator = torch.Generator(device='cuda')
-
-
- for i, generation in enumerate(queue, start=1):
- generator.manual_seed(generation['seed'])
-
-
- image = pipe(
- prompt=generation['prompt'],
- generator=generator,
- ).images[0]
-
-
- image.save(f'image_{i}.png')

另外,出于好奇,我还使用启用了TF32的NVIDIA A100显卡进行了测试。
- # it's already activated by default
- # torch.backends.cudnn.allow_tf32 = True
- torch.backends.cuda.matmul.allow_tf32 = True
-
-
- pipe = AutoPipelineForText2Image.from_pretrained(
- 'stabilityai/stable-diffusion-xl-base-1.0',
- use_safetensors=True,
- ).to('cuda')
-
-
- generator = torch.Generator(device='cuda')
-
-
- for i, generation in enumerate(queue, start=1):
- generator.manual_seed(generation['seed'])
-
-
- image = pipe(
- prompt=generation['prompt'],
- generator=generator,
- ).images[0]
-
-
- image.save(f'image_{i}.png')

权衡:要使用TF32,必须禁用FP16格式,因此我们无法使用 torch_dtype=torch.float16 或 variant='fp16' 。
测试结果:
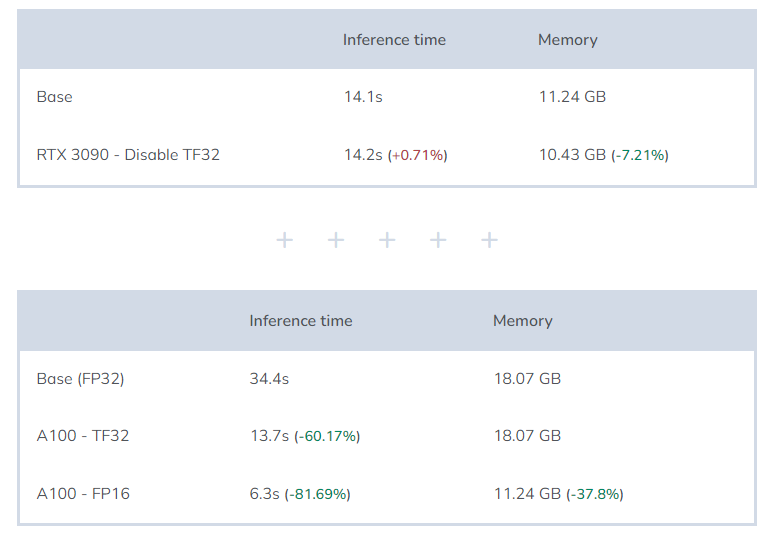
结论:
在使用RTX 3090 时,如果禁用 torch.backends.cudnn.allow_tf32 属性,内存占用会减少 7%。为什么呢?我不知道,原则上讲,我认为这可能是一个 bug,因为在不支持TF32的显卡上启用TF32毫无意义。
使用A100显卡时,使用FP16能够显著减少推理时间和内存占用。就像在RTX 3090上一样,通过禁用torch.backends.cudnn.allow_tf32属性能够进一步减少内存占用。至于使用TF32,则介于FP32和FP16之间,它无法超越 FP16。
何时使用:对于不支持TF32的显卡,明智的选择显然是禁用默认启用的属性。在使用A100时,如果可以使用FP16,就不值得使用TF32。
3
Pipeline优化
以下优化方法改进了pipeline以改善某些方面的性能。
前三个优化改进了何时将Stable Diffusion的不同组件加载到内存中,以便它们不会同时加载。以上技术实现了减少内存使用量的目的。
当由于显卡和内存限制而需要这些优化时,请使用这些优化方法。如果在Linux上收到RuntimeError: CUDA out of memory报错,本节内容就是你所需要的。在Windows上,默认情况下存在虚拟内存(共享GPU内存),尽管很难出现这种报错,但推理时间会呈指数级增长,因此本节也是你需要关注的内容。
至于本节中的最后三个优化方法,它们以不同方式优化pipeline的库,以尽可能减少推理时间。
Model CPU Offload
Model CPU Offload优化方法来自 accelerate 库。当执行pipeline时,所有模型都会加载到内存中。通过这一优化,我们让pipeline每次只在需要时将模型移入内存。在pipeline的源代码(https://github.com/huggingface/diffusers/blob/main/src/diffusers/pipelines/stable_diffusion_xl/pipeline_stable_diffusion_xl.py#L201)中可以找到这个顺序,在Stable Diffusion XL的情况下,我们会找到以下代码:
model_cpu_offload_seq = "text_encoder->text_encoder_2->image_encoder->unet->vae"实现Model CPU Offload的代码非常简单:
- pipe = AutoPipelineForText2Image.from_pretrained(
- 'stabilityai/stable-diffusion-xl-base-1.0',
- use_safetensors=True,
- torch_dtype=torch.float16,
- variant='fp16',
- ).to('cuda')
- pipe.enable_model_cpu_offload()
- generator = torch.Generator(device='cuda')
- for i, generation in enumerate(queue, start=1):
- generator.manual_seed(generation['seed'])
- image = pipe(
- prompt=generation['prompt'],
- generator=generator,
- ).images[0]
- image.save(f'image_{i}.png')
重要提醒:与其他优化不同,我们不应该使用 to('cuda') 将pipeline移至显卡上。当必要时,该优化会进行自动处理。(感谢Terrence Goh的提醒)
- pipe = AutoPipelineForText2Image.from_pretrained(
- # ...
- ).to('cuda')
测试结果:

结论:
使用这一技术将取决于我们拥有的显卡。如果显卡有6-8GB内存,这种优化将有所帮助,因为内存使用量正好减少了一半。
至于推理时间,不会受到太大影响以至于成为一个问题。
何时使用:需要减少内存消耗时使用。由于消耗最多内存的组件是噪声预测器(U-Net),我们无法通过应用优化到VAE来进一步减少内存消耗。
Sequential CPU Offload
这种优化与Model CPU Offload类似,只是更加激进。它不是将整个组件移入内存,而是将每个组件的子模块移入内存。例如,该优化不是将整个U-Net模型移入内存,而是在使用时移动特定部分,以尽可能少地占用内存。这意味着,如果噪声预测器必须在50步内清理一个张量,那么子模块必须进出内存50次。
同样只需添加一行代码:
- pipe = AutoPipelineForText2Image.from_pretrained(
- 'stabilityai/stable-diffusion-xl-base-1.0',
- use_safetensors=True,
- torch_dtype=torch.float16,
- variant='fp16',
- )
-
-
- pipe.enable_sequential_cpu_offload()
-
-
- generator = torch.Generator(device='cuda')
-
-
- for i, generation in enumerate(queue, start=1):
- generator.manual_seed(generation['seed'])
-
-
- image = pipe(
- prompt=generation['prompt'],
- generator=generator,
- ).images[0]
-
-
- image.save(f'image_{i}.png')

重要提示:使用模型CPU卸载时,记得不要在pipeline中使用 to('cuda')。
测试结果:

结论:
该优化会考验我们的耐心。为了尽可能减少内存使用,推理时间会大幅增加。
何时使用:如果你需要不超过4GB的内存,那么将该优化与VAE FP16 fix或Tiny VAE一起使用是你的唯一选择,但如果你不需要这么做,那再好不过。
批处理
该技术是从文章“How to implement Stable Diffusion(https://www.felixsanz.dev/articles/how-to-implement-stable-diffusion)”和“PixArt-α with less than 8GB VRAM(https://www.felixsanz.dev/articles/pixart-a-with-less-than-8gb-vram)”中获取的学习成果,我才了解到这一技术。通过这些文章,你会找到一些我将使用但不再解释的部分代码信息。
这有关批处理中的执行组件。其背后的理念与“Model CPU Offload”技术类似,问题在于官方pipeline实现并未最大程度地优化内存使用。当你启动pipeline,只想获取文本编码器时却做不到。
也就是说,我们应该能够这样做:
- pipe = AutoPipelineForText2Image.from_pretrained(
- 'stabilityai/stable-diffusion-xl-base-1.0',
- use_safetensors=True,
- torch_dtype=torch.float16,
- variant='fp16',
- unet=None,
- vae=None,
- ).to('cuda')
但实际上却不能这样做。当你启动pipeline时,它需要访问U-Net模型配置 (self.unet.config.*),以及VAE配置 (self.vae.config.*)。
因此(并且无需创建分支),我们将手动使用文本编码器,而不依赖于pipeline。
第一步是复制pipeline中的encode_prompt函数,并对其进行调整/简化。
该函数负责对提示进行词元化并处理,以获取已转换的嵌入张量。你可以在“How to implement Stable Diffusion”中找到对这一过程的解释。
接下来,我们实例化所需的所有组件和模型。我们还需要垃圾收集器 (gc)。
- import gc
- from transformers import CLIPTokenizer, CLIPTextModel, CLIPTextModelWithProjection
- # ...
- tokenizer = CLIPTokenizer.from_pretrained(
- 'stabilityai/stable-diffusion-xl-base-1.0',
- subfolder='tokenizer',
- )
- text_encoder = CLIPTextModel.from_pretrained(
- 'stabilityai/stable-diffusion-xl-base-1.0',
- subfolder='text_encoder',
- use_safetensors=True,
- torch_dtype=torch.float16,
- variant='fp16',
- ).to('cuda')
- tokenizer_2 = CLIPTokenizer.from_pretrained(
- 'stabilityai/stable-diffusion-xl-base-1.0',
- subfolder='tokenizer_2',
- )
- text_encoder_2 = CLIPTextModelWithProjection.from_pretrained(
- 'stabilityai/stable-diffusion-xl-base-1.0',
- subfolder='text_encoder_2',
- use_safetensors=True,
- torch_dtype=torch.float16,
- variant='fp16',
- ).to('cuda')

现在我们需要把这两部分组合起来。我们调用encode_prompt函数,并将相同的提示传递给第一个文本编码器和第二个文本编码器,并为其传递组件以供使用。
- with torch.no_grad():
- for generation in queue:
- generation['embeddings'] = encode_prompt(
- [generation['prompt'], generation['prompt']],
- [tokenizer, tokenizer_2],
- [text_encoder, text_encoder_2],
- )
得到的张量作为结果存储在变量中以供后续使用。
由于我们已经处理了所有提示,可以从内存中删除这些组件:
- del tokenizer, text_encoder, tokenizer_2, text_encoder_2
- gc.collect()
- torch.cuda.empty_cache()
现在,让我们创建一个只能访问U-Net和VAE的pipeline,无需实例化文本编码器来节省内存。
- pipe = AutoPipelineForText2Image.from_pretrained(
- 'stabilityai/stable-diffusion-xl-base-1.0',
- use_safetensors=True,
- torch_dtype=torch.float16,
- variant='fp16',
- tokenizer=None,
- text_encoder=None,
- tokenizer_2=None,
- text_encoder_2=None,
- ).to('cuda')
预热:由于每个部分都是分开的,这个测试的预热有点复杂。尽管如此,我们将使用以下代码来预热U-Net模型:
- for generation in queue:
- pipe(
- prompt_embeds=generation['embeddings'][0],
- negative_prompt_embeds =generation['embeddings'][1],
- pooled_prompt_embeds=generation['embeddings'][2],
- negative_pooled_prompt_embeds=generation['embeddings'][3],
- output_type='latent',
- )
我们使用pipeline来处理上一步保存的嵌入张量。请记住,在这一部分中,pipeline创建了一个充满噪音的张量,并在50步中对其进行清理(同时受到我们的嵌入向量的引导)。
- generator = torch.Generator(device='cuda')
-
-
- for i, generation in enumerate(queue, start=1):
- generator.manual_seed(generation['seed'])
-
-
- generation['latents'] = pipe(
- prompt_embeds=generation['embeddings'][0],
- negative_prompt_embeds =generation['embeddings'][1],
- pooled_prompt_embeds=generation['embeddings'][2],
- negative_pooled_prompt_embeds=generation['embeddings'][3],
- generator=generator,
- output_type='latent',
- ).images # We do not access images[0], but the entire tensor
正如你所见,我们指示pipeline返回潜在空间中的张量(output_type='latent')。如果不这样做,VAE将被加载到内存中以返回图像,这将导致两个模型同时占用资源。所以,就像我们之前删除文本编码器一样,我们先删除U-Net模型。
- del pipe.unet
- gc.collect()
- torch.cuda.empty_cache()
现在,我们将存储的无噪声张量转换为图像:
- pipe.upcast_vae()
-
-
- with torch.no_grad():
- for i, generation in enumerate(queue, start=1):
- generation['latents'] = generation['latents'].to(next(iter(pipe.vae.post_quant_conv.parameters())).dtype)
-
-
- image = pipe.vae.decode(
- generation['latents'] / pipe.vae.config.scaling_factor,
- return_dict=False,
- )[0]
-
-
- image = pipe.image_processor.postprocess(image, output_type='pil')[0]
- image.save(f'image_{i}.png')

VAE(FP32):在Stable Diffusion XL中,我们用pipe.upcast_vae()来保持VAE为FP32格式,因为在FP16下它无法正常工作。
此循环负责将处于潜在空间的张量解码,以将其转换为图像空间。然后,使用 pipe.image_processor.postprocess方法,将其转换为图像并保存。
测试结果:

结论:
这是我决定撰写这篇文章的原因之一。推理时间没有受到影响的情况下,我们将内存占用减少了一半。现在,甚至可以使用一张只有6GB内存的显卡来生成图像。
何时使用:虽然Model CPU Offload只是多了一行代码,但推理时间有所增加。因此,如果你不介意写更多的代码,使用这种技术,你将拥有绝对的控制权,并获得更好的性能。你还可以使用专家去噪器集成(Ensemble of Expert Denoisers)方法添加精炼模型,而内存消耗将保持不变。
Stable Fast
Stable Fast项目能够通过一系列技术来加速任何扩散模型(如使用增强版本的torch.jit.trace 进行跟踪模型、xFormers、高级的Channels-last-memory-format实现等)。事实上,他们做得非常出色。
他们承诺的结果是创下推理时间的记录,远远超过torch.compile API,并赶上TensorRT。最有趣的是,由于这些是运行时优化,就无需等待数十分钟进行初始编译。
要集成Stable Fast,首先需要安装项目库,还有Triton,以及与我们正在使用的PyTorch版本兼容的xFormers版本。
- pip install stable-fast
- pip install torch torchvision triton xformers --index-url https://download.pytorch.org/whl/cu118
然后,利用Stable Fast修改脚本以导入并启用这些库:
- import xformers
- import triton
- from sfast.compilers.diffusion_pipeline_compiler import (compile, CompilationConfig)
-
-
- # ...
-
-
- pipe = AutoPipelineForText2Image.from_pretrained(
- 'stabilityai/stable-diffusion-xl-base-1.0',
- use_safetensors=True,
- torch_dtype=torch.float16,
- variant='fp16',
- ).to('cuda')
-
-
- config = CompilationConfig.Default()
-
-
- config.enable_xformers = True
- config.enable_triton = True
- config.enable_cuda_graph = True
-
-
- pipe = compile(pipe, config)
-
-
- generator = torch.Generator(device='cuda')
-
-
- for i, generation in enumerate(queue, start=1):
- generator.manual_seed(generation['seed'])
-
-
- image = pipe(
- prompt=generation['prompt'],
- generator=generator,
- ).images[0]
-
-
- image.save(f'image_{i}.png')

此外,该项目还因其简易性而脱颖而出,只需几行代码就能运行。现在让我们看看它是否符合期望。
测试结果:


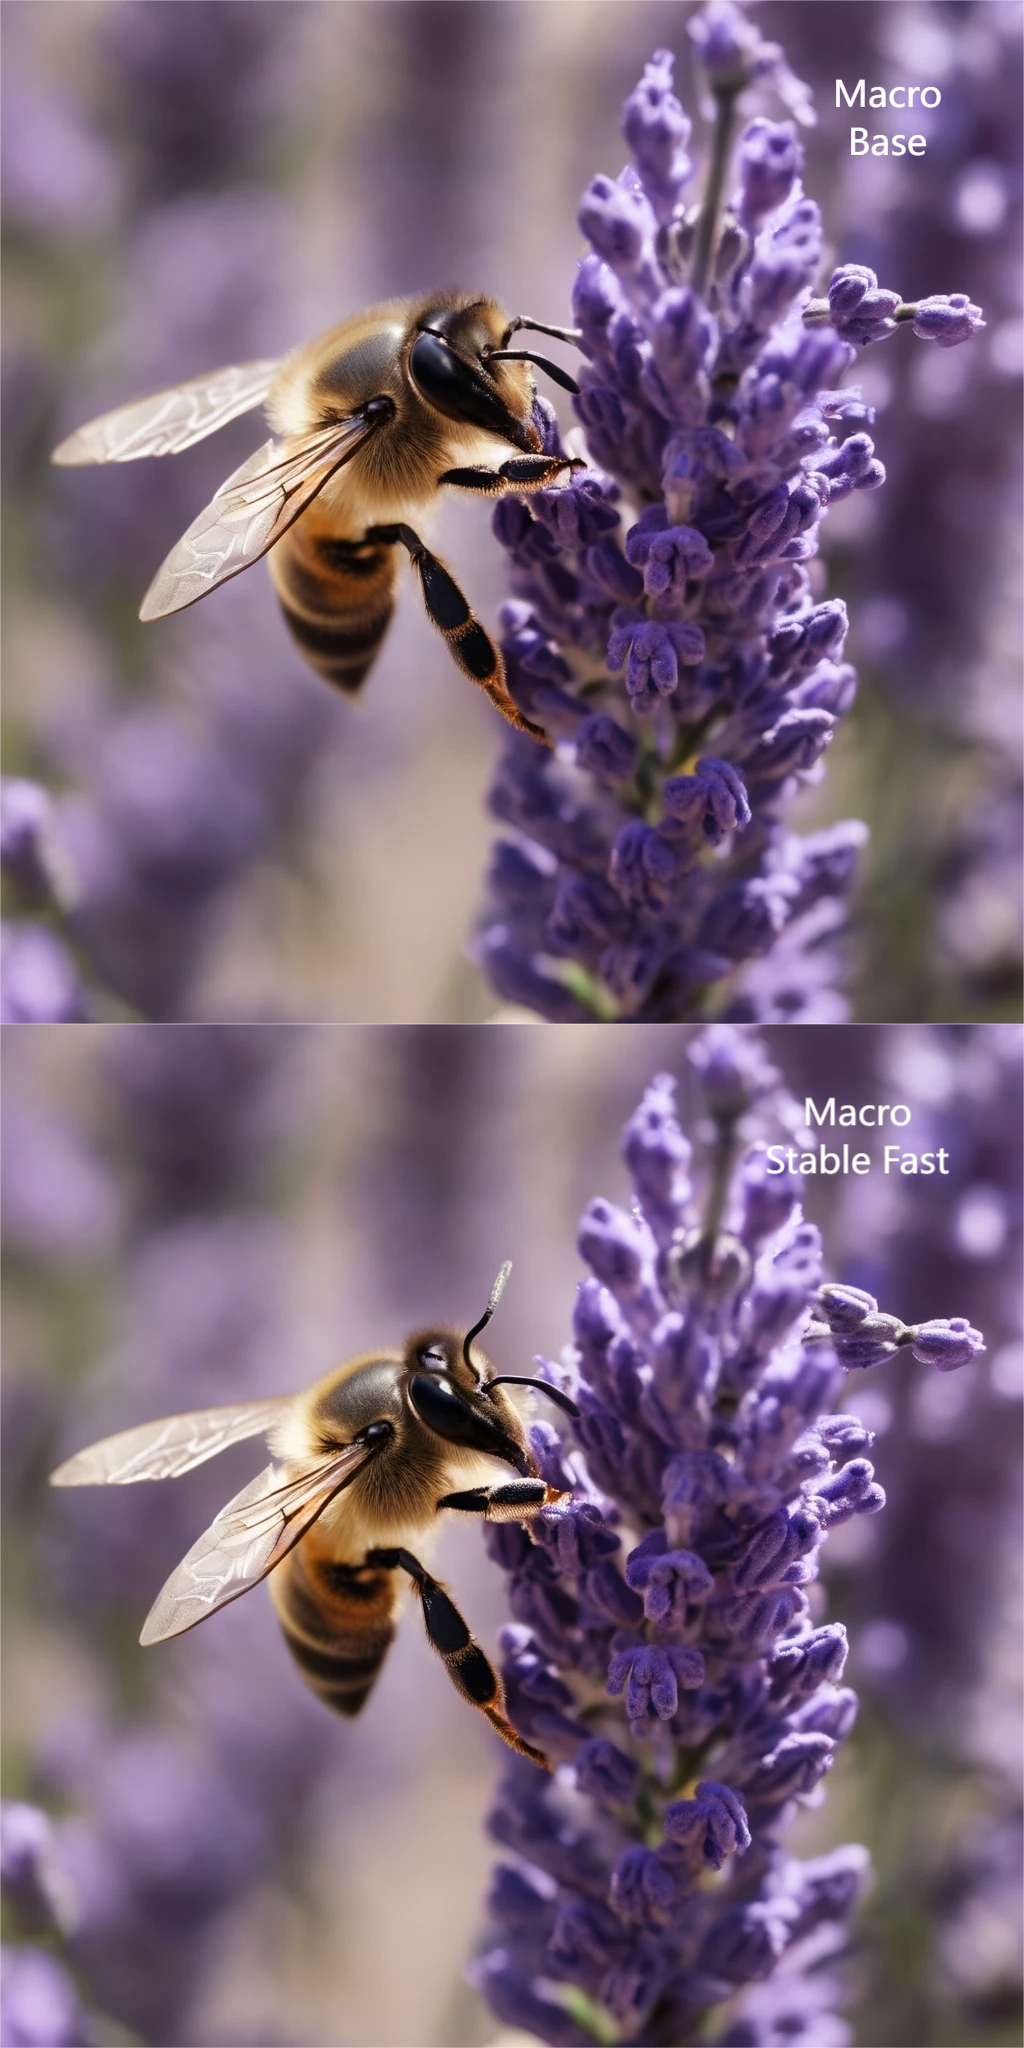

<左右滑动查看更多图片>

结论:
它超出了期望值。你可以看到该项目背后的出色工作。
最引人注目的是速度的提高。我们生成的第一张图像需要较长时间(19秒),但如果在这些测试中进行了预热,就不重要了。
内存使用量有所增加,但仍然相当可控。
至于视觉效果,构图略有变化。在某些图像中,某些元素的质量甚至已经提高,所以……眼见为实。
何时使用:我想说,随时都可用。
DeepCache
DeepCache项目称,要成为用户可以实施的最佳优化方法之一,几乎没有什么缺点,且易于添加。它利用缓存系统来重用高级别函数,并以更高效的方式更新低级别函数。
首先,我们安装所需的库:
pip install deepcache然后,我们将以下代码集成到我们的pipeline中:
- from DeepCache import DeepCacheSDHelper
-
-
- # ...
-
-
- pipe = AutoPipelineForText2Image.from_pretrained(
- 'stabilityai/stable-diffusion-xl-base-1.0',
- use_safetensors=True,
- torch_dtype=torch.float16,
- variant='fp16',
- ).to('cuda')
-
-
- helper = DeepCacheSDHelper(pipe=pipe)
- helper.set_params(cache_interval=3, cache_branch_id=0)
- helper.enable()
-
-
- generator = torch.Generator(device='cuda')
-
-
- for i, generation in enumerate(queue, start=1):
- generator.manual_seed(generation['seed'])
-
-
- image = pipe(
- prompt=generation['prompt'],
- generator=generator,
- ).images[0]
-
-
- image.save(f'image_{i}.png')

有两个参数可以修改,以实现更高的速度,尽管会在结果中引入更大的质量损失。
cache_interval=3:指定缓存在几个步数后更新一次。
cache_branch_id=0:指定神经网络负责执行缓存过程的分支(按降序排列,0 是第一层)。
让我们看看使用默认推荐参数的结果。
测试结果:


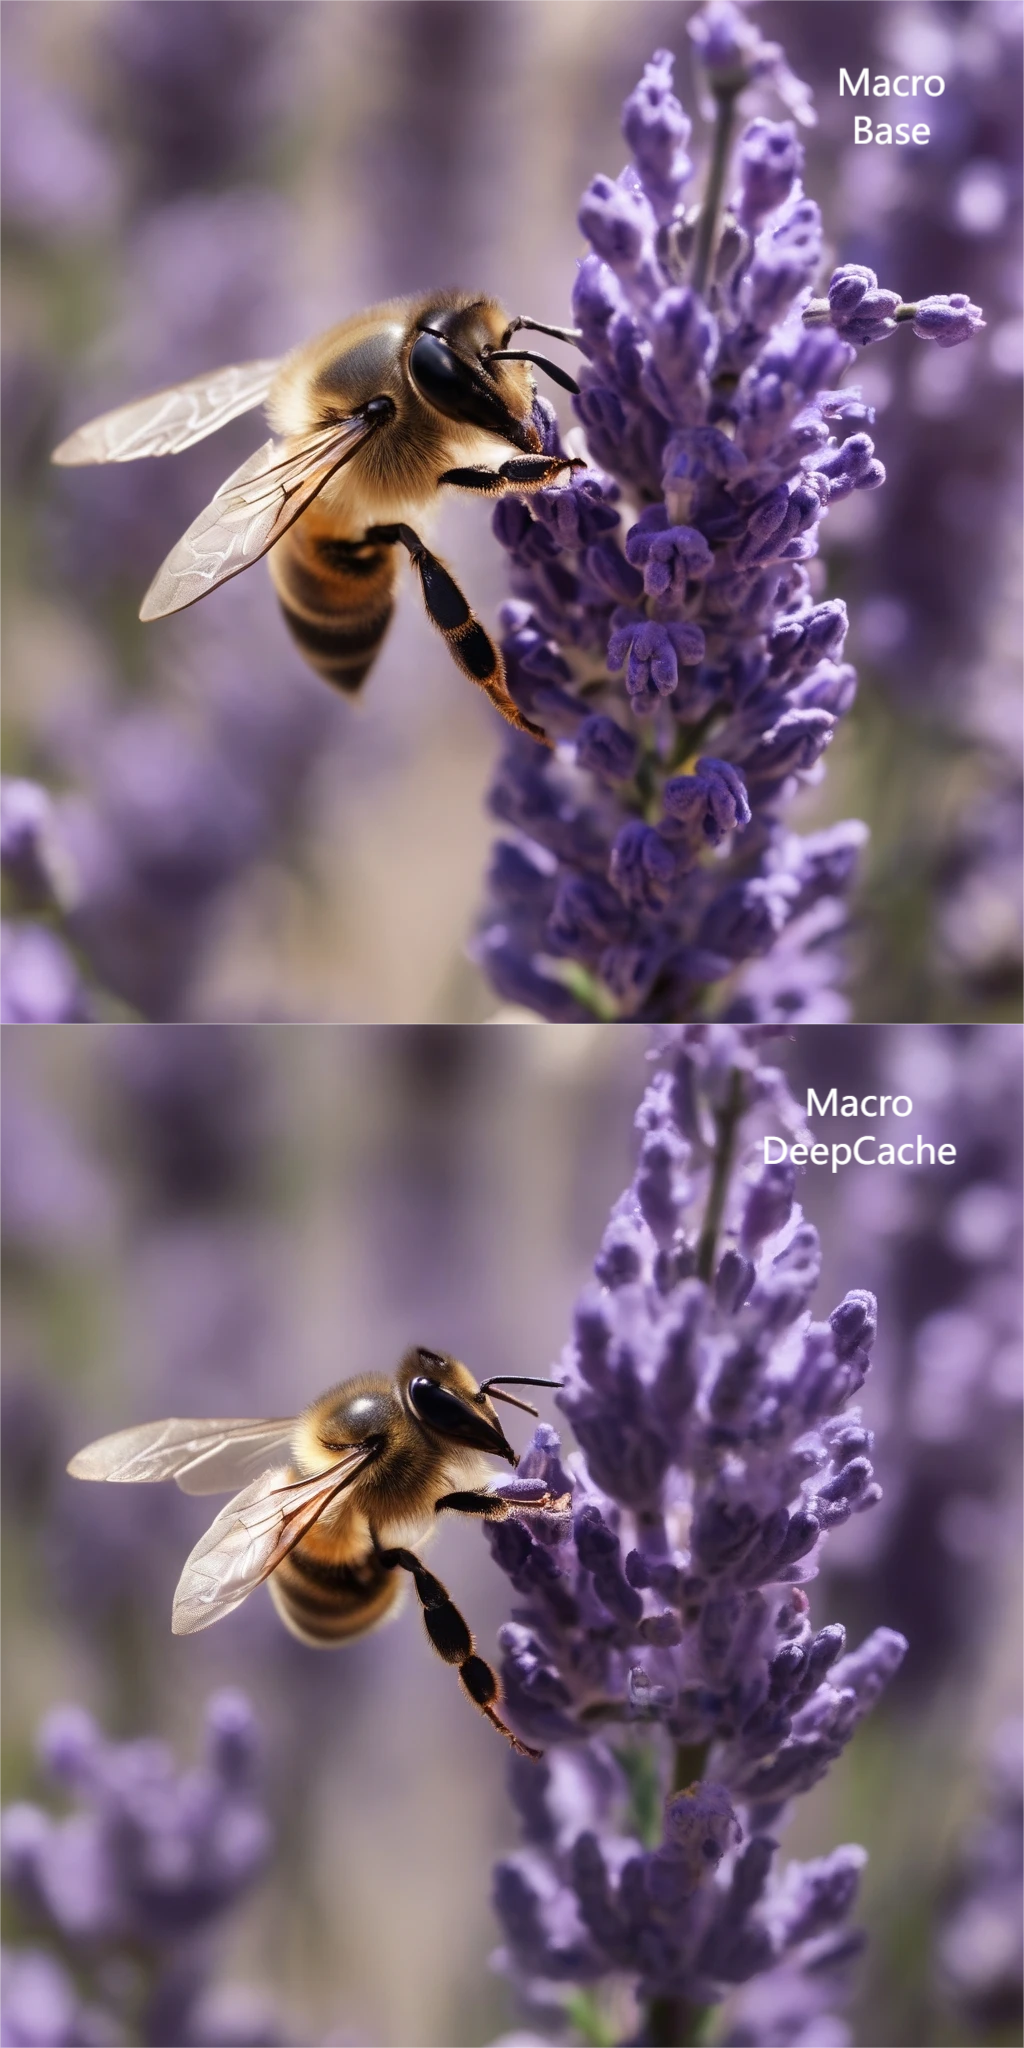

<左右滑动查看更多图片>

结论:
哇!在略微牺牲内存使用量的情况下,推理时间可以减少一半以上。
至于图像质量,你可能已经注意到变化很大,且不幸的是,变得更糟了。根据图像的风格,这一点可能更重要或不那么重要,但这个劣势的确存在(在物体图像中似乎并没有太大影响)。
增加cache_branch_id的值似乎可以提供更高的视觉质量,尽管可能还不够。
何时使用:由于DeepCache大幅降低了推理时间,理所当然地会稍微降低图像质量。毫无疑问,当用于测试提示或参数时,这是一个非常有用的优化方法,不过,当你希望输出更好的图像质量时就不适用了。
TensorRT
TensorRT是NVIDIA推出的高性能推理优化器和运行时环境,旨在加速神经网络推理过程。
但我们从一开始就遇到了问题。我们的测试使用的是diffusers库中的pipeline,目前还没有与Stable Diffusion XL兼容的TensorRT pipeline。针对Stable Diffusion 2.x(txt2img、img2img 或 inpainting)有社区提供的pipeline。我也看到一些针对Stable Diffusion 1.x的pipeline,但正如我所说的,都不适用于SDXL。
另一方面,在HuggingFace上,我们可以找到官方的stabilityai/stable-diffusion-xl-1.0-tensorrt库。其中包含了使用TensorRT执行推理过程的说明,但不幸的是,它使用的脚本非常复杂,几乎不可能适应我们的测试。
由于使用的脚本甚至没有相同的调度器(Euler),因此结果看起来会有很大不同。尽管如此,我尽可能地重用了许多数值,包括正向提示、无负向提示、相同的种子、相同的CFG值和相同的图像尺寸。
以下是脚本使用说明,便于你进行深入研究:
- # 克隆整个仓库或从此文件夹下载文件
- # https://github.com/rajeevsrao/TensorRT/tree/release/8.6/demo/Diffusion
- # 像往常一样创建并激活一个虚拟环境
- python -m venv .venv
- ## Unix
- source .venv/bin/activate
- ## Windows
- .venv\Scripts\activate
- # 安装所需的库
- pip install torch torchvision --index-url https://download.pytorch.org/whl/cu118
- pip install transformers accelerate diffusers cuda-python nvtx onnx colored scipy polygraphy
- pip install --pre --extra-index-url https://pypi.nvidia.com tensorrt
- pip install --pre --extra-index-url https://pypi.ngc.nvidia.com onnx_graphsurgeon
- # 可以使用以下行验证 TensorRT 是否正确安装
- python -c "import tensorrt; print(tensorrt.__version__)"
- # 9.3.0.post12.dev1
- # 进行推理
- python demo_txt2img_xl.py "macro shot of a bee collecting nectar from lavender flowers"

测试结果:


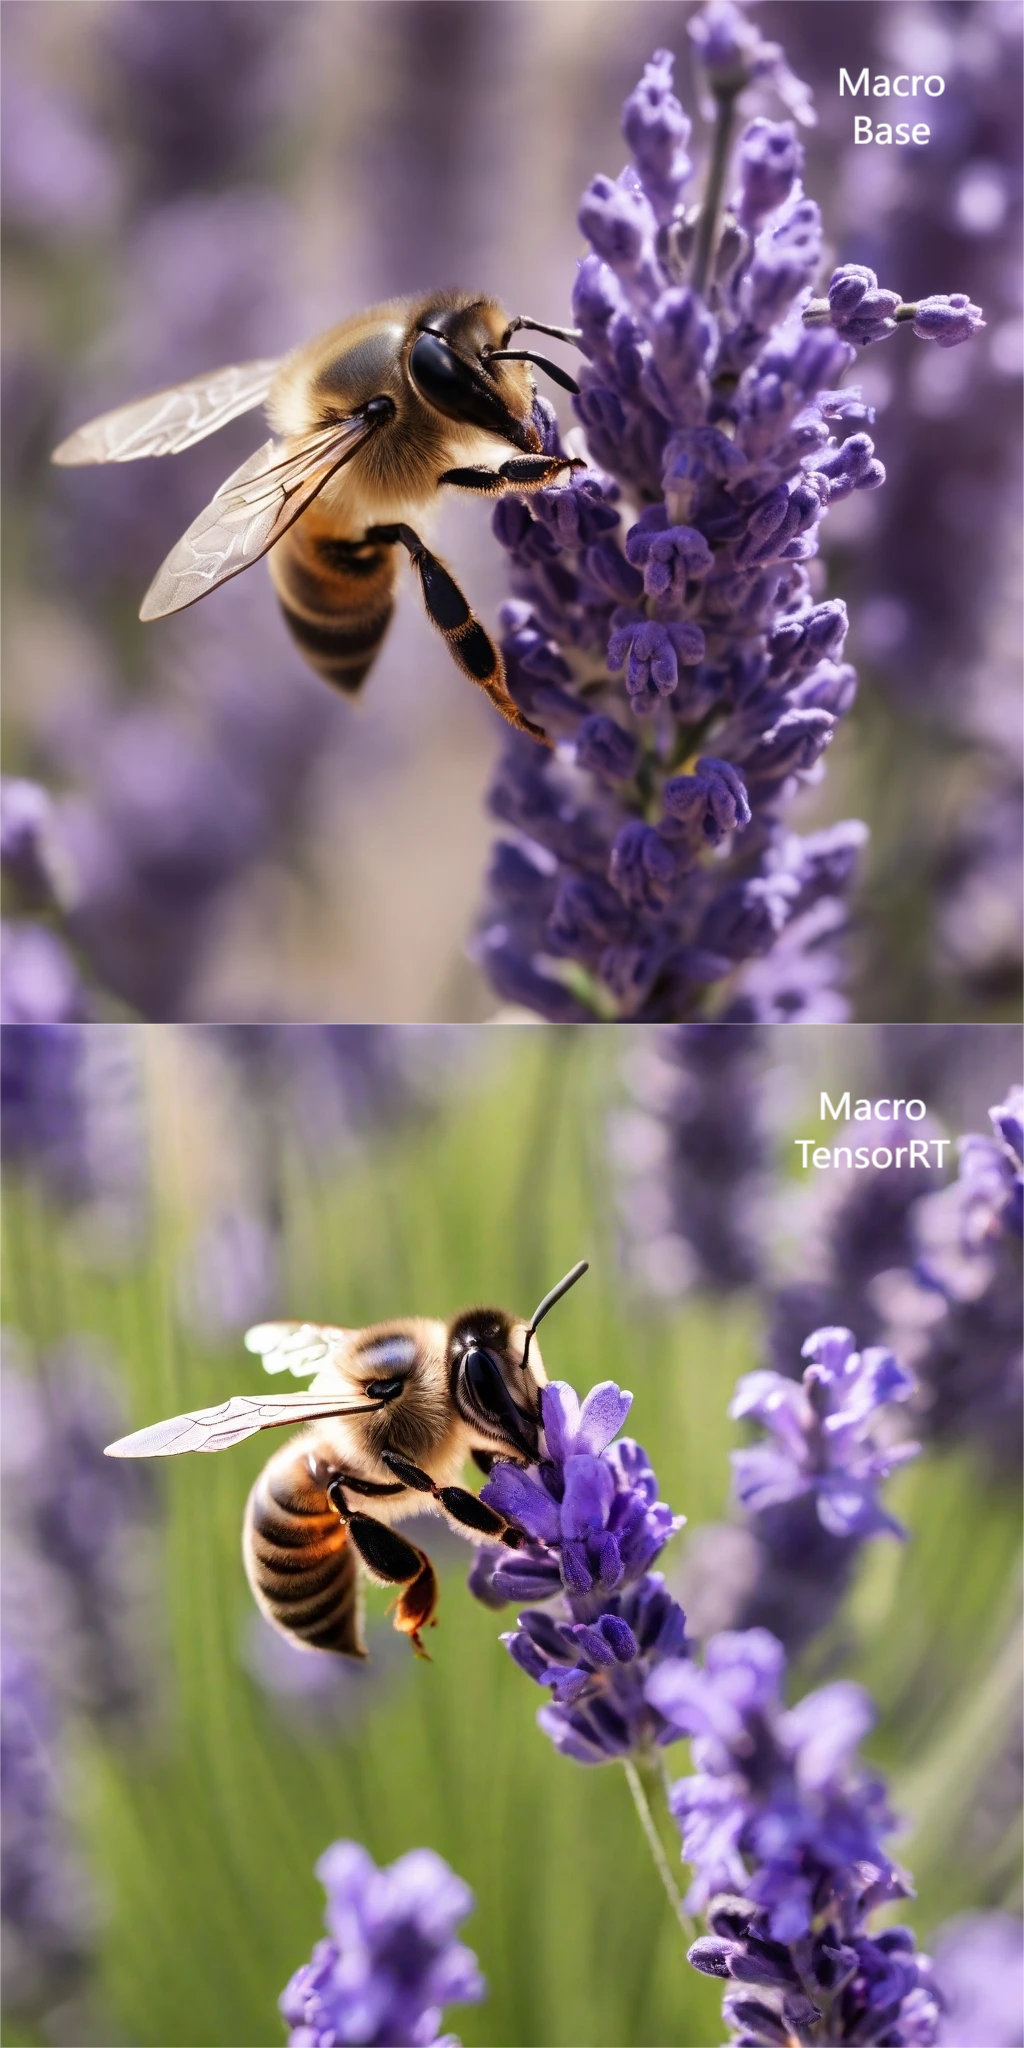

<左右滑动查看更多图片>

结论:
经过模型准备后(约半个小时,仅在第一次准备时需要),推理过程似乎加速了很多,每张图像的生成时间仅为 8 秒,而未经优化的代码则需要14秒。我无法确定内存消耗情况,因为TensorRT使用了不同的API。
至于图像的质量……在初始状态下看起来很惊艳。
何时使用:如果你可以将TensorRT集成到你的流程中,可以尝试一下。看起来是一个不错的优化方法,值得一试。
4
组件优化
这些优化措施对于 Stable Diffusion XL 的各个组件进行了修改,从而通过多种不同方式提升其性能。每个单独的改进可能只会带来一点点提升,但将它们全部结合起来,就会产生显著影响。
torch.compile
使用PyTorch 2或更高版本时,我们可以通过 [torch.compile] API(https://pytorch.org/docs/stable/generated/torch.compile.html) 对模型进行编译,以获得更好的性能。尽管编译需要一定时间,但后续调用将受益于额外的速度提升。
在以前的PyTorch版本中,也可以通过torch.jit.trace API使用跟踪技术对模型进行编译。这种即时(just-in-time / JIT)运行时的编译方法不如新方法高效,因此我们可以忽略此API。
在torch.compile方法中,mode参数接受以下值:default、reduce-overhead、max-autotune和max-autotune-no-cudagraphs。理论上它们是不同的,但我没有看到任何区别,因此我们将使用 reduce-overhead。
Windows操作系统如下所示:
RuntimeError: Windows not yet supported for torch.compile- pipe = AutoPipelineForText2Image.from_pretrained(
- 'stabilityai/stable-diffusion-xl-base-1.0',
- use_safetensors=True,
- torch_dtype=torch.float16,
- variant='fp16',
- ).to('cuda')
-
-
- pipe.unet = torch.compile(pipe.unet, mode='reduce-overhead', fullgraph=True)
-
-
- generator = torch.Generator(device='cuda')
-
-
- for i, generation in enumerate(queue, start=1):
- generator.manual_seed(generation['seed'])
-
-
- image = pipe(
- prompt=generation['prompt'],
- generator=generator,
- ).images[0]
-
-
- image.save(f'image_{i}.png')

我们将评估编译模型所需的时间以及每一个连续生成所需的时间。
测试结果:

结论:
一项能很快带来成效的简单优化。
何时使用:当生成的图片足够多,值得承受编译时间时就可以使用这种技术。
OneDiff
OneDiff是一个适配了Diffusers、ComfyUI和Stable Diffusion webUI应用框架的优化库。其名字的字面意思是:一行代码就能加速扩散模型。
该库采用了量化、注意力机制改进和模型编译等技术。
安装该加速引擎只需添加几个库,但如果你使用的是其他CUDA版本,或者想要使用不同的安装方法,可以参考技术文档进行安装(https://github.com/siliconflow/onediff#1-install-oneflow)。
- pip install --pre oneflow -f https://github.com/siliconflow/oneflow_releases/releases/expanded_assets/community_cu118
-
-
- pip install --pre onediff
如果你使用的是Windows或macOS,则必须自己编译该库。
RuntimeError: This package is a placeholder. Please install oneflow following the instructions in https://github.com/Oneflow-Inc/oneflow#install-oneflowOneDiff创建者还提供了一个企业版,承诺额外提供20%的速度(甚至更多),尽管我无法验证这一点,而且他们也没有提供太多细节。
类似于torch.compile,所需的代码只有一行,可以改变pipe.unet 的行为。
- import oneflow as flow
- from onediff.infer_compiler import oneflow_compile
-
-
- # ...
-
-
- pipe = AutoPipelineForText2Image.from_pretrained(
- 'stabilityai/stable-diffusion-xl-base-1.0',
- use_safetensors=True,
- torch_dtype=torch.float16,
- variant='fp16',
- ).to('cuda')
-
-
- pipe.unet = oneflow_compile(pipe.unet)
-
-
- generator = torch.Generator(device='cuda')
-
-
- with flow.autocast('cuda'):
- for i, generation in enumerate(queue, start=1):
- generator.manual_seed(generation['seed'])
-
-
- image = pipe(
- prompt=generation['prompt'],
- generator=generator,
- ).images[0]
-
-
- image.save(f'image_{i}.png')

让我们看看它是否符合预期。
测试结果:


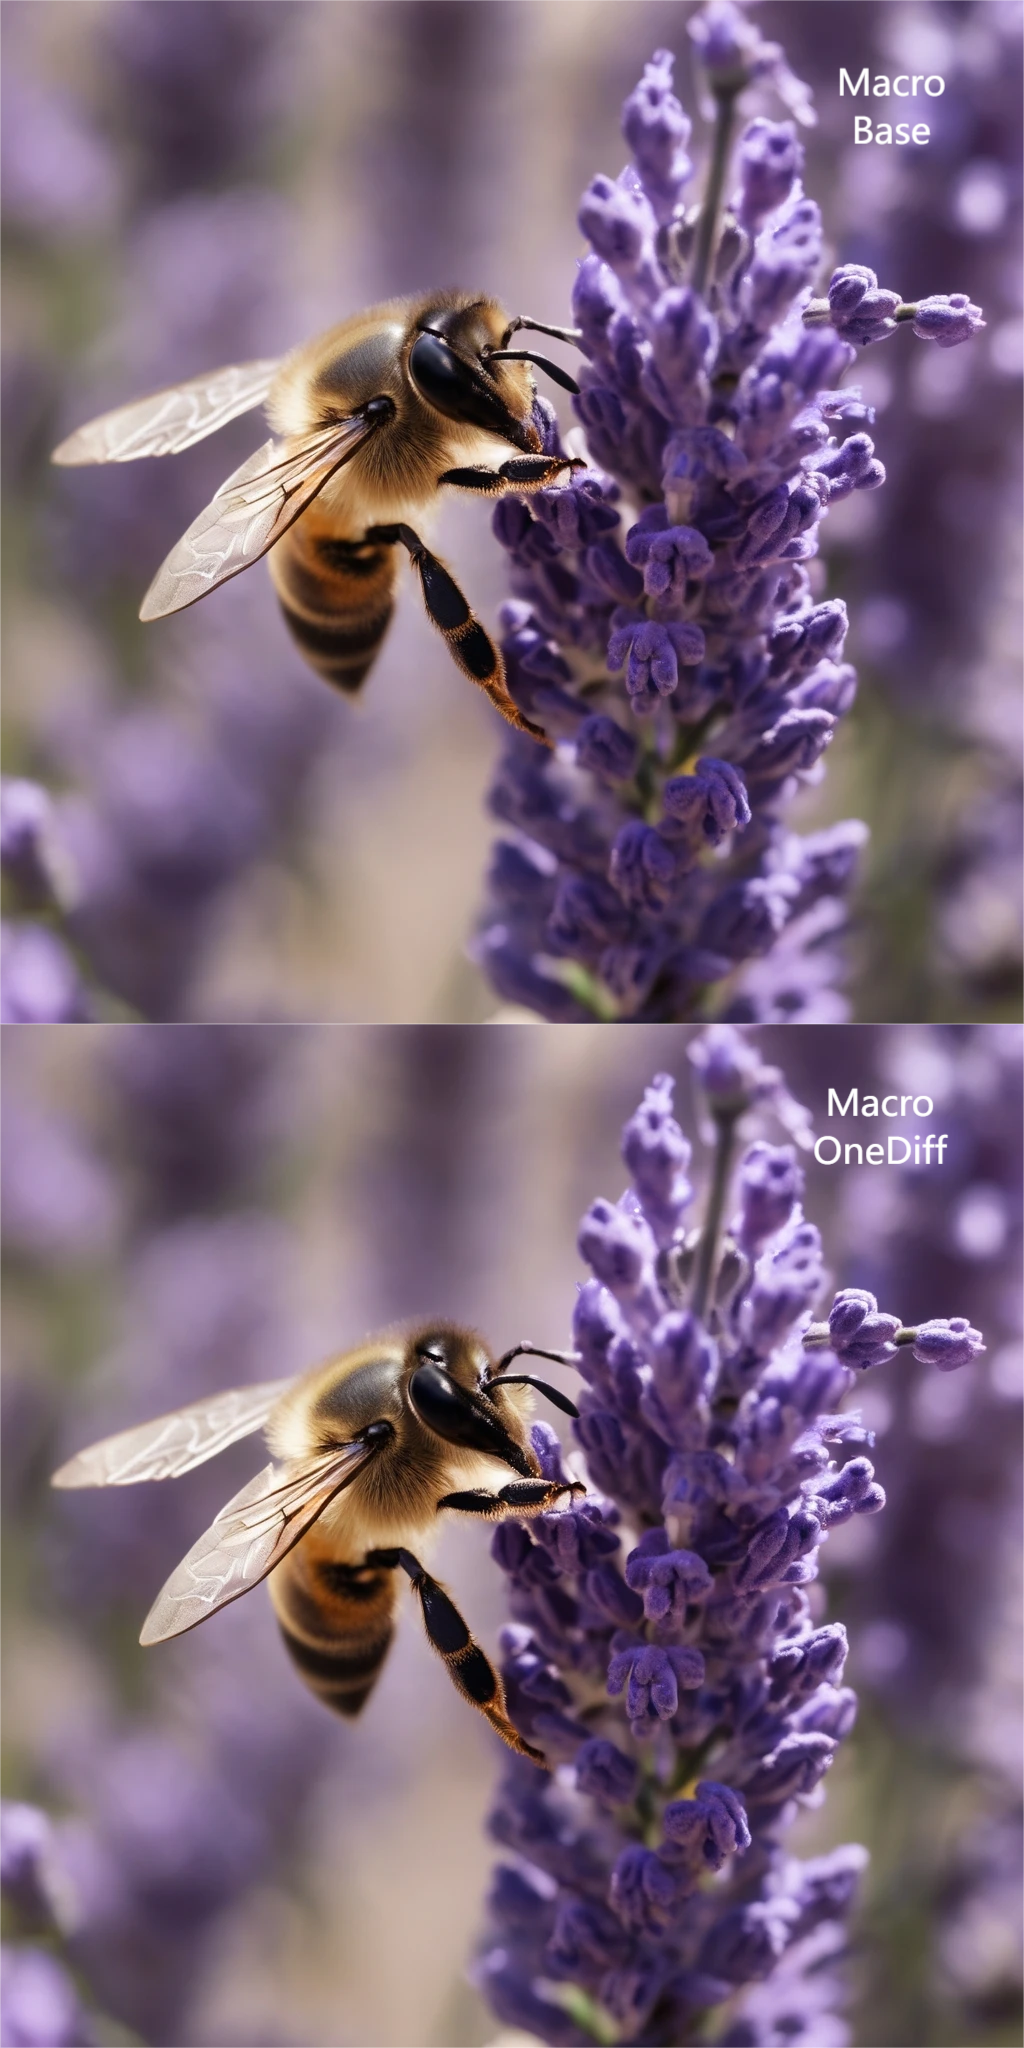

<左右滑动查看更多图片>

结论:
OneDiff稍微改变了图像结构,但这是一个有利的改变。在interior图像中,我们可以看到有一个bug通过变成一个阴影的方式被修复了,。
编译时间非常短,比torch.compile快得多。
OneDiff使推理时间缩短了45%,超过了所有竞品的优化速度(Stable Fast、TensorRT 和 torch.compile)。
令人惊讶的是(与Stable Fast不同),其内存使用量并没有增加。
何时使用:建议一直使用。它提高了生成结果的视觉质量,推理时间几乎减半,唯一的代价是在编译时需要稍微等待。非常漂亮的工作!
Channels-last内存格式
Channels-last内存格式组织数据,用以将颜色通道(color channel)储存在张量的最后一个纬度中。
默认情况下,张量采用的是NCHW格式,对应着以下四个维度:
-
N(数量):同时生成多少张图像(批大小)。
-
C(通道):图像具有多少个通道。
-
H(高度):图像的高度(以像素为单位)。
-
W(宽度):图像的宽度(以像素为单位)。
相比之下,使用这种技术,以NHWC格式将张量数据重新排序,将通道数放在最后。
- pipe = AutoPipelineForText2Image.from_pretrained(
- 'stabilityai/stable-diffusion-xl-base-1.0',
- use_safetensors=True,
- torch_dtype=torch.float16,
- variant='fp16',
- ).to('cuda')
-
-
- pipe.unet.to(memory_format=torch.channels_last)
-
-
- generator = torch.Generator(device='cuda')
-
-
- for i, generation in enumerate(queue, start=1):
- generator.manual_seed(generation['seed'])
-
-
- image = pipe(
- prompt=generation['prompt'],
- generator=generator,
- ).images[0]
-
-
- image.save(f'image_{i}.png')

使用以下命令,检查张量是否已重新排序(将其放置在重排序之前和之后):
print(pipe.unet.conv_out.state_dict()['weight'].stride())虽然channels-last内存格式在某些情况下可能会提高效率并减少内存使用,但它不兼容某些神经网络,甚至可能会降低性能。因此,我们可以将其排除。
测试结果:

结论:
在Stable Diffusion XL中,U-Net模型似乎并没有从这种优化中受益,但即使这样,知识也不会占用太多空间对吧?
何时使用:永远别用。
FreeU
FreeU是第一个也是唯一一个不改善推理时间或内存使用情况,而改善图像结果质量的优化技术。
这种技术平衡了U-Net架构中两个关键元素的贡献:skip connections(跳跃连接,引入高频细节)和backbone feature maps(主干特征图,提供语义信息)。
换句话说,FreeU 抵消了图像中不自然细节的引入,提供了更真实的视觉结果。
- pipe = AutoPipelineForText2Image.from_pretrained(
- 'stabilityai/stable-diffusion-xl-base-1.0',
- use_safetensors=True,
- torch_dtype=torch.float16,
- variant='fp16',
- ).to('cuda')
-
-
- pipe.enable_freeu(s1=0.9, s2=0.2, b1=1.3, b2=1.4)
-
-
- generator = torch.Generator(device='cuda')
-
-
- for i, generation in enumerate(queue, start=1):
- generator.manual_seed(generation['seed'])
-
-
- image = pipe(
- prompt=generation['prompt'],
- generator=generator,
- ).images[0]
-
-
- image.save(f'image_{i}.png')

你可以调整这些值,尽管它们是Stable Diffusion XL的推荐值。
如需要更多信息,可查看项目:https://github.com/ChenyangSi/FreeU#parameters
测试结果:


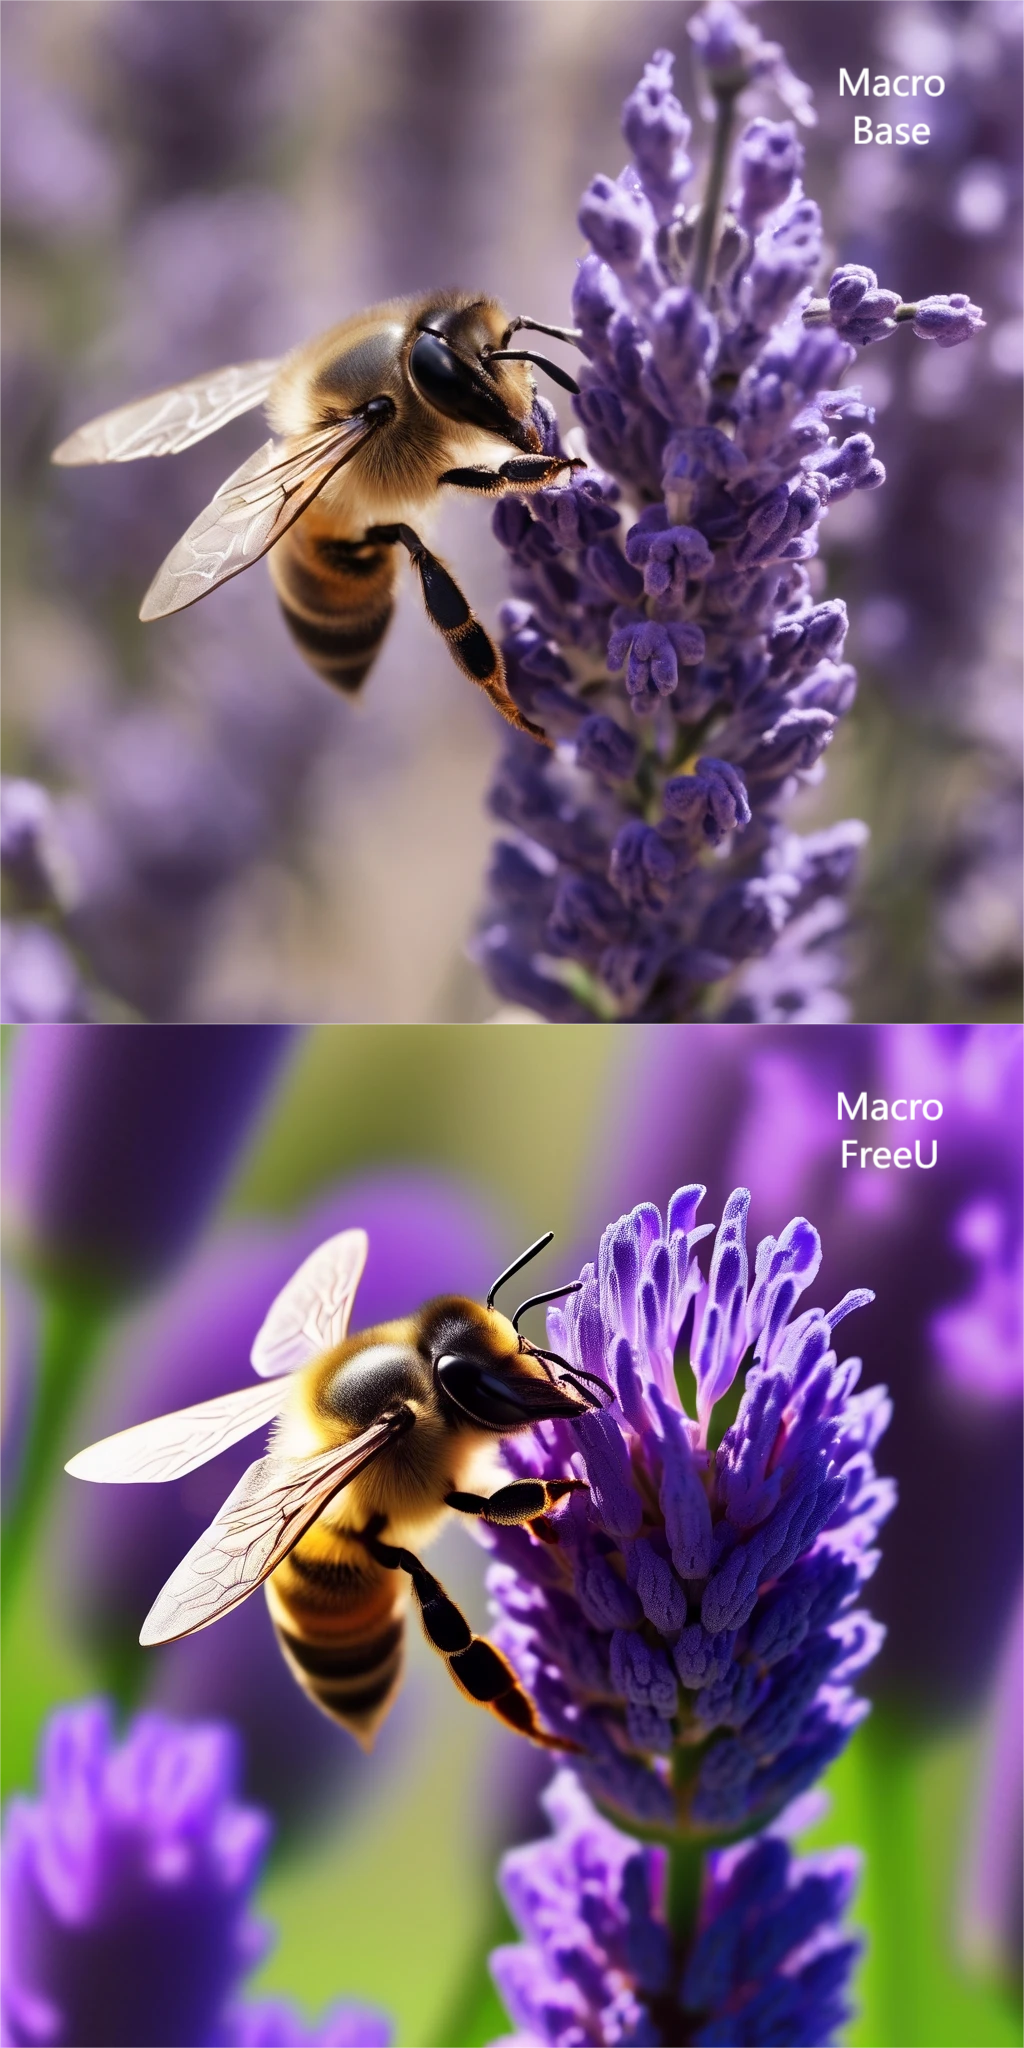

<左右滑动查看更多图片>
结论:
我之前从未尝试过FreeU,但这个结果给我留下了深刻印象。尽管图片的结构与原始输入有所不同,但我认为它们更忠实于提示,并专注于提供最佳视觉质量,而不会陷入细节的琐碎之中。
同时我发现这个技术也有一个问题,即图片失去了一些连贯性。例如,沙发顶部有一盆植物,蜜蜂有三只翅膀。这表明尽管图片视觉上引人注目,但可能缺乏一定的逻辑一致性或现实感。
何时使用:当我们想要获得更具创意、更高视觉质量的结果时使用(尽管这也取决于我们所追求的图像风格)。
VAE FP16 fix
正如在批处理优化中看到的,Stable Diffusion XL中默认包含的VAE模型无法在FP16格式下运行。在解码图像之前,pipeline会执行一个方式,以使强制模型以FP32格式工作 (pipe.upcast_vae())。而在之前的FP16优化中,将模型以FP32格式运行是一种不必要的资源浪费。
用户madebyollin(也是TAESD的创作者,稍后我们将看到)已经创建了这个模型的一个修复版,使其可以在FP16格式下运行。
我们只需导入这个VAE并替换原始版本:(https://huggingface.co/madebyollin/sdxl-vae-fp16-fix)
- from diffusers import AutoPipelineForText2Image, AutoencoderKL
-
-
- # ...
-
-
- vae = AutoencoderKL.from_pretrained(
- 'madebyollin/sdxl-vae-fp16-fix',
- use_safetensors=True,
- torch_dtype=torch.float16,
- ).to('cuda')
-
-
- pipe = AutoPipelineForText2Image.from_pretrained(
- 'stabilityai/stable-diffusion-xl-base-1.0',
- use_safetensors=True,
- torch_dtype=torch.float16,
- variant='fp16',
- vae=vae,
- ).to('cuda')
-
-
- generator = torch.Generator(device='cuda')
-
-
- for i, generation in enumerate(queue, start=1):
- generator.manual_seed(generation['seed'])
-
-
- image = pipe(
- prompt=generation['prompt'],
- generator=generator,
- ).images[0]
-
-
- image.save(f'image_{i}.png')

测试结果:


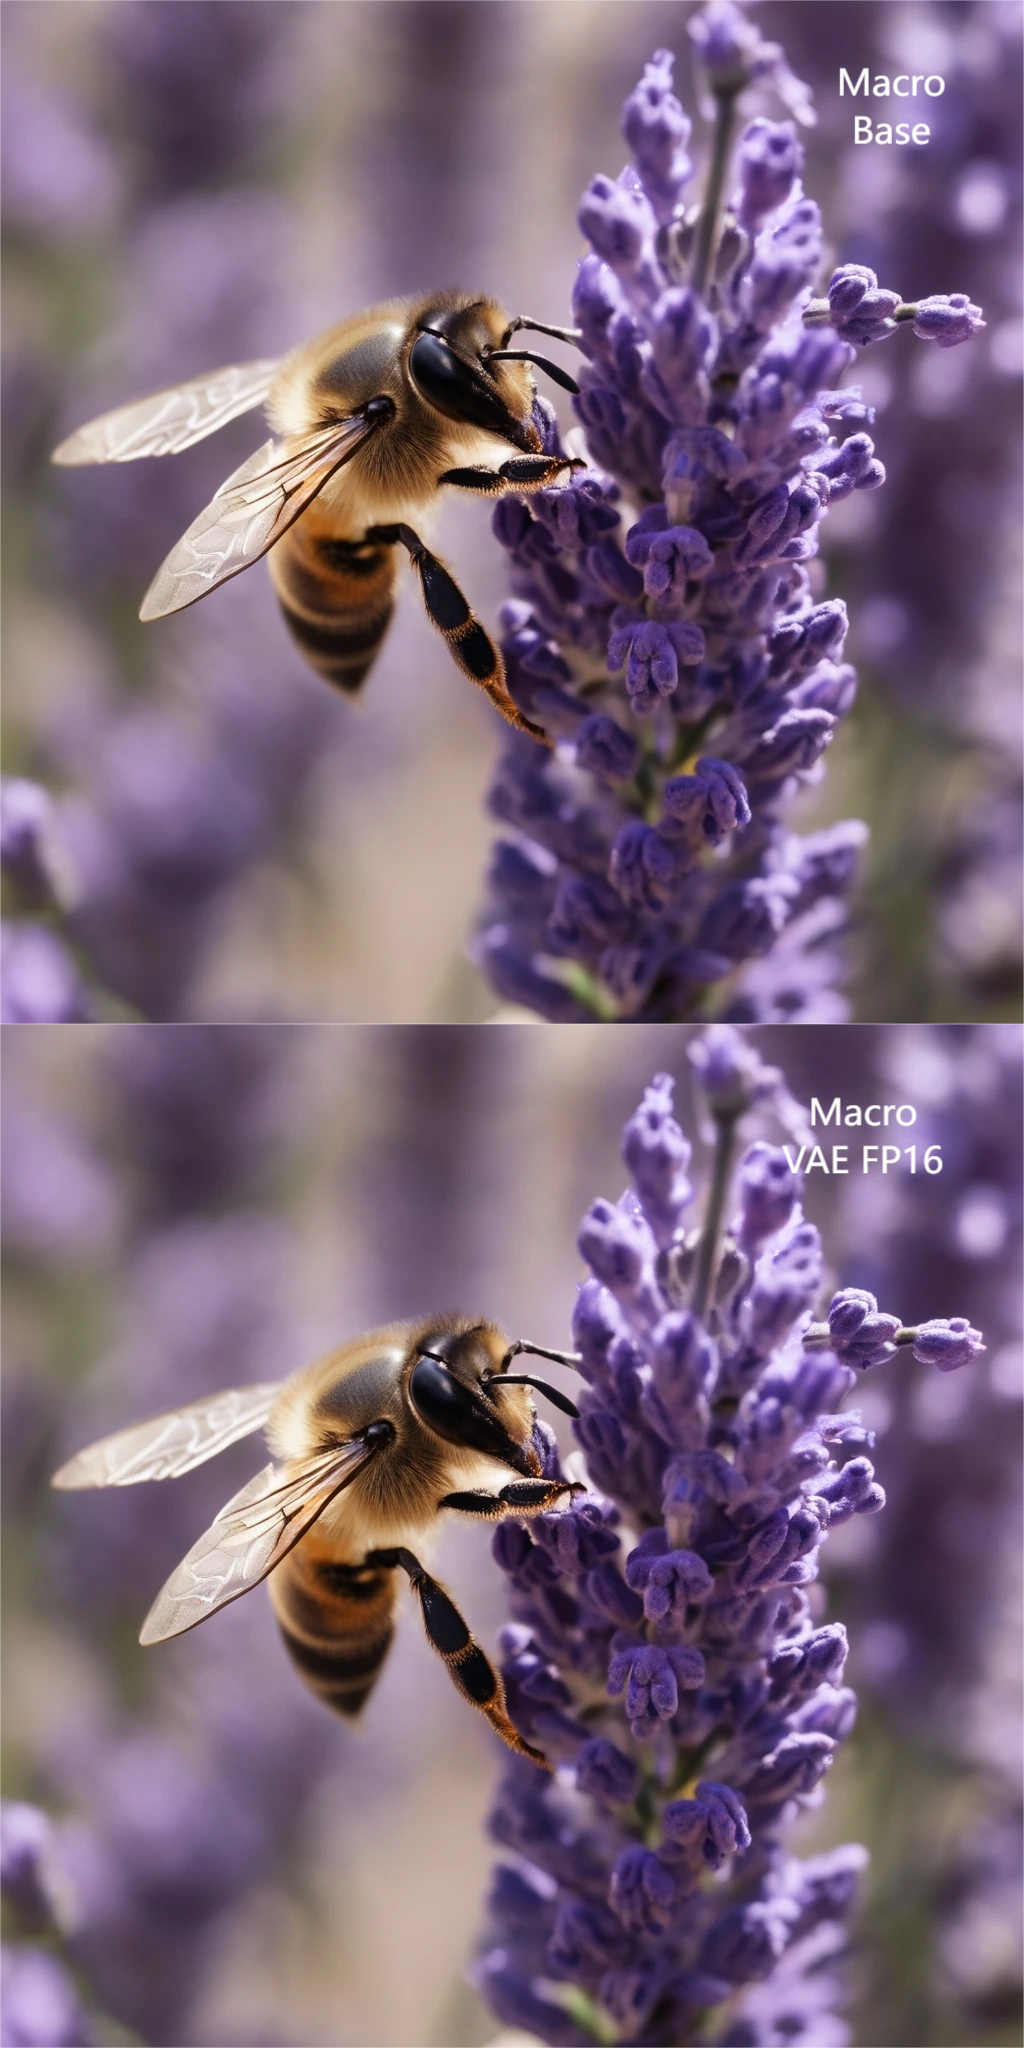

<左右滑动查看更多图片>

结论:
图像视觉质量与原始模型几乎相同,没有质量损失。
内存使用量减少了将近15%,对于这一简单改进来说是相当不错的结果。
何时使用:可以一直使用,除非你更倾向于使用Tiny VAE优化(https://www.felixsanz.dev/articles/ultimate-guide-to-optimizing-stable-diffusion-xl#tiny-vae)。
VAE slicing
当同时生成多张图像时(增加批大小),VAE会同时解码所有张量(并行)。这会大大增加内存使用量。为避免这种情况,可以使用VAE切片技术逐个解码张量(串行)。这与我们在批处理优化中手动操作的方式几乎相同。
举例来说,无论使用的批大小为1、2、8还是32,VAE的内存消耗都会保持不变,与此相对应的是,会有一个几乎不可察觉的少量时间损失。
- pipe = AutoPipelineForText2Image.from_pretrained(
- 'stabilityai/stable-diffusion-xl-base-1.0',
- use_safetensors=True,
- torch_dtype=torch.float16,
- variant='fp16',
- ).to('cuda')
-
-
- pipe.enable_vae_slicing()
-
-
- generator = torch.Generator(device='cuda')
-
-
- for i, generation in enumerate(queue, start=1):
- generator.manual_seed(generation['seed'])
-
-
- image = pipe(
- prompt=generation['prompt'],
- generator=generator,
- ).images[0]
-
-
- image.save(f'image_{i}.png')

批大小为1时,这一优化技术没有任何作用。由于在测试中使用的批处理大小为1,因此我们将跳过测试结果,直接给出结论。
结论:
这一优化技术试图在增加批大小时减少内存使用,而批大小的增加恰恰是导致内存使用增加的最关键因素。因此,这种优化技术本身存在矛盾。
何时使用:建议仅在有一个完善的流程,同时生成多张图像,并且VAE执行是瓶颈时使用这种优化技术。换句话说,适合使用这种技术的情况很少。
VAE tiling
当生成高分辨率图像(如4K/8K)时,VAE往往成为瓶颈。解码这么大尺寸的图像不仅需要花费几分钟时间,而且还会消耗大量内存。经常会遇到如下问题:torch.cuda.OutOfMemoryError: CUDA out of memory.
通过这种优化技术,张量被分割成几部分(就像它们是切片一样),然后逐个解码,最后再重新连接起来形成图像。这样,VAE不必一次性解码所有内容。
因为图像被分割成了多个部分,然后再重新连接起来,所以连接处可能会出现一些微小的颜色差异或瑕疵。然而,通常情况下这种差异都不太常见或不容易被察觉。
测试结果:

结论:
这种优化技术相对简单易懂:如果需要生成非常高分辨率的图像,而你的显卡内存不足,这将是实现这一目标的唯一选择。
何时使用:永远不要使用这种优化技术。非常高分辨率的图像存在缺陷,因为Stable Diffusion模型并没有针对这种任务进行训练。如果需要增加分辨率,应该使用一个上采样器(upscaler)。
Tiny VAE
在Stable Diffusion XL中使用了一个拥有5000万个参数的32 bit VAE。由于这个组件是可互换的,我们将使用一个名为TAESD的VAE。这个小模型只有100万个参数,是原始VAE的精简版,同时能够在16 bit格式下运行。
- from diffusers import AutoPipelineForText2Image, AutoencoderTiny
-
-
- # ...
-
-
- vae = AutoencoderTiny.from_pretrained(
- 'madebyollin/taesdxl',
- use_safetensors=True,
- torch_dtype=torch.float16,
- ).to('cuda')
-
-
- pipe = AutoPipelineForText2Image.from_pretrained(
- 'stabilityai/stable-diffusion-xl-base-1.0',
- use_safetensors=True,
- torch_dtype=torch.float16,
- variant='fp16',
- vae=vae,
- ).to('cuda')
-
-
- generator = torch.Generator(device='cuda')
-
-
- for i, generation in enumerate(queue, start=1):
- generator.manual_seed(generation['seed'])
-
-
- image = pipe(
- prompt=generation['prompt'],
- generator=generator,
- ).images[0]
-
-
- image.save(f'image_{i}.png')

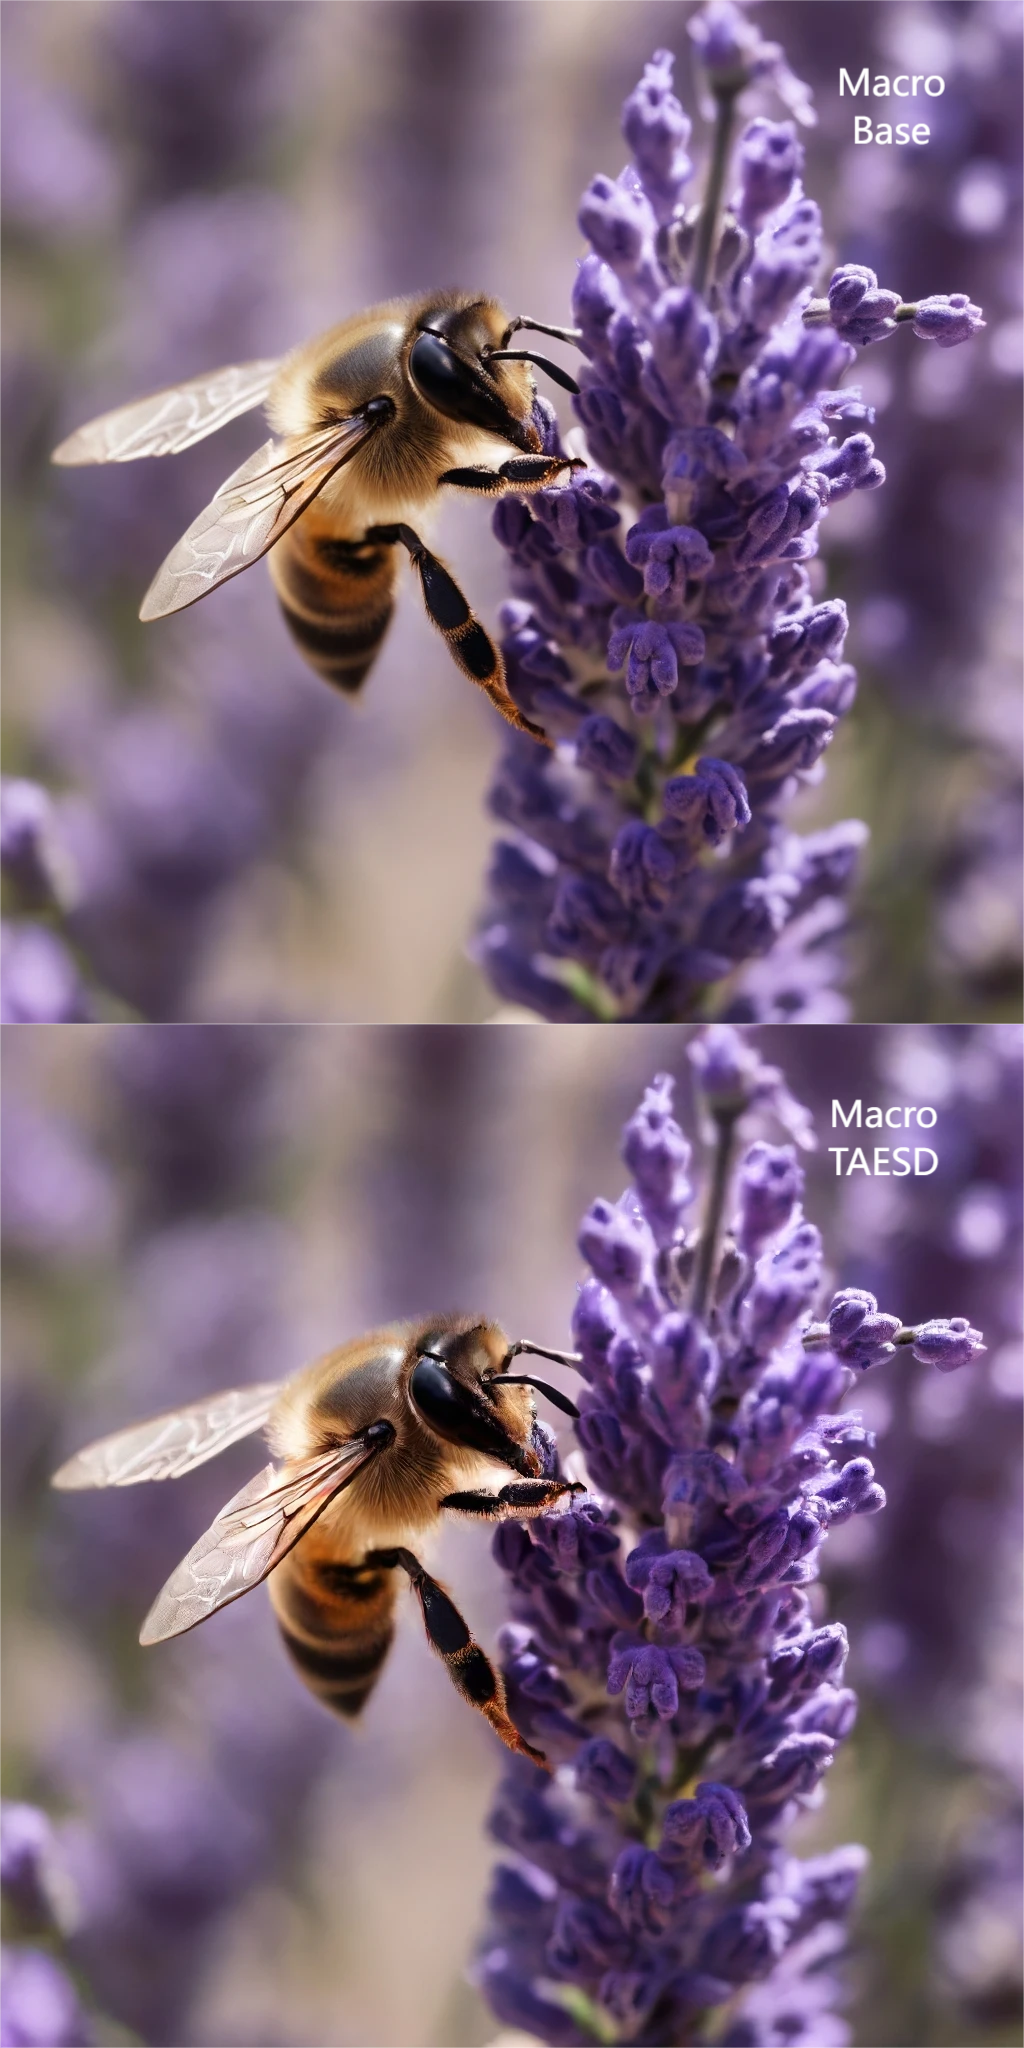
牺牲图像质量,以获取更快的速度和更少的内存使用是否值得?
测试结果:



<左右滑动查看更多图片>

结论:
由于Tiny VAE是一个更小的模型,并且能够在16 bit格式下运行,因此内存使用量大幅减少。
Tiny VAE并没有显著减少推理时间。
尽管图像略微改变,尤其是似乎增加了一些对比度和纹理,但我认为这种变化不明显。因此,图像质量的损失是可以接受的。
何时使用:如果你需要一直减少内存使用量,那么建议始终使用Tiny VAE。有了这个模型,甚至可以在不采用其他优化策略的情况下,用8GB显卡运行推理过程。即使不需要减少内存使用,使用Tiny VAE也是一个不错的选择,因为它似乎没有负面影响。
5
参数优化
在这个类别中,我们将以牺牲图像质量为代价,修改一些参数以获得额外速度,希望这种牺牲不会太大。
Stable Diffusion XL使用Euler作为默认采样器。虽然可能有更快的采样器,但Euler本身已经属于快速采样器范畴,因此将Euler替换为其他采样器并不会带来显著的优化效果。
步数(Step)
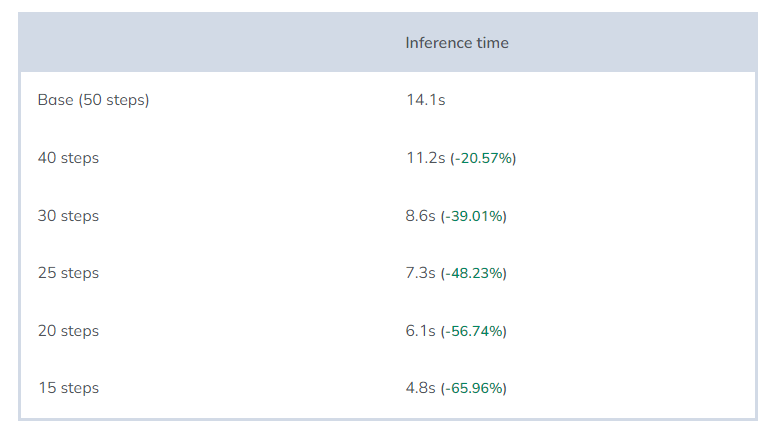
采用默认SDXL,通过50步来清除一个充满噪音的张量。步数越多,噪音清除效果就越好,但推理时间也会相应增加。使用num_inference_steps参数,我们可以指定想要使用的步数。
我们将分别使用30、25、20和15步,来生成一系列图像。我们将使用默认值(50)作为比较基准。
- pipe = AutoPipelineForText2Image.from_pretrained(
- 'stabilityai/stable-diffusion-xl-base-1.0',
- use_safetensors=True,
- torch_dtype=torch.float16,
- variant='fp16',
- ).to('cuda')
-
-
- generator = torch.Generator(device='cuda')
-
-
- for i, generation in enumerate(queue, start=1):
- generator.manual_seed(generation['seed'])
-
-
- image = pipe(
- prompt=generation['prompt'],
- num_inference_steps=30,
- generator=generator,
- ).images[0]
-
-
- image.save(f'image_{i}.png')

尽管减少步数可以缩短推理时间,但我们更感兴趣的是保持在一定范围的步数,以尽可能地维持图像的质量和结构。如果我们的图像质量大幅下降,就算节省了大量时间也没有意义。接下来我们来探索步数数量的极限。
测试结果:


<左右滑动查看更多图片>
结论:
肖像照片(Portrait):在15和20步时,质量尚可,但结构有所不同。25步及以上时,我发现图像质量和结构相当不错。
室内照片(Interior):在15步时,仍然没有达到期望的结构。在20步时,结果相当不错,但某些元素仍有缺失。因此,我认为至少需要25步。
微距摄影(Macro):在微距摄影中,即使只有15步,细节水平也相当惊人。我不知道应该选哪个步数,因为所有选项都是有效和正确的。
3D图像:在3D风格的图像中,少量步数会导致产生大量缺陷,甚至在某些区域会出现模糊。尽管30步的图像还不错,但我更倾向于使用50步(或者40步)的结果。
总的来说,根据生成的图像风格,可以选择使用更多或更少的步数。但是,在25-30步时可以获得相当不错的质量。这样做可以将推理时间缩短约40%,是一种相当显著的提升。
何时使用:当测试提示或调整参数,并且想要快速生成图像时,这是一个很好的优化方法。调试完所有参数和提示后,可以增加步数,以获取最高质量的图像。根据具体的使用情况,可以选择是否永久采用这种优化方法。
禁用 CFG
正如文章“How Stable Diffusion works”所说,无分类器引导(classifier-free guidance)技术负责调整噪音预测器与特定标签之间的距离。
举例来说,假设我们有一个关于汽车的正向提示和一个关于玩具的负向提示。CFG技术可以调整噪音预测器与“汽车”标签之间的距离,使其更接近“汽车”标签所代表的概念,同时远离“玩具”标签所代表的概念。这样做可以确保生成的图像更符合“汽车”的特征,而不受“玩具”的影响。这是一种非常有效的控制条件图像生成法。
“How to implement Stable Diffusion(https://www.felixsanz.dev/articles/how-to-implement-stable-diffusion)”一文介绍了如何实现CFG技术,并且说明了它引入需要复制张量的需求:
- # As we're using classifier-free guidance, we duplicate the tensor to avoid making two passes
- # One pass will be for the conditioned values and another for the unconditioned values
- latent_model_input = torch.cat([latents] * 2)
这意味着噪音预测器在每步上需要花费两倍的时间。
在生成图像的早期阶段,启用CFG技术对于获得质量良好且符合我们提示的图像至关重要。一旦噪音预测器成功地开始产生符合预期的图像,我们就可能不再需要继续使用CFG技术了。在这一优化方法中,我们将探索在图像生成过程中停用CFG技术的影响。
代码很简单,我们创建了一个函数,负责在步数达到指定值后禁用CFG技术(pipe._guidance_scale = 0.0)。此外,停止使用CFG技术后,将不再需要复制张量。
- pipe = AutoPipelineForText2Image.from_pretrained(
- 'stabilityai/stable-diffusion-xl-base-1.0',
- use_safetensors=True,
- torch_dtype=torch.float16,
- variant='fp16',
- ).to('cuda')
-
-
- def callback_dynamic_cfg(pipe, step_index, timestep, callback_kwargs):
- if step_index == int(pipe.num_timesteps * 0.5):
- callback_kwargs['prompt_embeds'] = callback_kwargs['prompt_embeds'].chunk(2)[-1]
- callback_kwargs['add_text_embeds'] = callback_kwargs['add_text_embeds'].chunk(2)[-1]
- callback_kwargs['add_time_ids'] = callback_kwargs['add_time_ids'].chunk(2)[-1]
- pipe._guidance_scale = 0.0
-
-
- return callback_kwargs
-
-
- generator = torch.Generator(device='cuda')
-
-
- for i, generation in enumerate(queue, start=1):
- generator.manual_seed(generation['seed'])
-
-
- image = pipe(
- prompt=generation['prompt'],
- generator=generator,
- callback_on_step_end=callback_dynamic_cfg,
- callback_on_step_end_tensor_inputs=['prompt_embeds', 'add_text_embeds', 'add_time_ids'],
- ).images[0]
-
-
- image.save(f'image_{i}.png')

由于callback_on_step_end参数,在每一步结束时这个函数作为回调函数被执行。我们需要使用callback_on_step_end_tensor_inputs参数,确定我们将在回调函数内部修改的张量。
我们来看看在图像生成过程的最后25%和后半部分(50%),停用CFG技术会发生什么。
测试结果:


<左右滑动查看更多图片>

结论:
正如我们所预期的,在50%的情况下停用CFG,可以使每张图像的推理时间减少25%(并非总体时间,因为模型加载时间也计入其中)。这是因为如果使用CFG执行50步操作,模型实际上清理了100个张量。而使用这种优化方法,模型在前25步清理了50个张量,在接下来的25步中清理了一半(25个张量)。所以,75/100相当于跳过了25%的工作量。在停用CFG达到75%的情况下,每张图像的推理时间减少12.5%。
图像质量似乎有所下降但不太明显。这可能是因为没有使用负向提示,而使用CFG的主要优势就在于能够应用负向提示。使用更好的提示肯定会提高质量,但在停用CFG达到75%的情况下,这种影响几乎可以忽略不计。
何时使用:当你对图像生成速度要求较高,且能够接受一定程度的质量损失,那么可以积极采用这种优化方法(例如,用于测试提示或参数时)。通过稍后停用CFG,可以提高速度而不牺牲质量。
细化模型(Refiner)
那么细化模型呢?虽然我们已经优化了基础模型,但Stable Diffusion XL的一个主要优势是,它还有一个专门细化细节的模型。这个模型显著提高了生成的图像质量。
默认情况下,基础模型使用11.24 GB的内存。当同时使用细化模型时,内存需求增加到了17.38 GB。但要记住,由于它具有相同的组件(除了第一个文本编码器),大多数优化也可以应用于这个模型。
在使用细化模型进行预热时,因为需要预热两个不同的模型,所以会有些复杂。为实现这一点,我们首先从基础模型获取结果,然后将其通过细化模型进行处理:
- for generation in queue:
- image = base(generation['prompt'], output_type='latent').images
- refiner(generation['prompt'], image=image)
细化模型有两种不同的使用方式,我们将分别讨论。
专家去噪器集成(Ensemble of Expert Denoisers)
专家去噪器集成是指图像生成的方法,其过程从基础模型开始,最后使用细化模型结束。在整个过程中,不会生成任何图像,而是基础模型在指定数量的步数(总步数的一部分)内清理张量,然后将张量传递给细化模型以完成处理。
可以这样说,它们共同工作以生成结果(基础模型+细化器)。
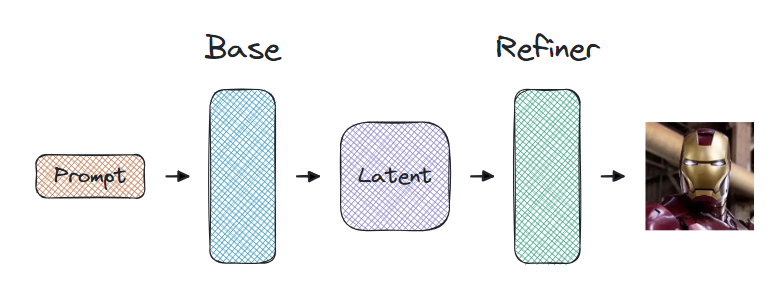
就代码而言,基础模型在使用denoising_end=0.8参数时,会在处理过程的80%处停止其工作,并且通过 output_type='latent' 返回张量。
细化模型通过image参数接收到这个张量(讽刺的是,它并不是一个图像)。然后,细化模型开始清理这个张量,通过参数denoising_start=0.8假设已经完成了80%的工作。我们再次指定了整个处理过程的步数 (num_inference_steps),以便它计算剩余需要清理的步数。也就是说,如果我们使用50步,并且在80%处进行了变化,那么基础模型将会在前40步清理张量,细化模型将为剩余的10步进行精细化处理,以完善剩余细节。
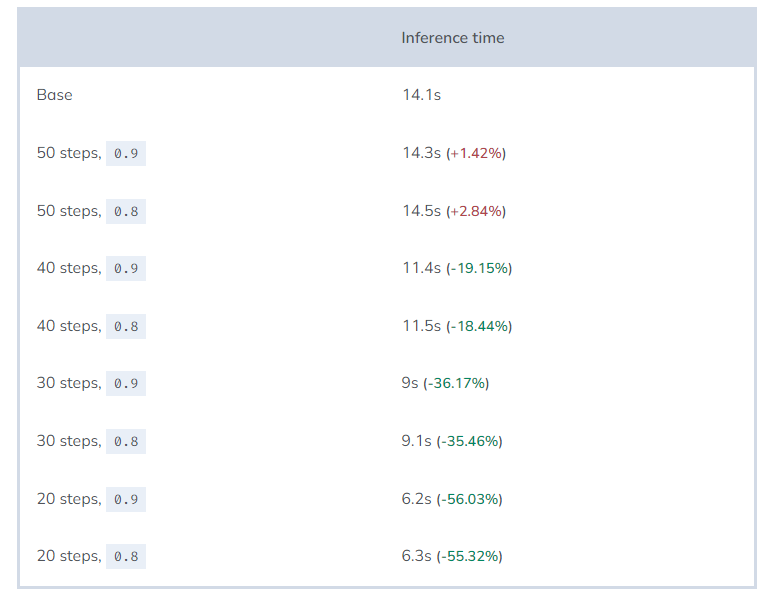
我们将在50、40、30和20步时生成图像,并在处理到0.9和0.8时切换到细化模型。
作为参考,我们还将包括在所有比较中作为基础的图像(只使用基础模型,共50步)。
测试结果:


<左右滑动查看更多图片>
结论:
毫无疑问,使用细化模型显然会极大地改善结果。
那么应该在何时使用细化模型来处理图像呢?显然,可以看出在 0.9 处得到的结果比在 0.8 处更好,因为细化模型旨在优化最终细节,不应该用于改变图像结构。
我认为,无论步数是多少,细化模型似乎都能提供非常高的视觉质量结果。唯一会改变的是图像结构,但即使只有30步,视觉质量也很高。
同时,我们还要考虑到当步数减少到40以下时,所需时间会显著减少。
何时使用:每当我们想要利用细化模型来提高图像的视觉质量时,就可以使用它。至于参数,只要我们不追求最佳的质量,就可以使用30或40步。当然始终要在0.9处切换到细化模型。
图像到图像(Image-to-image)
在Stable Diffusion XL中,经典的图像到图像(img2img)方法并不新鲜。这种方法是使用基础模型生成完整图像,然后将生成的图像和原始提示一起传递给细化模型,细化模型使用这些条件生成新的图像。
换句话说,在img2img方法中,这两个模型是独立工作的(基础模型->细化模型)。
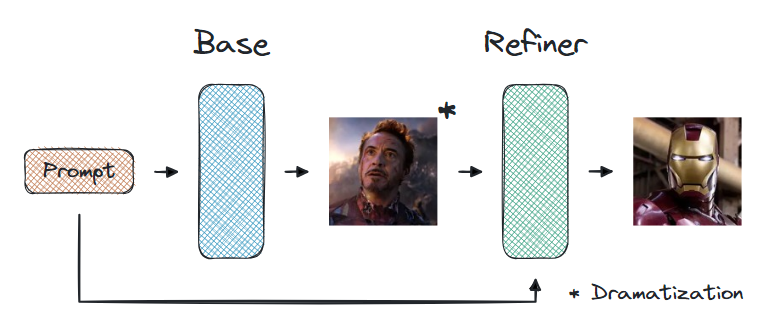
由于两个过程是独立的,因此相对容易应用本文中的优化方法。尽管如此,代码并没有太大的差异,只是简单地生成了一个图像,并将其用作细化模型的参数。
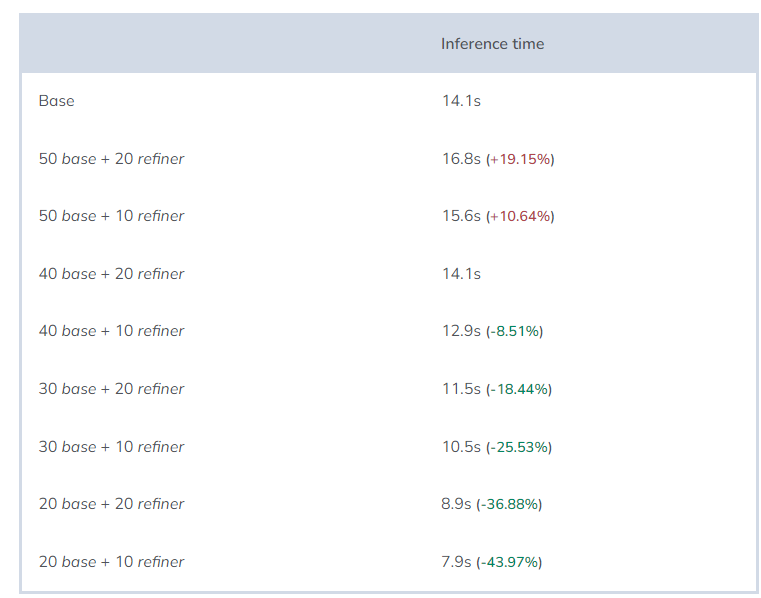
我们将使用基础模型在50、40、30和20步处生成图像,然后再通过细化模型添加额外的20步和10步的组合。
作为参考,我们还包含了所有比较的基础图像,这张图像是基础模型处理的结果,只进行了50步的处理。
测试结果:


<左右滑动查看更多图片>
结论:
在图像到图像(img2img)模式中,细化模型的表现不如人意。
当我们在基础模型中使用足够的步数时,似乎细化模型被迫向本不需要的部分添加细节。换句话说,这是在画蛇添足。
另一方面,如果我们在基础模型中使用较少的步数,结果会稍微好一些。这是因为使用如此少的步数,基础模型无法添加细微的细节,为细化模型提供了更大的发挥空间。
同时,我们也必须考虑通过减少步数来减少时间。如果我们使用太多步数,将会受到显著的损失。
何时使用:首先要记住的是,使用细化模型的目的是最大化视觉质量。在这种情况下,我们可以增加步数,因此,“专家去噪器集成”方法是最佳选择。我认为,使用少量步数无法获得更好的视觉质量,也不会提高生成速度,与其他方法相比也不具备优势。因此,在图像到图像模式下使用细化模型有其优势,但其优势并不突出。
6
结论
开始写这篇文章时,我并没有想到会深入研究到这个程度。我能够理解直接跳到结论部分的读者,同时我也很佩服看了所有优化内容的读者。希望阅读完本文后,读者们能够有所所获。
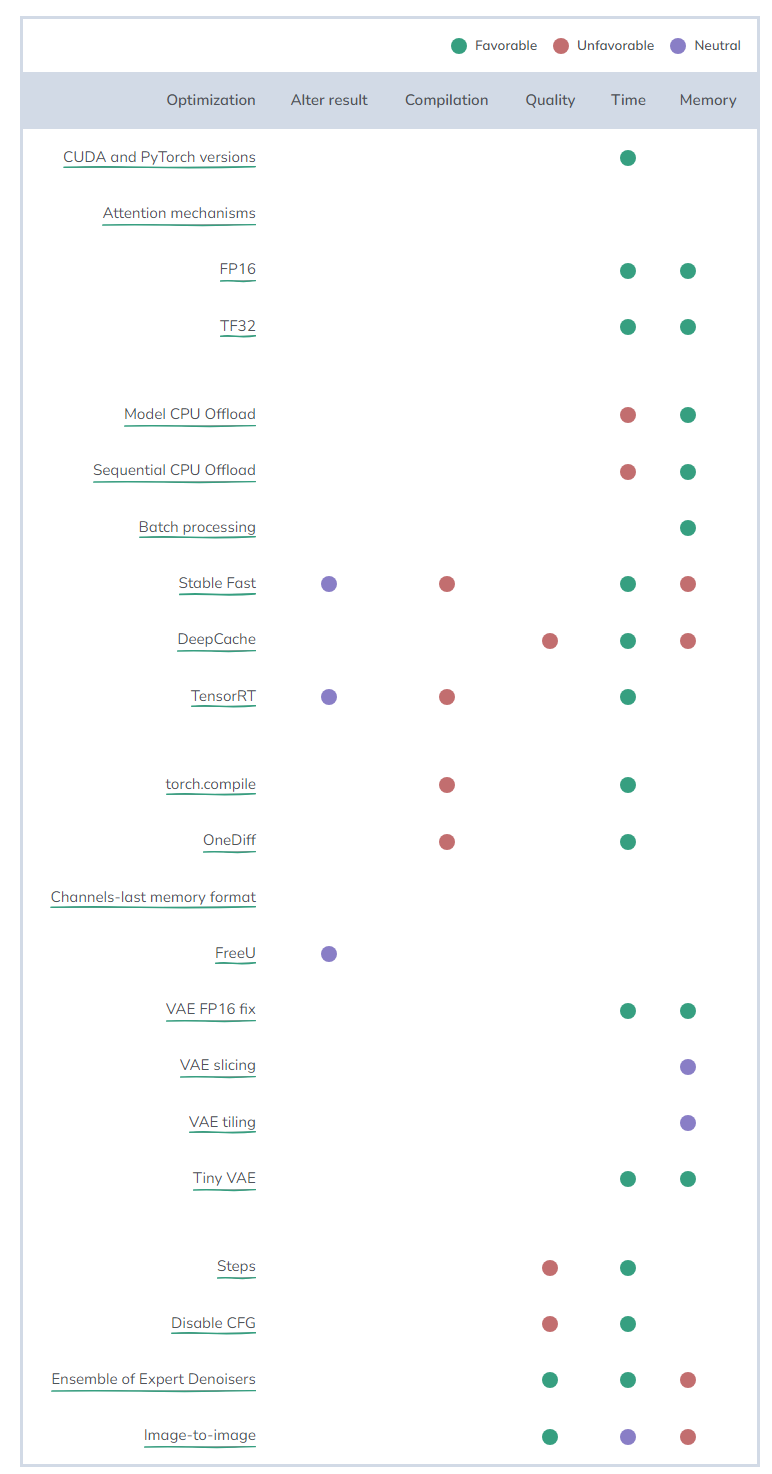
根据目标和可用的硬件,我们需要应用不同的优化方法。让我们以表格的形式,总结所有的优化措施以及它们引入的改进(或损失)。
理论上来说,“中立”的优化方法是该类别中一个有利的改变,但其可解释性可能有争议,或者仅适用于某些特定用例。
最快速度
使用基础模型结合OneDiff+Tiny VAE+75%处禁用CFG+30步,可以在几乎质量无损的情况下实现最短的生成时间,从而达到最快速度。
在拥有RTX 3090显卡的情况下,可以在仅4.0秒的时间内生成图像,内存消耗为6.91 GB,因此甚至可以在具有8 GB内存的显卡上运行。
我们还可以添加DeepCache以进一步加快流程,但问题是,它与禁用CFG优化不兼容,一旦禁用它,最终速度就会增加。
使用相同的配置,A100显卡可以在2.7秒内生成图像。在全新的 H100 上,推理时间仅为2.0秒。
不到4GB的内存使用量
在使用Sequential CPU Offload时,瓶颈在于VAE。因此,将这种优化与VAE FP16 fix或Tiny VAE结合使用,将分别需要2.56 GB和0.68 GB的内存使用量。虽然内存使用量低得离谱,但推理时间会让你觉得有必要去换一张拥有更多内存的新显卡。
不到6GB的内存使用量
通过使用批处理优化,内存使用量降低至5.77 GB,从而使得在拥有6 GB内存的显卡上可以使用 Stable Diffusion XL 生成图像。在这种情况下,没有质量损失或推理时间增加,如果我们想使用细化模型也没有问题,内存消耗是一样的。
另一个选择是使用Model CPU Offload,这也足以减少内存使用,只不过会有一点时间上的损失。
通过使用VAE FP16 fix或Tiny VAE优化VAE,我们可以稍微加快推理过程。
如果我们想要稍微加快推理过程并在12.9秒内生成图像,我们可以通过使用VAE FP16 fix来实现这一点。而且,如果我们不介意稍微改变结果,我们还可以进一步优化,通过使用Tiny VAE,将内存消耗降低到5.6 GB,生成时间缩短到12.6秒。
请记住,仍然可以应用其他优化措施来减少生成时间。
不到8GB的内存使用量
突破了6 GB的内存限制之后,就可以开启新的优化选择。
正如之前所看到的,使用OneDiff+Tiny VAE将内存使用量降至6.91 GB,并实现了可能的最低推理时间。因此,如果你的显卡至少有8 GB内存,这可能是你的最佳选择。
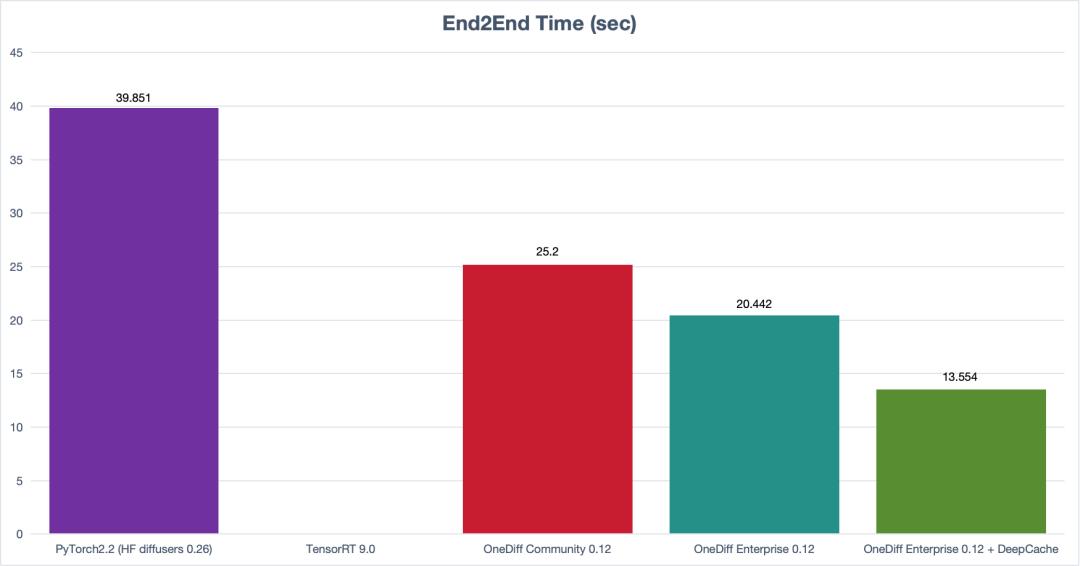
【OneDiff v0.12.1正式发布(生产环境稳定加速SD&SVD)】本次更新包含以下亮点,欢迎体验新版本:github.com/siliconflow/onediff
* 更新SDXL和SVD的SOTA性能
* 全面支持SD和SVD动态分辨率运行
* 编译/保存/加载HF Diffusers的pipeline
* HF Diffusers的快速LoRA加载和切换
* 加速了InstantID(加速1.8倍)
* 加速了SDXL Lightning
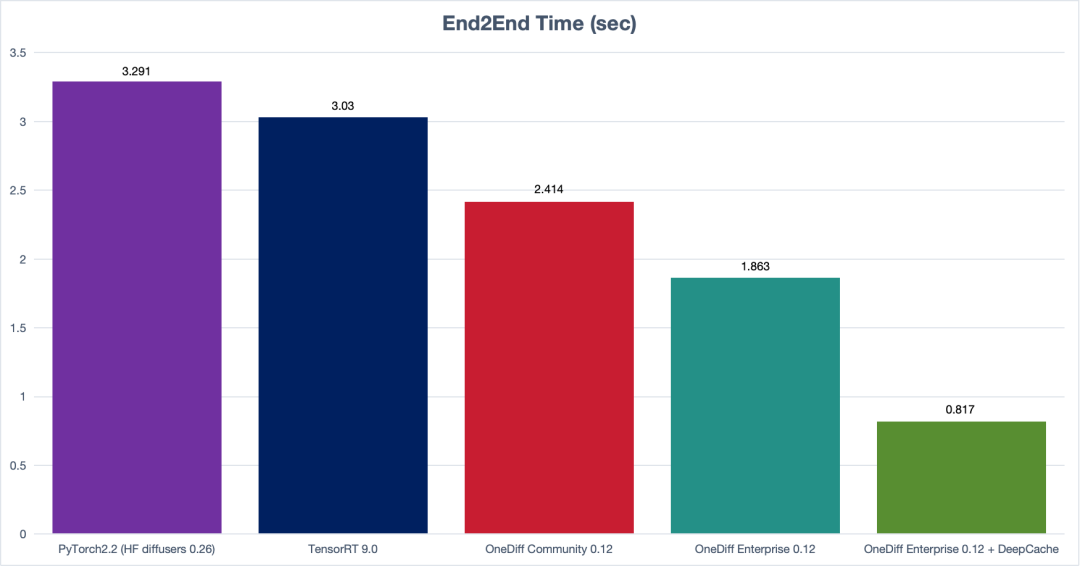
(SDXL E2E Time)
(SVD E2E Time)
更多详情:https://medium.com/@SiliconFlowAI/
其他人都在看


