- 1stable diffusion推理过程代码梳理_stable diffusion 代码详解
- 2git国内镜像地址_mac 查看git镜像地址
- 3RabbitMQ的安装与使用
- 4Win10环境下yolov8快速配置与测试_yolov8 github
- 5使用setInterval执行定时器造成的倒计时误差问题修改_setinterval 倒计时差几秒
- 6You Only Look Once: Unified, Real-Time Object Detection_you only look once:unified, real-time object detec
- 7最细致讲解yolov8模型推理完整代码--(前处理,后处理)_yolov8推理
- 8Exception in thread "main" java.lang.NoClassDefFoundError: org/apache/commons/logging/LogFactory处理
- 9[原创] debian 9.3 搭建Jira+Confluence+Bitbucket项目管理工具(三) -- 安装confluence 6.6.1
- 10Android Handler的使用和原理解析_android jni handler
【Qt】QtIFW 安装包制作总结 -如何使用样式表来定制安装器的显示界面_qtifw安装界面风格设置
赞
踩
QtIFW 安装包制作总结 -如何使用样式表来定制安装器的显示界面
一、引言
在一个安装器的流程页面中,主要使用到的控件有:按钮、文本标签、输入框、下拉框、文本显示框、CheckBox等。
那么在QtIFW中可以使用样式表来定制显示页面以及页面中的控件。
本文的主题是:如何使用样式表来定制安装器的显示界面。包括:
(1)页面背景颜色、文字大小
(2)页面的显示设置、风格设置
(3)页面中控件的显示效果、点击效果
二、操作过程
首先用于构建一个安装包主要有两个目录。包括config目录和packages目录,然后安装器的组件包放置在packages目录中,其中包括meta和data目录用于描述一个安装组件以及具体的数据本体。
核心点:
【在config.xml文件中可以使用给定的xml元素来指定页面中的样式,对于页面中的具体组件可以使用样式表文件来描述】
2-1、编写config.xml配置文件
(1)在config/config.xml文件中使用<StyleSheet>来指定样式表文件,参数为具体的样式表文件,对于安装器页面的各控件可以在样式表文件中进行描述。
(2)在config/config.xml文件中使用<WizardStyle>来指定风格。具体参数可选择:“Modern”, “Mac”, “Aero” or “Classic”
(3)在config/config.xml文件中使用<TitleColor>来指定标题的颜色。
(4)在config/config.xml文件中使用<WizardDefaultWidth>来指定安装器页面的默认显示宽度。
(5)在config/config.xml文件中使用<WizardDefaultHeight>来指定安装器页面的默认显示高度。
(6)在config/config.xml文件中使用<WizardShowPageList>来设置是否显示左侧的安装步骤。默认:显示。
(7)在config/config.xml文件中使用<AllowNonAsciiCharacters>在设置允许在中文路径下安装。默认:false
config.xml文件内容如下:
<?xml version="1.0" encoding="UTF-8"?>
<Installer>
    <Name>WeightMonitor</Name>
    <Version>1.0.0</Version>
    <Title>WeightMonitor</Title>
    <Publisher>iriczhao</Publisher>
    <StartMenuDir>WeightMonitor</StartMenuDir>
    <TargetDir>@HomeDir@/</TargetDir>
	<AllowNonAsciiCharacters>true</AllowNonAsciiCharacters>
    <WizardStyle>Classic</WizardStyle>
    <StyleSheet>style.qss</StyleSheet>
    <TitleColor>#97CBFF</TitleColor>
	<WizardDefaultWidth>200ex</WizardDefaultWidth>
	<WizardDefaultHeight>200ex</WizardDefaultHeight>
	<WizardShowPageList>true</WizardShowPageList>
</Installer>
- 1
- 2
- 3
- 4
- 5
- 6
- 7
- 8
- 9
- 10
- 11
- 12
- 13
- 14
- 15
- 16
2-2、编写style.qss样式表文件
在config目录下新创建一个样式表文件:style.qss
style.qss文件内容如下:
QWidget
{
    color: white;
	font:14px 'Microsoft YaHei';
     background-color: rgb(65, 65, 65);
}

QPushButton
{
    background: qlineargradient(x1:0, y1:0, x2:0, y2:1, stop:0 rgba(150, 150, 150, 60%), stop:1 rgba(50, 50, 50, 60%));
    border-color: rgb(60, 60, 60);
    border-style: solid;
    border-width: 2px;
    border-radius: 6px;
    min-height: 30px;
    max-height: 30px;
    min-width: 80px;
    max-width: 80px;
    padding-left: 15px;
    padding-right: 15px;
}

QPushButton:pressed, QPushButton:checked
{
    background: qlineargradient(x1:0, y1:0, x2:0, y2:1, stop:0 rgba(50, 50, 50, 60%), stop:1 rgba(150, 150, 150, 60%));
}
- 1
- 2
- 3
- 4
- 5
- 6
- 7
- 8
- 9
- 10
- 11
- 12
- 13
- 14
- 15
- 16
- 17
- 18
- 19
- 20
- 21
- 22
- 23
- 24
- 25
- 26
- 27
2-3、生成安装包
binarycreator.exe --offline-only -c config\config.xml -p packages Installer.exe
- 1
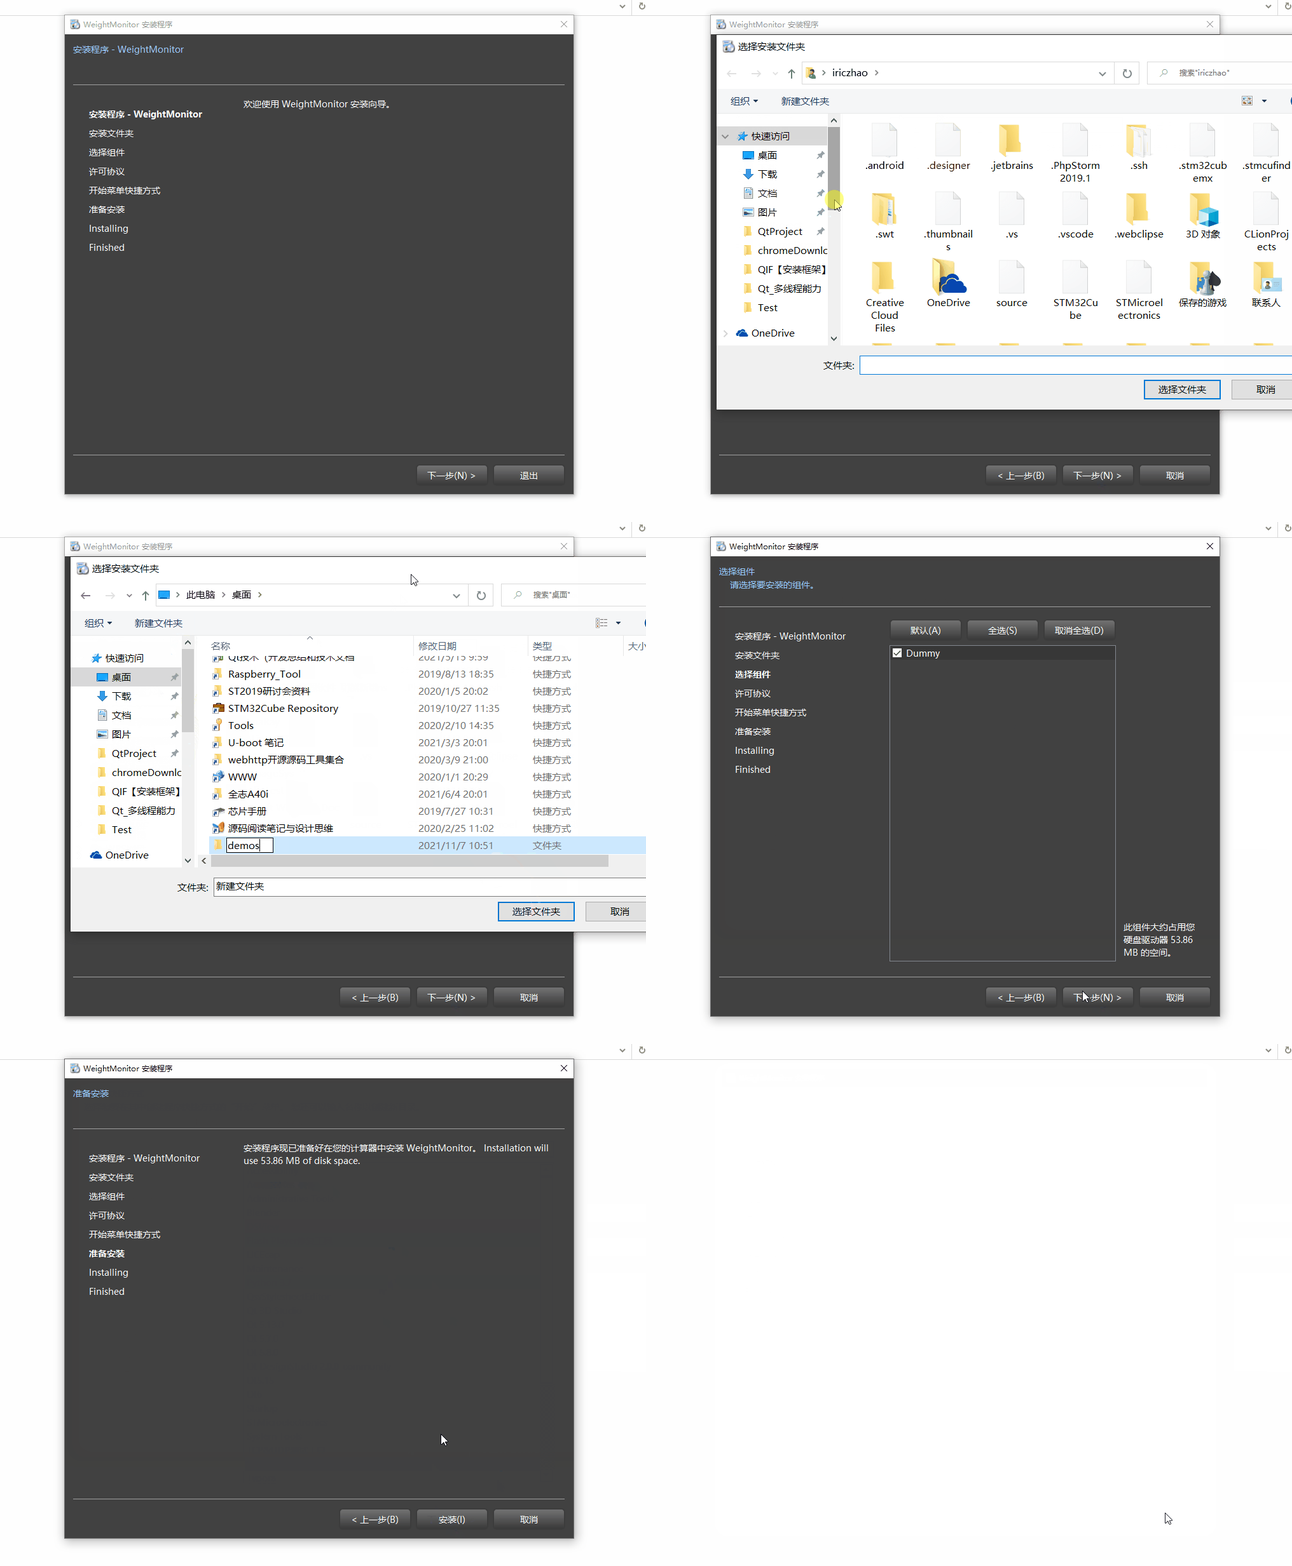
三、效果演示


