热门标签
热门文章
- 1Linux系统基础命令_finalshell怎么改时间
- 2Springboot整合Jedis_springboot集成jedis
- 3Python多进程(process)和多线程(thread)的区别_python多线程和多进程的区别
- 4LeetCode11.盛水最多的容器_11. 盛最多水的容器 解题思路是贪心还是滑块
- 5NAS折腾记1️⃣:从OpenWrt到Unraid_truenas n100
- 6ES6学习笔记(十五)Ajax_es6语法 ajax
- 7S32K144 Bootloader UDS 开发_s32k144 基于can uds的bootloader
- 8计算机网络实验——基于TCP协议的socket编程_计算机网络大作业 socket
- 9google浏览器chrome无法访问localhost等本地虚拟域名的解决方法
- 10【深度学习】之激活函数篇[Sigmoid、tanh、ReLU、Leaky ReLU、Mish、Hardswish、SiLU]附绘图Python代码。_hardswich和relu激活函数
当前位置: article > 正文
【环境搭建:onnx模型部署】onnxruntime-gpu安装与测试(python)
作者:我家自动化 | 2024-02-27 03:05:02
赞
踩
onnxruntime-gpu
ONNX模型部署环境创建
1. onnxruntime 安装
onnx 模型在 CPU 上进行推理,在conda环境中直接使用pip安装即可
pip install onnxruntime
- 1
2. onnxruntime-gpu 安装
想要 onnx 模型在 GPU 上加速推理,需要安装 onnxruntime-gpu 。有两种思路:
- 依赖于 本地主机 上已安装的 cuda 和 cudnn 版本
- 不依赖于 本地主机 上已安装的 cuda 和 cudnn 版本
要注意:onnxruntime-gpu, cuda, cudnn三者的版本要对应,否则会报错 或 不能使用GPU推理。
onnxruntime-gpu, cuda, cudnn版本对应关系详见: 官网
2.1 方法一:onnxruntime-gpu依赖于本地主机上cuda和cudnn
-
查看已安装 cuda 和 cudnn 版本
# cuda version cat /usr/local/cuda/version.txt # cudnn version cat /usr/local/cuda/include/cudnn.h | grep CUDNN_MAJOR -A 2- 1
- 2
- 3
- 4
- 5
-
根据 onnxruntime-gpu, cuda, cudnn 三者对应关系,安装相应的 onnxruntime-gpu 即可。
## cuda==10.2 ## cudnn==8.0.3 ## onnxruntime-gpu==1.5.0 or 1.6.0 pip install onnxruntime-gpu==1.6.0- 1
- 2
- 3
- 4
2.2 方法二:onnxruntime-gpu不依赖于本地主机上cuda和cudnn
在 conda 环境中安装,不依赖于 本地主机 上已安装的 cuda 和 cudnn 版本,灵活方便。这里,先说一下已经测试通过的组合:
- python3.6, cudatoolkit10.2.89, cudnn7.6.5, onnxruntime-gpu1.4.0
- python3.8, cudatoolkit11.3.1, cudnn8.2.1, onnxruntime-gpu1.14.1
如果需要其他的版本, 可以根据 onnxruntime-gpu, cuda, cudnn 三者对应关系自行组合测试。
下面,从创建conda环境,到实现在GPU上加速onnx模型推理进行举例。
2.2.1 举例:创建onnxruntime-gpu==1.14.1的conda环境
## 创建conda环境
conda create -n torch python=3.8

## 激活conda环境
source activate torch
conda install pytorch==1.10.0 torchvision==0.11.0 torchaudio==0.10.0 cudatoolkit=11.3 -c pytorch -c conda-forge
conda install cudnn==8.2.1
pip install onnxruntime-gpu==1.14.1
## pip install ... (根据需求,安装其他的包)
- 1
- 2
- 3
- 4
- 5
- 6
- 7
- 8
- 9
- 10
2.2.2 举例:实例测试
-
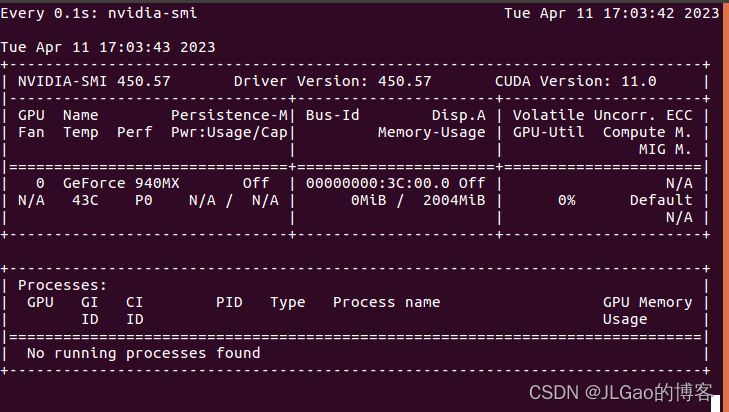
打开终端,输入 watch -n 0.1 nvidia-smi, 实时查看gpu使用情况

-
代码测试,摘取API
  import numpy as np
  import torch
  import onnxruntime

  MODEL_FILE = '.model.onnx'
  DEVICE_NAME = 'cuda' if torch.cuda.is_available() else 'cpu'
  DEVICE_INDEX = 0
  DEVICE=f'{DEVICE_NAME}:{DEVICE_INDEX}'

  # A simple model to calculate addition of two tensors
  def model():
      class Model(torch.nn.Module):
          def __init__(self):
              super(Model, self).__init__()

          def forward(self, x, y):
              return x.add(y)

      return Model()

  # Create an instance of the model and export it to ONNX graph format
  def create_model(type: torch.dtype = torch.float32):
      sample_x = torch.ones(3, dtype=type)
      sample_y = torch.zeros(3, dtype=type)
      torch.onnx.export(model(), (sample_x, sample_y), MODEL_FILE,
                        input_names=["x", "y"], output_names=["z"],
                        dynamic_axes={"x":{0 : "array_length_x"}, "y":{0: "array_length_y"}})

  # Create an ONNX Runtime session with the provided model
  def create_session(model: str) -> onnxruntime.InferenceSession:
      providers = ['CPUExecutionProvider']
      if torch.cuda.is_available():
          providers.insert(0, 'CUDAExecutionProvider')
      return onnxruntime.InferenceSession(model, providers=providers)

  # Run the model on CPU consuming and producing numpy arrays
  def run(x: np.array, y: np.array) -> np.array:
      session = create_session(MODEL_FILE)
      z = session.run(["z"], {"x": x, "y": y})
      return z[0]

  # Run the model on device consuming and producing ORTValues
  def run_with_data_on_device(x: np.array, y: np.array) -> onnxruntime.OrtValue:
      session = create_session(MODEL_FILE)

      x_ortvalue = onnxruntime.OrtValue.ortvalue_from_numpy(x, DEVICE_NAME, DEVICE_INDEX)
      y_ortvalue = onnxruntime.OrtValue.ortvalue_from_numpy(y, DEVICE_NAME, DEVICE_INDEX)

      io_binding = session.io_binding()
      io_binding.bind_input(name='x', device_type=x_ortvalue.device_name(), device_id=0, element_type=x.dtype, shape=x_ortvalue.shape(), buffer_ptr=x_ortvalue.data_ptr())
      io_binding.bind_input(name='y', device_type=y_ortvalue.device_name(), device_id=0, element_type=y.dtype, shape=y_ortvalue.shape(), buffer_ptr=y_ortvalue.data_ptr())
      io_binding.bind_output(name='z', device_type=DEVICE_NAME, device_id=DEVICE_INDEX, element_type=x.dtype, shape=x_ortvalue.shape())
      session.run_with_iobinding(io_binding)

      z = io_binding.get_outputs()

      return z[0]

  def main():
      create_model()
      # print(run(x=np.float32([1.0, 2.0, 3.0]),y=np.float32([4.0, 5.0, 6.0])))

      t1 = time.time()
      print(run(x=np.float32([1.0, 2.0, 3.0]),y=np.float32([4.0, 5.0, 6.0])))
      # [array([5., 7., 9.], dtype=float32)]t1 = time.time()
      t2 = time.time()

      print(run_with_data_on_device(x=np.float32([1.0, 2.0, 3.0, 4.0, 5.0]), y=np.float32([1.0, 2.0, 3.0, 4.0, 5.0])).numpy())
      # [ 2.  4.  6.  8. 10.]
      t3 = time.time()

      print(f'Done. ({(1E3 * (t2 - t1)):.1f}ms) Inference.')
      print(f'Done. ({(1E3 * (t3 - t2)):.1f}ms) Inference.')

  if __name__ == "__main__":
      main()
- 1
- 2
- 3
- 4
- 5
- 6
- 7
- 8
- 9
- 10
- 11
- 12
- 13
- 14
- 15
- 16
- 17
- 18
- 19
- 20
- 21
- 22
- 23
- 24
- 25
- 26
- 27
- 28
- 29
- 30
- 31
- 32
- 33
- 34
- 35
- 36
- 37
- 38
- 39
- 40
- 41
- 42
- 43
- 44
- 45
- 46
- 47
- 48
- 49
- 50
- 51
- 52
- 53
- 54
- 55
- 56
- 57
- 58
- 59
- 60
- 61
- 62
- 63
- 64
- 65
- 66
- 67
- 68
- 69
- 70
- 71
- 72
- 73
- 74
- 75
- 76
声明:本文内容由网友自发贡献,不代表【wpsshop博客】立场,版权归原作者所有,本站不承担相应法律责任。如您发现有侵权的内容,请联系我们。转载请注明出处:https://www.wpsshop.cn/w/我家自动化/article/detail/149531
推荐阅读
相关标签


