热门标签
热门文章
- 1flink原理源码分析(一) 集群与资源@k8s_kubernetes-jobmanager.sh
- 2LlamaIndex中的CustomLLM(本地加载模型)_llama 加载llm
- 3【SQLAlchemy】MySQL server has gone away 原因分析、解决方法_sqlalchemy mysql server has gone away
- 4github加速(SwitchHosts)_switchhosts github
- 527、Flink 的SQL之SELECT (Pattern Recognition 模式检测)介绍及详细示例(7)
- 6Bag-of-words模型
- 7SpringCloud Sleuth + Zipkin 分布式链路追踪实践
- 8自然语言处理:经典的两个数据集和评价指标_文本二分类的标准数据集
- 9对比RocketMQ和RabbitMQ消息可靠性投递_rabbitmq 对比rocketmq 可靠性对比
- 10centos安装opencv并在springboot中使用_centos 安装 opencv 配置环境变量 让springboot通过system.loadli
当前位置: article > 正文
ESP8266 最简单的OTA升级模式_巴法云 ota
作者:我家自动化 | 2024-05-21 03:52:50
赞
踩
巴法云 ota
最近在做一个项目时有OTA的需求,之前是通过arduino自带的ota模式,虽说也可以用,但操作比较麻烦,昨晚在网上搜索相关教程,发现了使用巴法云来实现ota的功能,现分享如下
1、首先要让你的设备联网
2、注册巴法云,并添加设备

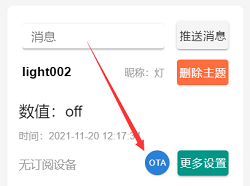
3、将固件发送到巴法云,会得到一个链接,

4、将此链接放入你的源码中,更新上传到巴法云的固件

5、在需要升级的时候,调用updateBin();
共用部分如下,可做简单移植使用,
- #include <ESP8266WiFi.h>
- #include <ESP8266httpUpdate.h>
-
- // 固件链接,在巴法云控制台复制、粘贴到这里即可
- String upUrl = "http://bin.bemfa.com/b/3BcNGM5NTZiMDcxM2QwNDdjY2IyYTQ0YWIyNzQzOTgxZWU=test.bin";
-
- // 当升级开始时,打印日志
- void update_started()
- {
- Serial.println("CALLBACK: HTTP update process started");
- }
-
- // 当升级结束时,打印日志
- void update_finished()
- {
- Serial.println("CALLBACK: HTTP update process finished");
- u8g2.clearBuffer();
- u8g2.drawStr(u8g2.getWidth() / 2, u8g2.getHeight() / 2, "Restart");
- u8g2.sendBuffer();
- }
-
- // 当升级中,打印日志
- void update_progress(int cur, int total)
- {
- Serial.printf("CALLBACK: HTTP update process at %d of %d bytes...%d%% \n", cur, total, cur / (total / 100));
- ota_OLED_onProgress(4, 32, 120, 8, cur / (total / 100) );
- }
-
- // 当升级失败时,打印日志
- void update_error(int err)
- {
- Serial.printf("CALLBACK: HTTP update fatal error code %d\n", err);
- }
-
- /**
- * 固件升级函数
- * 在需要升级的地方,加上这个函数即可,例如setup中加的updateBin();
- * 原理:通过http请求获取远程固件,实现升级
- */
- void updateBin()
- {
- WiFiClient UpdateClient;
- ESPhttpUpdate.onStart(update_started); // 当升级开始时
- ESPhttpUpdate.onEnd(update_finished); // 当升级结束时
- ESPhttpUpdate.onProgress(update_progress); // 当升级中
- ESPhttpUpdate.onError(update_error); // 当升级失败时
-
- t_httpUpdate_return ret = ESPhttpUpdate.update(UpdateClient, upUrl);
- switch (ret)
- {
- case HTTP_UPDATE_FAILED: // 当升级失败
- Serial.println("[update] Update failed.");
- break;
- case HTTP_UPDATE_NO_UPDATES: // 当无升级
- Serial.println("[update] Update no Update.");
- break;
- case HTTP_UPDATE_OK: // 当升级成功
- Serial.println("[update] Update ok.");
- break;
- }
- }

代码中有添加两行屏幕显示的部分,如有使用屏幕也可直接拿来使用:
- void ota_OLED_onProgress(uint16_t x, uint16_t y, uint16_t width, uint16_t height, uint8_t progress)
- {
- u8g2.clearBuffer();
- uint16_t radius = height / 2;
- uint16_t xRadius = x + radius;
- uint16_t yRadius = y + radius;
- uint16_t doubleRadius = 2 * radius;
- uint16_t innerRadius = radius - 2;
- drawCircleQuads(xRadius, yRadius, radius, 0b00000110);
- u8g2.drawHLine(xRadius, y, width - doubleRadius + 1);
- u8g2.drawHLine(xRadius, y + height, width - doubleRadius + 1);
- drawCircleQuads(x + width - radius, yRadius, radius, 0b00001001);
- uint16_t maxProgressWidth = (width - doubleRadius + 1) * progress / 100;
- fillCircle(xRadius, yRadius, innerRadius);
- fillRect(xRadius + 1, y + 2, maxProgressWidth, height - 3);
- fillCircle(xRadius + maxProgressWidth, yRadius, innerRadius);
-
- u8g2.setCursor(10, 20);
- u8g2.drawStr(10, u8g2.getHeight() / 2 - 10, "OTA update..."); // 返回错误值
- u8g2.setCursor(55, u8g2.getHeight() / 2 + 30);
- u8g2.print(progress);
- u8g2.print("%");
- u8g2.sendBuffer();
- }
- void fillRect(int16_t xMove, int16_t yMove, int16_t width, int16_t height)
- {
- for (int16_t x = xMove; x < xMove + width; x++)
- {
- u8g2.drawVLine(x, yMove, height);
- }
- }
- void fillCircle(int16_t x0, int16_t y0, int16_t radius)
- {
- int16_t x = 0, y = radius;
- int16_t dp = 1 - radius;
- do
- {
- if (dp < 0)
- dp = dp + (x++) * 2 + 3;
- else
- dp = dp + (x++) * 2 - (y--) * 2 + 5;
-
- u8g2.drawHLine(x0 - x, y0 - y, 2 * x);
- u8g2.drawHLine(x0 - x, y0 + y, 2 * x);
- u8g2.drawHLine(x0 - y, y0 - x, 2 * y);
- u8g2.drawHLine(x0 - y, y0 + x, 2 * y);
- } while (x < y);
- u8g2.drawHLine(x0 - radius, y0, 2 * radius);
- }
- void drawCircleQuads(int16_t x0, int16_t y0, int16_t radius, uint8_t quads)
- {
- int16_t x = 0, y = radius;
- int16_t dp = 1 - radius;
- while (x < y)
- {
- if (dp < 0)
- dp = dp + (x++) * 2 + 3;
- else
- dp = dp + (x++) * 2 - (y--) * 2 + 5;
- if (quads & 0x1)
- {
- u8g2.drawPixel(x0 + x, y0 - y);
- u8g2.drawPixel(x0 + y, y0 - x);
- }
- if (quads & 0x2)
- {
- u8g2.drawPixel(x0 - y, y0 - x);
- u8g2.drawPixel(x0 - x, y0 - y);
- }
- if (quads & 0x4)
- {
- u8g2.drawPixel(x0 - y, y0 + x);
- u8g2.drawPixel(x0 - x, y0 + y);
- }
- if (quads & 0x8)
- {
- u8g2.drawPixel(x0 + x, y0 + y);
- u8g2.drawPixel(x0 + y, y0 + x);
- }
- }
- if (quads & 0x1 && quads & 0x8)
- {
- u8g2.drawPixel(x0 + radius, y0);
- }
- if (quads & 0x4 && quads & 0x8)
- {
- u8g2.drawPixel(x0, y0 + radius);
- }
- if (quads & 0x2 && quads & 0x4)
- {
- u8g2.drawPixel(x0 - radius, y0);
- }
- if (quads & 0x1 && quads & 0x2)
- {
- u8g2.drawPixel(x0, y0 - radius);
- }
- }

声明:本文内容由网友自发贡献,不代表【wpsshop博客】立场,版权归原作者所有,本站不承担相应法律责任。如您发现有侵权的内容,请联系我们。转载请注明出处:https://www.wpsshop.cn/w/我家自动化/article/detail/600715
推荐阅读
相关标签


