
- 1用scipy的solve_ivp 求解复数常微分方程组_python在复数域内求解微分方程
- 2关于oracle 11g 循环多判断+continue 用法例子_oracle 多个判定多次执行
- 3Java中的推荐系统算法与实现
- 4lvs实现ftp负载均衡集群
- 5基于自然语言处理的深度学习综述(从word2vec,RNN,LSTM,Encoder-Decoder,Attention,BERT)_word2vec,rnn,lstm,gru等方法属于深度学习算法吗
- 6Java多线程的详细介绍_关于java中的多线程的说法
- 7JVM面试题详解系列——Java 对象的创建过程_java对象的创建过程
- 8打造智能Web抓取:ScrapeGraphAI - 一次抓取,无限可能!
- 9SQL分组统计,将两个字段或者属性相加进行分组_sql统计两个字段
- 10LangChain:大模型框架的深度解析与应用探索_langchange 大模型
PyQt6 uic 修改ui编译器代码生成 方便实现ui和逻辑代码分离提高效率_pyqt6 pyuic
赞
踩
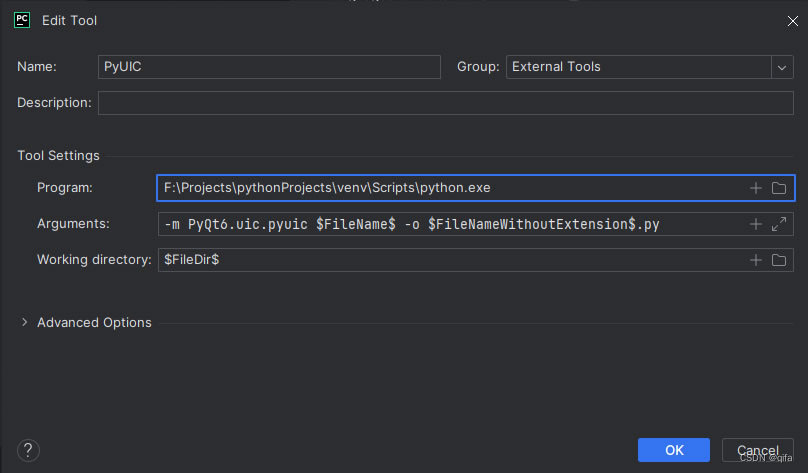
使用PyQt6 uic 在终端生成py代码命令如下:
python -m PyQt6.uic.pyuic uifile.ui -o uifile.py在pycharm的设置如下:
通过PyQt附带的designer设计好UI后,通过uic可以将ui文件转换为py文件, 生成py文件后类似下面的代码:
- class Ui_Frame(object):
- def setupUi(self, Frame):
- # ...
ui类默认从object派生,如果直接使用该文件进行后续开发,需要将object替换为QWidget才能将界面显示出来,类似下面的代码
- from PyQt6 import QtCore, QtGui, QtWidgets
- from PyQt6.QtWidgets import QWidget
-
-
- class Ui_Frame(QWidget):
- def __init__(self):
- super(Ui_Frame, self).__init__()
- self.setupUi(self)
-
- def setupUi(self, Frame):
- pass
- # ...
而且如果后期一旦界面更新,需要重新生成文件的时候内容会被覆盖,不利于界面和代码的分离,每次手动修改也麻烦,于是想到能不能修改编译器代码生成把ui代码类(Ui_Frame)的生成修改一下,改成上图所示的那样,业务逻辑在Ui_Frame的派生类进行处理,这样每次变更ui重新生成代码,对于业务逻辑处理的影响降到最小
通过翻看uic的源码 (site-packages\PyQt6\uic 路径下),可以实现上面的修改
我这边的实现修改了三个文件:
site-packages\PyQt6\uic\pyuic.py
site-packages\PyQt6\uic\compile_ui.py
site-packages\PyQt6\uic\Compiler\compiler.py
修改步骤如下:
1.pyuic.py文件的修改,修改 generate 函数,新增函数 generate_extend,使得可以生成派生类文件
- def generate(ui_file, output, indent, execute):
- """ Generate the Python code. """
-
- from .compile_ui import compileUi
-
- if output == '-':
- import io
-
- pyfile = io.TextIOWrapper(sys.stdout.buffer, encoding='utf8')
- needs_close = False
- else:
- pyfile = open(output, 'wt', encoding='utf8')
- needs_close = True
-
- winfo = compileUi(ui_file, pyfile, execute, indent) # 修改1
-
- if needs_close:
- pyfile.close()
-
- # 生成派生类
- generate_extend(output, winfo) # 新增 2
-
-
- # by qifa(新增函数)
- def generate_extend(output: str, winfo: dict) -> None:
- import os
- filename = output[:output.rfind('.')]
- class_name = 'Ui_' + filename + 'extend'
- output_file = filename + 'extend.py'
- if os.path.exists(output_file):
- return # 如果文件已经存在,不再生成
- from PyQt6.uic.Compiler.indenter import createCodeIndenter, getIndenter
- output_stream = open(output_file, 'wt', encoding='utf8')
- createCodeIndenter(output_stream)
- indenter = getIndenter()
- indenter.level = 0
-
- # 生成代码
- indenter.write("from %s import %s" % (filename, winfo['uiclass']))
- indenter.write("")
- indenter.write("")
- indenter.write("class %s(%s):" %(class_name, winfo['uiclass']))
- indenter.indent()
- indenter.write("def __init__(self):")
- indenter.indent()
- indenter.write("super().__init__()")
- indenter.write("pass")
-
- output_stream.close()

派生类最终生成的示例代码如下:
- from ebookdownloadmain import Ui_Frame
-
-
- class Ui_ebookdownloadmainextend(Ui_Frame):
- def __init__(self):
- super().__init__()
- pass
2. 修改 compile_ui.py 文件,修改compileUi函数,返回一个字典信息
- def compileUi(uifile, pyfile, execute=False, indent=4):
- """compileUi(uifile, pyfile, execute=False, indent=4)
- Creates a Python module from a Qt Designer .ui file.
-
- uifile is a file name or file-like object containing the .ui file.
- pyfile is the file-like object to which the Python code will be written to.
- execute is optionally set to generate extra Python code that allows the
- code to be run as a standalone application. The default is False.
- indent is the optional indentation width using spaces. If it is 0 then a
- tab is used. The default is 4.
- """
-
- from PyQt6.QtCore import PYQT_VERSION_STR
-
- try:
- uifname = uifile.name
- except AttributeError:
- uifname = uifile
-
- indenter.indentwidth = indent
-
- pyfile.write(_header.format(uifname, PYQT_VERSION_STR))
-
- winfo = compiler.UICompiler().compileUi(uifile, pyfile)
-
- if execute:
- indenter.write_code(_display_code % winfo)
-
- return winfo # 修改 返回字典信息
3. 修改Compiler\compiler.py文件,这里才是修改ui文件生成py文件的地方,修改UICompiler类的createToplevelWidget成员函数,代码如下:
- class UICompiler(UIParser):
- def __init__(self):
- UIParser.__init__(self, qtproxies.QtCore, qtproxies.QtGui,
- qtproxies.QtWidgets, CompilerCreatorPolicy())
-
- def reset(self):
- qtproxies.i18n_strings = []
- UIParser.reset(self)
-
- def setContext(self, context):
- qtproxies.i18n_context = context
-
- # 修改
- def createToplevelWidget(self, classname, widgetname):
- indenter = getIndenter()
- indenter.level = 0
-
- indenter.write("from PyQt6 import QtCore, QtGui, QtWidgets")
- indenter.write("from PyQt6.QtWidgets import QWidget")
- indenter.write("")
-
- indenter.write("")
- indenter.write("class Ui_%s(QWidget):" % self.uiname)
- indenter.indent()
- indenter.write("def __init__(self):")
- indenter.indent()
- indenter.write("super(Ui_%s, self).__init__()" % self.uiname)
- indenter.write("self.setupUi(self)")
- indenter.dedent()
- indenter.write("")
- indenter.write("def setupUi(self, %s):" % widgetname)
- indenter.indent()
- w = self.factory.createQtObject(classname, widgetname,
- is_attribute=False, no_instantiation=True)
- w.baseclass = classname
- w.uiclass = "Ui_%s" % self.uiname
- return w
-
-
- # ...
最终效果示例效果:
- from PyQt6 import QtCore, QtGui, QtWidgets
- from PyQt6.QtWidgets import QWidget
-
-
- class Ui_Frame(QWidget):
- def __init__(self):
- super(Ui_Frame, self).__init__()
- self.setupUi(self)
-
- def setupUi(self, Frame):
- pass
- # ...
-
-
-
- from ebookdownloadmain import Ui_Frame
-
-
- class Ui_ebookdownloadmainextend(Ui_Frame):
- def __init__(self):
- super().__init__()
- pass
-
-
- if __name__ == '__main__':
- app = QApplication(sys.argv)
- ui = Ui_ebookdownloadmainextend()
- ui.show()
- sys.exit(app.exec())
后续只需要在 Ui_ebookdownloadmainextend 类写业务逻辑即可,代码的智能提示也方便,原ui生成的py文件不用管它,界面更新了重新生成即可
修改的几个文件已经打包好了,点这里下载

