热门标签
热门文章
- 1新版Edge(120) 侧边栏copilot消失找回办法_新版本的edge不支持copilots
- 2记录 | docker拉取镜像失败报错Error response from daemon Get https_docker pull镜像失败
- 3[机器学习算法]支持向量机
- 4PostgreSQL 物化视图快速入门_物化视图 postgres
- 5使用Python写出一个GUI可视化爬虫工具总结分享_gui的系统爬取
- 6element 表单验证的三种方式
- 7【uniapp小程序实战】—— 使用腾讯地图获取定位_uniapp 腾讯地图_软件开发什么软件可以免费提供获取地址位置的服务
- 8基于Imx6ull的车牌识别项目_imx6ull车牌识别
- 9明确人生的目的和意义_明确事业的目的和意义感悟
- 10定制 Android Window 层级_android window层级
当前位置: article > 正文
RabbitMQ(四种使用模式)
作者:盐析白兔 | 2024-05-27 06:09:30
赞
踩
RabbitMQ(四种使用模式)
文章目录
1.Fanout(广播模式)
1.基本介绍
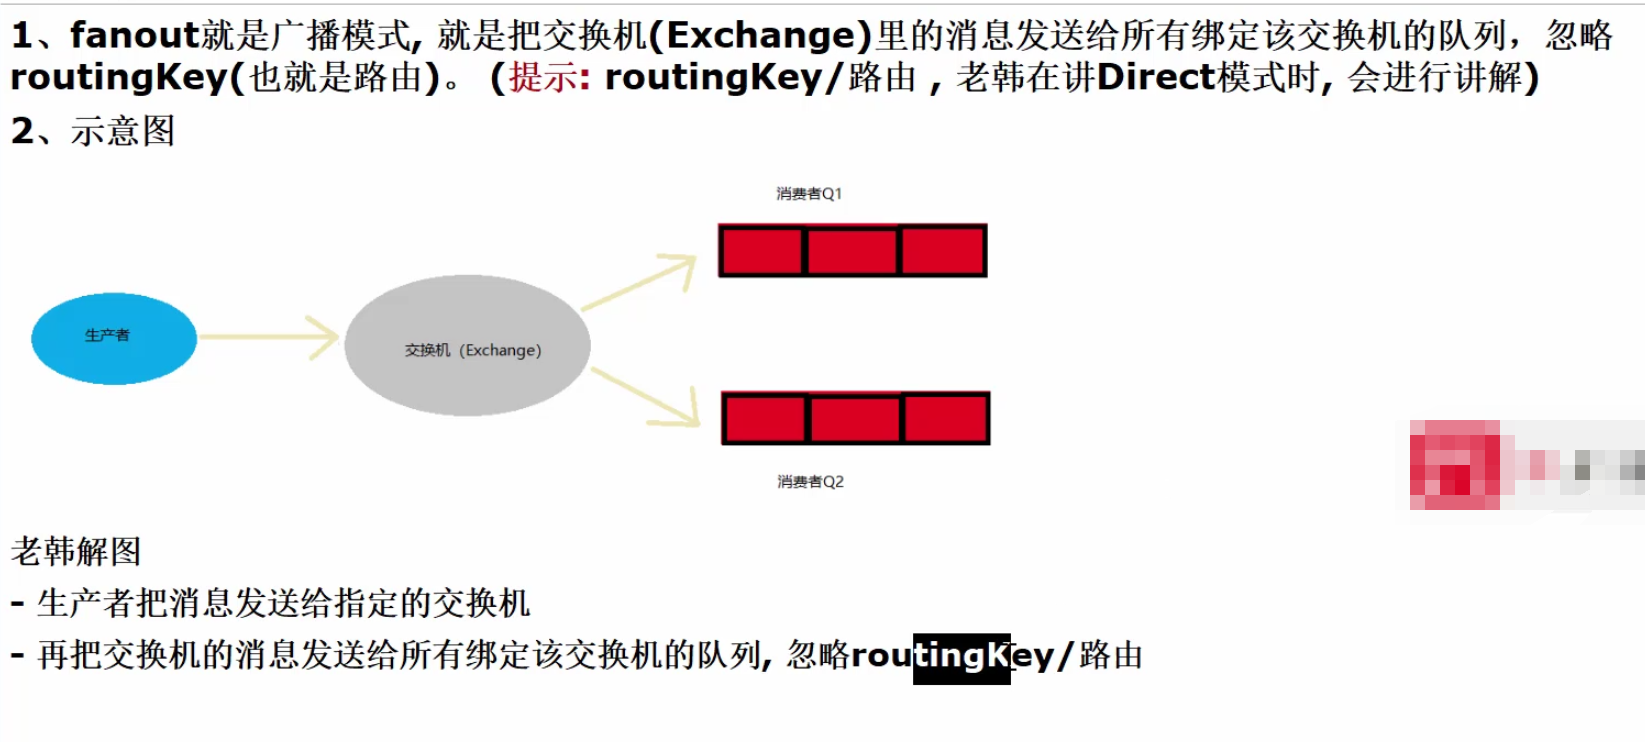
2.需求分析

3.具体实现
1.编写配置类 RabbitMQConfig.java
    // 定义一个交换机,两个队列的名称
    private static final String EXCHANGE = "exchange";
    private static final String QUEUE1 = "queue1";
    private static final String QUEUE2 = "queue2";

    // 创建两个队列和一个交换机
    // 创建队列1
    @Bean
    public Queue queue1() {
        return new Queue(QUEUE1, true);
    }
    // 创建队列2
    @Bean
    public Queue queue2() {
        return new Queue(QUEUE2, true);
    }
    // 创建交换机
    @Bean
    public FanoutExchange exchange() {
        return new FanoutExchange(EXCHANGE);
    }

    // 将队列一和交换机绑定
    @Bean
    public Binding binding1() {
        return BindingBuilder.bind(queue1()).to(exchange());
    }
    // 将队列二和交换机绑定
    @Bean
    public Binding binding2() {
        return BindingBuilder.bind(queue2()).to(exchange());
    }
- 1
- 2
- 3
- 4
- 5
- 6
- 7
- 8
- 9
- 10
- 11
- 12
- 13
- 14
- 15
- 16
- 17
- 18
- 19
- 20
- 21
- 22
- 23
- 24
- 25
- 26
- 27
- 28
- 29
- 30
- 31
- 32
2.编写生产者,发送消息到交换机 MQSender.java
    // 发送消息到交换机
    public void sendExchange(Object message) {
        log.info("发送消息到交换机: " + message);
        // 发送消息到交换机,需要指定在配置类中配置的交换机名,这里的空字符串表示忽略路由键
        rabbitTemplate.convertAndSend("exchange", "", message);
    }
- 1
- 2
- 3
- 4
- 5
- 6
3.编写消费者,接受消息 MQReceiver.java
    // 两个队列从交换机接受消息
    @RabbitListener(queues = "queue1")
    public void receive1(Object message) {
        log.info("queue1接收消息: " + message);
    }
    // 两个队列从交换机接受消息
    @RabbitListener(queues = "queue2")
    public void receive2(Object message) {
        log.info("queue2接收消息: " + message);
    }
- 1
- 2
- 3
- 4
- 5
- 6
- 7
- 8
- 9
- 10
4.控制层调用方法,发送信息到交换机
    // 发送信息到交换机
    @RequestMapping("/mq/exchange")
    @ResponseBody
    public void mqExchange() {
        mqSender.sendExchange("hello rabbitmq exchange");
    }
- 1
- 2
- 3
- 4
- 5
- 6
4.启动测试
1.访问查看IDEA控制台输出
1.访问 http://localhost:9092/seckill/mq/exchange

2.查看控制台输出,两个队列同时接受到了消息

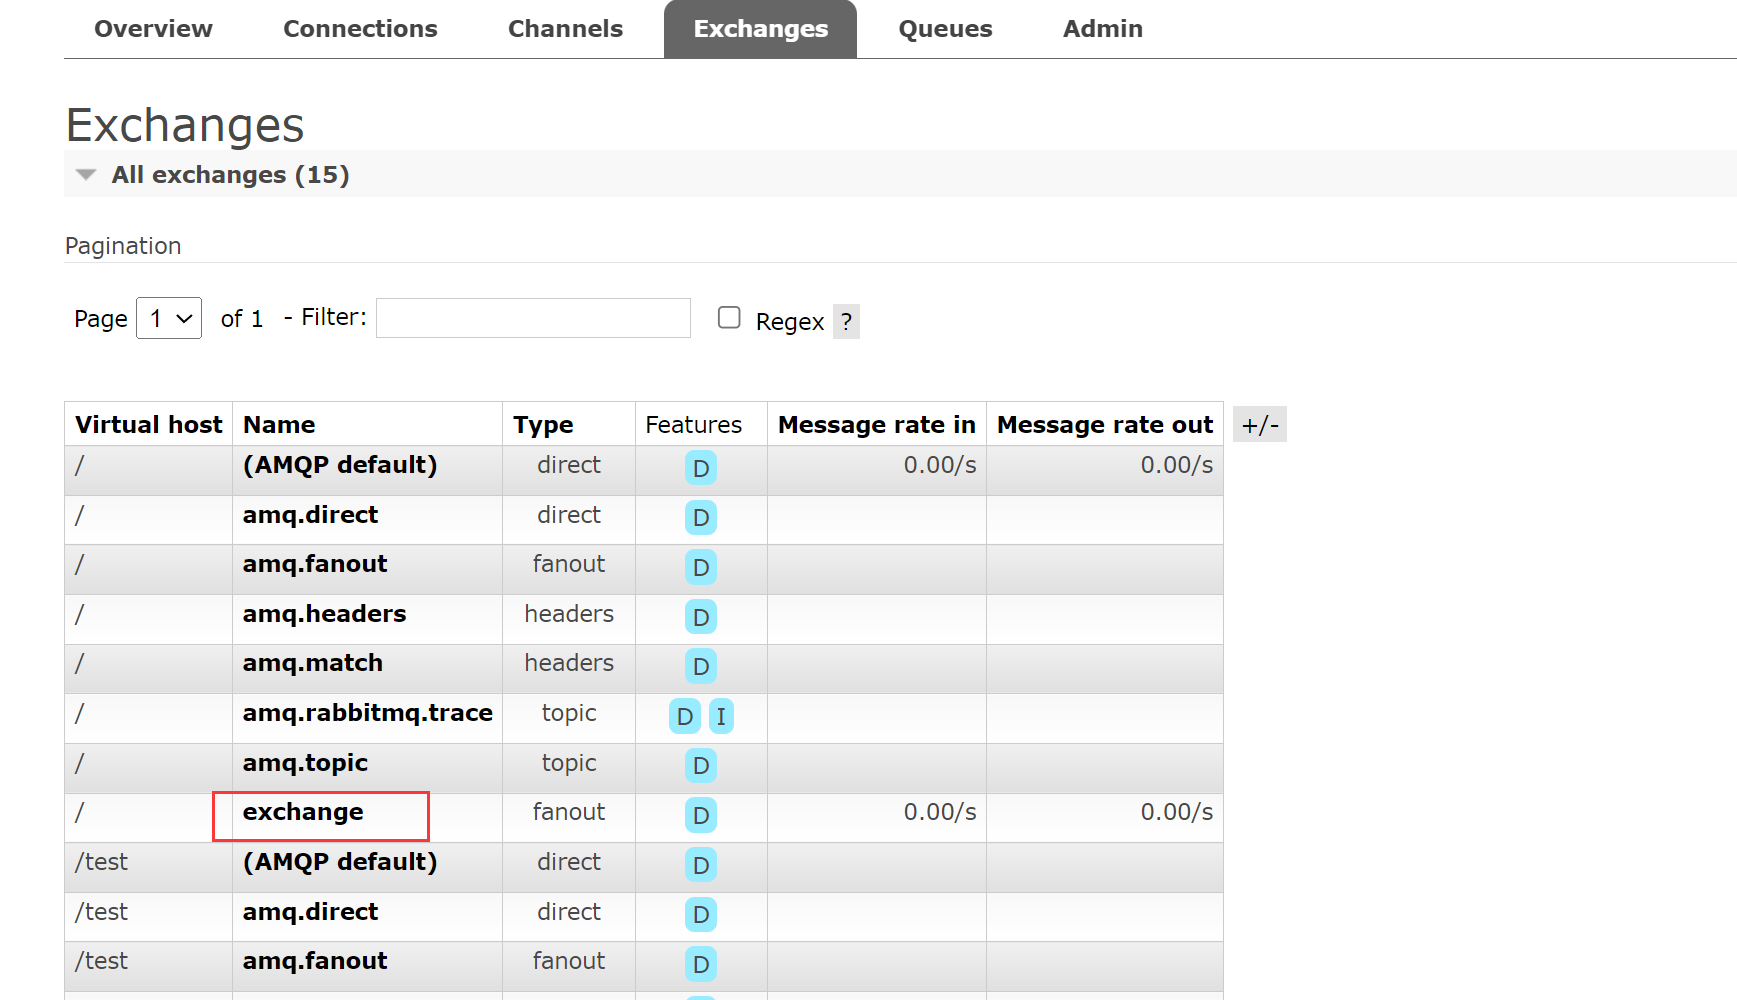
2.访问RabbitMQ控制台 http://ip:15672
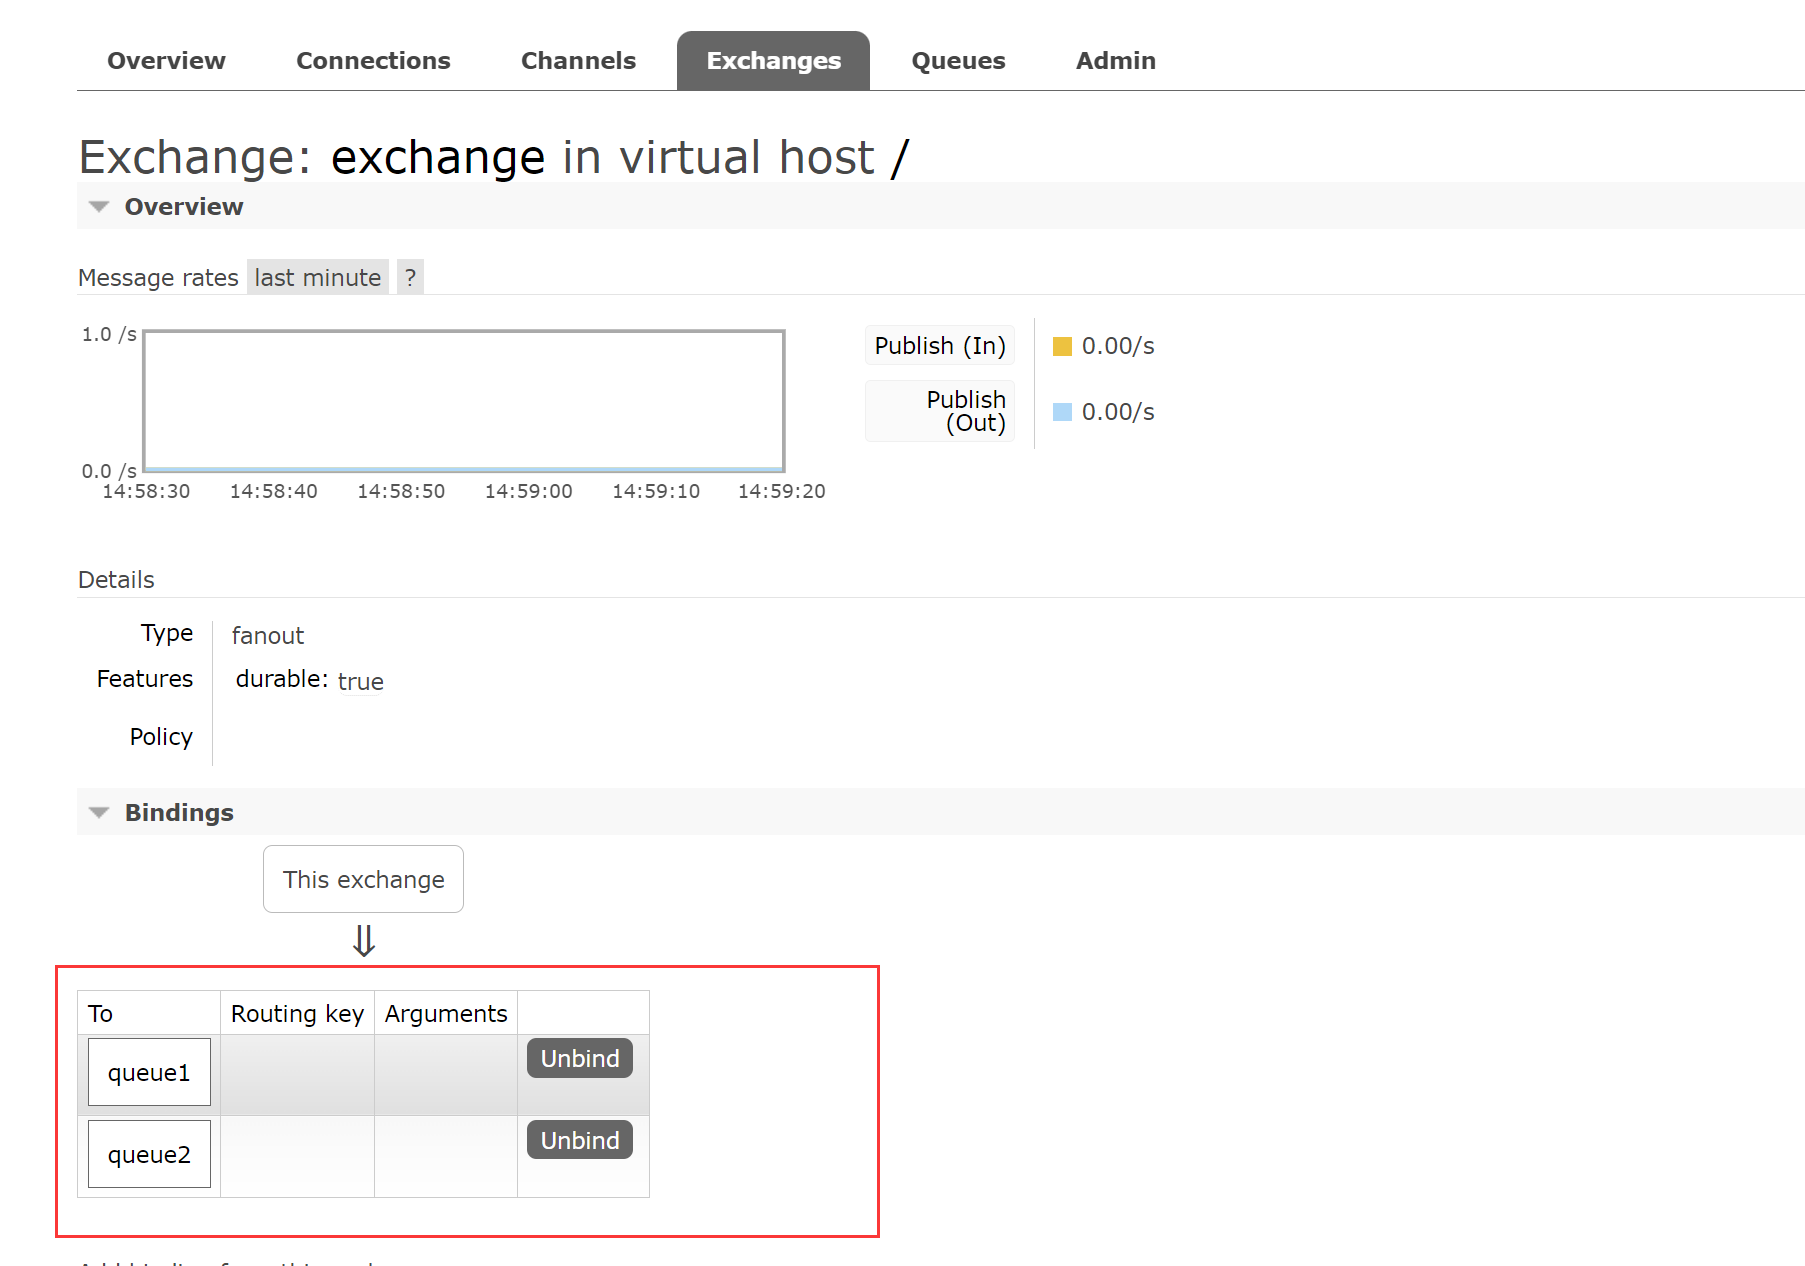
1.查看交换机是否绑定了两个队列
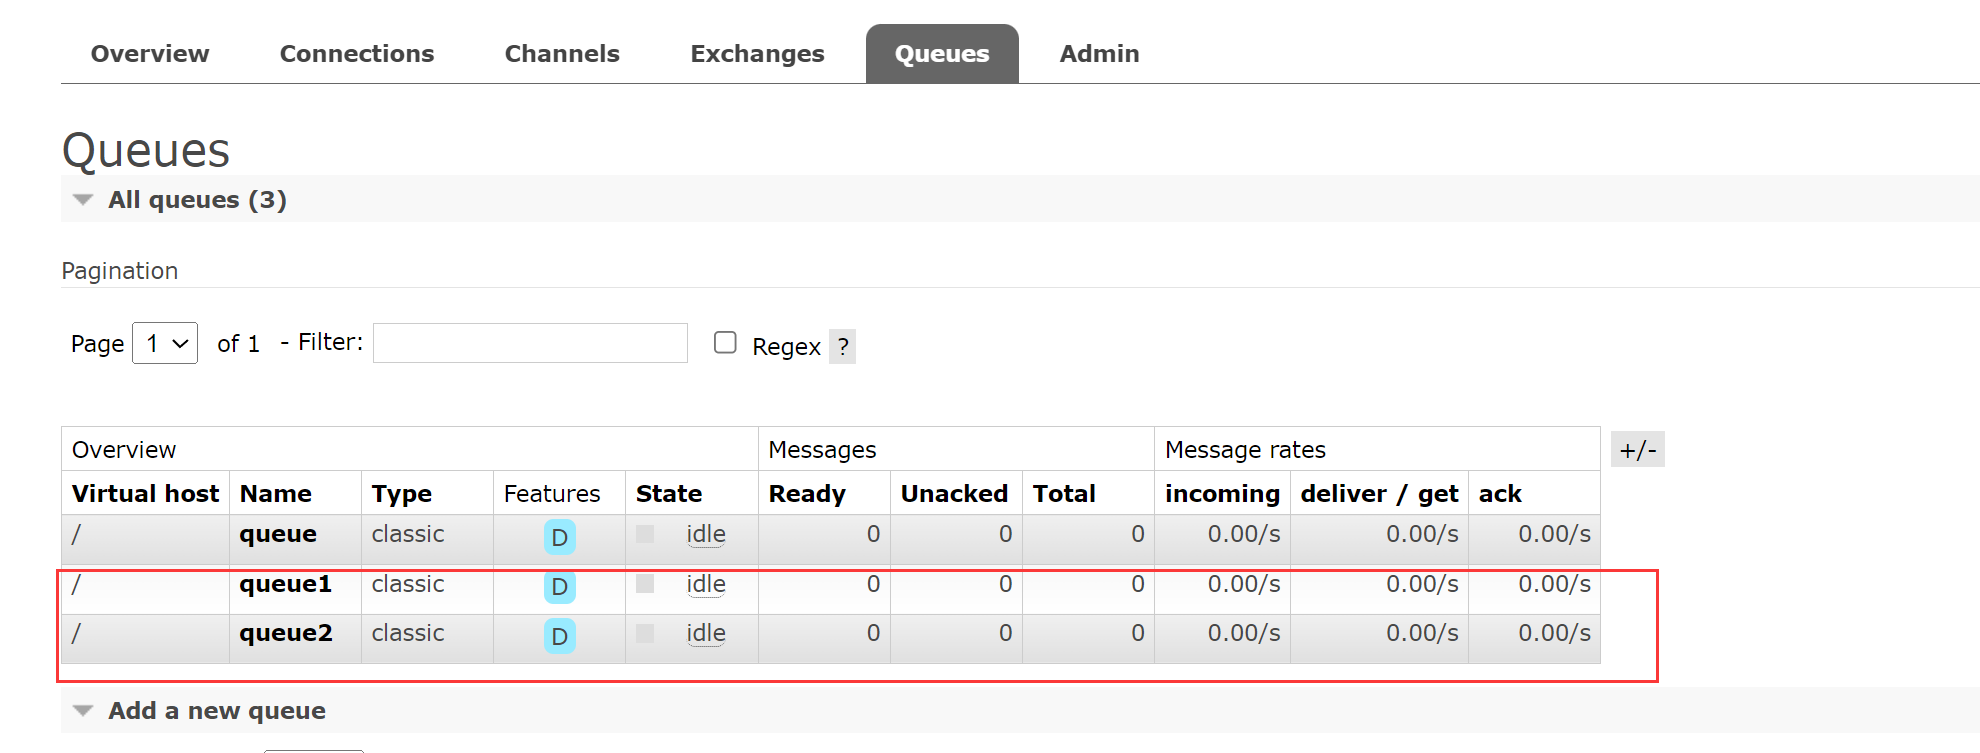
2.再查看Queues,新增了两个队列
2.Direct(路由模式)
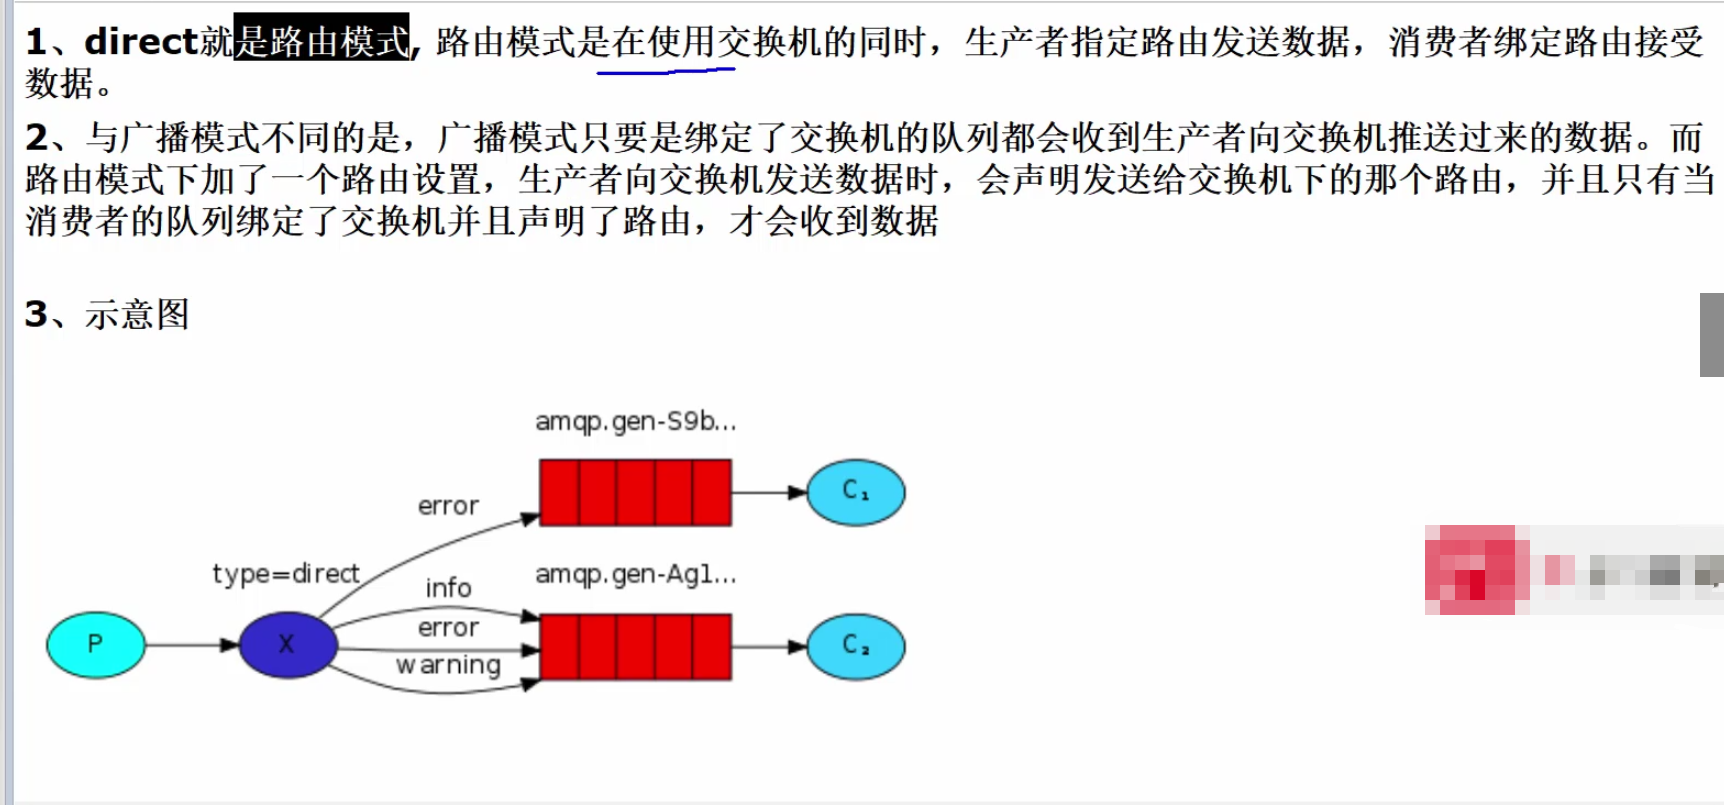
1.基本介绍
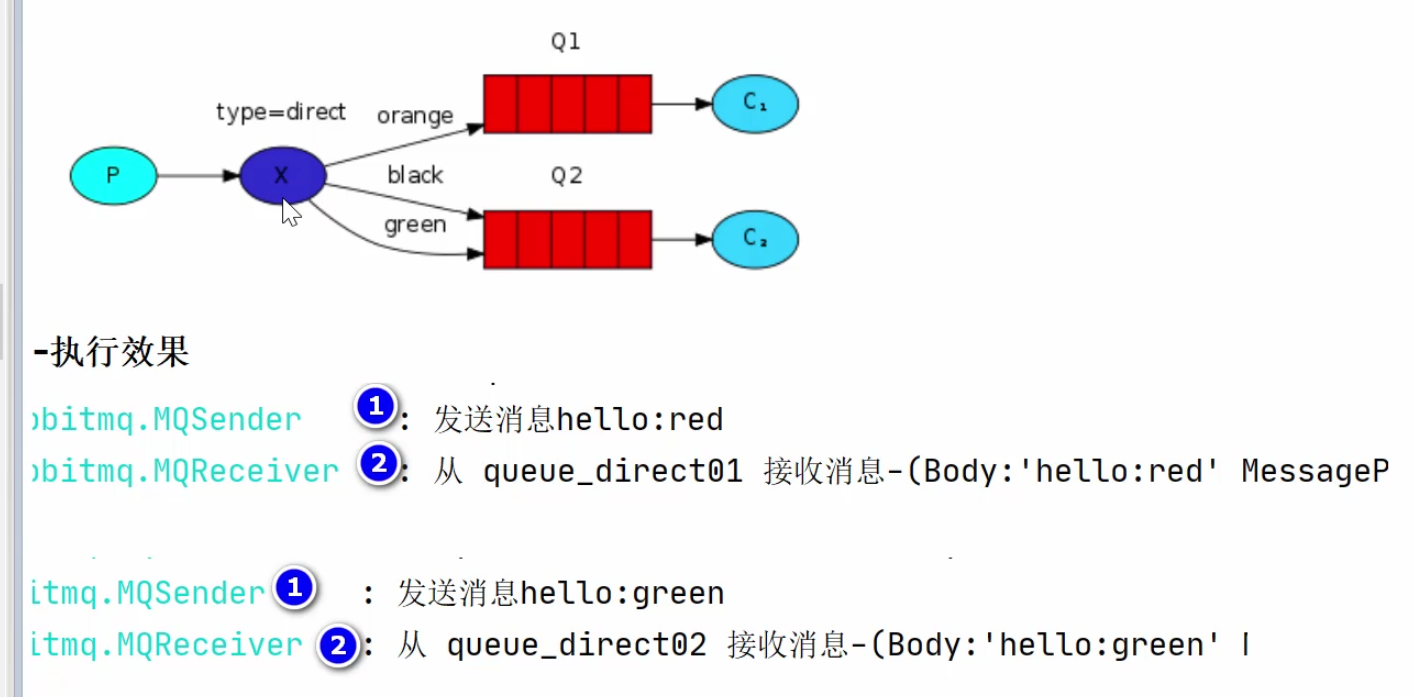
2.需求分析
3.具体实现
1.配置类 RabbitMQConfig.java
    // ----------------- Direct模式 -----------------
    // 定义一个交换机,两个队列的名称
    private static final String DIRECT_EXCHANGE = "directExchange";
    private static final String DIRECT_QUEUE1 = "directQueue1";
    private static final String DIRECT_QUEUE2 = "directQueue2";

    // 定义两个路由分别为red和green
    public static final String RED = "red";
    public static final String GREEN = "green";

    // 创建两个队列和一个交换机
    // 创建队列1
    @Bean
    public Queue directQueue1() {
        return new Queue(DIRECT_QUEUE1, true);
    }

    // 创建队列2
    @Bean
    public Queue directQueue2() {
        return new Queue(DIRECT_QUEUE2, true);
    }

    // 创建Direct交换机
    @Bean
    public DirectExchange directExchange() {
        return new DirectExchange(DIRECT_EXCHANGE);
    }

    // 将队列一和交换机绑定,并指定路由为red
    @Bean
    public Binding directBinding1() {
        return BindingBuilder.bind(directQueue1()).to(directExchange()).with(RED);
    }
    // 将队列二和交换机绑定,并指定路由为green
    @Bean
    public Binding directBinding2() {
        return BindingBuilder.bind(directQueue2()).to(directExchange()).with(GREEN);
    }
    // ----------------- Direct模式 -----------------
- 1
- 2
- 3
- 4
- 5
- 6
- 7
- 8
- 9
- 10
- 11
- 12
- 13
- 14
- 15
- 16
- 17
- 18
- 19
- 20
- 21
- 22
- 23
- 24
- 25
- 26
- 27
- 28
- 29
- 30
- 31
- 32
- 33
- 34
- 35
- 36
- 37
- 38
- 39
- 40
2.编写生产者,发送消息到交换机并指定路由 MQSender.java
    // ----------------- Direct模式 -----------------
    // 发送消息到Direct交换机,指定路由键
    public void sendDirect(Object message, String routingKey) {
        log.info("发送消息到Direct交换机: " + message);
        // 发送消息到交换机,需要指定在配置类中配置的交换机名,这里的路由键为 routingKey
        rabbitTemplate.convertAndSend("directExchange", routingKey, message);
    }
    // ----------------- Direct模式 -----------------
- 1
- 2
- 3
- 4
- 5
- 6
- 7
- 8
3.编写消费者,接受消息 MQReceiver.java
    // ----------------- Direct模式 -----------------
    // directQueue1接收消息
    @RabbitListener(queues = "directQueue1")
    public void receiveDirect(Object message) {
        log.info("directQueue1接收消息: " + message);
    }

    // directQueue2接收消息
    @RabbitListener(queues = "directQueue2")
    public void receiveDirect2(Object message) {
        log.info("directQueue2接收消息: " + message);
    }
    // ----------------- Direct模式 -----------------
- 1
- 2
- 3
- 4
- 5
- 6
- 7
- 8
- 9
- 10
- 11
- 12
- 13
4.控制层调用方法,发送信息到交换机
    // ----------------- Direct模式 -----------------
    // 发送消息到Direct交换机,指定路由键
    @RequestMapping("/mq/direct/{routingKey}")
    @ResponseBody
    public void mqDirect(@PathVariable String routingKey) {
        mqSender.sendDirect("hello rabbitmq direct", routingKey);
    }
    // ----------------- Direct模式 -----------------
- 1
- 2
- 3
- 4
- 5
- 6
- 7
- 8
4.启动测试
1.访问查看IDEA控制台输出
1.访问 http://localhost:9092/seckill/mq/direct/green

2.访问 http://localhost:9092/seckill/mq/direct/red

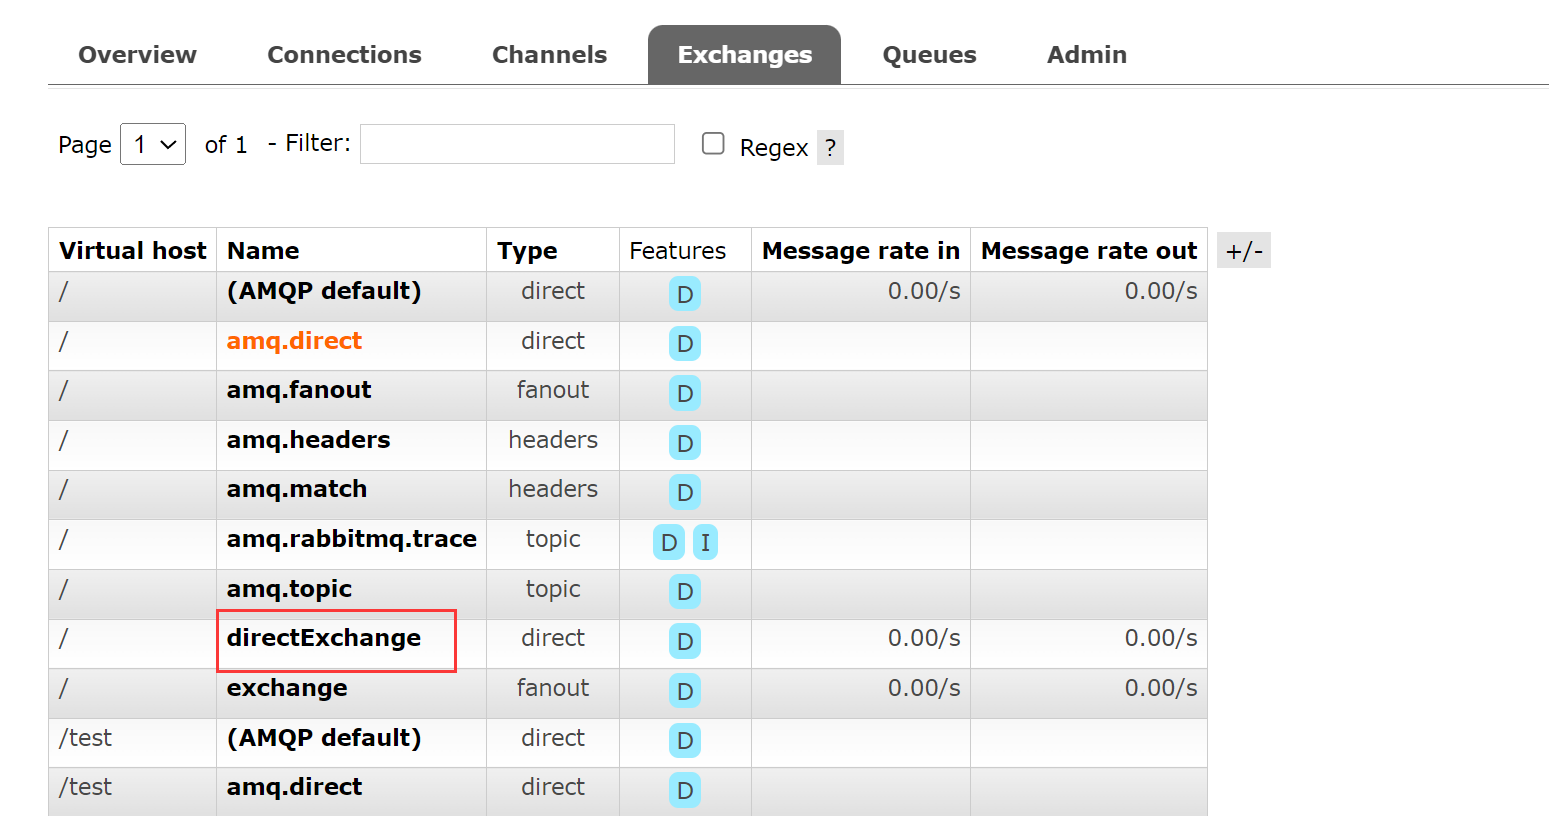
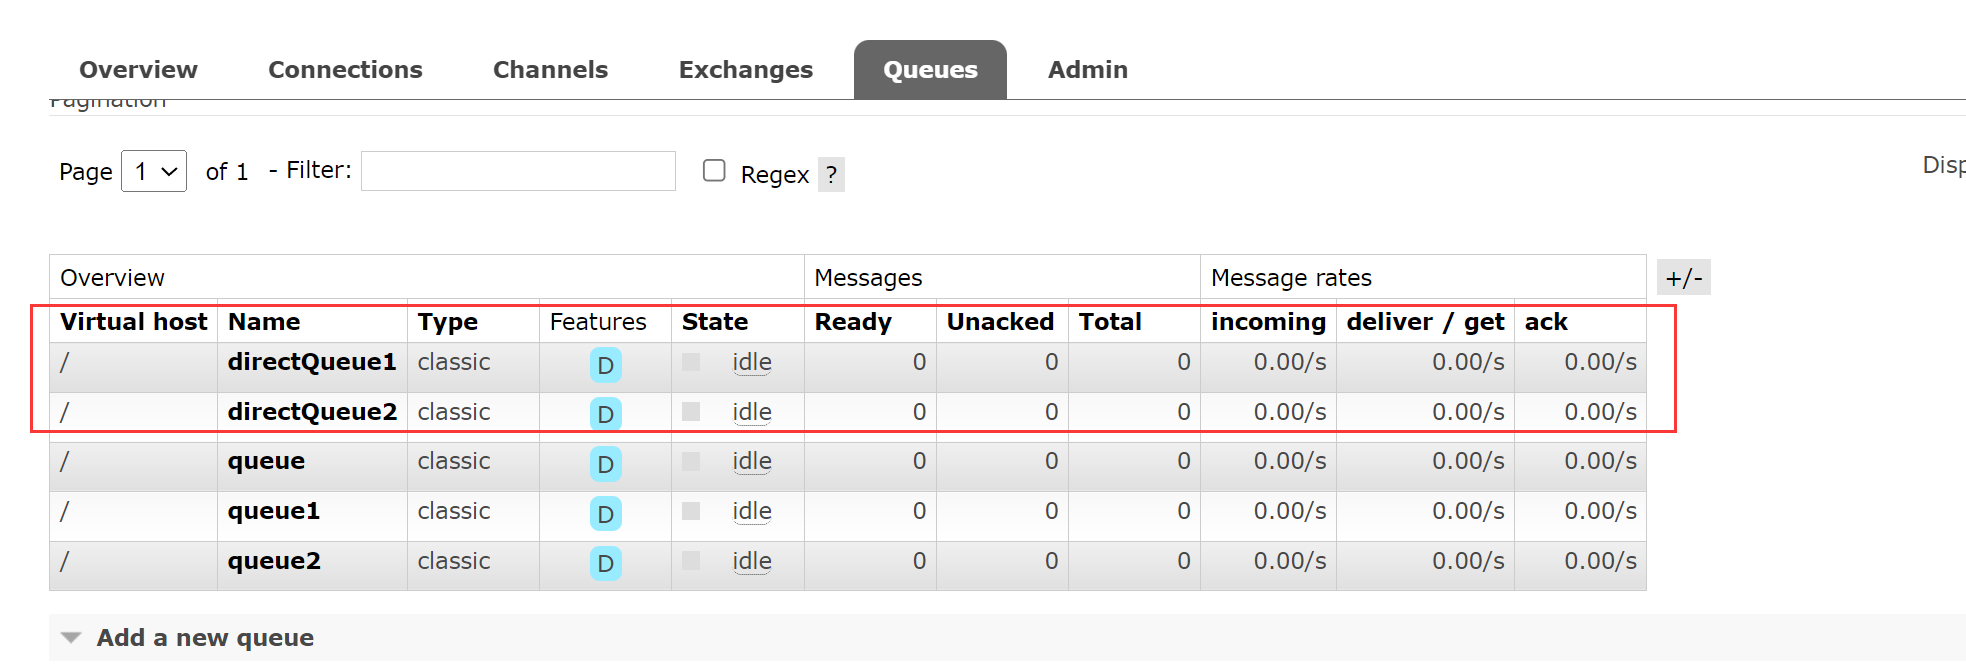
2.访问RabbitMQ控制台 http://140.143.164.206:15672
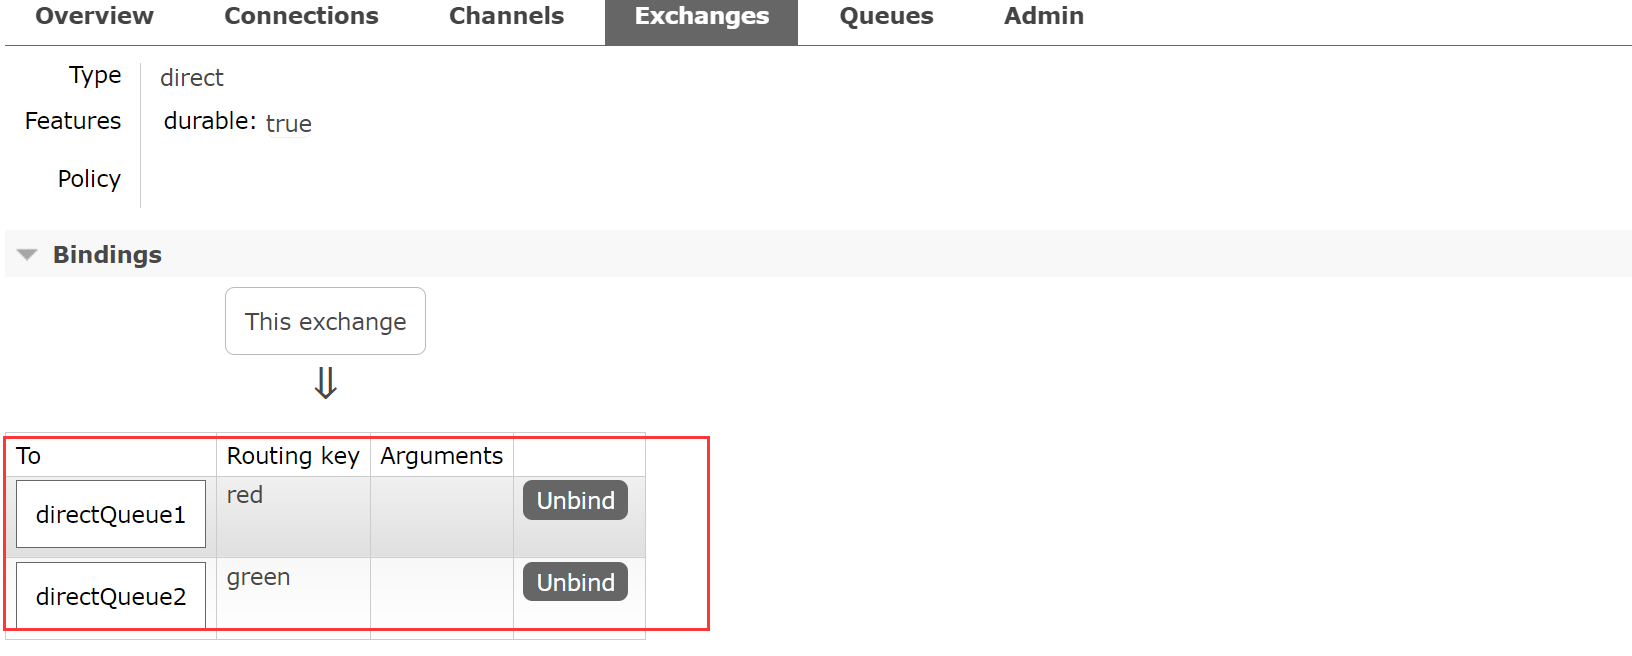
1.交换机绑定了两个队列
2.再查看Queues,新增了两个队列
3.Topic(主题模式)
1.基本介绍
1.介绍

2.关于匹配模式的说明
- 星号:可以匹配一个单词
- 井号:可以匹配零个或多个单词
2.需求分析

3.具体实现
1.配置类 RabbitMQConfig.java
    // ----------------- Topic模式 -----------------
    // 定义一个交换机,两个队列的名称
    private static final String TOPIC_EXCHANGE = "topicExchange";
    private static final String TOPIC_QUEUE1 = "topicQueue1";
    private static final String TOPIC_QUEUE2 = "topicQueue2";

    // 定义三个路由
    public static final String ROUTING_KEY1 = "*.orange.*";
    public static final String ROUTING_KEY2 = "*.*.rabbit";
    public static final String ROUTING_KEY3 = "lazy.#";

    // 创建两个队列和一个交换机
    // 创建队列1
    @Bean
    public Queue topicQueue1() {
        return new Queue(TOPIC_QUEUE1, true);
    }
    // 创建队列2
    @Bean
    public Queue topicQueue2() {
        return new Queue(TOPIC_QUEUE2, true);
    }
    // 创建Topic交换机
    @Bean
    public TopicExchange topicExchange() {
        return new TopicExchange(TOPIC_EXCHANGE);
    }

    // 将队列一和交换机绑定,并指定路由为*.orange.*
    @Bean
    public Binding topicBinding1() {
        return BindingBuilder.bind(topicQueue1()).to(topicExchange()).with(ROUTING_KEY1);
    }
    // 将队列二和交换机绑定,并指定路由为*.*.rabbit和lazy.#
    @Bean
    public Binding topicBinding2() {
        return BindingBuilder.bind(topicQueue2()).to(topicExchange()).with(ROUTING_KEY2);
    }
    @Bean
    public Binding topicBinding3() {
        return BindingBuilder.bind(topicQueue2()).to(topicExchange()).with(ROUTING_KEY3);
    }
    // ----------------- Topic模式 -----------------
- 1
- 2
- 3
- 4
- 5
- 6
- 7
- 8
- 9
- 10
- 11
- 12
- 13
- 14
- 15
- 16
- 17
- 18
- 19
- 20
- 21
- 22
- 23
- 24
- 25
- 26
- 27
- 28
- 29
- 30
- 31
- 32
- 33
- 34
- 35
- 36
- 37
- 38
- 39
- 40
- 41
- 42
- 43
- 44
2.编写生产者,发送消息到交换机并指定路由 MQSender.java
    // ----------------- Topic模式 -----------------
    // 发送消息到Topic交换机,指定路由键
    public void sendTopic(Object message, String routingKey) {
        log.info("发送消息到Topic交换机: " + message);
        // 发送消息到交换机,需要指定在配置类中配置的交换机名,这里的路由键为 routingKey
        rabbitTemplate.convertAndSend("topicExchange", routingKey, message);
    }
    // ----------------- Topic模式 -----------------
- 1
- 2
- 3
- 4
- 5
- 6
- 7
- 8
- 9
3.编写消费者,接受消息 MQReceiver.java
    // ----------------- Topic模式 -----------------
    // topicQueue1接收消息
    @RabbitListener(queues = "topicQueue1")
    public void receiveTopic1(Object message) {
        log.info("topicQueue1接收消息: " + message);
    }
    // topicQueue2接收消息
    @RabbitListener(queues = "topicQueue2")
    public void receiveTopic2(Object message) {
        log.info("topicQueue2接收消息: " + message);
    }
    // ----------------- Topic模式 -----------------
- 1
- 2
- 3
- 4
- 5
- 6
- 7
- 8
- 9
- 10
- 11
- 12
- 13
4.控制层调用方法,发送信息到交换机
    // ----------------- Topic模式 -----------------
    // 发送消息到Topic交换机,指定路由键
    @RequestMapping("/mq/topic/{routingKey}")
    @ResponseBody
    public void mqTopic(@PathVariable String routingKey) {
        mqSender.sendTopic("hello rabbitmq topic", routingKey);
    }
    // ----------------- Topic模式 -----------------
- 1
- 2
- 3
- 4
- 5
- 6
- 7
- 8
4.启动测试
1.示意图

2.访问查看IDEA控制台输出
1.访问 http://localhost:9092/seckill/mq/topic/one.orange.one 匹配Q1

2.访问 http://localhost:9092/seckill/mq/topic/one.one.rabbit 匹配Q2

3.访问 http://localhost:9092/seckill/mq/topic/lazy.orange.one 匹配Q1和Q2

4.访问 http://localhost:9092/seckill/mq/topic/lazy.any.any.any.any 匹配Q2

4.Headers(头路由模式,使用较少)
1.基本介绍

2.示意图

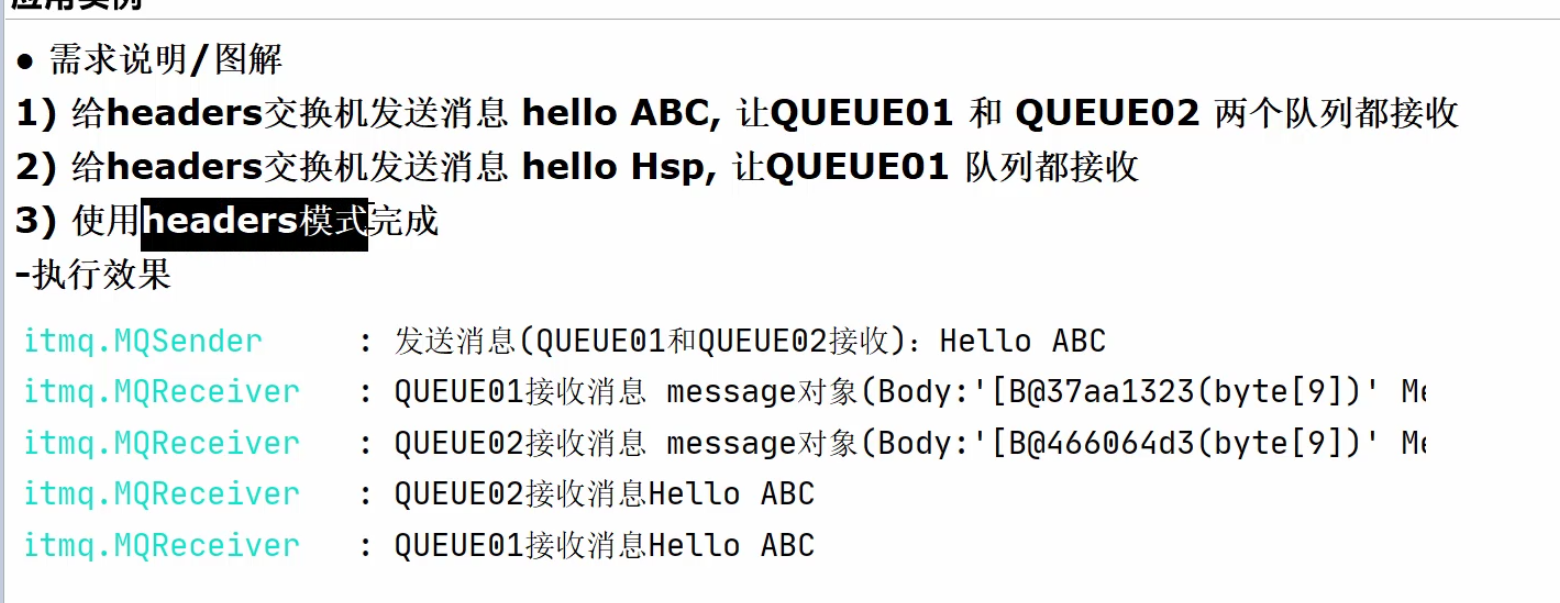
3.需求分析
4.具体实现
1.配置类 RabbitMQConfig.java
    // ----------------- Headers模式 -----------------
    // 定义一个交换机,两个队列的名称
    private static final String HEADERS_EXCHANGE = "headersExchange";
    private static final String HEADERS_QUEUE1 = "headersQueue1";
    private static final String HEADERS_QUEUE2 = "headersQueue2";

    // 创建两个队列和一个交换机
    // 创建队列1
    @Bean
    public Queue headersQueue1() {
        return new Queue(HEADERS_QUEUE1, true);
    }
    // 创建队列2
    @Bean
    public Queue headersQueue2() {
        return new Queue(HEADERS_QUEUE2, true);
    }
    // 创建Headers交换机
    @Bean
    public HeadersExchange headersExchange() {
        return new HeadersExchange(HEADERS_EXCHANGE);
    }

    // 将队列一和交换机绑定,并指定key-value,使用any表示只要有一个匹配就可以
    @Bean
    public Binding headersBinding1() {
        Map<String, Object> map = new HashMap<>();
        map.put("key1", "value1");
        map.put("key2", "value2");
        return BindingBuilder.bind(headersQueue1()).to(headersExchange()).whereAny(map).match();
    }

    // 将队列二和交换机绑定,并指定key-value,使用all表示所有的key-value都要匹配
    @Bean
    public Binding headersBinding2() {
        Map<String, Object> map = new HashMap<>();
        map.put("key3", "value3");
        map.put("key4", "value4");
        return BindingBuilder.bind(headersQueue2()).to(headersExchange()).whereAll(map).match();
    }
    // ----------------- Headers模式 -----------------
- 1
- 2
- 3
- 4
- 5
- 6
- 7
- 8
- 9
- 10
- 11
- 12
- 13
- 14
- 15
- 16
- 17
- 18
- 19
- 20
- 21
- 22
- 23
- 24
- 25
- 26
- 27
- 28
- 29
- 30
- 31
- 32
- 33
- 34
- 35
- 36
- 37
- 38
- 39
- 40
- 41
2.编写生产者,发送消息到交换机并指定路由 MQSender.java
    // ----------------- Headers模式 -----------------
    // 发送消息到Headers交换机,匹配队列一
    public void sendHeaders(Object message) {
        log.info("发送消息到Headers交换机: " + message);
        // 发送消息到交换机,需要指定在配置类中配置的交换机名,这里的空字符串表示忽略路由键
        rabbitTemplate.convertAndSend("headersExchange", "", message, message1 -> {
            message1.getMessageProperties().getHeaders().put("key1", "value1");
            return message1;
        });
    }
    // 发送消息到Headers交换机,匹配队列二
    public void sendHeaders2(Object message) {
        log.info("发送消息到Headers交换机: " + message);
        // 发送消息到交换机,需要指定在配置类中配置的交换机名,这里的空字符串表示忽略路由键
        rabbitTemplate.convertAndSend("headersExchange", "", message, message1 -> {
            message1.getMessageProperties().getHeaders().put("key3", "value3");
            message1.getMessageProperties().getHeaders().put("key4", "value4");
            return message1;
        });
    }
    // ----------------- Headers模式 -----------------
- 1
- 2
- 3
- 4
- 5
- 6
- 7
- 8
- 9
- 10
- 11
- 12
- 13
- 14
- 15
- 16
- 17
- 18
- 19
- 20
- 21
3.编写消费者,接受消息 MQReceiver.java
    // ----------------- Headers模式 -----------------
    // headersQueue1接收消息
    @RabbitListener(queues = "headersQueue1")
    public void receiveHeaders1(Object message) {
        log.info("headersQueue1接收消息: " + message);
    }
    // headersQueue2接收消息
    @RabbitListener(queues = "headersQueue2")
    public void receiveHeaders2(Object message) {
        log.info("headersQueue2接收消息: " + message);
    }
    // ----------------- Headers模式 -----------------
- 1
- 2
- 3
- 4
- 5
- 6
- 7
- 8
- 9
- 10
- 11
- 12
4.控制层调用方法,发送信息到交换机
    // ----------------- Headers模式 -----------------
    // 发送消息到Headers交换机,匹配队列一
    @RequestMapping("/mq/headers")
    @ResponseBody
    public void mqHeaders() {
        mqSender.sendHeaders("hello rabbitmq headers");
    }
    // 发送消息到Headers交换机,匹配队列二
    @RequestMapping("/mq/headers2")
    @ResponseBody
    public void mqHeaders2() {
        mqSender.sendHeaders2("hello rabbitmq headers2");
    }
    // ----------------- Headers模式 -----------------
- 1
- 2
- 3
- 4
- 5
- 6
- 7
- 8
- 9
- 10
- 11
- 12
- 13
- 14
5.启动测试
1.访问查看IDEA控制台输出
1.访问 http://localhost:9092/seckill/mq/headers 匹配队列一

2.访问 http://localhost:9092/seckill/mq/headers2 匹配队列二

5.RabbitMQ使用模式总结
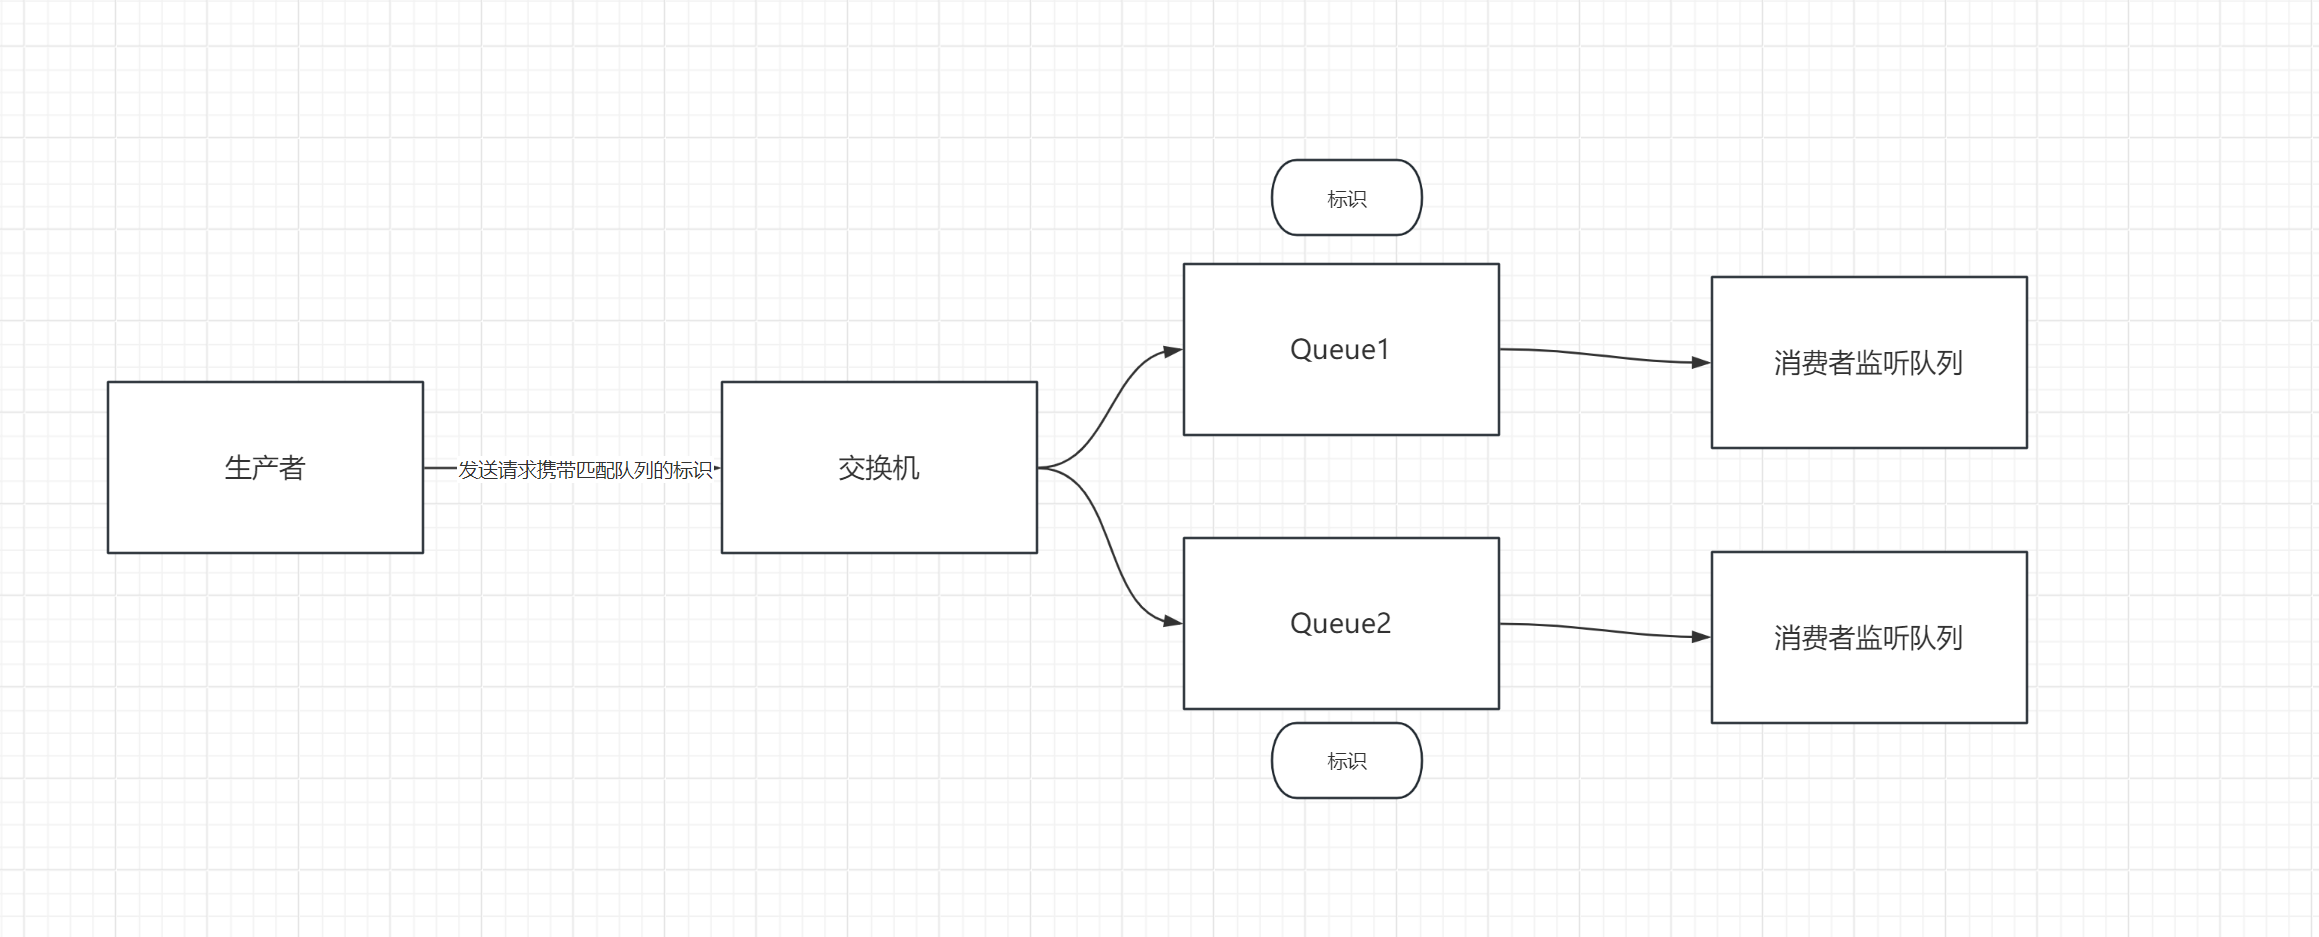
1.整体架构图
2.通用使用方式
1.编写RabbitMQ的配置类
- 创建交换机和队列
- 将队列分别与交换机按照具体标识绑定
2.编写消息发送者
- 指定交换机
- 携带消息和具体队列标识
3.编写消息接受者
- 只需要监听队列,接收消息即可
4.编写控制层
- 调用消息发送者,向交换机发送请求
声明:本文内容由网友自发贡献,不代表【wpsshop博客】立场,版权归原作者所有,本站不承担相应法律责任。如您发现有侵权的内容,请联系我们。转载请注明出处:https://www.wpsshop.cn/w/盐析白兔/article/detail/630214
推荐阅读
相关标签


