热门标签
热门文章
- 1使用pip install 时报错:“Fatal error in launcher: Unable to create process using ‘....”_pip install jieba 出现fatal error in launcher
- 2Kafka集群扩容_kafka集群随着扩大之后会发生什么?
- 3职场生存法则和处世之道
- 4使用conda创建虚拟环境,指定python版本,报错,该如何解决_conda create -n python 3.7报错
- 5unity学习笔记 Restsharp 使用心得_unity restsharp
- 6uniapp通过custom-tab-bar 自定义tabbar导航栏(主要用于微信小程序)_uniapp自定义导航栏custom
- 7【UE4 UE5】UE设置屏幕分辨率 全屏、窗口设置的方法_ue5设置分辨率
- 8基于Flink流处理的动态实时电商实时分析系统_基flink的电商销售数据实时分析处理系统的设计与实现
- 9什么是DCMM模型数据管理能力成熟度评估_dcmm数据成熟度模型
- 10狼搜索算法(WSA):利用狼的社交和狩猎策略进行优化_wolf search algorithm
当前位置: article > 正文
基于WebSocket和Android的多人实时聊天系统(Demo)的实现_android websocket demo下载
作者:盐析白兔 | 2024-05-31 12:30:25
赞
踩
android websocket demo下载
实现效果

服务端实现
服务端参考之前的这篇文件Android初学 使用WebSocket与服务器进行通信.
这里做了一些修改, 就是再服务端收到消息后, 将消息群发给所有在线的客户端
// 服务端的Bean实体类
@Data
@AllArgsConstructor
@NoArgsConstructor
public class MsgBean {
    private String mUserName;
    private String mMsg;
}
- 1
- 2
- 3
- 4
- 5
- 6
- 7
- 8
// 服务端的WebSocketClient
// 客户端可以通过 ws://ip:port/test 进行connnect
@ServerEndpoint("/test")
@Component
@Slf4j
public class WebSocketController {
    /**
     * 存放所有在线的客户端
     */
    private static Map<String, Session> clients = new ConcurrentHashMap<>();

    @OnOpen
    public void onOpen(Session session) {
        log.info("有新的客户端连接了: {}", session.getId());
        //将新用户存入在线的组
        clients.put(session.getId(), session);
    }

    /**
     * 客户端关闭
     *
     * @param session session
     */
    @OnClose
    public void onClose(Session session) {
        log.info("有用户断开了, id为:{}", session.getId());
        // 将掉线的用户移除在线的组里
        clients.remove(session.getId());
    }

    /**
     * 发生错误
     *
     * @param throwable e
     */
    @OnError
    public void onError(Throwable throwable) {
        throwable.printStackTrace();
    }

    /**
     * 收到客户端发来消息
     *
     * @param message 消息对象
     */
    @OnMessage
    public void onMessage(String message) {
        log.info("服务端收到客户端发来的消息: {}", message);
        this.sendAll(message);
    }

    /**
     * 群发消息
     *
     * @param message 消息内容
     */
    private void sendAll(String message) {
        for (Map.Entry<String, Session> sessionEntry : clients.entrySet()) {
            sessionEntry.getValue().getAsyncRemote().sendText(message);
        }
    }
}
- 1
- 2
- 3
- 4
- 5
- 6
- 7
- 8
- 9
- 10
- 11
- 12
- 13
- 14
- 15
- 16
- 17
- 18
- 19
- 20
- 21
- 22
- 23
- 24
- 25
- 26
- 27
- 28
- 29
- 30
- 31
- 32
- 33
- 34
- 35
- 36
- 37
- 38
- 39
- 40
- 41
- 42
- 43
- 44
- 45
- 46
- 47
- 48
- 49
- 50
- 51
- 52
- 53
- 54
- 55
- 56
- 57
- 58
- 59
- 60
- 61
- 62
启动SpringBoot之后, 可以先使用PostMan测试链接是否成功
客户端实现
主页面的实现
首先写聊天页面的布局, 因为使用了binding, 所以布局长这个样子
主要组件的一个RecycleView, EditText和Button
<?xml version="1.0" encoding="utf-8"?>
<layout xmlns:android="http://schemas.android.com/apk/res/android"
        xmlns:app="http://schemas.android.com/apk/res-auto"
        xmlns:tools="http://schemas.android.com/tools">

    <data>

    </data>

    <androidx.constraintlayout.widget.ConstraintLayout
            android:layout_width="match_parent"
            android:layout_height="match_parent"
            android:background="@drawable/chat_background"
            tools:context=".fragment.ChatFragment">

        <androidx.constraintlayout.widget.Guideline
                android:orientation="horizontal"
                android:layout_width="wrap_content"
                android:layout_height="wrap_content"
                app:layout_constraintGuide_percent="0.9"
                android:id="@+id/guideline2" />

        <EditText
                android:layout_width="230dp"
                android:hint="..."
                android:layout_height="38dp"
                android:text=""
                android:background="#99FFFFFF"
                android:id="@+id/msg_edit_text"
                app:layout_constraintEnd_toStartOf="@+id/guideline3"
                app:layout_constraintStart_toStartOf="parent"
                app:layout_constraintTop_toTopOf="@+id/guideline2"
                app:layout_constraintBottom_toBottomOf="parent"
                android:minHeight="48dp"
                android:layout_marginStart="10dp"
                android:layout_marginEnd="10dp" />

        <androidx.constraintlayout.widget.Guideline
                android:orientation="vertical"
                android:layout_width="wrap_content"
                android:layout_height="wrap_content"
                app:layout_constraintGuide_begin="266dp"
                android:id="@+id/guideline3"
                app:layout_constraintGuide_percent="0.7" />

        <Button
                android:text="发送"
                android:layout_width="wrap_content"
                android:layout_height="wrap_content"
                android:id="@+id/send_btn"
                app:layout_constraintEnd_toEndOf="parent"
                app:layout_constraintStart_toStartOf="@+id/guideline3"
                app:layout_constraintBottom_toBottomOf="parent"
                app:layout_constraintTop_toTopOf="@+id/guideline2" />

        <androidx.recyclerview.widget.RecyclerView
                android:id="@+id/msg_list_recycle_view"
                android:layout_width="350dp"
                android:scrollbars="vertical"
                android:layout_height="600dp"
                app:layout_constraintEnd_toEndOf="parent"
                app:layout_constraintStart_toStartOf="parent"
                app:layout_constraintTop_toTopOf="parent"
                app:layout_constraintBottom_toTopOf="@+id/guideline2"
                android:layout_marginStart="10dp"
                android:layout_marginEnd="10dp"
                android:layout_marginBottom="20dp"
                android:layout_marginTop="20dp" />
    </androidx.constraintlayout.widget.ConstraintLayout>
</layout>
- 1
- 2
- 3
- 4
- 5
- 6
- 7
- 8
- 9
- 10
- 11
- 12
- 13
- 14
- 15
- 16
- 17
- 18
- 19
- 20
- 21
- 22
- 23
- 24
- 25
- 26
- 27
- 28
- 29
- 30
- 31
- 32
- 33
- 34
- 35
- 36
- 37
- 38
- 39
- 40
- 41
- 42
- 43
- 44
- 45
- 46
- 47
- 48
- 49
- 50
- 51
- 52
- 53
- 54
- 55
- 56
- 57
- 58
- 59
- 60
- 61
- 62
- 63
- 64
- 65
- 66
- 67
- 68
- 69
- 70
上面的布局的background设置的是@drawable/chat_background, drawable/chat_background.xml文件内容如下
<?xml version="1.0" encoding="utf-8"?>
<bitmap xmlns:android="http://schemas.android.com/apk/res/android"
        android:src="@drawable/zhouye"
        android:gravity="center_vertical" />
- 1
- 2
- 3
- 4
这样做的目的是为了保持图片的纵横比.
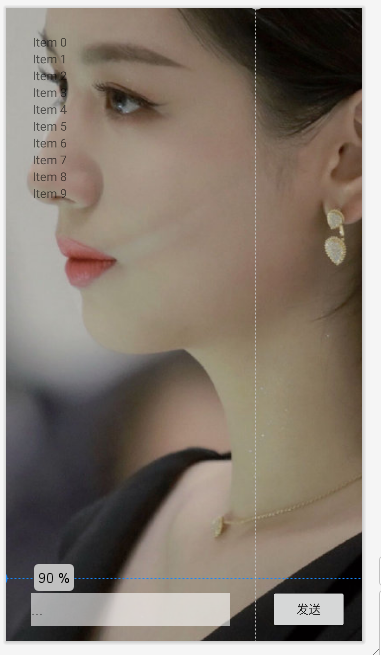
实现效果图如下:

消息的布局
QQ中的每条消息, 大概长这个样子 这里只简单实现一下

每条消息包含两个TextView, 分别为用户名和消息, 布局文件如下
<?xml version="1.0" encoding="utf-8"?>
<androidx.constraintlayout.widget.ConstraintLayout xmlns:android="http://schemas.android.com/apk/res/android"
        xmlns:app="http://schemas.android.com/apk/res-auto"
        android:layout_width="match_parent"
        android:layout_gravity="left"
        android:layout_height="wrap_content">

    <TextView
            android:text="ZhangSan"
            android:textSize="20sp"
            android:layout_width="wrap_content"
            android:layout_height="wrap_content"
            android:id="@+id/user_name"
            app:layout_constraintStart_toStartOf="parent"
            app:layout_constraintTop_toTopOf="parent" />

    <TextView
            android:text="HiHiHiHiHiiHiHHiHiHiHiHiHiHiHi"
            android:layout_width="wrap_content"
            android:textSize="15sp"
            android:layout_height="wrap_content"
            android:id="@+id/user_msg"
            android:background="@drawable/msg_background"
            app:layout_constraintTop_toBottomOf="@+id/user_name"
            app:layout_constraintBottom_toBottomOf="parent"
            app:layout_constraintStart_toStartOf="parent"
            android:layout_marginStart="10dp" />
</androidx.constraintlayout.widget.ConstraintLayout>
- 1
- 2
- 3
- 4
- 5
- 6
- 7
- 8
- 9
- 10
- 11
- 12
- 13
- 14
- 15
- 16
- 17
- 18
- 19
- 20
- 21
- 22
- 23
- 24
- 25
- 26
- 27
- 28
为了实现消息的圆角和背景色, 这里设置了android:background="@drawable/msg_background", 其中drawable/msg_background的文件内容如下
<?xml version="1.0" encoding="utf-8"?>
<shape xmlns:android="http://schemas.android.com/apk/res/android"
        android:shape="rectangle">
    <!--    填充色-->
    <solid android:color="@color/teal_200" />
    <!--    圆角弧度-->
    <corners android:radius="10dp" />
    <!--    四周内边距-->
    <padding
            android:left="20px"
            android:right="20px"
            android:bottom="15px"
            android:top="15px" />
    <!--    边框颜色-->
    <stroke
            android:color="@color/teal_700"
            android:width="1dp" />
</shape>
- 1
- 2
- 3
- 4
- 5
- 6
- 7
- 8
- 9
- 10
- 11
- 12
- 13
- 14
- 15
- 16
- 17
- 18
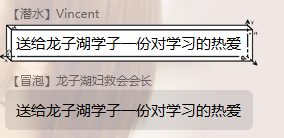
整体的每条消息的布局效果如下图

先写一下Service
因为是写完功能之后才写的总结, 所以描述有点混乱...
- 1
为了保证应用在后台的时候也能够接收到WebSocket发送的消息, 将WebSocketClient放在了Service中. 同时使用心跳机制保证连接.
心跳机制最开始是在大数据中听说的, 服务器集群的master会定时给每个node发送心跳包, 检测该节点是否掉线, 如果掉线会进行一些数据的恢复等其他操作. 本文的心跳指的是检测一下与服务之间的连接状态. 如果连接失败, 则进行重连
- 1
Service的完整代码如下
public class WebSocketService extends Service {
    private static final String TAG = WebSocketClient.class.getSimpleName();
    // 发送心跳Message 在handle中的what,
    private static final int WEB_SOCKET_HEART_BERT = 0x01;
    // WebSocket的Client
    WebSocketClient mChatSocketClient = null;
    // 与服务器通信的WebSocket的URI
    private final URI mURI = URI.create("ws://192.168.69.205:8080/test");
    private Handler mHandler;
    // bind service 之后, 会返回这个对象, 消息的发送和接收都是通过这个对象来实现的
    private final SocketBinder mSocketBinder = new SocketBinder();

    public WebSocketService() {
    }

    @Override
    public void onCreate() {
        super.onCreate();
        mHandler = new WebSocketHandler(getMainLooper());
        initWebSocket();
    }

    private void initWebSocket() { // 初始化WebSocket Client
        mChatSocketClient = new WebSocketClient(mURI) {
            @Override
            public void onOpen(ServerHandshake handshakedata) { Log.e(TAG, "onOpen: "); }

            @Override
            public void onMessage(String message) {
                Log.e(TAG, "mChatSocketClient onMessage: " + message);
                // 调用Binder中的onMessage, binder中通过CallBack将消息发送给Fragment
                mSocketBinder.onMessage(message);
            }

            @Override
            public void onClose(int code, String reason, boolean remote) { Log.e(TAG, "onClose: " + "close"); }

            @Override
            public void onError(Exception ex) { Log.e(TAG, "onError: " + ex.getMessage()); }
        };
        mChatSocketClient.connect();
        // 连接之后就启动心跳
        webSocketHeartBeat();
    }

    @Override
    public IBinder onBind(Intent intent) {
        return mSocketBinder;
    }

    @Override
    public boolean onUnbind(Intent intent) {
        Log.e(TAG, "onUnbind: ");
        if (mChatSocketClient != null) {
            mChatSocketClient.close();
        }
        return super.onUnbind(intent);
    }

    public class SocketBinder extends Binder {
    	// 获取此对象后需要调用setSocketCallBack, 实现此接口, 然后通过回调来接收Socket接收到的消息
    	// 异步回调
    	// 这个回调也可以放在WebSocketService中, 然后再此onMessage被调用的时候, 通过Handle发送一个Message, 在Handle中回调接收到的消息.
        private SocketCallBack mSocketCallBack;

        public void sendMsg(String msg) {
            mChatSocketClient.send(msg);
        }

        public void sendMsgBean(MsgBean msgBean) {
            mChatSocketClient.send(JSONObject.toJSONString(msgBean));
        }

        public void onMessage(String message) {
            Log.e(TAG, "SocketBinder onMessage: " + message);
            mSocketCallBack.onMessage(message);
        }

        public void setSocketCallBack(SocketCallBack socketCallBack) {
            mSocketCallBack = socketCallBack;
        }

        public SocketCallBack getSocketCallBack() {
            return mSocketCallBack;
        }
    }

    public interface SocketCallBack {
        void onMessage(String message);
    }


    class WebSocketHandler extends Handler {

        public WebSocketHandler(@NonNull Looper looper) {
            super(looper);
        }

        public WebSocketHandler(@NonNull Looper looper, @Nullable Callback callback) {
            super(looper, callback);
        }

        @Override
        public void handleMessage(@NonNull Message msg) {
            switch (msg.what) {
                case WEB_SOCKET_HEART_BERT:
                    Log.d(TAG, "handleMessage: WEB_SOCKET_HEART_BERT");
                    if (mChatSocketClient != null && mChatSocketClient.isClosed()) {
                        reconnectWebSocket();
                    } else {
                        webSocketHeartBeat();
                    }
                    break;
                default:
                    break;
            }
            super.handleMessage(msg);
        }
    }

    private void webSocketHeartBeat() { // 心跳, 发送一个任务 延迟5s执行
        Log.d(TAG, "webSocketHeartBeat: ");
        mHandler.postDelayed(new Runnable() {
            @Override
            public void run() {// 判断websocket的连接状态, 如果连接关闭 则重连, 否则, 给Handle发送一条消息, handle收到这个消息后还会判断连接状态, 如果连接失败则重连, 连接成功则再次执行webSocketHeartBeat, 发送一个任务 延迟5s执行...
                if (mChatSocketClient.isClosed()) {
                    reconnectWebSocket();
                }
                Message msg = new Message();
                msg.what = WEB_SOCKET_HEART_BERT;
                mHandler.sendMessage(msg);
            }
        }, 5000);
    }

    private void reconnectWebSocket() {// 重连 重连之后发送Message, 在Handle中检测连接是否成功...
        Log.d(TAG, "reconnectWebSocket: ");
        if (mChatSocketClient != null) {
            mChatSocketClient.reconnect();
        } else {
            Log.e(TAG, "reconnectWebSocket: mChatSocketClient is null");
        }
        Message msg = new Message();
        msg.what = WEB_SOCKET_HEART_BERT;
        mHandler.sendMessage(msg);
    }
}
- 1
- 2
- 3
- 4
- 5
- 6
- 7
- 8
- 9
- 10
- 11
- 12
- 13
- 14
- 15
- 16
- 17
- 18
- 19
- 20
- 21
- 22
- 23
- 24
- 25
- 26
- 27
- 28
- 29
- 30
- 31
- 32
- 33
- 34
- 35
- 36
- 37
- 38
- 39
- 40
- 41
- 42
- 43
- 44
- 45
- 46
- 47
- 48
- 49
- 50
- 51
- 52
- 53
- 54
- 55
- 56
- 57
- 58
- 59
- 60
- 61
- 62
- 63
- 64
- 65
- 66
- 67
- 68
- 69
- 70
- 71
- 72
- 73
- 74
- 75
- 76
- 77
- 78
- 79
- 80
- 81
- 82
- 83
- 84
- 85
- 86
- 87
- 88
- 89
- 90
- 91
- 92
- 93
- 94
- 95
- 96
- 97
- 98
- 99
- 100
- 101
- 102
- 103
- 104
- 105
- 106
- 107
- 108
- 109
- 110
- 111
- 112
- 113
- 114
- 115
- 116
- 117
- 118
- 119
- 120
- 121
- 122
- 123
- 124
- 125
- 126
- 127
- 128
- 129
- 130
- 131
- 132
- 133
- 134
- 135
- 136
- 137
- 138
- 139
- 140
- 141
- 142
- 143
- 144
- 145
- 146
- 147
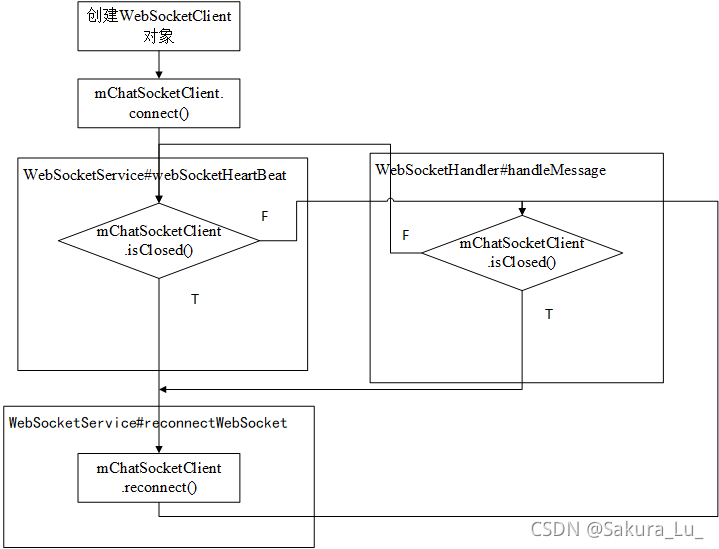
Socket重连流程如下


接下来在Fragment中绑定服务
public class ChatFragment extends Fragment {
    private static final String TAG = ChatFragment.class.getSimpleName();
    private FragmentChatBinding mChatBinding;
    private WebSocketService.SocketBinder mSocketBinder;
    private MsgListRecycleViewAdapter mAdapter;
    private Handler mHandler;

    public ChatFragment() {
    }

    public static ChatFragment newInstance() { // 获取Fragment实例
        ChatFragment fragment = new ChatFragment();
        return fragment;
    }

    @Override
    public void onCreate(Bundle savedInstanceState) {
        super.onCreate(savedInstanceState);
        startService();
        mHandler = new ChatHandler(Looper.getMainLooper());
        mChatBinding = FragmentChatBinding.inflate(getLayoutInflater());
        List<MsgBean> list = new ArrayList<>();
        mAdapter = new MsgListRecycleViewAdapter(list);
        // 设置RecycleView的布局管理器
        LinearLayoutManager linearLayoutManager = new LinearLayoutManager(getContext());
        linearLayoutManager.setStackFromEnd(true);// 自动滑动尾部
        mChatBinding.msgListRecycleView.setLayoutManager(linearLayoutManager);
        mChatBinding.msgListRecycleView.setAdapter(mAdapter);
    }

    private void startService() { // 启动Service
        FragmentActivity activity = getActivity();
        if (activity != null) {
            activity.bindService(new Intent(getContext(), WebSocketService.class),
                    serviceConnection, Context.BIND_AUTO_CREATE);
        } else {
        }
    }

    @Override
    public View onCreateView(@NonNull LayoutInflater inflater, ViewGroup container,
                             Bundle savedInstanceState) {
        return mChatBinding.getRoot();
    }

    @Override
    public void onActivityCreated(@Nullable Bundle savedInstanceState) {
        super.onActivityCreated(savedInstanceState);
        mChatBinding.sendBtn.setOnClickListener(view -> { // 发送按钮的点击事件
            String msg = mChatBinding.msgEditText.getText().toString();
            if (msg.equals("")) {
                Toast.makeText(getContext(), "请输入消息", Toast.LENGTH_SHORT).show();
            } else {
                MsgBean msgBean = new MsgBean(MsgBean.name, msg);
                mSocketBinder.sendMsgBean(msgBean);
            }
        });
    }

	// 匿名类 实现WebSocketService.SocketCallBack接口
    private final WebSocketService.SocketCallBack mSocketCallBack = new WebSocketService.SocketCallBack() {
        @Override
        public void onMessage(String message) { // WebSocket收到消息后会通过回调将消息发送过来
            Log.e(TAG, "mSocketCallBack: " + message);
            MsgBean msgBean = JSONObject.parseObject(message, MsgBean.class);
            mAdapter.addMsgBean(msgBean);
            Message handleMsg = new Message();// 在Handle中更新UI
            handleMsg.what = 0x01;
            mHandler.sendMessage(handleMsg);
        }
    };

	// 匿名类 实现ServiceConnection接口, 实现绑定成功/断开连接的回调方法
    private final ServiceConnection serviceConnection = new ServiceConnection() {
        @Override
        public void onServiceConnected(ComponentName componentName, IBinder iBinder) { //服务与活动成功绑定之后会回调此方法
            mSocketBinder = (WebSocketService.SocketBinder) iBinder;
            mSocketBinder.setSocketCallBack(mSocketCallBack);
        }

        @Override
        public void onServiceDisconnected(ComponentName componentName) { Log.e("MainActivity", "服务与活动成功断开"); }
    };

    class ChatHandler extends Handler { // 更新UI用的
        public ChatHandler(@NonNull Looper looper) {
            super(looper);
        }

        @Override
        public void handleMessage(@NonNull Message msg) {
            super.handleMessage(msg);
            switch (msg.what) {
                case 0x01:
                    Log.e(TAG, "handleMessage: 0x01");
            		// 将RecyclerView定位到最后一行
                    mAdapter.notifyItemInserted(mAdapter.getItemCount() - 1);
                    mChatBinding.msgListRecycleView.smoothScrollToPosition(mAdapter.getItemCount() - 1);
                    Log.e(TAG, "handleMessage: 0x01 end");
                    break;
                default:
                    break;
            }
        }
    }
}
- 1
- 2
- 3
- 4
- 5
- 6
- 7
- 8
- 9
- 10
- 11
- 12
- 13
- 14
- 15
- 16
- 17
- 18
- 19
- 20
- 21
- 22
- 23
- 24
- 25
- 26
- 27
- 28
- 29
- 30
- 31
- 32
- 33
- 34
- 35
- 36
- 37
- 38
- 39
- 40
- 41
- 42
- 43
- 44
- 45
- 46
- 47
- 48
- 49
- 50
- 51
- 52
- 53
- 54
- 55
- 56
- 57
- 58
- 59
- 60
- 61
- 62
- 63
- 64
- 65
- 66
- 67
- 68
- 69
- 70
- 71
- 72
- 73
- 74
- 75
- 76
- 77
- 78
- 79
- 80
- 81
- 82
- 83
- 84
- 85
- 86
- 87
- 88
- 89
- 90
- 91
- 92
- 93
- 94
- 95
- 96
- 97
- 98
- 99
- 100
- 101
- 102
- 103
- 104
- 105
- 106
发送消息和接收消息的时序图如下:

声明:本文内容由网友自发贡献,不代表【wpsshop博客】立场,版权归原作者所有,本站不承担相应法律责任。如您发现有侵权的内容,请联系我们。转载请注明出处:https://www.wpsshop.cn/w/盐析白兔/article/detail/652324
推荐阅读
相关标签


