- 1105、基于STM32单片机倒车雷达超声波测距报警系统LCD1602设计(程序+原理图+PCB源文件+任务书+参考论文+开题报告+流程图+硬件设计资料+元器件清单等)_基于stm32单片机的停车雷达监测系统设计
- 2爆火!开源多模态大模型在手机端进行本地部署!_多模态大模型 本地部署
- 3离散数学一些内容的整理_离散数学复合关系可以不存在吗
- 4sqlserver--SQLServer2017 安装图文详解(sql server安装勾选哪些功能)22222_sqlserver2017功能选择
- 5java kafka demo_Kafka Stream WordCountDemo.java
- 6C# WPF Prism框架-2.MVVM的绑定和命令_c#的mvvm的代码
- 7STM32+ESP8266连接新版OneNET云平台_基于stm32+esp8266+mqtt连接最新版onenet云平台(非旧版本多协议接入)hal库开
- 8贴心的深度学习领域必备网址汇总(持续更新)_深度学习网站
- 9双非本科,Java岗,四面阿里(技术面+交叉面+HR面,2024年最新微众银行java面试经验分享_字节前端交叉面
- 10基于Python爬虫山东济南天气预报数据可视化系统设计与实现(Django框架) 研究背景与意义、国内外研究现状_数据挖掘预测气温
一键上传,无限容量!打造高效图床工具,利用Electron和Gitee搭建自己的私人云存储空间_利用gitee做数据存储
赞
踩
说在前面
平时写文章或写代码的时候,都少不了需要将本地图片转成在线图片链接,大家都是使用什么工具进行转换的呢?相信很多人都有自己的图床工具,今天来给大家介绍一下,怎么基于Gitee和Electron来开发一个便捷的图床工具,支持图片的上传、删除、复制和快速生成markdown链接、快捷键唤起和隐藏面板,粘贴剪切板图片上传等……
框架选型
原本只是想写一个Chrome插件来实现简单功能,后面发现Chrome插件的局限性太大了,所以最后还是选择使用Electron来制作一个桌面程序。
存储方面我们可以直接使用gitee来用做图库存储,不需要额外去购买存储服务器。
准备工作
一、Gitee创建图床仓库目录
1、Gitee注册
直接到Gitee官网: Gitee - 基于 Git 的代码托管和研发协作平台 ,点击注册即可。

2、仓库创建
注册完账号后直接登录,在首页点击右上角的加号可以新建仓库

仓库信息自行填写即可
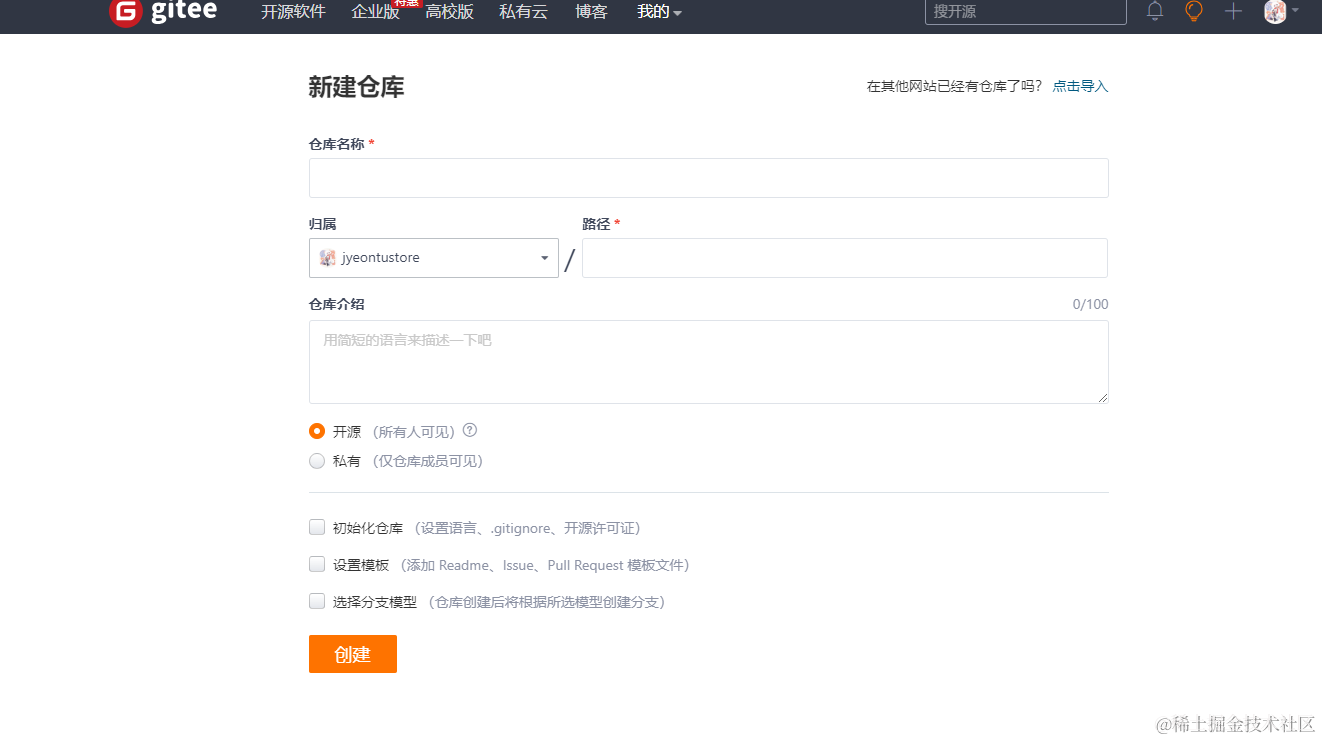
创建完仓库后我们可以新建一个文件夹用来存储图片:
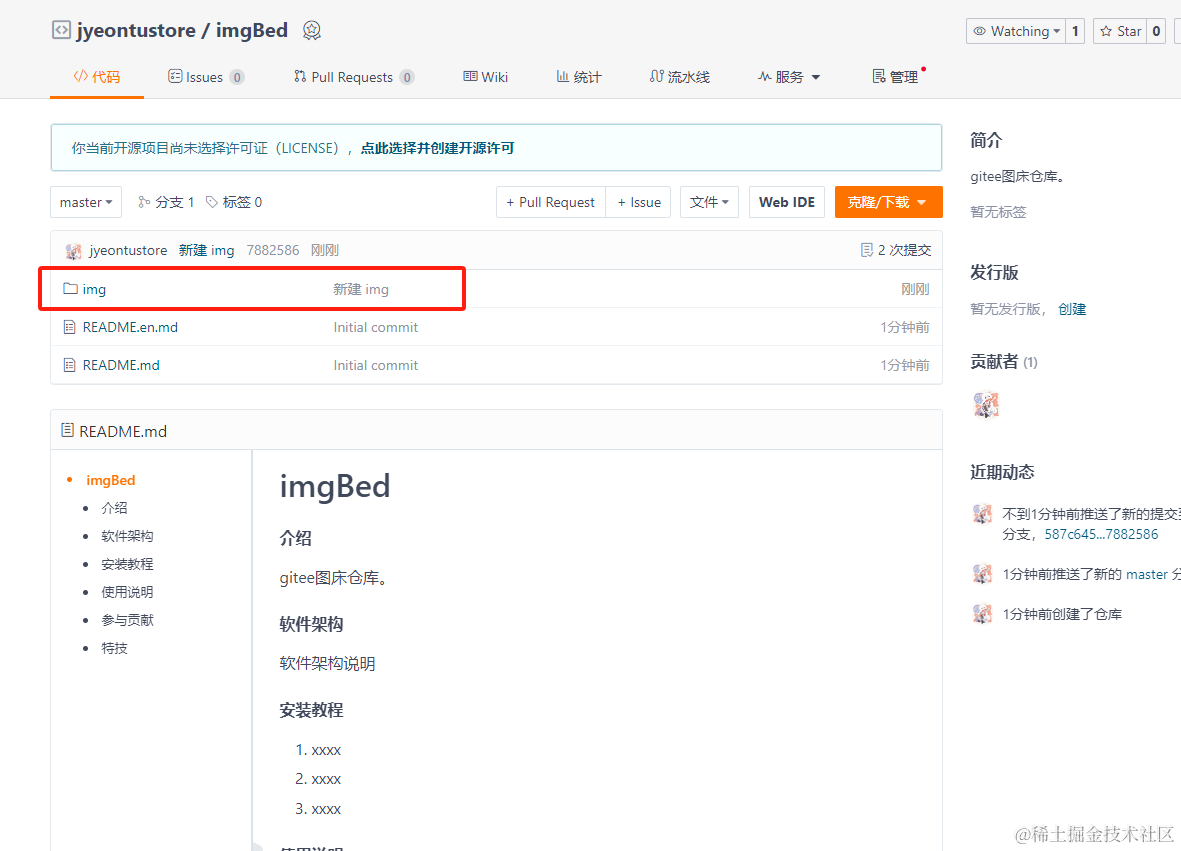
3、生成授权码
打开设置里的私人令牌页面
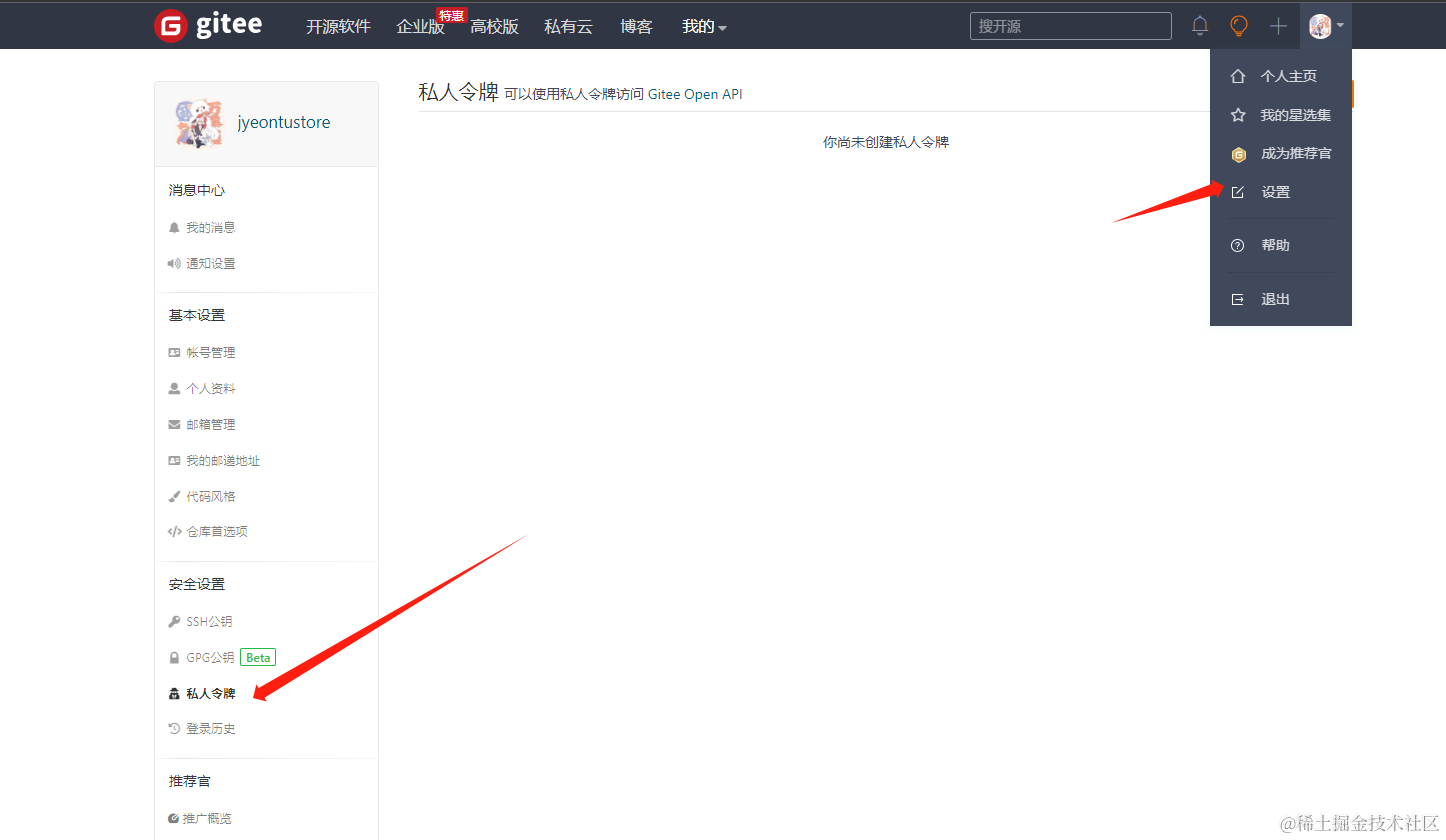
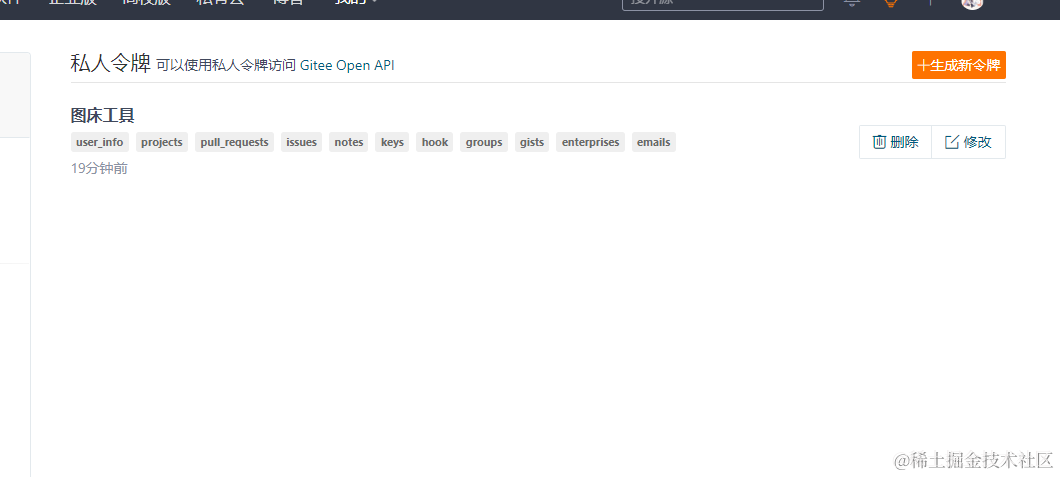
点击生成新令牌,根据提示填写信息即可,注意保存好生成的令牌。

二、搭建electron项目
我们可以先搭建一个简单的electron项目:
-
安装 Node.js:确保你的电脑上已经安装了 Node.js。你可以从 Node.js 官方网站(https://nodejs.org)下载并安装最新版本的 Node.js。
-
创建项目目录:在你想要创建项目的位置,创建一个新的文件夹作为项目目录。
-
初始化项目:打开命令行终端,进入到项目目录,并执行以下命令初始化一个新的 npm 项目:
npm init -y
- 1
- 安装 Electron:在命令行终端中执行以下命令来安装 Electron:
npm install electron
- 1
-
创建主文件:在项目目录中创建一个名为
main.js的文件,作为 Electron 应用的主文件。 -
编写主文件代码:在
main.js文件中编写 Electron 应用的主要逻辑。例如,下面是一个简单的示例:
const { app, BrowserWindow } = require('electron');

function createWindow() {
  const win = new BrowserWindow({
    width: 800,
    height: 600,
    webPreferences: {
      nodeIntegration: true
    }
  });

  win.loadFile('index.html');
}

app.whenReady().then(() => {
  createWindow();

  app.on('activate', function () {
    if (BrowserWindow.getAllWindows().length === 0) createWindow();
  });
});

app.on('window-all-closed', function () {
  if (process.platform !== 'darwin') app.quit();
});
- 1
- 2
- 3
- 4
- 5
- 6
- 7
- 8
- 9
- 10
- 11
- 12
- 13
- 14
- 15
- 16
- 17
- 18
- 19
- 20
- 21
- 22
- 23
- 24
- 25
-
创建 HTML 文件:在项目目录中创建一个名为
index.html的文件,作为 Electron 应用的初始页面。 -
编写 HTML 文件代码:在
index.html文件中编写你的应用界面的 HTML 代码。 -
在
package.json文件中添加启动命令:打开package.json文件,在"scripts"部分添加以下内容:
"scripts": {
  "start": "electron ."
}
- 1
- 2
- 3
- 启动 Electron 应用:在命令行终端中执行以下命令来启动 Electron 应用:
npm start
- 1
功能实现
前面准备工作全都完成后,现在我们就有了一个简单electron项目架子和一个gitee仓库,可以开始来实现相关的功能了。
一、git操作
gitee提供了api文档,我们可以通过gitee的api文档来对我们的仓库进行上传图片和获取图片的操作。
gitee API文档地址:https://gitee.com/api/v5/swagger#/getV5ReposOwnerRepoStargazers?ex=no
这里我将需要使用到的功能写成了一个类:
1、初始化,获取配置信息
- accessToken
用户授权码,也就是我们前面生成的私人令牌。
- username
仓库所属空间地址(企业、组织或个人的地址path),如下图:

- repo
仓库路径(path),如下图:

- dirPath
图片存放目录地址,如下图:

- branchName
分支名,默认为master,我们可以修改成指定分支:

  init(config = {}) {
    // 设置 Gitee 仓库信息和目录路径
    this.username = config.username;
    this.repo = config.repo;
    this.accessToken = config.accessToken;
    this.branchName = config.branchName || "master";
    this.apiUrl = "https://gitee.com/api/v5/repos/";
    this.dirPath = config.dirPath;
  }
- 1
- 2
- 3
- 4
- 5
- 6
- 7
- 8
- 9
将以上配置信息在程序的配置里设置好即可:

2、上传图片到gitee图床目录下
根据API文档进行请求即可:
  async uploadToGitee(base64Data) {
    try {
      const formData = new FormData();
      formData.append("content", base64Data);
      formData.append("access_token", this.accessToken);
      formData.append("message", "上传图片");

      const timeStamp = new Date().getTime();
      Toast.showLoading("正在上传");
      const response = await fetch(
        `${this.apiUrl}${this.username}/${this.repo}/contents/${this.dirPath}${timeStamp}.jpg`,
        {
          method: "POST",
          body: formData,
        }
      );
      Toast.hide();
      if (!response.ok) {
        throw new Error("上传图片失败");
      }

      const data = await response.json();
      Toast.showToast("图片上传成功!");
      return data.content.download_url;
    } catch (error) {
      console.error(error);
      Toast.showToast("图片上传失败!");
      throw error;
    }
  }
- 1
- 2
- 3
- 4
- 5
- 6
- 7
- 8
- 9
- 10
- 11
- 12
- 13
- 14
- 15
- 16
- 17
- 18
- 19
- 20
- 21
- 22
- 23
- 24
- 25
- 26
- 27
- 28
- 29
- 30
3、获取gitee图床目录下的所有图片
根据API文档进行请求即可:
async getImg() {
    try {
      const response = await fetch(
        `${this.apiUrl}${this.username}/${this.repo}/contents/${this.dirPath}`,
        {
          headers: {
            Authorization: `token ${this.accessToken}`,
          },
        }
      );

      if (!response.ok) {
        throw new Error("获取图片列表失败");
      }

      const data = await response.json();

      // 筛选出图片文件
      const imageFiles = data.filter(
        (file) =>
          file.type === "file" && file.name.match(/\.(jpg|jpeg|png|gif)$/i)
      );

      return imageFiles;
    } catch (error) {
      console.error(error);
      throw error;
    }
  }
- 1
- 2
- 3
- 4
- 5
- 6
- 7
- 8
- 9
- 10
- 11
- 12
- 13
- 14
- 15
- 16
- 17
- 18
- 19
- 20
- 21
- 22
- 23
- 24
- 25
- 26
- 27
- 28
- 29
4、删除gitee图床目录下指定图片
根据API文档进行请求即可:
  async deleteImg(fileName, sha, cb) {
    try {
      const response = await fetch(
        `${this.apiUrl}${this.username}/${this.repo}/contents/${this.dirPath}/${fileName}?access_token=${this.accessToken}&ref=${this.branchName}`,
        {
          method: "DELETE",
          headers: {
            "Content-Type": "application/json;charset=utf-8",
          },
          body: JSON.stringify({
            message: "删除图片",
            sha,
            prune: true,
          }),
        }
      );

      if (!response.ok) {
        throw new Error("删除图片失败");
      }

      Toast.showToast("删除成功");
      cb && cb();
    } catch (error) {
      console.error(error);
      Toast.showToast("删除失败");
      throw error;
    }
  }
- 1
- 2
- 3
- 4
- 5
- 6
- 7
- 8
- 9
- 10
- 11
- 12
- 13
- 14
- 15
- 16
- 17
- 18
- 19
- 20
- 21
- 22
- 23
- 24
- 25
- 26
- 27
- 28
- 29
二、拖拽点击、粘贴、选择文件夹上传图片
我们可以通过三种方式来上传我们本地的图片
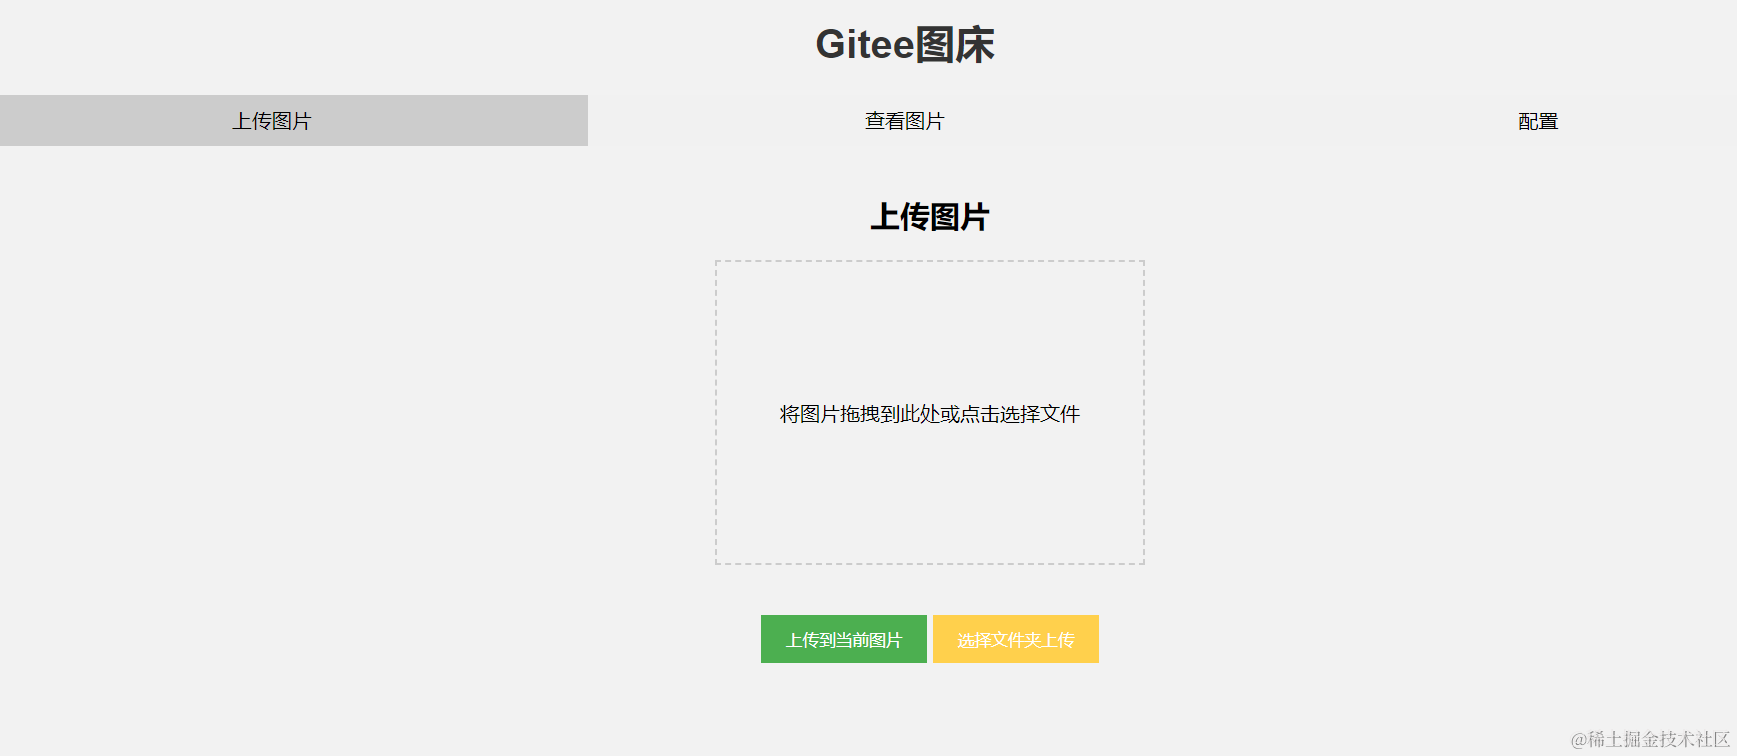

1、拖拽或点击上传图片
前面有写了一篇实现拖拽或点击上传图片的文章,这里就不详细再赘述了,有兴趣的可以去看看:《文件拖拽上传功能已经烂大街了,你还不会吗?》
2、粘贴上传
平时我们经常会使用到截图,所以我们希望可以直接将截图粘贴到工具中进行上传,这里我们可以通过监听页面上的paste事件,直接读取剪切板的图片展示到页面上并进行上传。
document.addEventListener("paste", function (e) {
  const items = e.clipboardData.items;

  for (const item of items) {
    if (item.type.indexOf("image") !== -1) {
      const blob = item.getAsFile();
      showPreview(blob);
    }
  }
});
- 1
- 2
- 3
- 4
- 5
- 6
- 7
- 8
- 9
- 10
3、选择文件夹上传文件夹中的所有图片
一张图片一张图片上传太慢了,所以我们也支持直接选择一个文件夹,将文件夹里的所有图片一次性上传到gitee上,
-
- 创建一个 HTML 文件,包含一个用于选择文件夹的
<input>元素和一个按钮用于触发上传操作。代码如下:
- 创建一个 HTML 文件,包含一个用于选择文件夹的
<input
    type="file"
    style="display: none"
    id="folderInput"
    onchange="uploadImages()"
    webkitdirectory
    multiple
  />
  <button class="upload-btn" onclick="selectFolder()" style="background: #FFD04C;">
    选择文件夹上传
  </button>
- 1
- 2
- 3
- 4
- 5
- 6
- 7
- 8
- 9
- 10
- 11
webkitdirectory:告诉浏览器文件选择器应该允许选择文件夹(目录),而不仅仅是单个文件。
multiple:告诉浏览器文件选择器应该允许选择多个文件或文件夹。
- 2、获取到选择的文件并做相关处理
function blobToBase64(blob) {
  return new Promise((resolve, reject) => {
    const reader = new FileReader();
    reader.onloadend = () => {
      const base64String = reader.result.split(",")[1];
      resolve(base64String);
    };
    reader.onerror = reject;
    reader.readAsDataURL(blob);
  });
}
function selectFolder() {
  const folderInput = document.getElementById("folderInput");
  folderInput.click();
}

async function uploadImages() {
  const folderInput = document.getElementById("folderInput");
  let files = folderInput.files || [];
  files = [...files].filter((file) => file.type.startsWith("image/"));

  for (let i = 0; i < files.length; i++) {
    Toast.showLoading(`上传中,${i}/${files.length}`);
    const file = files[i];
    const base64Data = await blobToBase64(file);
    await gitOperate.uploadToGitee(base64Data,false);
  }
  Toast.hide();
  Toast.showToast(`已全部上传`);
  waterfall.init();
}
- 1
- 2
- 3
- 4
- 5
- 6
- 7
- 8
- 9
- 10
- 11
- 12
- 13
- 14
- 15
- 16
- 17
- 18
- 19
- 20
- 21
- 22
- 23
- 24
- 25
- 26
- 27
- 28
- 29
- 30
- 31
三、瀑布流展示图片
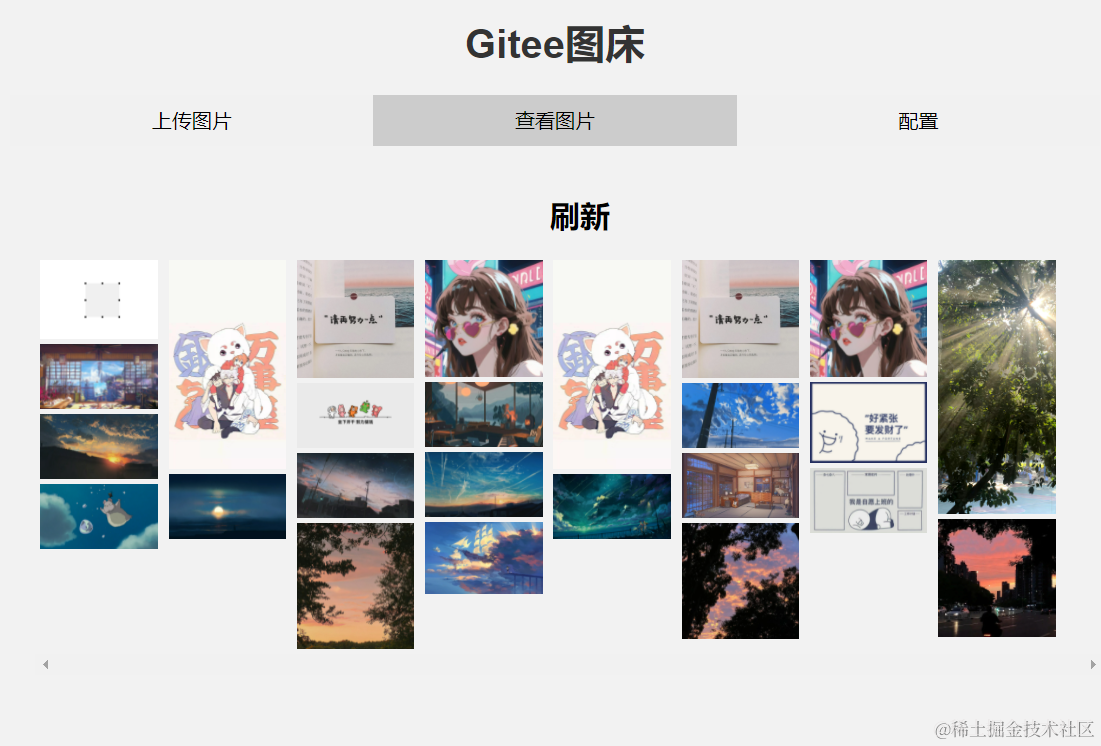
上传完图片后,我们还希望可以看到之前上传的图片,这里我们需要对图片列表做一个瀑布流展示。
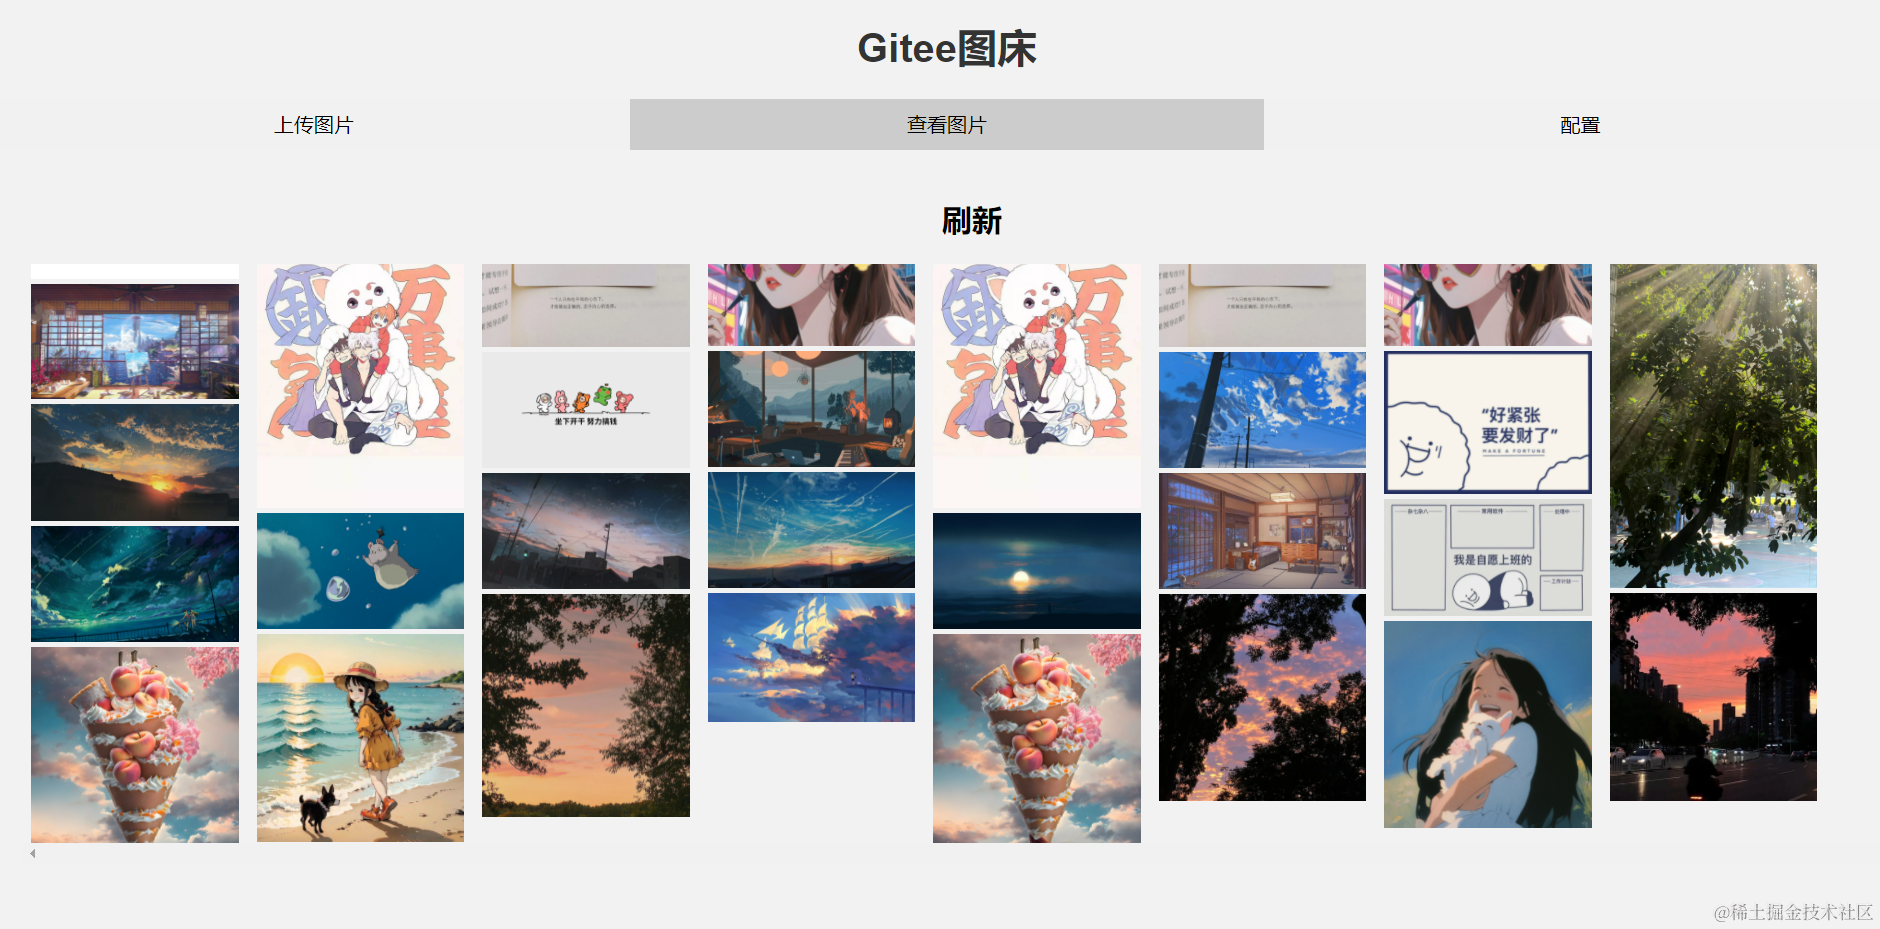
之前我也有写过一个瀑布流组件详细的实现步骤,有兴趣的同学可以看看:《Vue封装一个瀑布流图片容器组件》。
这里我们可以通过原生JavaScrip来快速实现一个,具体代码如下:
class WaterfallContent {
  constructor(config = {}) {
    this.init(config);
  }
  init(config = {}) {
    this.imgList = config.imgList || [];
    this.column = config.column || 8;
    this.imgMargin = config.imgMargin || 0.5;
    this.domId = config.domId || "waterfall-container";
    this.minHeight = [];
    this.arr = [];
    const ul = document.getElementById(this.domId);
    ul.innerHTML = "";
  }
  async create(imgList = this.imgList, cb) {
    this.init();
    this.imgList = imgList;
    const ul = document.getElementById(this.domId);
    ul.innerHTML = "";
    let trueWidth = Math.floor(
      (100 - this.column * this.imgMargin * 2) / this.column
    );
    let trueWidthPx = 0;
    for (let i = 0; i < this.column; i++) {
      let li = document.createElement("li");
      li.style.listStyle = "none";
      li.style.float = "left";
      li.style.width = `${trueWidth}%`;
      li.style.margin = `0 ${this.imgMargin}%`;
      li.classList.add("git-img");

      ul.appendChild(li);
      this.arr.push(li);
      this.minHeight.push(0);
      trueWidthPx = li.offsetWidth;
    }
    this.loadHandler(trueWidthPx, cb);
  }
  getBase64(file) {
    const reader = new FileReader();
    reader.readAsDataURL(file);
    return new Promise((resolve) => {
      reader.onload = () => {
        resolve(reader.result);
      };
    });
  }
  getImgPx(img, maxWidth) {
    const image = new Image();
    image.src = img;
    return new Promise((resolve) => {
      image.onload = () => {
        const width = image.width;
        const height = image.height;
        image.width = maxWidth;
        image.height = image.height * (maxWidth / width);
        resolve({ width, height, image });
      };
    });
  }
  async loadHandler(trueWidth, cb) {
    for (let i = 0; i < this.imgList.length; i++) {
      const imgItem = this.imgList[i];
      const src = imgItem.download_url;
      const res = await this.getImgPx(src, trueWidth);
      const { image } = res;
      const minHeight = this.minHeight;
      const arr = this.arr;
      // 高度数组的最小值
      const min = Math.min.apply(null, minHeight);
      // 高度数组的最小值索引
      const minIndex = minHeight.indexOf(min);
      // 克隆一份图片
      const im = image.cloneNode(true);
      im.setAttribute("data-sha", imgItem.sha);
      im.onclick = this.imgClick;
      // 将图片假如对应最小值索引的容器中
      arr[minIndex].appendChild(im);
      // 更新最小值索引的容器的高度
      minHeight[minIndex] += im.height;
      if (i === 0 && cb) {
        cb();
      }
    }
  }
}
- 1
- 2
- 3
- 4
- 5
- 6
- 7
- 8
- 9
- 10
- 11
- 12
- 13
- 14
- 15
- 16
- 17
- 18
- 19
- 20
- 21
- 22
- 23
- 24
- 25
- 26
- 27
- 28
- 29
- 30
- 31
- 32
- 33
- 34
- 35
- 36
- 37
- 38
- 39
- 40
- 41
- 42
- 43
- 44
- 45
- 46
- 47
- 48
- 49
- 50
- 51
- 52
- 53
- 54
- 55
- 56
- 57
- 58
- 59
- 60
- 61
- 62
- 63
- 64
- 65
- 66
- 67
- 68
- 69
- 70
- 71
- 72
- 73
- 74
- 75
- 76
- 77
- 78
- 79
- 80
- 81
- 82
- 83
- 84
- 85
- 86
四、自定义鼠标右键菜单栏

查看图片的时候我们希望可以对图片进行操作,这里的操作我们通过鼠标右键点击弹出,所以我们可以实现一个自定义鼠标右键菜单栏。
具体代码如下:
class MouseMenu {
  constructor(config) {
    this.menuClass = config.menuClass || "j-mouse-menu";
    this.menuId = config.menuId || "JMouseMenu";
    this.contentId = config.contentId || "j-mouse-content";
    this.init();
  }
  init() {
    const dom = document.getElementById(this.contentId);
    dom.oncontextmenu = (e) => {
      const clickItem = e.path[0];
      if (clickItem.localName !== "img") return;
      const menu = document.getElementById(this.menuId);
      this.clickItem = clickItem;
      this.hideAllMenu();
      // 自定义body元素的鼠标事件处理函数
      e = e || window.event;
      e.preventDefault();
      let scrollTop =
        document.documentElement.scrollTop || document.body.scrollTop; // 获取垂直滚动条位置
      let scrollLeft =
        document.documentElement.scrollLeft || document.body.scrollLeft; // 获取水平滚动条位置
      menu.style.display = "block";
      let left = e.clientX + scrollLeft;
      let top = e.clientY + scrollTop;
      if (menu.offsetHeight + top > window.innerHeight) {
        top = window.innerHeight - menu.offsetHeight - 5;
      }
      if (menu.offsetWidth + left > window.innerWidth) {
        left = window.innerWidth - menu.offsetWidth - 5;
      }
      menu.style.left = left + "px";
      menu.style.top = top + "px";
      document.onclick = () => {
        this.hideAllMenu();
      };
    };
  }
  hideAllMenu() {
    const jMenu = document.getElementsByClassName("j-mouse-menu");
    for (const item of jMenu) {
      item.style.display = "none";
    }
  }
}
- 1
- 2
- 3
- 4
- 5
- 6
- 7
- 8
- 9
- 10
- 11
- 12
- 13
- 14
- 15
- 16
- 17
- 18
- 19
- 20
- 21
- 22
- 23
- 24
- 25
- 26
- 27
- 28
- 29
- 30
- 31
- 32
- 33
- 34
- 35
- 36
- 37
- 38
- 39
- 40
- 41
- 42
- 43
- 44
- 45
五、Toast提示功能

交互少不了Toast弹窗提示,这里我们使用JavaScrip简单实现一个,具体代码如下:
class ToastC {
  constructor(config) {
    this.config = config;
    this.init();
  }

  init() {
    const body = document.body;
    const toastContainer = document.createElement("div");
    toastContainer.id = "toastContainer";
    const styleObj = {
      position: "fixed",
      top: "50%",
      left: "50%",
      transform: "translate(-50%, -50%)",
      background: "rgba(0, 0, 0, 0.8)",
      color: "#ffffff",
      fontSize: "16px",
      opacity: 0.7,
      transition: "opacity 0.3s ease-in-out",
      padding: "10px",
      "border-radius": "5px",
      display: "none",
      textAlign: "center",
    };
    for (const key in styleObj) toastContainer.style[key] = styleObj[key];
    body.appendChild(toastContainer);

    const loader = document.createElement("div");
    loader.id = "toastLoader";
    const loaderStyleObj = {
      border: "4px solid #f3f3f3",
      borderTop: "4px solid #3498db",
      borderRadius: "50%",
      width: "20px",
      height: "20px",
      animation: "spin 1s linear infinite",
      margin: "0 auto 10px",
      display: "none",
    };
    for (const key in loaderStyleObj) loader.style[key] = loaderStyleObj[key];
    toastContainer.appendChild(loader);

    const text = document.createElement("div");
    text.id = "toastText";
    const textStyleObj = {
      marginTop: "5px",
    };
    for (const key in textStyleObj) text.style[key] = textStyleObj[key];
    toastContainer.appendChild(text);

    const keyframes = `
        @keyframes spin {
          0% { transform: rotate(0deg); }
          100% { transform: rotate(360deg); }
        }
      `;
    const style = document.createElement("style");
    style.innerHTML = keyframes;
    document.head.appendChild(style);
  }

  showToast(text) {
    const textElem = document.getElementById("toastText");

    // 设置Toast提示文本
    textElem.innerText = text;

    // 显示Toast提示
    toastContainer.style.display = "block";

    // 3秒后隐藏Toast提示
    setTimeout(() => this.hide(), 3000);
  }

  showLoading(text = "加载中...") {
    const loader = document.getElementById("toastLoader");
    const textElem = document.getElementById("toastText");

    // 设置Toast提示文本为加载中
    textElem.innerText = text;

    // 显示Toast提示和加载动画
    loader.style.display = "block";
    this.show();
  }

  show() {
    const toastContainer = document.getElementById("toastContainer");

    // 显示Toast提示
    toastContainer.style.display = "block";
  }

  hide() {
    try {
      const toastContainer = document.getElementById("toastContainer");
      const loader = document.getElementById("toastLoader");

      // 隐藏Toast提示和加载动画
      toastContainer.style.display = "none";
      loader.style.display = "none";
    } catch (err) {}
  }
}
- 1
- 2
- 3
- 4
- 5
- 6
- 7
- 8
- 9
- 10
- 11
- 12
- 13
- 14
- 15
- 16
- 17
- 18
- 19
- 20
- 21
- 22
- 23
- 24
- 25
- 26
- 27
- 28
- 29
- 30
- 31
- 32
- 33
- 34
- 35
- 36
- 37
- 38
- 39
- 40
- 41
- 42
- 43
- 44
- 45
- 46
- 47
- 48
- 49
- 50
- 51
- 52
- 53
- 54
- 55
- 56
- 57
- 58
- 59
- 60
- 61
- 62
- 63
- 64
- 65
- 66
- 67
- 68
- 69
- 70
- 71
- 72
- 73
- 74
- 75
- 76
- 77
- 78
- 79
- 80
- 81
- 82
- 83
- 84
- 85
- 86
- 87
- 88
- 89
- 90
- 91
- 92
- 93
- 94
- 95
- 96
- 97
- 98
- 99
- 100
- 101
- 102
- 103
- 104
- 105
六、快捷键打开隐藏窗口
我们可以设置快捷键快速唤起和隐藏窗口,在根目录下的main.js文件中注册快捷键,这里我设置的是alt + x,大家也可以改成自己喜欢的快捷键,具体代码如下:
  // 注册快捷键
  globalShortcut.register("Alt+X", () => {
    if (mainWindow.isVisible()) {
      mainWindow.hide();
    } else {
      mainWindow.show();
    }
  });
- 1
- 2
- 3
- 4
- 5
- 6
- 7
- 8
工具使用
一、源码下载
直接到 gitee 上下载即可。

二、依赖安装
下载完源码之后,我们到gitImgBed目录下运行npm i安装依赖,等待依赖安装完成。

三、程序打包
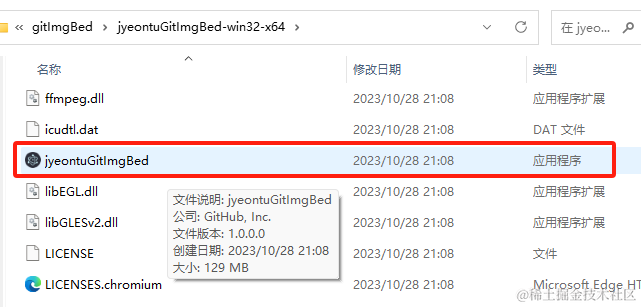
依赖安装完成之后,我们可以在gitImgBed目录下运行npm run build进行打包

打包完成后我们可以在当前目录下看到一个叫jyeontuGitImgBed-win32-x64文件夹,打开文件夹,找到里面一个叫jyeontuGitImgBed的应用程序,双击启动即可
四、配置填写
将之前准备工作时间的gitee仓库相关信息填写到配置中。
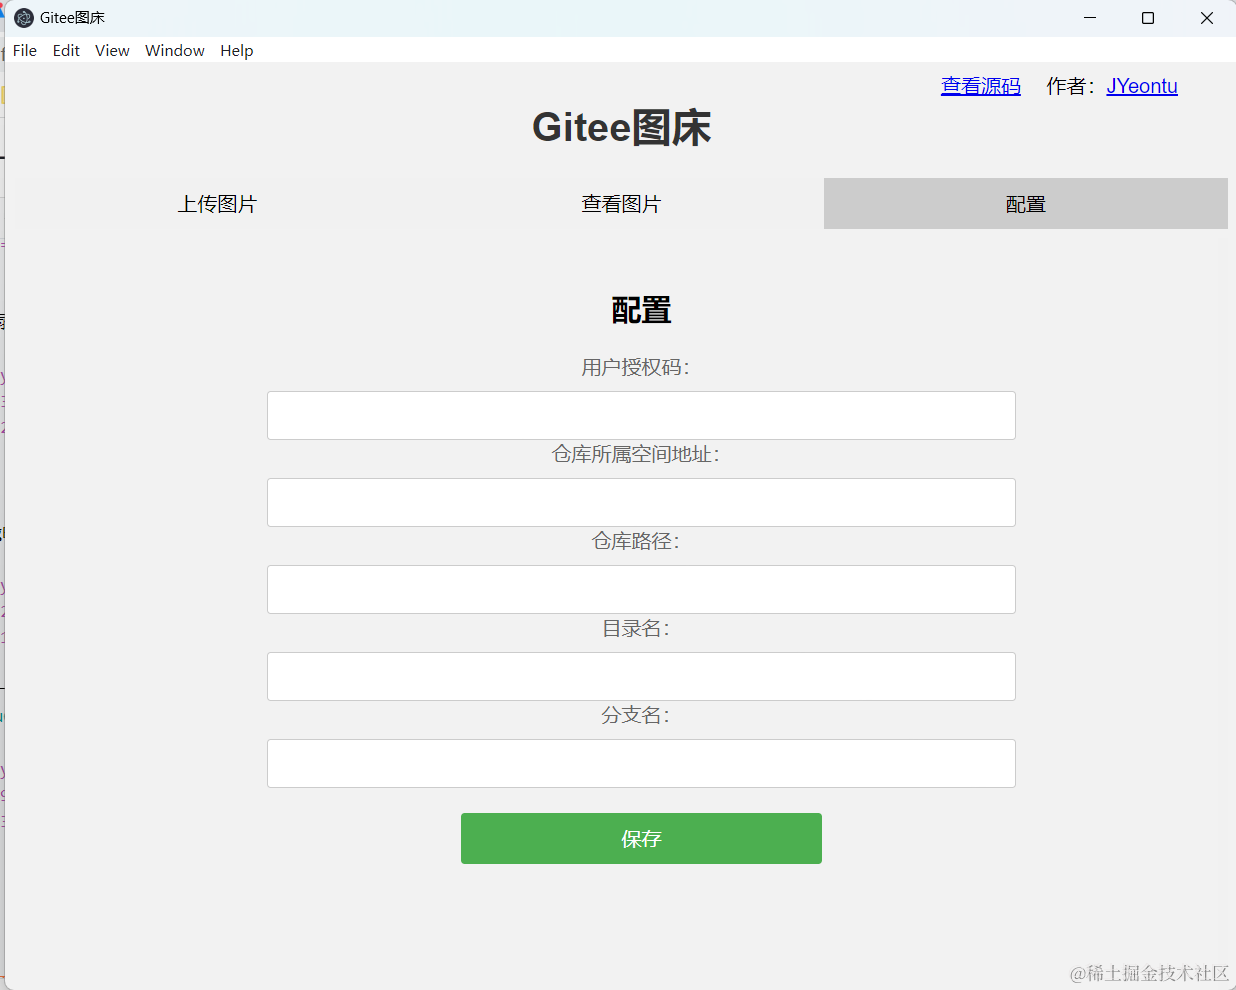
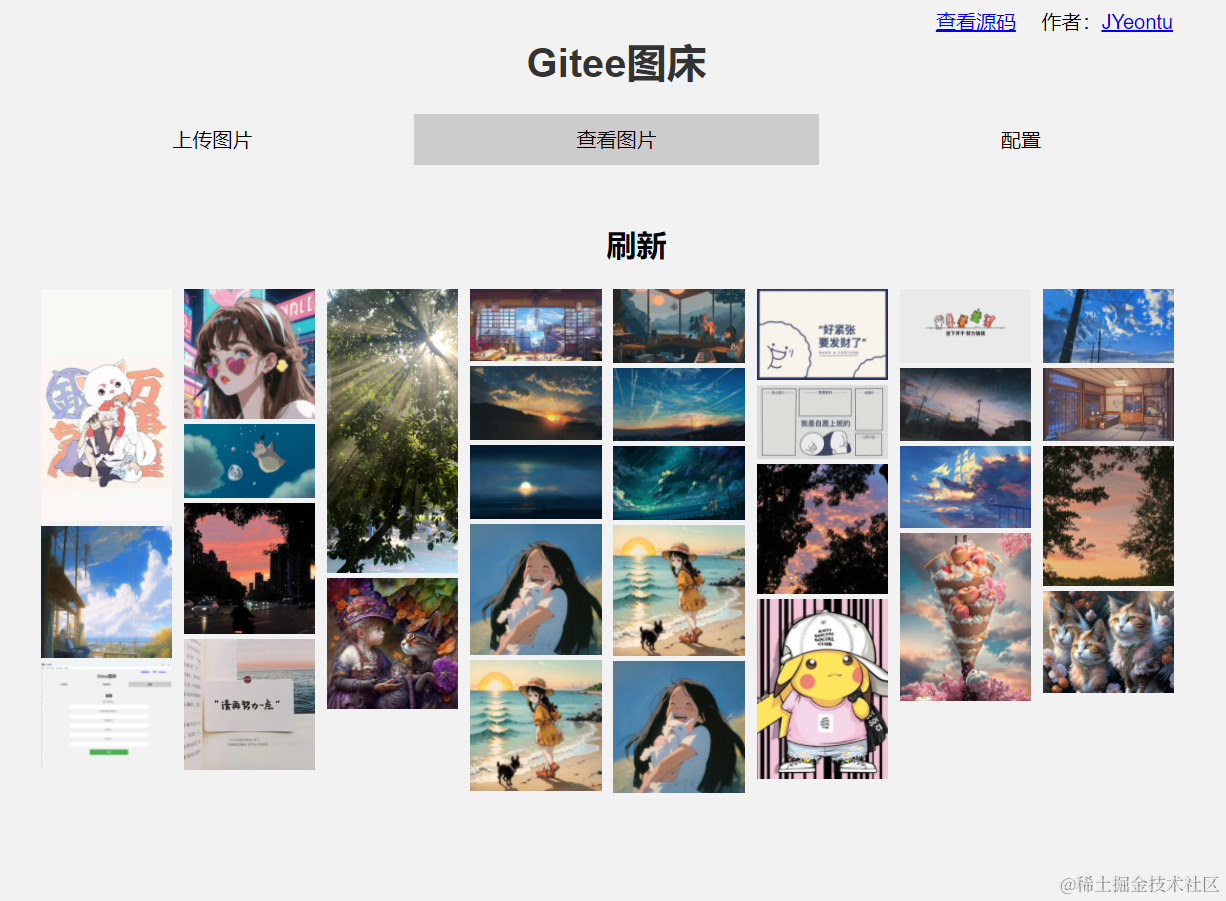
输入正确信息后保存,便可以上传和查看gitee图床中的图片了。


源码
一、gitee
gitee 地址:https://gitee.com/zheng_yongtao/electron_program
二、公众号
关注公众号『前端也能这么有趣』发送 图床即可获取源码。
说在后面
声明:本文内容由网友自发贡献,不代表【wpsshop博客】立场,版权归原作者所有,本站不承担相应法律责任。如您发现有侵权的内容,请联系我们。转载请注明出处:https://www.wpsshop.cn/w/盐析白兔/article/detail/771792
Copyright © 2003-2013 www.wpsshop.cn 版权所有,并保留所有权利。


