- 1李宏毅BERT部分学习_bert from scratch
- 2机器学习实验------决策树
- 3在华为ENSP中进行ACL网络标准访问控制和扩展访问控制_ensp 访问控制实验 时间
- 4月薪10k和月薪25k的软件测试人员有什么区别?看完你就不会再迷茫了_不同薪资的测试工程师想什么
- 5数据结构之时间复杂度浅谈_外层循环次数多于内层循环时间复杂度
- 6VSCode中 task.json 和 launch.json 的作用和参数解释以及配置教程
- 7人工智能、机器学习和深度学习的区别?_人工智能教育和机器人教育两者的区别和联系是什么?
- 8设计分享|单片机4*4矩阵键盘控制LED灯_矩阵键盘控制led灯程序
- 9华为三层交换机绑定IP和MAC地址_华三交换机静态ip与mac绑定
- 10scrapy-redis(分布式爬虫)
gem5 garnet 拓扑结构之port: NI CPU ROUTER L1 L2_gem5 portapi
赞
踩
简介
有Crossbar,CrossbarGarnet,Mesh_*,MeshDirCorners_XY,Pt2Pt等拓扑结构,我们主要关注mesh-xy。参考是https://www.gem5.org/documentation/general_docs/ruby/interconnection-network/
MESI TWO LEVEL与 mesh xy
数目
mesh-xy此拓扑要求目录数量等于 cpu 数量。路由器/交换机的数量等于系统中CPU的数量。每个路由器/交换机都连接到一个 L1、一个 L2(如果存在)和一个目录。网格中的行数必须由–mesh-rows指定。该参数也可以创建非对称网格。
Mesh_XY:具有 XY 路由的网格。所有 x 方向链接的偏置权重为 1,而所有 y 方向链接的偏置权重为 2。这强制所有消息在使用 Y 链接之前首先使用 X 链接。可以通过–topology=Mesh_XY从命令行调用它
simple-MI_example.py
我们研究noc一般是会用到共享 l2的,也就是说每个router都连上了l1 l2 和 dire。
我们之前的 gem5 RubyPort: mem_request_port作用与连接 simple-MI_example.py 描述了没有l2的互联,
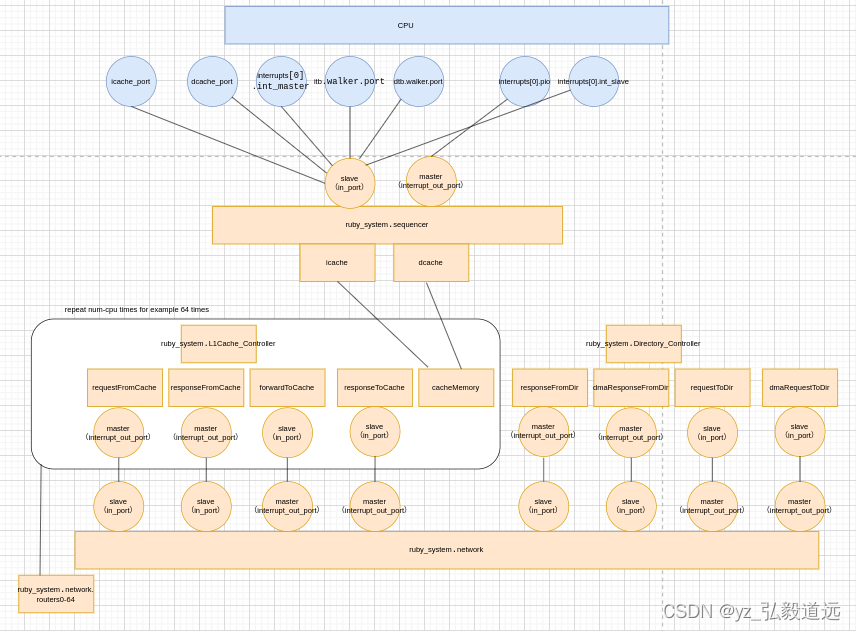
simple-MI_example.py中定义的结构:

mesi-twolevel
我们现在看有l2之后,更复杂的互联,用的protocol是mesi-twolevel,也是x86 isa的默认协议。
先看官方的博客:https://www.gem5.org/documentation/general_docs/ruby/MESI_Two_Level/
协议概述
- 该协议对两级缓存层次结构进行建模。L1 缓存是核心私有的,而 L2 缓存是核心之间共享的。L1 Cache 分为指令缓存和数据缓存。
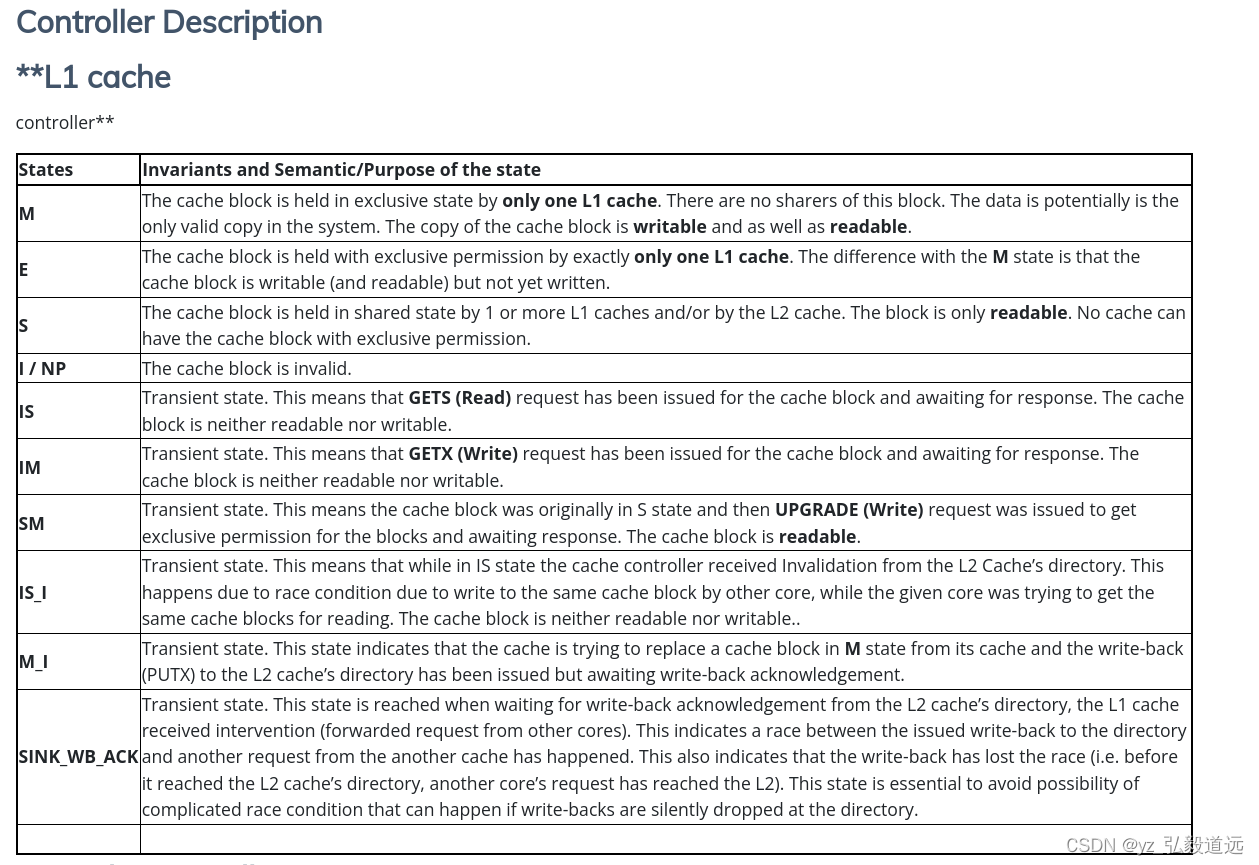
L1 和 L2 缓存之间保持包含关系。 - 在高层,协议有四个稳定状态:M、E、 S和I。处于M状态的块意味着该块是可写的(即具有独占许可)并且已被弄脏(即它是片上唯一有效的副本)。E状态表示具有独占权限(即可写)但尚未写入的缓存块。S 状态意味着缓存块是只读的,并且它可能存在于多个私有缓存以及共享缓存中的多个副本。I的意思是缓存块无效。
- 片上缓存一致性通过目录一致性方案来维护,其中目录信息与共享二级缓存中的相应缓存块位于同一位置。
该协议有四种类型的控制器——L1缓存控制器、L2缓存控制器、目录控制器和DMA控制器。L1缓存控制器负责管理L1指令和L1数据缓存。L1 缓存控制器的实例化数量等于模拟系统中的核心数量。L2 缓存控制器负责管理共享 L2 缓存并通过目录一致性方案维护片上数据的一致性。目录控制器充当存储器控制器/片外主存储器的接口,并且还负责跨多个芯片/以及来自 DMA 控制器的外部一致性请求的一致性。DMA 控制器负责满足相干 DMA 请求。 - 该协议的主要优化之一是,如果 L1 Cache 请求数据块(即使是读取权限),L2 Cache 控制器如果发现没有其他核心拥有该块,则会返回具有独占权限的缓存块。这是一项优化,预计读取的缓存块很快就会由同一核心写入,从而通过此优化节省额外的请求。这正是E状态存在的原因(即当缓存块可写但尚未写入时)。
- 该协议支持从私有 L1 缓存中静默驱逐干净的缓存块。这意味着未被写入且具有可读权限的缓存块只能从私有L1缓存中删除该缓存块,而无需通知L2缓存。此优化有助于减少 L2 缓存控制器的写回流量。
相关文件
src/mem/protocols
MESI_CMP_directory-L1cache.sm:L1缓存控制器规范
MESI_CMP_directory-L2cache.sm:L2缓存控制器规范
MESI_CMP_directory-dir.sm:目录控制器规范
MESI_CMP_directory-dma.sm:DMA控制器规范
MESI_CMP_directory-msg.sm:一致性消息类型规范。这定义了给定协议将使用的不同类型消息的不同字段
MESI_CMP_directory.slicc:容器文件
状态与功能
跳过,我们只放一些截图大概了解一下。


SLICC 接口
https://www.gem5.org/documentation/general_docs/ruby/slicc/ 介绍的SLICC缓存一致性协议可以写很多部分写很久,我们这里先只看一下接口。
C++ to Slicc Interface - @note: What do each of these files do/define???
src/mem/protocol/RubySlicc_interaces.sm
RubySlicc_Exports.sm
RubySlicc_Defines.sm
RubySlicc_Profiler.sm
RubySlicc_Types.sm
RubySlicc_MemControl.sm
RubySlicc_ComponentMapping.sm
Variable Assignments
Use the := operator to assign members in class (e.g. a member defined in RubySlicc_Types.sm):
an automatic m_ is added to the name mentioned in the SLICC file.
learning gem5 part3 有slicc的讲解
https://www.gem5.org/documentation/learning_gem5/part3/cache-declarations/
Sequencer. 这是一个在 Ruby 中实现的特殊类,用于与 gem5 的其余部分交互。Sequencer 是一个MemObject带有从端口的 gem5,因此它可以接受来自其他对象的内存请求。定序器接受来自 CPU(或其他主端口)的请求,并将 gem5 数据包转换为RubyRequest. 最后,RubyRequest将其推入mandatoryQueue状态机。我们将重新审视mandatoryQueue港口部分。
接下来,有一个CacheMemory对象。这是保存缓存数据(即缓存条目)的内容。确切的实现、大小等可以在运行时配置。
接下来,同样在参数块中(即在第一个左括号之前),我们需要声明该状态机将使用的所有消息缓冲区。消息缓冲区是状态机和 Ruby 网络之间的接口。消息通过消息缓冲区发送和接收。因此,对于我们协议中的每个虚拟通道,我们需要一个单独的消息缓冲区。
MSI协议需要三个不同的虚拟网络。需要虚拟网络来防止死锁(例如,如果响应卡在停滞的请求后面,那就不好了)。在该协议中,最高优先级是响应(虚拟网络2),其次是转发请求(虚拟网络1),然后请求具有最低优先级(虚拟网络0)。参见索林等人。了解为什么需要这三个虚拟网络的详细信息。
以下代码声明了所有需要的消息缓冲区。
machine(MachineType:L1Cache, "MSI cache")
: Sequencer *sequencer;
  CacheMemory *cacheMemory;
  bool send_evictions;

  MessageBuffer * requestToDir, network="To", virtual_network="0", vnet_type="request";
  MessageBuffer * responseToDirOrSibling, network="To", virtual_network="2", vnet_type="response";

  MessageBuffer * forwardFromDir, network="From", virtual_network="1", vnet_type="forward";
  MessageBuffer * responseFromDirOrSibling, network="From", virtual_network="2", vnet_type="response";

  MessageBuffer * mandatoryQueue;
{
}
- 1
- 2
- 3
- 4
- 5
- 6
- 7
- 8
- 9
- 10
- 11
- 12
- 13
- 14
如前所述,该参数块被转换为 SimObject 描述文件。您在此块中放入的任何参数都将是可从 Python 配置文件访问的 SimObject 参数。如果你看一下生成的文件 L1Cache_Controller.py,你会发现它看起来非常熟悉。注意:这是一个生成的文件,您不应该直接修改生成的文件!
由此可见,这个sm文件变成了python文件L1Cache_Controller.py (实际上他叫l1_cache.py ,例如src/python/gem5/components/cachehierarchies/ruby/caches/mesi_two_level/l1_cache.py )。
由此我们发现,cache是没有c文件的,是slicc文件和转化的python文件作为接口。
从python到cpp到slicc文件的接口: python部分
举个例子, 我们看看network.slave network.in_port 是什么端口
python中的 network.slave network.in_port
哪里用了network.slave network.in_port?这引起我们思考,哪里提供了供使用的network.in_port定义
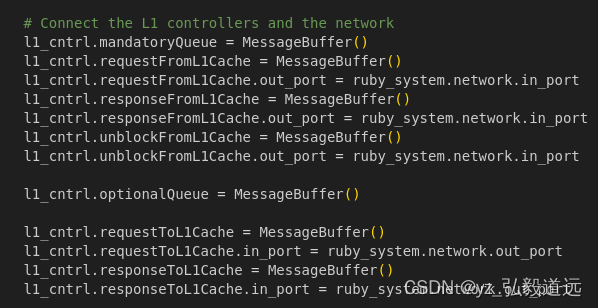
src/python/gem5/components/cachehierarchies/ruby/caches/mesi_two_level/l1_cache.py
@overrides(AbstractL1Cache)
    def connectQueues(self, network):
        self.mandatoryQueue = MessageBuffer()
        self.requestFromL1Cache = MessageBuffer()
        self.requestFromL1Cache.out_port = network.in_port
        self.responseFromL1Cache = MessageBuffer()
        self.responseFromL1Cache.out_port = network.in_port
        self.unblockFromL1Cache = MessageBuffer()
        self.unblockFromL1Cache.out_port = network.in_port

        self.optionalQueue = MessageBuffer()

        self.requestToL1Cache = MessageBuffer()
        self.requestToL1Cache.in_port = network.out_port
        self.responseToL1Cache = MessageBuffer()
        self.responseToL1Cache.in_port = network.out_port
- 1
- 2
- 3
- 4
- 5
- 6
- 7
- 8
- 9
- 10
- 11
- 12
- 13
- 14
- 15
- 16
network.in_port 中这个network是啥 ( mesi_two_level/l1_cache.py )
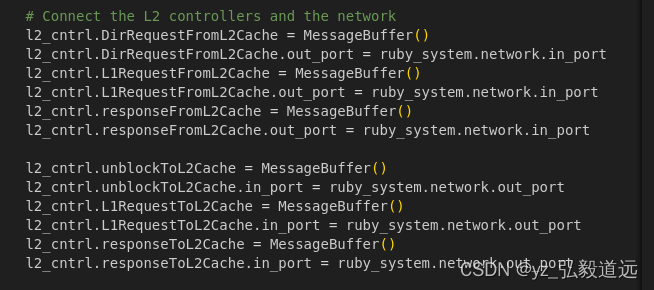
fs py 用了ruby creatysytem,其实调用的mesi two level 的 create_system。 mesi two level 的 create_system中 将l1 cache和 network slave相连。
例如
l1_cntrl.requestFromL1Cache.out_port = ruby_system.network.in_port
- 1
我们细看下什么是mesi_two_level.py 中的 network。
fs py 用了ruby creatysytem, ruby creatysytem 内嵌了 configs/network/Network.py 中 NetworkClass函数来 创建的network.
configs/network/Network.py
 network = NetworkClass(
        ruby_system=ruby,
        topology=options.topology,
        routers=[],
        ext_links=[],
        int_links=[],
        netifs=[],
    )
- 1
- 2
- 3
- 4
- 5
- 6
- 7
- 8
python src/mem/ruby/network/Network.py 一样说明了
    in_port = VectorResponsePort("CPU input port")
    slave = DeprecatedParam(in_port, "`slave` is now called `in_port`")
- 1
- 2
network = NetworkClass 本质是调用garnetwork的创建过程, 但是这个slaveport只用到了ruby 这一层的定义
创建的是garnetnetwork,但是继承了rubynetwork的 slave 或者叫in_port
下面是创建的garnetwork
src/mem/ruby/network/garnet/GarnetNetwork.py:
class GarnetNetwork(RubyNetwork):
    type = "GarnetNetwork"
    cxx_header = "mem/ruby/network/garnet/GarnetNetwork.hh"
    cxx_class = "gem5::ruby::garnet::GarnetNetwork"

    num_rows = Param.Int(0, "number of rows if 2D (mesh/torus/..) topology")
    ni_flit_size = Param.UInt32(16, "network interface flit size in bytes")
    vcs_per_vnet = Param.UInt32(4, "virtual channels per virtual network")
    buffers_per_data_vc = Param.UInt32(4, "buffers per data virtual channel")
    buffers_per_ctrl_vc = Param.UInt32(1, "buffers per ctrl virtual channel")
    routing_algorithm = Param.Int(0, "0: Weight-based Table, 1: XY, 2: Custom")
    enable_fault_model = Param.Bool(False, "enable network fault model")
    fault_model = Param.FaultModel(NULL, "network fault model")
    garnet_deadlock_threshold = Param.UInt32(
        50000, "network-level deadlock threshold"
    )
- 1
- 2
- 3
- 4
- 5
- 6
- 7
- 8
- 9
- 10
- 11
- 12
- 13
- 14
- 15
- 16
garnetnetwork是继承的src/mem/ruby/network/Network.py 中定义的 slave 或者叫in_port
注意并不是 configs/network/Network.py 而是 src/mem/ruby/network/Network.py 中的class RubyNetwork(ClockedObject):
这是 src/mem/ruby/network/Network.py 中RubyNetwork 全部的python内容。
class RubyNetwork(ClockedObject):
    type = "RubyNetwork"
    cxx_class = "gem5::ruby::Network"
    cxx_header = "mem/ruby/network/Network.hh"
    abstract = True

    topology = Param.String(
        "Not Specified", "the name of the imported topology module"
    )

    number_of_virtual_networks = Param.Unsigned(
        "Number of virtual networks "
        "used by the coherence protocol in use.  The on-chip network "
        "assumes the protocol numbers vnets starting from 0.  Therefore, "
        "the number of virtual networks should be one more than the "
        "highest numbered vnet in use."
    )
    control_msg_size = Param.Int(8, "")
    ruby_system = Param.RubySystem("")

    routers = VectorParam.BasicRouter("Network routers")
    netifs = VectorParam.ClockedObject("Network Interfaces")
    ext_links = VectorParam.BasicExtLink("Links to external nodes")
    int_links = VectorParam.BasicIntLink("Links between internal nodes")

    in_port = VectorResponsePort("CPU input port")
    slave = DeprecatedParam(in_port, "`slave` is now called `in_port`")
    out_port = VectorRequestPort("CPU output port")
    master = DeprecatedParam(out_port, "`master` is now called `out_port`")

    data_msg_size = Param.Int(
        Parent.block_size_bytes,
        "Size of data messages. Defaults to the parent "
        "RubySystem cache line size.",
    )
- 1
- 2
- 3
- 4
- 5
- 6
- 7
- 8
- 9
- 10
- 11
- 12
- 13
- 14
- 15
- 16
- 17
- 18
- 19
- 20
- 21
- 22
- 23
- 24
- 25
- 26
- 27
- 28
- 29
- 30
- 31
- 32
- 33
- 34
- 35
其中port1的部分出现了。
    in_port = VectorResponsePort("CPU input port")
    slave = DeprecatedParam(in_port, "`slave` is now called `in_port`")
    out_port = VectorRequestPort("CPU output port")
    master = DeprecatedParam(out_port, "`master` is now called `out_port`")
- 1
- 2
- 3
- 4
小结,也就是说,python 代码里 l1cache 的一个port现在和rubynetwork的一个 port 相连了
理解 VectorResponsePort(“CPU input port”)
src/python/m5/params.py 中说明了 VectorResponsePort(VectorPort)是怎么创建的。他是继承自VectorPort,创建的时候字符串“CPU input port”作为desc。传递进来。
然后调用super().init(“GEM5 RESPONDER”, desc) 也就是调用 super().init(“GEM5 RESPONDER”, “CPU input port”)
class VectorResponsePort(VectorPort):
    # VectorResponsePort("description")
    def __init__(self, desc):
        super().__init__("GEM5 RESPONDER", desc)
- 1
- 2
- 3
- 4
super()让您避免显式引用基类,这很好。但主要优点是多重继承,可以发生各种有趣的事情。 https://stackoverflow.com/questions/576169/understanding-python-super-with-init-methods
其实就是基类VectorPort的初始化, 传递进来了 “GEM5 RESPONDER” 和 “CPU input port”
小结就是,这里用了VectorPort的init方式,创建了一个很像vectorPort的类(准确的说,继承). 而它的初始化,使用了vectorPort的父类,Port
src/python/m5/params.py 中:并没有需要这个初始化的参数传递,而是给了一个新函数。因此我们扫一眼,继续看VectorPort的基类也就是port的初始化。
# VectorPort description object.  Like Port, but represents a vector
# of connections (e.g., as on a XBar).
class VectorPort(Port):
    def makeRef(self, simobj):
        return VectorPortRef(simobj, self.name, self.role, self.is_source)
- 1
- 2
- 3
- 4
- 5
最后还是python文件中 port的初始化
src/python/m5/params.py 中:我们先看代码再解读。
# Port description object.  Like a ParamDesc object, this represents a
# logical port in the SimObject class, not a particular port on a
# SimObject instance.  The latter are represented by PortRef objects.
class Port(object):
    # Port("role", "description")

    _compat_dict = {}

    @classmethod
    def compat(cls, role, peer):
        cls._compat_dict.setdefault(role, set()).add(peer)
        cls._compat_dict.setdefault(peer, set()).add(role)

    @classmethod
    def is_compat(cls, one, two):
        for port in one, two:
            if not port.role in Port._compat_dict:
                fatal("Unrecognized role '%s' for port %s\n", port.role, port)
        return one.role in Port._compat_dict[two.role]

    def __init__(self, role, desc, is_source=False):
        self.desc = desc
        self.role = role
        self.is_source = is_source

    # Generate a PortRef for this port on the given SimObject with the
    # given name
    def makeRef(self, simobj):
        return PortRef(simobj, self.name, self.role, self.is_source)

    # Connect an instance of this port (on the given SimObject with
    # the given name) with the port described by the supplied PortRef
    def connect(self, simobj, ref):
        self.makeRef(simobj).connect(ref)

    # No need for any pre-declarations at the moment as we merely rely
    # on an unsigned int.
    def cxx_predecls(self, code):
        pass

    def pybind_predecls(self, code):
        cls.cxx_predecls(self, code)

    # Declare an unsigned int with the same name as the port, that
    # will eventually hold the number of connected ports (and thus the
    # number of elements for a VectorPort).
    def cxx_decl(self, code):
        code("unsigned int port_${{self.name}}_connection_count;")
- 1
- 2
- 3
- 4
- 5
- 6
- 7
- 8
- 9
- 10
- 11
- 12
- 13
- 14
- 15
- 16
- 17
- 18
- 19
- 20
- 21
- 22
- 23
- 24
- 25
- 26
- 27
- 28
- 29
- 30
- 31
- 32
- 33
- 34
- 35
- 36
- 37
- 38
- 39
- 40
- 41
- 42
- 43
- 44
- 45
- 46
- 47
- 48
代码看完了,总算看到初始化了! 下面是核心代码。我们传递进来的 “GEM5 RESPONDER” 是role ,以及 “CPU input port” 是 desc,is_source没传递,默认是False。
def __init__(self, role, desc, is_source=False):
- 1
这个python 中的 src/mem/ruby/network/Network.py 的 in_port 是 VectorResponsePort,它现在也初始化了 自己知道了自己的desc和role和 is_source。 但是我们依旧不知道它自己到底是怎么和cache或者router怎么相连的。 我们甚至还不知道它和cpp的port是怎么对应的
		self.desc = desc
        self.role = role
        self.is_source = is_source
- 1
- 2
- 3
从python到cpp到slicc文件的接口: cpp部分
从统计的stats.txt中观察到
system.ruby.l2_cntrl0.L2cache.m_demand_accesses 1427527 # Number of cache demand accesses (Unspecified)
stats.txt搜索m_demand_accesses 发现有3xcpu_num个结果,比如4个cpu,则有4个l1Icache, 4个l1DCache,4个L2CACHE.
代码中搜索 m_demand_accesses,发现在 src/mem/ruby/structures/CacheMemory.cc 中有
ADD_STAT(m_demand_accesses, “Number of cache demand accesses”,
m_demand_hits + m_demand_misses).
这时候,联想到 "gem5 RubyPort: mem_request_port作用与连接,以simple-MI_example.py为例"博客中

cacheMemory,我们就有思路了.
还是老一套,从fs.py:: Ruby.create_system(
args, True, test_sys, test_sys.iobus, test_sys._dma_ports, bootmem
)
到Ruby.py中, def create_system() 里 system.ruby = RubySystem().
而src/mem/ruby/system/RubySystem.py 中, type = “RubySystem”
cxx_header = “mem/ruby/system/RubySystem.hh”
cxx_class = “gem5::ruby::RubySystem”
python里声明了一个python类,叫 RubySystem(),然后用cpp把 RubySystem()给具体的实现了.但是python并不知道也不关心这个cpp里面的代码,他只会读取src/mem/ruby/system/RubySystem.py中提供的python 功能.
对于cpp的类来说,相互之间是没有指定相连的,但是他们cpp 类A_CPP 对应的A_PYTHON和B_PYTHON相连了. A_CPP 和B_CPP也就间接相连了.
协议.py中的create_system 指定了python代码中,端口 如何 相连


这里的l1_cntrl 是 python对象 L1Cache_Controller的实例化/
l1_cntrl = L1Cache_Controller(
            version=i,
            L1Icache=l1i_cache,
            L1Dcache=l1d_cache,
            l2_select_num_bits=l2_bits,
            send_evictions=send_evicts(options),
            prefetcher=prefetcher,
            ruby_system=ruby_system,
            clk_domain=clk_domain,
            transitions_per_cycle=options.ports,
            enable_prefetch=False,
        )
- 1
- 2
- 3
- 4
- 5
- 6
- 7
- 8
- 9
- 10
- 11
- 12
mem/ruby/protocol/下有 L1Cache_Controller.py
class L1Cache_Controller(RubyController):
    type = 'L1Cache_Controller'
    cxx_header = 'mem/ruby/protocol/L1Cache_Controller.hh'
    cxx_class = 'gem5::ruby::L1Cache_Controller'
    sequencer = Param.RubySequencer("")
    L1Icache = Param.RubyCache("")
    L1Dcache = Param.RubyCache("")
    prefetcher = Param.RubyPrefetcher("")
    l2_select_num_bits = Param.Int("")
    l1_request_latency = Param.Cycles((2), "")
    l1_response_latency = Param.Cycles((2), "")
    to_l2_latency = Param.Cycles((1), "")
    send_evictions = Param.Bool("")
    enable_prefetch = Param.Bool(("False"), "")
    requestFromL1Cache = Param.MessageBuffer("")
    responseFromL1Cache = Param.MessageBuffer("")
    unblockFromL1Cache = Param.MessageBuffer("")
    requestToL1Cache = Param.MessageBuffer("")
    responseToL1Cache = Param.MessageBuffer("")
    optionalQueue = Param.MessageBuffer("")
    mandatoryQueue = Param.MessageBuffer("")
- 1
- 2
- 3
- 4
- 5
- 6
- 7
- 8
- 9
- 10
- 11
- 12
- 13
- 14
- 15
- 16
- 17
- 18
- 19
- 20
- 21
L1Cache_Controller.hh 是slicc创建的// Created by slicc definition of Module “MESI Directory L1 Cache CMP”.
L1Cache_Controller.cc 中 L1Cache_Controller::L1Cache_Controller(const Params &p) 是怎么创建
:L1Cache_Controller这个实例的:
python代码指定了 各种信息 作为 const Params &p 中的p , cpp代码将python中的通过函数传递,传递给自己这个cpp类.
  p.ruby_system->registerAbstractController(this);

    m_in_ports = 4;
    m_sequencer_ptr = p.sequencer;
    if (m_sequencer_ptr != NULL) {
        m_sequencer_ptr->setController(this);
    }
    m_L1Icache_ptr = p.L1Icache;
    m_L1Dcache_ptr = p.L1Dcache;
    m_prefetcher_ptr = p.prefetcher;
    m_l2_select_num_bits = p.l2_select_num_bits;
    m_l1_request_latency = p.l1_request_latency;
    m_l1_response_latency = p.l1_response_latency;
    m_to_l2_latency = p.to_l2_latency;
    m_send_evictions = p.send_evictions;
    m_enable_prefetch = p.enable_prefetch;
    m_requestFromL1Cache_ptr = p.requestFromL1Cache;
    m_responseFromL1Cache_ptr = p.responseFromL1Cache;
    m_unblockFromL1Cache_ptr = p.unblockFromL1Cache;
    m_requestToL1Cache_ptr = p.requestToL1Cache;
    m_responseToL1Cache_ptr = p.responseToL1Cache;
    m_optionalQueue_ptr = p.optionalQueue;
    m_mandatoryQueue_ptr = p.mandatoryQueue;
- 1
- 2
- 3
- 4
- 5
- 6
- 7
- 8
- 9
- 10
- 11
- 12
- 13
- 14
- 15
- 16
- 17
- 18
- 19
- 20
- 21
- 22
- 23
我们现在知道python中 L1Cache_Controller和ruby_system.network.in_port相连了,我们也知道有一个 L1Cache_Controller CPP实例了,我们下面要看的就是 ruby_system.network.in_port的cpp实例.
很多具体的功能则是src/mem/ruby/system/RubySystem.cc实施.例如其中的
// The function searches through all the buffers that exist in different
// cache, directory and memory controllers, and in the network components
// and writes the data portion of those that hold the address specified
// in the packet.
bool RubySystem::functionalWrite(PacketPtr pkt)
- 1
- 2
- 3
- 4
- 5
我们先只看结构不看功能,关注 cpp里的network的port. 并么有.
而是python中
class RubyNetwork(ClockedObject):
in_port = VectorResponsePort(“CPU input port”)
附录
下面是 草稿部分.
但是没关系, 核心的对应关系就在这个desc这里。这描述了 “CPU input port” 字符串不会是白用的 好吧原来关键是"GEM5 RESPONDER"。
src/python/m5/params.py中 对port进行了一次操作 Port.compat(“GEM5 REQUESTOR”, “GEM5 RESPONDER”)。
class Port(object):
	。。。
Port.compat("GEM5 REQUESTOR", "GEM5 RESPONDER")
- 1
- 2
- 3
Port.compat建立两种不同类型端口之间的兼容性:“GEM5 REQUESTOR”和“GEM5 RESPONDER”。这种兼容性对于确保只有可以逻辑地相互连接的端口才被允许。
看上去也没特别的。
线索到这里断了,我们来看
l1_cntrl.requestFromL1Cache.out_port = ruby_system.network.in_port
中的l1_cntrl.requestFromL1Cache.out_port 。
我们现在可以推测,具体的定义是在 slicc文件中定义的,而python中像是提供一个接口。
python中其他的代码需要访问这个slicc详细定义的out_port,是看不到的。这些python代码可以访问的是 ruby_system.network.in_port 。
查找一些资料:
Ruby 中内存请求的生命周期
在本节中,我们将高度概述 Ruby 作为一个整体如何服务内存请求以及它通过 Ruby 中的哪些组件。不过,有关每个组件内的详细操作,请参阅前面单独描述每个组件的部分。
来自 gem5 的核心或硬件上下文的内存请求通过RubyPort::recvTiming 接口(在 src/mem/ruby/system/RubyPort.hh/cc 中)进入 Ruby 的管辖范围。模拟系统中 Rubyport 实例化的数量等于硬件线程上下文或核心的数量(在 非多线程核心的情况下)。每个核心侧面的端口都与相应的 RubyPort 绑定。
内存请求以 gem5 数据包形式到达,RubyPort 负责将其转换为 RubyRequest 对象,该对象可以被 Ruby 的各个组件理解。它还查明请求是否针对某些 PIO,并操纵数据包以纠正 PIO。最后,一旦它生成了相应的 RubyRequest 对象并确定该请求是正常的内存请求(不是 PIO 访问),它就会将该请求传递给 带有端口的附加 Sequencer 对象的Sequencer::makeRequest接口(变量ruby_port保存该指针)到它)。请注意,Sequencer 类本身是 RubyPort 类的派生类。
正如在描述 Ruby Sequencer 类的部分中提到的,模拟系统中的 Sequencer 对象与硬件线程上下文的数量一样多(也等于系统中 RubyPort 对象的数量),并且有一个 - Sequencer 对象和硬件线程上下文之间的一对一映射。一旦内存请求到达Sequencer::makeRequest,它就会对该请求进行各种统计和资源分配,最后将请求推送到 Ruby 的一致缓存层次结构以满足请求,同时考虑服务中的延迟。在考虑 L1 缓存访问延迟后,通过将请求排队到强制队列,将请求推送到缓存层次结构。强制队列(变量名称 m_mandatory_q_ptr)有效地充当 Sequencer 和 SLICC 生成的缓存一致性文件之间的接口。
L1 缓存控制器(由 SLICC 根据一致性协议规范生成)将请求从强制队列 中出列并查找缓存,进行必要的一致性状态转换和/或根据要求将请求推送到缓存层次结构的下一级。SLICC 生成的 Ruby 代码的不同控制器和组件通过 Ruby 的MessageBuffer类 (src/mem/ruby/buffers/MessageBuffer.cc/hh)的实例化在它们之间进行通信,该类可以充当有序或无序的缓冲区或队列。此外,为满足内存请求而服务的不同步骤中的延迟也相应地用于调度入队和出队操作。如果可以在 L1 缓存中找到所请求的缓存块并且具有所需的一致性许可,则请求得到满足并立即返回。否则,请求将通过MessageBuffer推送到缓存层次结构的下一级。请求可以一直到达 Ruby 的内存控制器(在许多协议中也称为目录)。一旦请求得到满足,它就会通过MessageBuffer在层次结构中向上推送。
消息缓冲区还充当所建模的片上互连的一致性消息的入口点。MesageBuffers 根据指定的互连拓扑进行连接。因此,一致性消息相应地通过该片上互连。
一旦请求的缓存块在具有所需一致性权限的 L1 缓存中可用,L1 缓存控制器就会根据请求的类型通过调用其readCallback或 “writeCallback ”方法来通知相应的 Sequencer 对象。请注意,当 Sequencer 上的这些方法被调用时,服务请求的延迟已被隐式地考虑在内。
然后,Sequencer 会清除相应请求的记帐信息,然后调用 RubyPort::ruby_hit_callback方法。这最终将请求结果返回到前端(gem5)的核心/硬件上下文的相应端口。
slicc文件中的 requestFromL1Cache
src/mem/ruby/protocol/MESI_Two_Level-L1cache.sm 中 定义了详细的 MessageBuffer。
   // Message Queues
   // From this node's L1 cache TO the network

   // a local L1 -> this L2 bank, currently ordered with directory forwarded requests
   MessageBuffer * requestFromL1Cache, network="To", virtual_network="0",
        vnet_type="request";

   // a local L1 -> this L2 bank
   MessageBuffer * responseFromL1Cache, network="To", virtual_network="1",
        vnet_type="response";

   MessageBuffer * unblockFromL1Cache, network="To", virtual_network="2",
        vnet_type="unblock";


   // To this node's L1 cache FROM the network
   // a L2 bank -> this L1
   MessageBuffer * requestToL1Cache, network="From", virtual_network="2",
        vnet_type="request";

   // a L2 bank -> this L1
   MessageBuffer * responseToL1Cache, network="From", virtual_network="1",
        vnet_type="response";
- 1
- 2
- 3
- 4
- 5
- 6
- 7
- 8
- 9
- 10
- 11
- 12
- 13
- 14
- 15
- 16
- 17
- 18
- 19
- 20
- 21
- 22
- 23
- 24
- 25
dsc 为 "CPU input port"的 python port是怎么对应cpp的? 和其他python 对象的互联结构是怎么样的?
cpp代码
其对应的cpp如下
GarnetNetwork::GarnetNetwork(const Params &p)
    : Network(p)
{
    m_num_rows = p.num_rows;
    m_ni_flit_size = p.ni_flit_size;
    m_max_vcs_per_vnet = 0;
    m_buffers_per_data_vc = p.buffers_per_data_vc;
    m_buffers_per_ctrl_vc = p.buffers_per_ctrl_vc;
    m_routing_algorithm = p.routing_algorithm;
    m_next_packet_id = 0;

    m_enable_fault_model = p.enable_fault_model;
    if (m_enable_fault_model)
        fault_model = p.fault_model;

    m_vnet_type.resize(m_virtual_networks);

    for (int i = 0 ; i < m_virtual_networks ; i++) {
        if (m_vnet_type_names[i] == "response")
            m_vnet_type[i] = DATA_VNET_; // carries data (and ctrl) packets
        else
            m_vnet_type[i] = CTRL_VNET_; // carries only ctrl packets
    }

    // record the routers
    for (std::vector<BasicRouter*>::const_iterator i =  p.routers.begin();
         i != p.routers.end(); ++i) {
        Router* router = safe_cast<Router*>(*i);
        m_routers.push_back(router);

        // initialize the router's network pointers
        router->init_net_ptr(this);
    }

    // record the network interfaces
    for (std::vector<ClockedObject*>::const_iterator i = p.netifs.begin();
         i != p.netifs.end(); ++i) {
        NetworkInterface *ni = safe_cast<NetworkInterface *>(*i);
        m_nis.push_back(ni);
        ni->init_net_ptr(this);
    }

    // Print Garnet version
    inform("Garnet version %s\n", garnetVersion);
}
- 1
- 2
- 3
- 4
- 5
- 6
- 7
- 8
- 9
- 10
- 11
- 12
- 13
- 14
- 15
- 16
- 17
- 18
- 19
- 20
- 21
- 22
- 23
- 24
- 25
- 26
- 27
- 28
- 29
- 30
- 31
- 32
- 33
- 34
- 35
- 36
- 37
- 38
- 39
- 40
- 41
- 42
- 43
- 44
- 45
SLICC的CPP接口
SM文件是STATE MACHINE状态机文件,我们不如看看熟悉的cpp文件开始
src/mem/ruby/slicc_interface/RubySlicc_ComponentMapping.hh


