
【MySQL】Orchestrator最简单的 mysql 高可用方案最细细细细~_mysql orchestrator
赞
踩
简介
orchestrator 是基于 MySQL 主从的开源的 MySQL 高可用方案,可以管理上千个 MySQL 集群。实现 MySQL 高可用的同时,可配置实现自身的高可用。
大白话就是搭建一个 orchestrator 的高可用集群,就能管理上千个 mysql 主从集群,并且能让他们实现主库切换为从库/从库切换为主库,而且有网页,可用通过网页拖动实现上述功能。简单的一批。
项目地址: https://github.com/openark/orchestrator
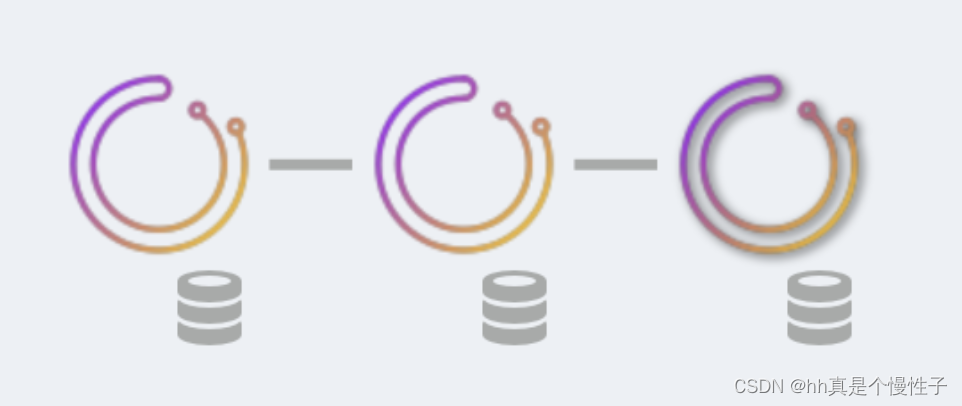
raft 实现 orchestrator 高可用
使用 orchestrator 的 raft 算法实现 orchestrator 的高可用
只有领导者才能进行恢复。所有节点都运行发现(探测)和自我分析
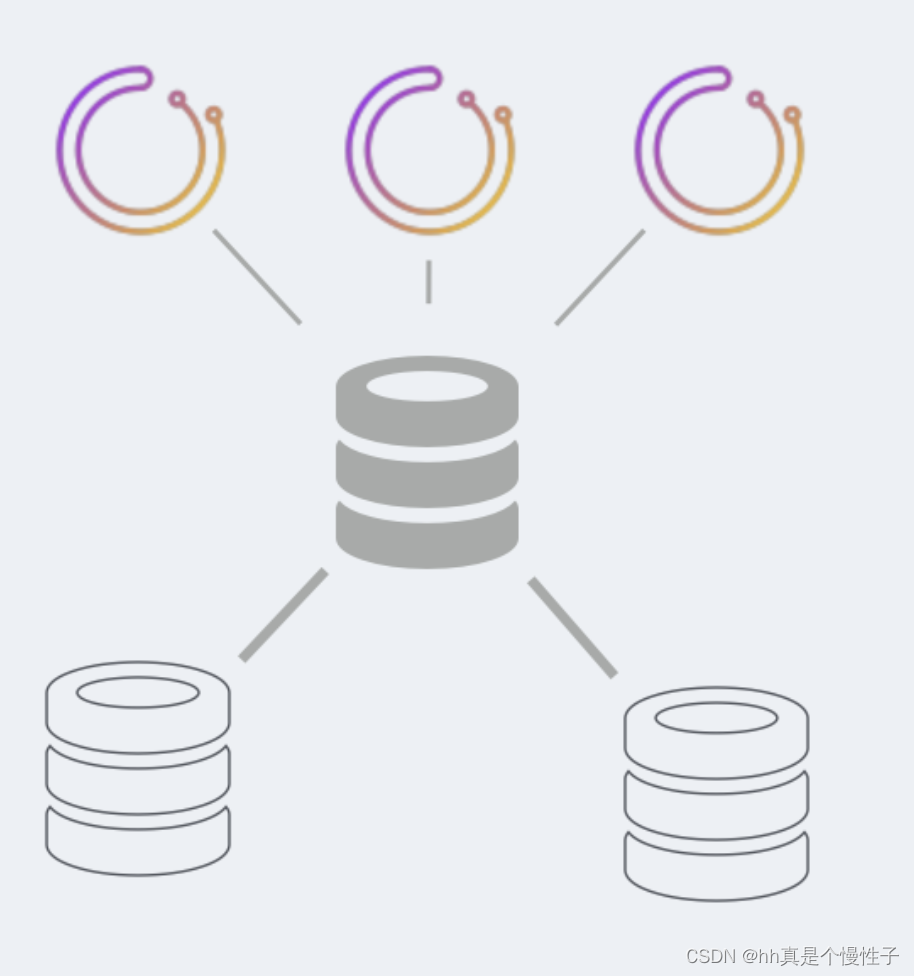
MGR 等实现 orchestrator 高可用
使用 MGR 实现 orchestrator 的高可用
多集群管理 、跨数据中心拓扑发现、故障转移
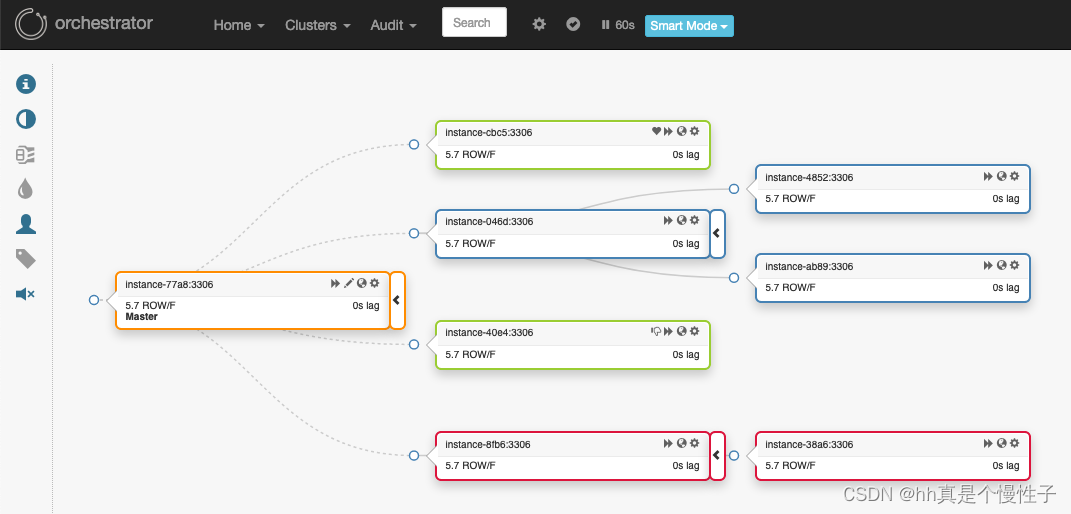
orchestrator 可以实现多集群管理 、跨数据中心拓扑发现、故障转移等功能,管理上千个 mysql 实例。

主要功能
拓扑发现 集群重塑 拓扑恢复 多集群管理
优势
可视化 复杂拓扑管理 拓扑发现 自身高可用 灵活的恢复选项 安全 精准 高效 快速 API 接口 伪 GTID

搭建 Orchestrator
系统优化
iptables -F
#关闭selinux
setenforce 0
sed -i  's#SELINUX=enforcing#SELINUX=disabled#g'   /etc/selinux/config
systemctl stop  NetworkManager
systemctl disable  NetworkManager

# 配置 host
cat >>/etc/hosts<<'EOF'
10.10.8.63 test02
10.10.8.64 test03
10.10.8.65 test04
EOF
- 1
- 2
- 3
- 4
- 5
- 6
- 7
- 8
- 9
- 10
- 11
- 12
- 13
安装orchestrator
cd /tmp
#wget   https://github.com/openark/orchestrator/releases/download/v3.2.6/orchestrator-3.2.6-1.x86_64.rpm
chown -R root:root orchestrator-3.2.6-1.x86_64.rpm
yum install  -y  orchestrator-3.2.6-1.x86_64.rpm
- 1
- 2
- 3
- 4
安装 MySQL
使用 MySQL 作为 Orchestrator 的后端数据,保存拓扑数据
wget  http://dev.mysql.com/get/mysql57-community-release-el7-10.noarch.rpm
yum -y install mysql57-community-release-el7-10.noarch.rpm
yum -y install mysql-community-server

gpg --export -a 3a79bd29 > 3a79bd29.asc
rpm --import https://repo.mysql.com/RPM-GPG-KEY-mysql-2022
yum -y install mysql-community-server

mysql -V
systemctl start  mysqld.service

mysql -p`grep "password" /var/log/mysqld.log|awk '{print $NF}'`
alter user root@'localhost' identified by 'Password_123';
flush privileges;
\q
- 1
- 2
- 3
- 4
- 5
- 6
- 7
- 8
- 9
- 10
- 11
- 12
- 13
- 14
- 15
授权用户
Orchestrator 使用 orc_server_user 用户连接 MySQL 读写数据
mysql -pPassword_123
create user orc_server_user@'127.0.0.1' identified by 'Password_123';
grant all on orchestrator.* to orc_server_user@'127.0.0.1';
flush privileges;
\q
- 1
- 2
- 3
- 4
- 5
创建目录
创建 orchestrator 日志、数据、配置文件目录保存对应的数据
mkdir -p /usr/local/orchestrator/{log,conf,raftdata}
# 拷贝配置文件到配置文件目录
cp /usr/local/orchestrator/orchestrator-sample.conf.json  /usr/local/orchestrator/conf/orchestrator.conf.json
- 1
- 2
- 3
修改配置文件
修改以下参数
vim /usr/local/orchestrator/conf/orchestrator.conf.json


  # 复制进去,配置文件中没有
  # 如果使用伪 GTID 开启此参数
  "AutoPseudoGTID": true,

	# mysql应用使用的账号密码
  "MySQLTopologyUser": "orc_client_user",
  "MySQLTopologyPassword": "Password_123",    # 修改密码

	# 自身的 mysql 连接信息
  "MySQLOrchestratorHost": "127.0.0.1",
  "MySQLOrchestratorPort": 3306,
  "MySQLOrchestratorDatabase": "orchestrator",
  "MySQLOrchestratorUser": "Password_123",  # 修改密码

	# 修改即可
	# 开启 web 页面认证
  "AuthenticationMethod": "basic",     # 修改为basic认证方法
  "HTTPAuthUser": "admin",             # 自定义用户名
  "HTTPAuthPassword": "Password_123",  # 自定义密码

	# 整个复制进去
	# 添加 raft 选举相关配置
	# 配置文件中去掉注释信息后使用
  "RaftEnabled": true,  # 开启
  "RaftDataDir":"/usr/local/orchestrator/raftdata",
  "RaftBind":"10.10.8.63",  # 本机IP
  "DefaultRaftPort":10008,
  "RaftNodes":[   # 集群的所有IP
  "10.10.8.63",
  "10.10.8.64",
  "10.10.8.65"
  ],

	# 修改多少秒之内不会再次故障转移 方便测试
  "RecoveryPeriodBlockSeconds": 60,

  # 恢复要忽略的主机 没有就不填,生产中可以将归档的机器等不需要显示的机器放到这里
  "RecoveryIgnoreHostnameFilters": [],

	# 恢复集群主正则
  "RecoverMasterClusterFilters": [
    "*"  # 改成 * 所有机器都恢复
  ],
	# 恢复集群中间主正则
  "RecoverIntermediateMasterClusterFilters": [
    "*"  # 改成 * 所有集群都能恢复
  ],

- 1
- 2
- 3
- 4
- 5
- 6
- 7
- 8
- 9
- 10
- 11
- 12
- 13
- 14
- 15
- 16
- 17
- 18
- 19
- 20
- 21
- 22
- 23
- 24
- 25
- 26
- 27
- 28
- 29
- 30
- 31
- 32
- 33
- 34
- 35
- 36
- 37
- 38
- 39
- 40
- 41
- 42
- 43
- 44
- 45
- 46
- 47
- 48
- 49
- 50
启动orchestrator
cd /usr/local/orchestrator # 必须进入目录在执行 要不然进不了网页
/usr/local/orchestrator/orchestrator -config /usr/local/orchestrator/conf/orchestrator.conf.json http >> /usr/local/orchestrator/log/orchestrator.log 2>&1 &

ps -ef|grep orch

# 关闭
#ps -ef|grep [o]rch|awk '{print $2}'|xargs kill -9
- 1
- 2
- 3
- 4
- 5
- 6
- 7
重启orchestrator 失败时使用
ps -ef|grep [o]rch|awk '{print $2}'|xargs kill -9
cd /usr/local/orchestrator # 必须进入目录在执行 要不然进不了网页
/usr/local/orchestrator/orchestrator -config /usr/local/orchestrator/conf/orchestrator.conf.json http >> /usr/local/orchestrator/log/orchestrator.log 2>&1 &
ps -ef|grep orch
- 1
- 2
- 3
- 4
搭建 MySQL 主从
测试使用 mysql-shell 快速搭建 MySQL 一主两从实例作为测试实例。
安装 mysql-shell
yum -y install https://dev.mysql.com/get/mysql80-community-release-el7-5.noarch.rpm
yum install -y mysql-shell

mysqlsh
dba.deploySandboxInstance(3307) # 密码配置为 123456
- 1
- 2
- 3
- 4
- 5
创建复制账号
主库创建复制账号
mysql -p123456 -S /root/mysql-sandboxes/3307/sandboxdata/mysqld.sock
show master status\G
create user repl@'test%' identified WITH 'mysql_native_password'  by '123456';
grant all on *.* to  repl@'test%';
flush privileges;
\q
- 1
- 2
- 3
- 4
- 5
- 6
从库导入主库备份
使用 gtid 时使用这种方式
# 在需要导入数据的从库执行
mysqldump -p123456 -urepl -h10.10.8.63 -P3307  -A -R -E --triggers --master-data=2  --single-transaction --set-gtid-purged=ON |mysql -p123456 -S /root/mysql-sandboxes/3307/sandboxdata/mysqld.sock
- 1
- 2
重新搭建主库
mysql -p123456 -S /root/mysql-sandboxes/3308/sandboxdata/mysqld.sock
show master status\G
create user repl@'test%' identified WITH 'mysql_native_password'  by '123456';
grant all on *.* to  repl@'test%';
flush privileges;
\q


# 备份
mysqldump -p123456 -urepl -htest02 -P3308  -A -R -E --triggers --master-data=2  --single-transaction --set-gtid-purged=ON |mysql -p123456 -S /root/mysql-sandboxes/3308/sandboxdata/mysqld.sock


mysqldump -p123456 -urepl -htest03 -P3307  -A -R -E --triggers --master-data=2  --single-transaction --set-gtid-purged=ON  >/tmp/full.sql
# 获取 pos 信息
head -n 24 /tmp/full.sql|tail -n 1
-- CHANGE MASTER TO MASTER_LOG_FILE='test03-bin.000003', MASTER_LOG_POS=107480;

mysql -p123456 -S /root/mysql-sandboxes/3307/sandboxdata/mysqld.sock
stop slave;
reset slave all;
source /tmp/full.sql
mysql -p123456 -S /root/mysql-sandboxes/3307/sandboxdata/mysqld.sock
source /tmp/full.sql
change master to
    master_user='repl',
    master_password='123456',
    master_host='test03',
    master_port=3307,
    MASTER_LOG_FILE='test03-bin.000003', MASTER_LOG_POS=107480;
start slave;
show slave status\G
- 1
- 2
- 3
- 4
- 5
- 6
- 7
- 8
- 9
- 10
- 11
- 12
- 13
- 14
- 15
- 16
- 17
- 18
- 19
- 20
- 21
- 22
- 23
- 24
- 25
- 26
- 27
- 28
- 29
- 30
- 31
⚠️: 从库导入主库备份不使用 GTID
不使用 gtid 时使用这种方式
# 在需要导入数据的从库执行
mysqldump -p123456 -urepl -h10.10.8.63 -P3307  -A -R -E --triggers --master-data=2  --single-transaction --set-gtid-purged=OFF |mysql -p123456 -S /root/mysql-sandboxes/3307/sandboxdata/mysqld.sock
- 1
- 2
指定主库信息
使用 gtid 时使用这种方式
# 在从库执行
mysql -p123456 -S /root/mysql-sandboxes/3307/sandboxdata/mysqld.sock
change master to
    master_user='repl',
    master_password='123456',
    master_host='test03',
    master_port=3307,
    master_auto_position=1;
start slave;
show slave status\G
- 1
- 2
- 3
- 4
- 5
- 6
- 7
- 8
- 9
- 10
⚠️:指定主库信息不使用GTID 的方式
不使用 gtid 时使用这种方式
# 在从库执行
mysql -p123456 -S /root/mysql-sandboxes/3307/sandboxdata/mysqld.sock
change master to
 master_user='repl',
 master_password='123456',
 master_host='test02',
 master_port=3307,
 master_log_file='test04-bin.000002',
 master_log_pos=941070;
start slave;
show slave status\G
- 1
- 2
- 3
- 4
- 5
- 6
- 7
- 8
- 9
- 10
- 11
主库创建应用账号
搭建好主从后,在主库创建应用账号
mysql -p123456 -S /root/mysql-sandboxes/3307/sandboxdata/mysqld.sock
create user orc_client_user@'%' identified WITH 'mysql_native_password'  by 'Password_123';
grant super,process,replication slave,reload  on *.* to orc_client_user@'%';
grant select on mysql.slave_master_info to orc_client_user@'%';
# 使用伪 GTID 时授权以下权限
#GRANT DROP ON _pseudo_gtid_.* to orc_client_user@'%';
flush privileges;
\q
- 1
- 2
- 3
- 4
- 5
- 6
- 7
- 8
⚠️:当使用了伪 GTID 时,需要将以上步骤中对应的注释解开,授权对应的权限
orchestrator-client安装
orchestrator-client是orchestrator的命令行管理工具,可以在命令行完成orchestrator所有的操作,如:切换主库、切换为级联复制、切换为单库、上下线库等
下载安装
wget https://github.com/openark/orchestrator/releases/download/v3.2.6/orchestrator-client-3.2.6-1.x86_64.rpm
yum install  -y orchestrator-client-3.2.6-1.x86_64.rpm
- 1
- 2
配置环境变量
# 在每台orchestrator实例执行,方便后期运维
cat >/etc/profile.d/orchestrator.sh<<'EOF'
export ORCHESTRATOR_API="10.10.8.63:3000/api 10.10.8.64:3000/api 10.10.8.65:3000/api"
export ORCHESTRATOR_AUTH_USER=admin
export ORCHESTRATOR_AUTH_PASSWORD=Password_123
EOF
source  /etc/profile.d/orchestrator.sh
- 1
- 2
- 3
- 4
- 5
- 6
- 7
orchestrator-client常用操作
查看帮助
可以查看到所有参数及注解
orchestrator-client -c help
- 1
查看所有集群
orchestrator-client -c clusters
- 1
查看从库
查看 test02:3307 实例的从库
orchestrator-client -c which-replicas -i test02:3307
- 1
查看主库
查看 test03:3307 的主库
orchestrator-client -c which-master -i test03:3307
- 1
查看集群所有实例
查看 test02:3307 集群的所有实例
orchestrator-client -c which-cluster-instances -i test02:3307
- 1
查看拓扑结构
查看 test02:3307 集群的拓扑信息
orchestrator-client -c topology -i test02:3307
- 1
查看发现的所有实例
显示所有集群的所有实例
orchestrator-client -c all-instances
- 1
忘记一个实例
在拓扑信息中不显示 test03:3307 实例
orchestrator-client -c forget -i test03:3307
- 1
发现一个实例
使用 orchestrator 扫描 test03:3307,并显示在拓扑信息中
orchestrator-client -c discover -i test03:3307
- 1
自动选主
在切换主从时,旧主库自动指向新主库
orchestrator-client -c graceful-master-takeover-auto -i test03:3307
- 1
不启动旧主库
将 test04 提升为主库,切换后旧主库指向新主库不开启复制线程
orchestrator-client -c graceful-master-takeover -i test02:3307 -d test04:3307
- 1
启动旧主库
将 test03 提升为主库,切换后旧主库指向新主库并开启复制线程
orchestrator-client -c graceful-master-takeover-auto -i test04:3307 -d test03:3307
- 1
迁移复制实例
# 查看切换前拓扑
[root@test02 tmp]# orchestrator-client -c topology -i test02:3307
test03:3307   [0s,ok,5.7.44-log,rw,ROW,>>,GTID]
+ test02:3307 [0s,ok,5.7.44-log,ro,ROW,>>,GTID]
+ test04:3307 [0s,ok,5.7.44-log,ro,ROW,>>,GTID,downtimed]
- 1
- 2
- 3
- 4
- 5
把 test02 放到 test04 下进行级联复制
orchestrator-client -c relocate -i test02:3307 -d test04:3307
- 1
# 查看切换后拓扑
[root@test02 tmp]# orchestrator-client -c topology -i test02:3307
test03:3307     [0s,ok,5.7.44-log,rw,ROW,>>,GTID]
+ test04:3307   [0s,ok,5.7.44-log,ro,ROW,>>,GTID]
  + test02:3307 [0s,ok,5.7.44-log,ro,ROW,>>,GTID]  # 在这
- 1
- 2
- 3
- 4
- 5
停止从库
orchestrator-client -c stop-replica -i test04:3307
- 1
启动从库
orchestrator-client -c start-replica -i test04:3307
- 1
重启从库
orchestrator-client -c restart-replica -i test04:3307
- 1
从库分离
将从库分离到集群外,不进行复制,通过修改 change master 里的 host // test02
orchestrator-client -c detach-replica -i test04:3307
- 1
从库重新加入
将从库加入到集群,开启复制,通过修改 change master 里的 host test02
orchestrator-client -c reattach-replica -i test04:3307
- 1
检查集群健康状况
orchestrator-client -c replication-analysis
- 1
设置节点可写
set read_only=0
orchestrator-client -c set-writeable -i test02:3307
- 1
设置节点只读
set read_only=1
orchestrator-client -c set-read-only -i test02:3307
- 1
启动半同步复制
orchestrator-client -c enable-semi-sync-master -i test04:3307
- 1
⚠️:需要先在 MySQL 实例中加载半同步复制插件
# mysql 命令行
INSTALL PLUGIN rpl_semi_sync_master SONAME 'semisync_master.so';
INSTALL PLUGIN rpl_semi_sync_slave SONAME 'semisync_slave.so';

# 配置文件
[mysqld]
plugin-load=rpl_semi_sync_master=semisync_master.so
plugin-load=rpl_semi_sync_slave=semisync_slave.so
- 1
- 2
- 3
- 4
- 5
- 6
- 7
- 8
关闭半同步复制
orchestrator-client -c disable-semi-sync-master -i test04:3307
- 1
使用API显示特定主机的所有数据
显示详细信息
orchestrator-client -c api -path instance/test03/3307|jq .
- 1
其他命令使您可以更精细地控制服务器的重新定位方式。考虑经典的二进制日志 file:pos 重新指向副本的方式:
将副本在拓扑中向上移动(使其成为其主副本的sbling,或其“祖父母”的直接副本):
orchestrator -c move-up -i 127.0.0.1:22988
- 1
仅当实例有祖父母且不存在副本滞后等问题时,上述命令才会成功。
将副本移至其同级下方:
orchestrator -c move-below -i 127.0.0.1:22988 -d 127.0.0.1:22990 --debug
- 1
上面的命令只有在
127.0.0.1:22988和127.0.0.1:22990是同级(同一主服务器的副本)时才会成功,它们都没有问题(例如副本滞后),并且同级可以是实例的主服务器(即有二进制日志,有log_slave_updates,没有版本冲突等)
批量使用示例
https://github.com/openark/orchestrator/blob/master/docs/script-samples.md
安全相关配置
https://github.com/openark/orchestrator/blob/master/docs/security.md
Orchestrator Hook
使用 VIP 实现不切换应用 IP 的高可用
添加 VIP
主库添加 VIP
ip addr add 10.10.8.68/23 dev ens192
- 1
建立互信
建立Orch到业务MySQL机器的互信
ssh-keygen
# 注意自身也要免密
ssh-copy-id root@test02
ssh-copy-id root@test03
ssh-copy-id root@test04
- 1
- 2
- 3
- 4
- 5
测试免密
测试是否免密
ssh root@test02 date
ssh root@test03 date
ssh root@test04 date
- 1
- 2
- 3
增加Hook配置
将 orch_hook.sh 脚本添加到故障恢复及手动切换的参数中
vim /usr/local/orchestrator/conf/orchestrator.conf.json

  "PostFailoverProcesses": [
  "echo '(for all types) Recovered from {failureType} on {failureCluster}. Failed: {failedHost}:{failedPort}; Successor: {successorHost}:{successorPort}' >> /tmp/recovery.log",
  "/usr/local/orchestrator/script/orch_hook.sh {failureType} {failureClusterAlias} {failedHost} {successorHost} >> /tmp/orch_hook.log"
  ],

  "PostGracefulTakeoverProcesses": [
    "echo 'Planned takeover complete' >> /tmp/recovery.log",
    "/usr/local/orchestrator/script/orch_hook.sh {failureType} {failureClusterAlias} {failedHost} {successorHost} >> /tmp/orch.log"
  ],
- 1
- 2
- 3
- 4
- 5
- 6
- 7
- 8
- 9
- 10
- 11
编辑Hook脚本
mkdir /usr/local/orchestrator/script -p
touch /usr/local/orchestrator/script/orch_hook.sh
chmod +x /usr/local/orchestrator/script/orch_hook.sh

cat  >/usr/local/orchestrator/script/orch_hook.sh<<'EOF'
#!/bin/bash

# 脚本接收的参数
FAILURE_TYPE=$1
CLUSTER_ALIAS=$2
FAILED_HOST=$3
SUCCESSOR_HOST=$4

# VIP 地址和网络接口配置
VIP='10.10.8.68'       # 修改为自己的 VIP
INTERFACE='ens192'     # 修改为每台机器的网卡名

# 日志文件路径
LOG_FILE="/usr/local/orchestrator/log/vip_migration.log"

# 添加或删除 VIP
update_vip() {
    local host=$1
    local action=$2  # 使用 "add" 或 "del"

    echo "$(date): Updating VIP ($VIP) on $host: $action" >> $LOG_FILE

    # SSH 到指定主机执行 IP 地址的添加或删除   注意指定子网掩码位数
    ssh root@$host "ip addr $action $VIP/23 dev $INTERFACE" 2>>$LOG_FILE

    if [ $? -eq 0 ]; then
        echo "$(date): VIP $action operation successful on $host" >> $LOG_FILE
    else
        echo "$(date): Error during VIP $action operation on $host" >> $LOG_FILE
    fi
}


echo "$(date): Orchestrator hook triggered" >> $LOG_FILE
echo "$(date): Failure Type: $FAILURE_TYPE, Cluster: $CLUSTER_ALIAS, Failed Host: $FAILED_HOST, Successor Host: $SUCCESSOR_HOST" >> $LOG_FILE

# 检查是否为主库故障转移
if [ "$FAILURE_TYPE" == "DeadMaster" ]; then
    # 从失败的主机删除 VIP
    update_vip $FAILED_HOST "del"

    # 在后续主机上添加 VIP
    update_vip $SUCCESSOR_HOST "add"
else
    echo "$(date): No action taken. Not a master failure." >> $LOG_FILE
fi
EOF
- 1
- 2
- 3
- 4
- 5
- 6
- 7
- 8
- 9
- 10
- 11
- 12
- 13
- 14
- 15
- 16
- 17
- 18
- 19
- 20
- 21
- 22
- 23
- 24
- 25
- 26
- 27
- 28
- 29
- 30
- 31
- 32
- 33
- 34
- 35
- 36
- 37
- 38
- 39
- 40
- 41
- 42
- 43
- 44
- 45
- 46
- 47
- 48
- 49
- 50
- 51
- 52
⚠️手动删除 ,出现脑裂时删除
ip addr del 10.10.8.68/23 dev ens192
重启实例
ps -ef|grep [o]rchestrator|awk '{print $2}'|xargs kill -9
cd /usr/local/orchestrator # 必须进入目录在执行 要不然进不了网页
/usr/local/orchestrator/orchestrator -config /usr/local/orchestrator/conf/orchestrator.conf.json http >> /usr/local/orchestrator/log/orchestrator.log 2>&1 &
ps -ef|grep orch
- 1
- 2
- 3
- 4
观察日志
tail -f /usr/local/orchestrator/log/orchestrator.log
- 1
功能点
开启伪 gtid
当不想使用或无法使用 gtid 的情况下,可以使用伪 gtid 来实现类似 gtid 的效果,自动化程度更高
# 配置文件配置 开启伪 GTID
"AutoPseudoGTID": true,

# 授权应用账号对应权限
GRANT DROP ON _pseudo_gtid_.* to 'orc_client_user'@'orch_clien_host';
- 1
- 2
- 3
- 4
- 5
注意事项
多线程复制时, MySQL 必须开启 顺序提交, 必须启用 log_slave_updates 和 log_bin
# 命令行设置
set global slave_preserve_commit_order=ON;

# mysql 配置文件中配置
slave_preserve_commit_order=ON
log_bin  # 默认启用
log_slave_updates=1 # 默认启用
- 1
- 2
- 3
- 4
- 5
- 6
- 7
当有些集群不想使用伪 GTID 时只需要收回应用账号的权限即可
REVOKE DROP ON _pseudo_gtid_.* FROM 'orc_client_user'@'orch_clien_host';
- 1
自动恢复限制
一旦集群经历了一次恢复,将在接下来的几秒(小时)orchestrator内阻止自动恢复。这是一种防抖动机制。
{
  "RecoveryPeriodBlockSeconds": 3600,  # 当故障恢复后,设置间隔 3600 秒之后才能进行下一次的故障恢复
  "RecoveryIgnoreHostnameFilters": [],
  "RecoverMasterClusterFilters": [
    "thiscluster",
    "thatcluster"
  ],
  "RecoverIntermediateMasterClusterFilters": [
    "*"
  ],
}
- 1
- 2
- 3
- 4
- 5
- 6
- 7
- 8
- 9
- 10
- 11
候选主库
在故障转移时,指定候选主库,有些库只能作为从库 ,举个栗子:
- 服务器硬件配置低
- 服务器在其他数据中心
- 作为备份的服务器
orchestrator指定候选主库:
orchestrator-client -c register-candidate -i ${::fqdn} --promotion-rule ${规则}
- 1
支持的规则:
prefer希望成为候选主库neutral中立、都可以prefer_not不希望成为候选主库must_not不能成为候选主库
候选规则一小时后失效,需要设置一个定时任务来通知服务器的候选规则:
*/2 * * * * root "/usr/bin/perl -le 'sleep rand 10' && /usr/bin/orchestrator-client -c register-candidate -i test02:3307 --promotion-rule prefer"
- 1
从库超时检测
由于故障检测是使用 MySQL 本身作为信息源,所以需要配置主从网络超时时间,以便快速发现故障。
set global slave_net_timeout = 4,这会在从库与其主服务器之间设置较短的 (2sec) 心跳间隔,并使从库能够快速识别故障。如果没有此设置,某些情况可能需要一分钟才能检测到。CHANGE MASTER TO MASTER_CONNECT_RETRY=1, MASTER_RETRY_COUNT=86400。如果复制失败,使副本每隔一次尝试重新连接1秒(默认为60秒)。对于短暂的网络问题,此设置会尝试快速复制恢复,如果成功,将避免一般故障/恢复操作orchestrator。
# MySQL 终端
set global slave_net_timeout = 4

[mysqld]
slave_net_timeout = 4
- 1
- 2
- 3
- 4
- 5
常见问题
常见问题总结
https://github.com/openark/orchestrator/blob/master/docs/faq.md
拓扑限制
https://github.com/openark/orchestrator/blob/master/docs/supported-topologies-and-versions.md
注意事项
-
使用 GTID 在切换时自动化程度更高,使用 pos 时复杂切换需要手动指定
-
host 信息必须要写, 不写会存在一些问题
-
当不使用 GTID 进行复制时,可以使用伪GTID ,代替GTID ,方便恢复,增加自动化程度
-
旧主库如因网络中断而切换,需要在恢复前删除旧主库的 VIP,或重启网卡
清除所有配置
yum remove  -y orchestrator-3.2.6-1.x86_64 orchestrator-client-3.2.6-1.x86_64
yum remove  -y mysql-community-common-5.7.44-1.el7.x86_64 mysql-community-libs-compat-5.7.44-1.el7.x86_64 mysql57-community-release-el7-10.noarch mysql-community-libs-5.7.44-1.el7.x86_64 mysql-community-libs-5.7.44-1.el7.x86_64 mysql-community-server-5.7.44-1.el7.x86_64 mysql-community-client-5.7.44-1.el7.x86_64 mysql-community-client-5.7.44-1.el7.x86_64 mysql-shell-8.0.35-1.el7.x86_64
>/etc/hosts
rm -rf /root/mysql-sandboxes/
rm -rf /usr/local/orchestrator
rm -f /var/log/mysqld.log
rm -rf /usr/share/mysql*
rm -f /etc/profile.d/orchestrator.sh
rm -rf  /var/lib/mysql


rpm -qa|grep  orche
rpm -qa|grep mysql
netstat -lntp
- 1
- 2
- 3
- 4
- 5
- 6
- 7
- 8
- 9
- 10
- 11
- 12
- 13
- 14
- 15
细不细?

