- 1微信小程序(一):微信小程序实现底部导航菜单_微信小程序底部导航栏
- 2【干货】快速部署微软开源GPU管理利器: OpenPAI_微软gpu服务器 教程
- 3Mac世界时钟The Clock_mac时间来源网址
- 4OpenAI Chatgpt发展历史和Chatgpt-3的研发过程工作原理_chatgpt3发布
- 5扬州大学2022年858程序设计与数据结构试题参考答案_2022扬大858真题
- 6基于springboot的市场摊位管理系统计算机毕业设计_城市地摊管理系统实现
- 7无人驾驶车辆控制(三):纯跟踪算法(Pure Pursuit)_用pure pursuit 控制速度 在转弯处不行怎么办
- 8windows 驱动开发-DMA技术(二)
- 9XDOJ密码强度判断_标题 密码强度 类别 字符串处理 时间限制 1s 内存限制 256kb 问题描述 每个人
- 10数据挖掘中的基于决策树的分类方法
RabbitMQ_rabbitmq rabbitlistener
赞
踩
1.MQ基础
2.常见消息模型
3.消息的可靠性
4.消息持久化
5.消费者确认机制ACK
6.死信交换机
7.延时交换机
8.消息堆积
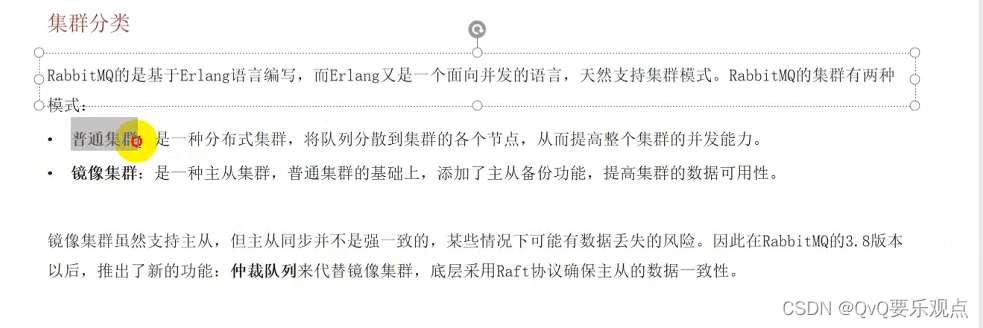
9.MQ集群
基础
同步通讯:
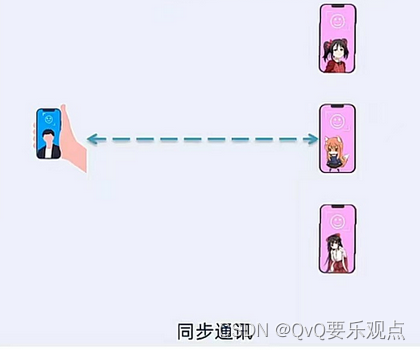
- 优点
- 时效性更强,可以立刻获得结果
- 问题
- 耦合度高
- 性能吞吐能力下降
- 有额外的资源消耗
- 有级联失败问题
异步通信

- 优点
- 耦合度低
- 吞吐量提升
- 故障隔离
- 流量削峰
- 缺点
- 依赖于Broker的可靠性、安全性、吞吐能力
- 架构复杂,没有明显流程线,不好追踪问题
安装
-
systemctl start docker # 启动docker服务
-
docker load -i mq.tar # 上传mq,并且安装
-
运行MQ
docker run
-e RABBITMQ_DEFAULT_USER=xiaowang
-e RABBITMQ_DEFAULT_PASS=123321
-v mq-plugins:/plugins
–name mq
–hostname mq
-p 15672:15672
-p 5672:5672
-d
rabbitmq:3.8-management -
通过ip地址 + 端口访问 http://ip:15672/
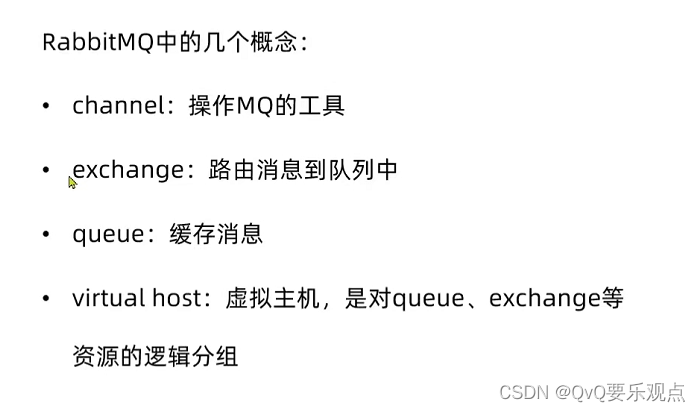
简介
消息发送者将消息发送交换机,交换机将消息路由交给队列,队列存储消息,消费者从队列获取消息,处理消息
常见消息模型
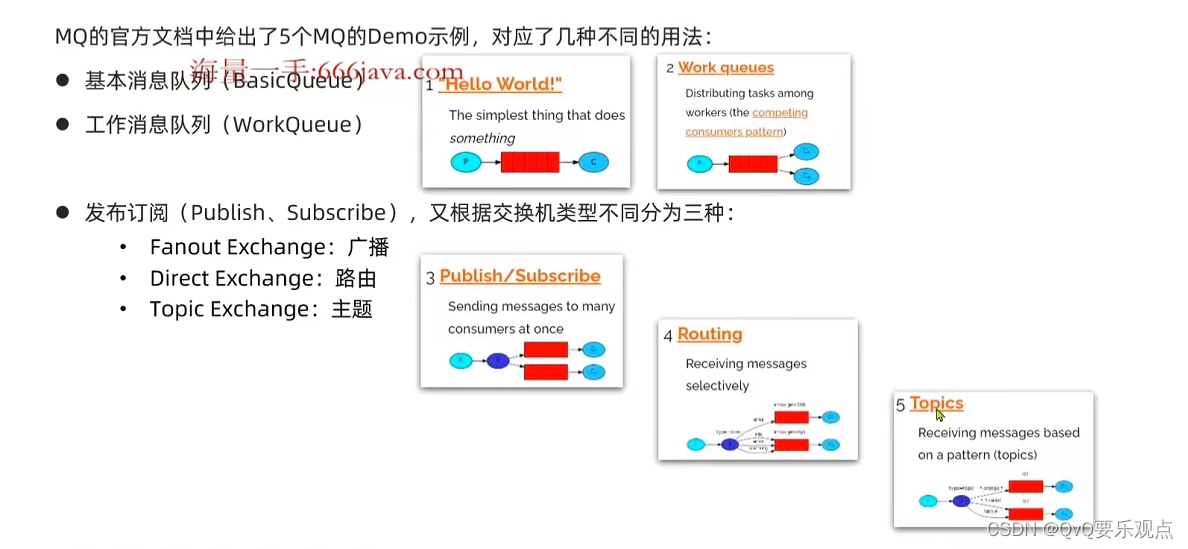
基本消息队列
发送者将信息发出,接收者创建队列查看是否存在当前队列,定义回调函数,将函数与队列做绑定,一般队列有消息,就会调用回调函数
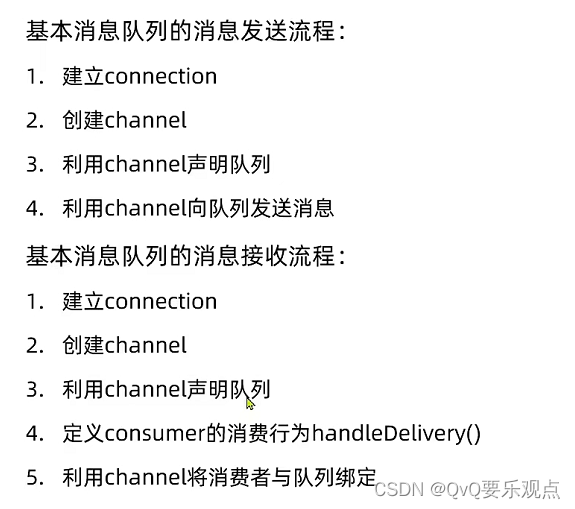
发送者
public void testSendMessage() throws IOException, TimeoutException {
        // 1.建立连接
        ConnectionFactory factory = new ConnectionFactory();
        // 1.1.设置连接参数,分别是:主机名、端口号、vhost、用户名、密码
        factory.setHost("192.168.150.101");
        factory.setPort(5672);
        factory.setVirtualHost("/");
        factory.setUsername("itcast");
        factory.setPassword("123321");
        // 1.2.建立连接
        Connection connection = factory.newConnection();

        // 2.创建通道Channel
        Channel channel = connection.createChannel();

        // 3.创建队列
        String queueName = "simple.queue";
        channel.queueDeclare(queueName, false, false, false, null);

        // 4.发送消息
        String message = "hello, rabbitmq!";
        channel.basicPublish("", queueName, null, message.getBytes());
        System.out.println("发送消息成功:【" + message + "】");

        // 5.关闭通道和连接
        channel.close();
        connection.close();

    }
- 1
- 2
- 3
- 4
- 5
- 6
- 7
- 8
- 9
- 10
- 11
- 12
- 13
- 14
- 15
- 16
- 17
- 18
- 19
- 20
- 21
- 22
- 23
- 24
- 25
- 26
- 27
- 28
- 29
接收者
  public static void main(String[] args) throws IOException, TimeoutException {
        // 1.建立连接
        ConnectionFactory factory = new ConnectionFactory();
        // 1.1.设置连接参数,分别是:主机名、端口号、vhost、用户名、密码
        factory.setHost("192.168.150.101");
        factory.setPort(5672);
        factory.setVirtualHost("/");
        factory.setUsername("itcast");
        factory.setPassword("123321");
        // 1.2.建立连接
        Connection connection = factory.newConnection();

        // 2.创建通道Channel
        Channel channel = connection.createChannel();

        // 3.创建队列
        String queueName = "simple.queue";
        channel.queueDeclare(queueName, false, false, false, null);

        // 4.订阅消息
        channel.basicConsume(queueName, true, new DefaultConsumer(channel){
            @Override
            public void handleDelivery(String consumerTag, Envelope envelope,
                                       AMQP.BasicProperties properties, byte[] body) throws IOException {
                // 5.处理消息
                String message = new String(body);
                System.out.println("接收到消息:【" + message + "】");
            }
        });
        System.out.println("等待接收消息。。。。");
    }
- 1
- 2
- 3
- 4
- 5
- 6
- 7
- 8
- 9
- 10
- 11
- 12
- 13
- 14
- 15
- 16
- 17
- 18
- 19
- 20
- 21
- 22
- 23
- 24
- 25
- 26
- 27
- 28
- 29
- 30
- 31
SpringAMQP
引入依赖
        <!--AMQP依赖,包含RabbitMQ-->
        <dependency>
            <groupId>org.springframework.boot</groupId>
            <artifactId>spring-boot-starter-amqp</artifactId>
        </dependency>
- 1
- 2
- 3
- 4
- 5
配置AMQP地址
spring:
  rabbitmq:
    host:  # 主机名
    port: 5672 # 端口
    virtual-host: / # 虚拟主机
    username: xiaowang # 用户名
    password: 123321 # 密码
- 1
- 2
- 3
- 4
- 5
- 6
- 7
发送者使用RabbitTemplate 发送队列消息
只能发送在已存在的队列

public class SpringAmpqpTest {

    @Autowired
    private RabbitTemplate rabbitTemplate;

    @Test
    public void testSendMessage2SimpleQueue(){
        String queueName = "simple.queue";
        String message = "Hello,Spring amqp !!!!!";
        rabbitTemplate.convertAndSend(queueName,message);
    }

}
- 1
- 2
- 3
- 4
- 5
- 6
- 7
- 8
- 9
- 10
- 11
- 12
- 13
监听队列的消息
一旦接收到队列,该队列就会被删除
    @RabbitListener(queues = "simple.queue")
    public void ListenterSimpleQuery(String message){
        System.out.println("消费者接收到发送者的消息:"+message);
    }
- 1
- 2
- 3
- 4
工作队列 WorkQueue
两个消费者同时处理请求,

spring:
  rabbitmq:
    host: 192.168.13.133 # 主机名
    port: 5672 # 端口
    virtual-host: / # 虚拟主机
    username: xiaowang # 用户名
    password: 123321 # 密码
    listener:
      simple:
        prefetch: 1  # 每次只能获取到一条消息,处理完才能获取第二条消息
- 1
- 2
- 3
- 4
- 5
- 6
- 7
- 8
- 9
- 10
交换机 ->发布/订阅模型
发布者发布消息到队列中,消费者获取到这条队列,队列种的数据就会删除.如果不想让队列删除,增加交换机,绑定队列,发布者发送至交换机,由交换机发布到每一个队列中
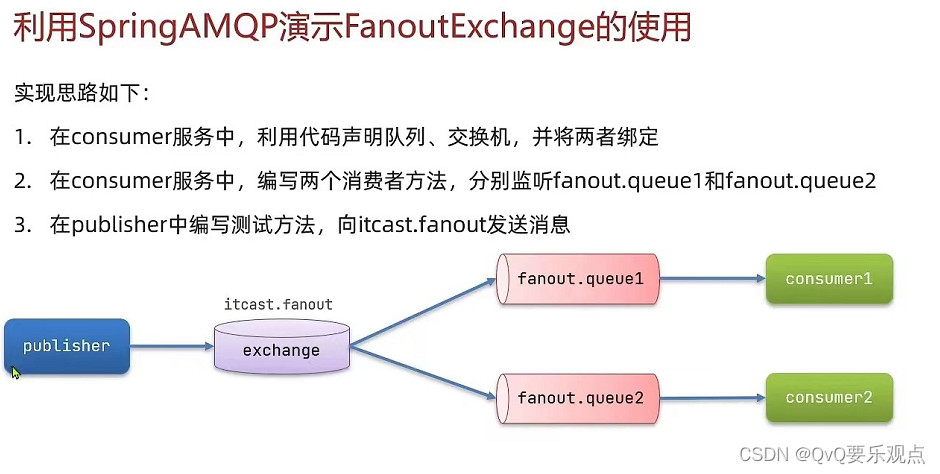
- 交换机绑定队列
@Configuration
public class FanoutConfig {

    /**
     * 声明交换机
     * @return Fanout类型交换机
     */
    @Bean
    public FanoutExchange fanoutExchange(){
        return new FanoutExchange("itcast.fanout");
    }

    /**
     * 第1个队列
     */
    @Bean
    public Queue fanoutQueue1(){
        return new Queue("fanout.queue1");
    }

    /**
     * 绑定队列和交换机
     */
    @Bean
    public Binding bindingQueue1(Queue fanoutQueue1, FanoutExchange fanoutExchange){
        return BindingBuilder.bind(fanoutQueue1).to(fanoutExchange);
    }

    /**
     * 第2个队列
     */
    @Bean
    public Queue fanoutQueue2(){
        return new Queue("fanout.queue2");
    }

    /**
     * 绑定队列和交换机
     */
    @Bean
    public Binding bindingQueue2(Queue fanoutQueue2, FanoutExchange fanoutExchange){
        return BindingBuilder.bind(fanoutQueue2).to(fanoutExchange);
    }


}
- 1
- 2
- 3
- 4
- 5
- 6
- 7
- 8
- 9
- 10
- 11
- 12
- 13
- 14
- 15
- 16
- 17
- 18
- 19
- 20
- 21
- 22
- 23
- 24
- 25
- 26
- 27
- 28
- 29
- 30
- 31
- 32
- 33
- 34
- 35
- 36
- 37
- 38
- 39
- 40
- 41
- 42
- 43
- 44
- 45
- 46
- 消费者
    @RabbitListener(queues = "fanout.queue1")
    public void ListenterSimpleQuery1(String message) throws InterruptedException {
        Thread.sleep(20);
        System.out.println("消费者接收到发送者的消息1:"+message+"------"+LocalTime.now());
    }

    @RabbitListener(queues = "fanout.queue2")
    public void ListenterSimpleQuerytwo2(String message) throws InterruptedException {
        Thread.sleep(200);
        System.out.println("消费者接收到发送者的消息2:"+message+"-------"+LocalTime.now());
    }
- 1
- 2
- 3
- 4
- 5
- 6
- 7
- 8
- 9
- 10
- 11
- 发布者
    // 发送到交换机
    @Test
    public void testSend(){
        String switchName = "itcast.fanout" ;
        String message = "hello.every one !!!!" ;
        rabbitTemplate.convertAndSend(switchName , "",message);
    }
- 1
- 2
- 3
- 4
- 5
- 6
- 7
路由模式 Direct交换机
发布者指定交换机,以及发送的key,对应的消费者key,就可以接收到
消费者
    @RabbitListener(bindings = @QueueBinding(
            value = @Queue(name = "direct.queue1") ,   //队列
            exchange = @Exchange(name = "itcast.direct"),
            key = {"red","blue"}
    ))
    public void ListeDirectQueue1(String msg){
        System.out.println("消费者1发送的消息是"+msg);
    }

    @RabbitListener(bindings = @QueueBinding(
            value = @Queue(name = "direct.queue2") ,   //队列
            exchange = @Exchange(name = "itcast.direct"),//交换机
            key = {"red","yellow"} //指定key 访问哪个key就可以发送到哪一个队列
    ))
    public void ListeDirectQueue2(String msg){
        System.out.println("消费者2发送的消息是"+msg);
    }
- 1
- 2
- 3
- 4
- 5
- 6
- 7
- 8
- 9
- 10
- 11
- 12
- 13
- 14
- 15
- 16
- 17
发布者
    // 发送到交换机
    @Test
    public void testSend2(){
        String switchName = "itcast.direct" ;
        String message = "hello.every red !!!!" ;
        rabbitTemplate.convertAndSend(switchName , "red",message);
    }
- 1
- 2
- 3
- 4
- 5
- 6
- 7
Topic交换机 支持通配符
生产者发送的消息,消费者通过通配符的形式查看是否符合
- 1
消费者
    @RabbitListener(bindings = @QueueBinding(
            value = @Queue(name = "topic.queue1") ,   //队列
            exchange = @Exchange(name = "itcast.topic",type = ExchangeTypes.TOPIC),//交换机
            key = {"china.#"} //指定key 访问哪个key就可以发送到哪一个队列
    ))
    public void ListeTopQueue1(String msg){
        System.out.println("消费者china1发送的消息是"+msg);
    }

    @RabbitListener(bindings = @QueueBinding(
            value = @Queue(name = "topic.queue2") ,   //队列
            exchange = @Exchange(name = "itcast.topic",type = ExchangeTypes.TOPIC),//交换机
            key = {"#.news"} //指定key 访问哪个key就可以发送到哪一个队列
    ))
    public void ListeTopQueue2(String msg){
        System.out.println("消费者china2发送的消息是"+msg);
    }
- 1
- 2
- 3
- 4
- 5
- 6
- 7
- 8
- 9
- 10
- 11
- 12
- 13
- 14
- 15
- 16
- 17
生产者
    // 发送到交换机
    @Test
    public void testTop1(){
        String switchName = "itcast.topic" ;
        String message = "hello.every China !!!!" ;
        rabbitTemplate.convertAndSend(switchName , "china.news",message);
    }

    @Test
    public void testTop2(){
        String switchName = "itcast.topic" ;
        String message = "hello.天气 GOOd" ;
        rabbitTemplate.convertAndSend(switchName , "china.weather",message);
    }
- 1
- 2
- 3
- 4
- 5
- 6
- 7
- 8
- 9
- 10
- 11
- 12
- 13
- 14
消息转换器
引入jackson依赖
<dependency>
    <groupId>com.fasterxml.jackson.dataformat</groupId>
    <artifactId>jackson-dataformat-xml</artifactId>
    <version>2.9.10</version>
</dependency>
- 1
- 2
- 3
- 4
- 5
声明转化json的bean
<dependency>
    <groupId>com.fasterxml.jackson.dataformat</groupId>
    <artifactId>jackson-dataformat-xml</artifactId>
    <version>2.9.10</version>
</dependency>
- 1
- 2
- 3
- 4
- 5
发送定义转化json
    @Bean
    public MessageConverter messageConverter(){
        return new Jackson2JsonMessageConverter();//转json
    }
- 1
- 2
- 3
- 4
可以显示中文
    @Test
    public void testTop3(){
        Map<String,Object> map =new HashMap<>();
        map.put("你好",123);
        map.put("hello123",123);
        rabbitTemplate.convertAndSend( "object.queue",map);
    }
- 1
- 2
- 3
- 4
- 5
- 6
- 7
消费者监听消息转化为中文
@Bean
public MessageConverter jsonMessageConverter(){
    return new Jackson2JsonMessageConverter();
}
- 1
- 2
- 3
- 4
消费者监听消息
    @RabbitListener(queues = "object.queue")
    public void Test(Map<String,Object> map) {
        System.out.println("接收到object消息"+map);
    }
- 1
- 2
- 3
- 4
mq消息的可靠性
消息丢失
- mq生产者将消息发送的时候,可能造成数据的丢失
- 消息在mq存储的时候,可能会造成数据的丢失
- 消费者在消费消息时,可能会造成数据的丢失
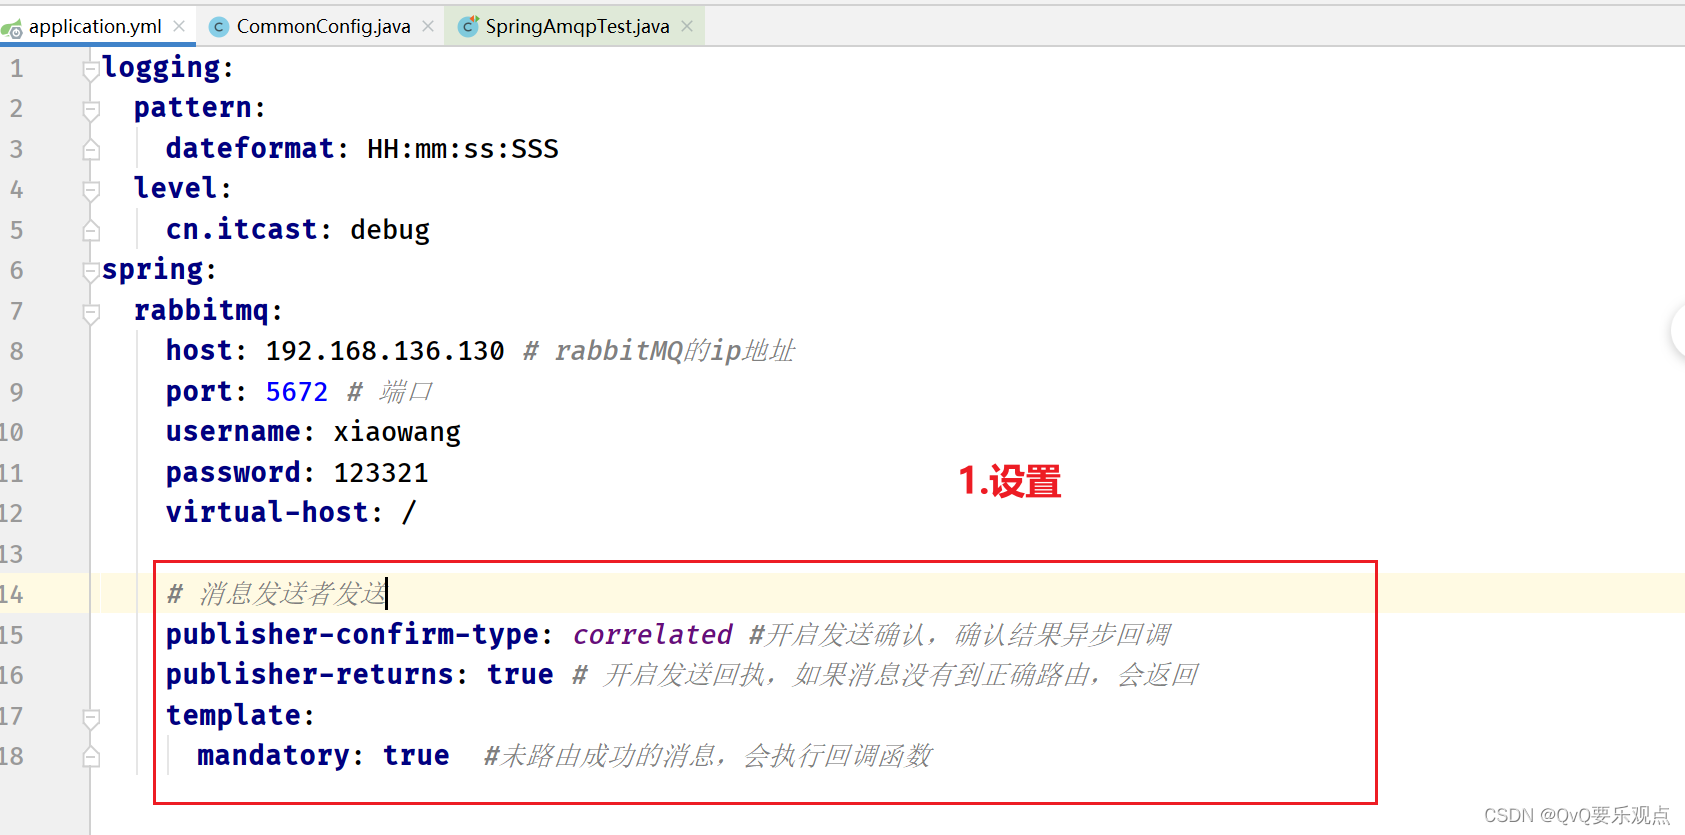
生产者确认机制,会发送是否发送到交换机的通知
1.生产者设置文件
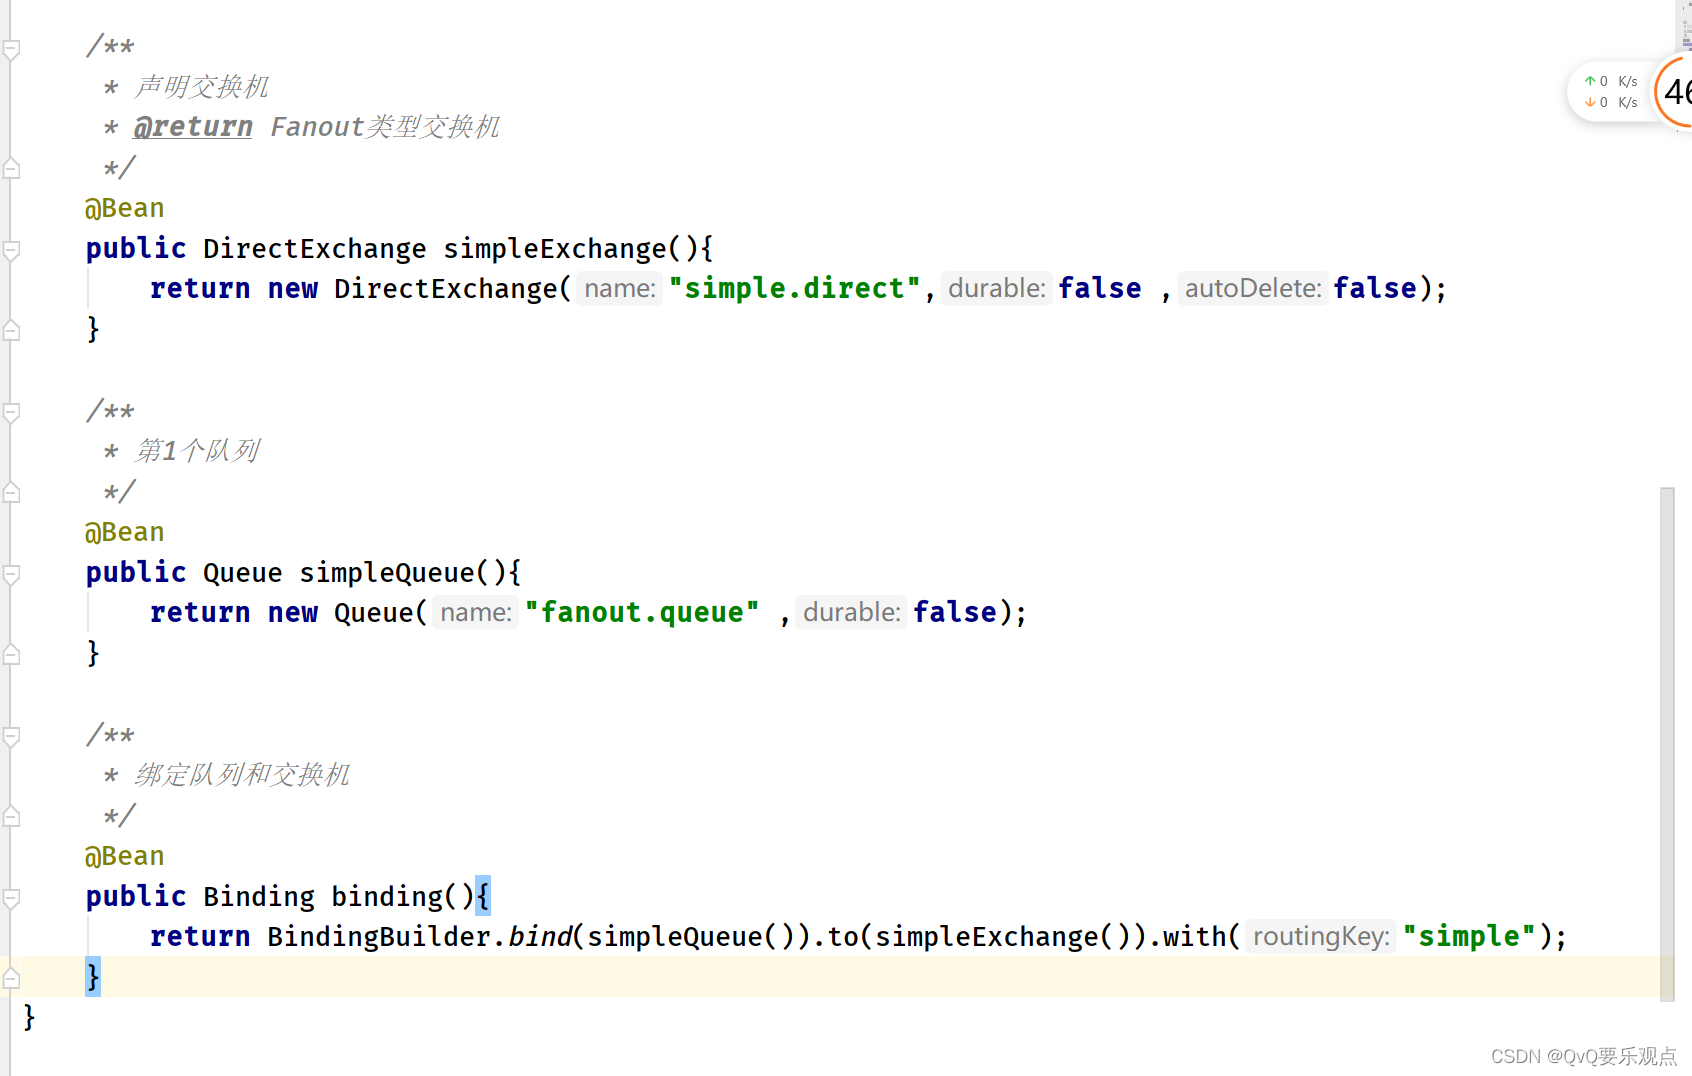
 2.设置交换机/队列/并绑定
3.判断消息是否发送到交换机
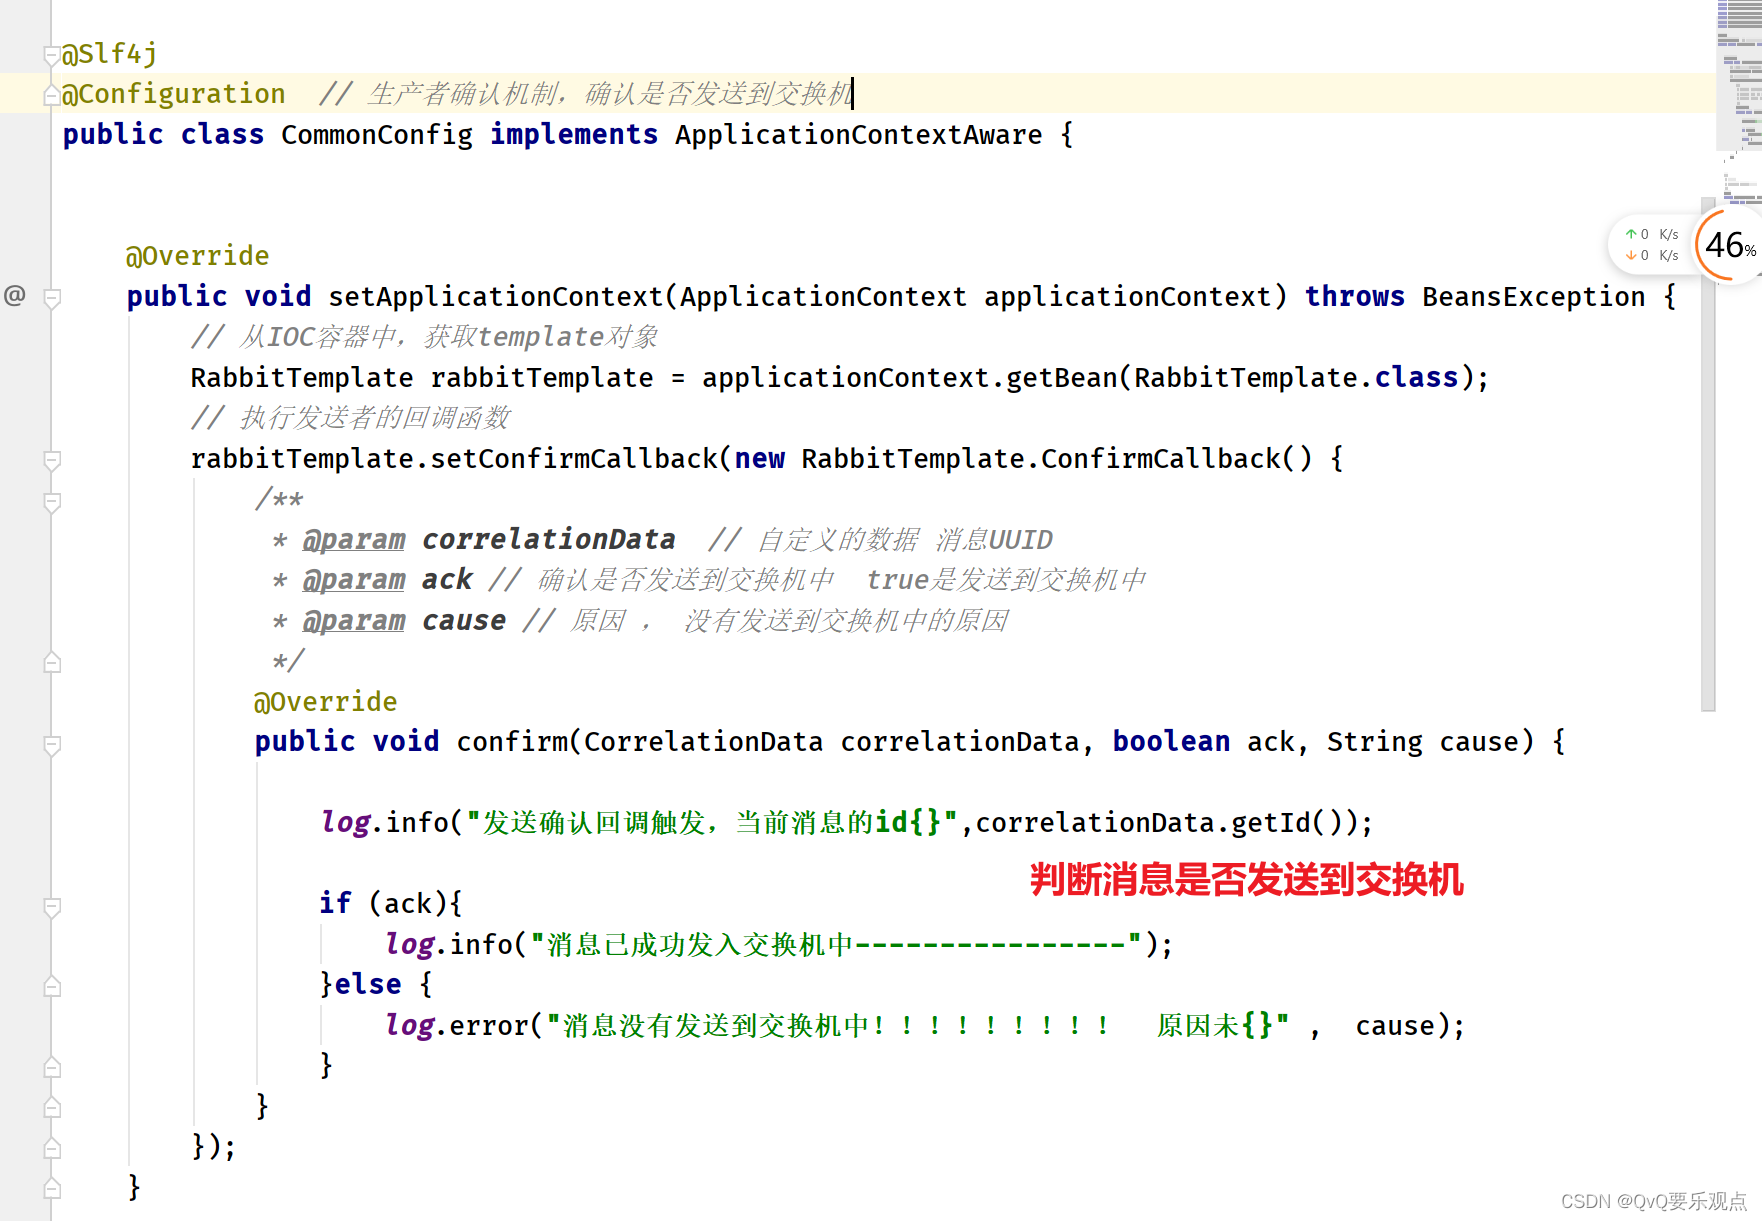
消息没有发送都队列中
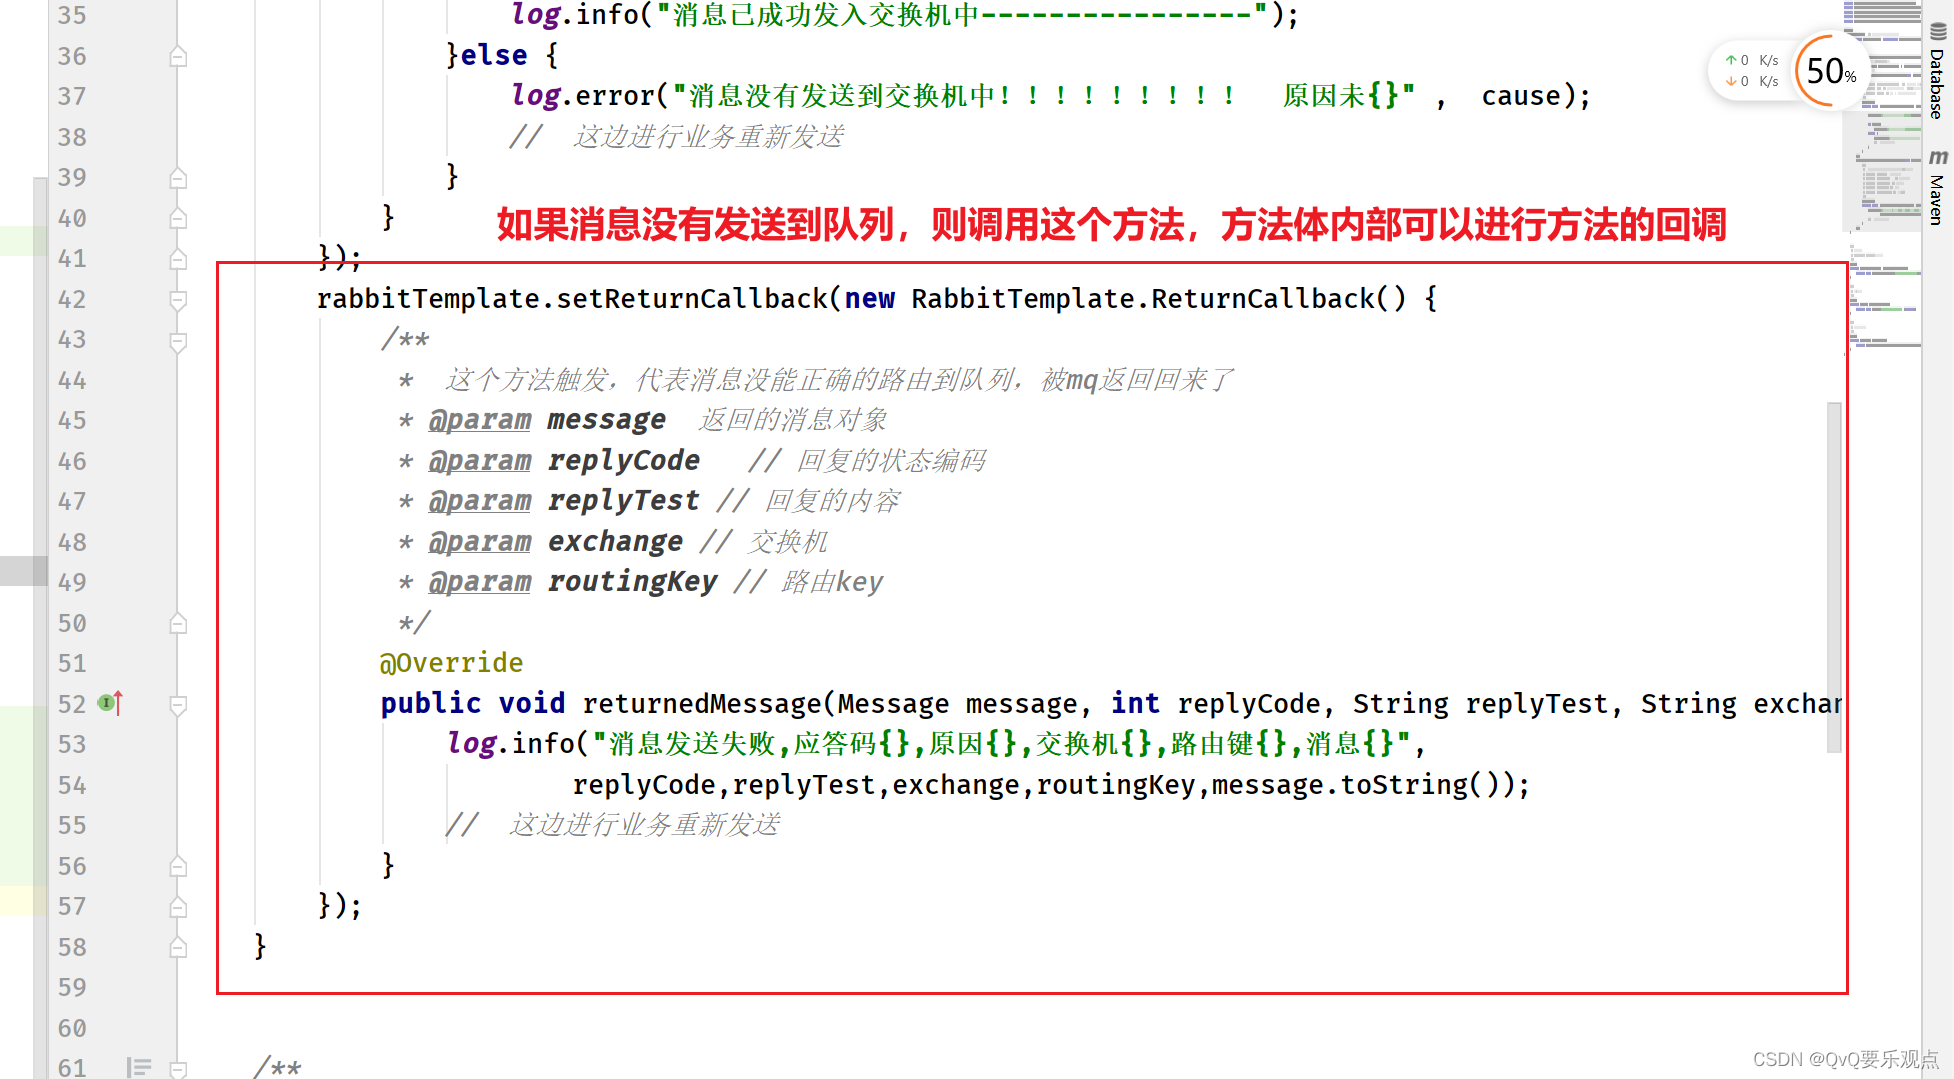
- 实现步骤:
import lombok.extern.slf4j.Slf4j;
import org.springframework.amqp.core.*;
import org.springframework.amqp.rabbit.connection.CorrelationData;
import org.springframework.amqp.rabbit.core.RabbitTemplate;
import org.springframework.beans.BeansException;
import org.springframework.context.ApplicationContext;
import org.springframework.context.ApplicationContextAware;
import org.springframework.context.annotation.Bean;
import org.springframework.context.annotation.Configuration;

@Slf4j
@Configuration  // 生产者确认机制,确认是否发送到交换机
public class CommonConfig implements ApplicationContextAware {


    @Override
    public void setApplicationContext(ApplicationContext applicationContext) throws BeansException {
        // 从IOC容器中,获取template对象
        RabbitTemplate rabbitTemplate = applicationContext.getBean(RabbitTemplate.class);
        // 执行发送者的回调函数
        rabbitTemplate.setConfirmCallback(new RabbitTemplate.ConfirmCallback() {
            /**
             * @param correlationData  // 自定义的数据 消息UUID
             * @param ack // 确认是否发送到交换机中  true是发送到交换机中
             * @param cause // 原因 , 没有发送到交换机中的原因
             */
            @Override
            public void confirm(CorrelationData correlationData, boolean ack, String cause) {

                log.info("发送确认回调触发,当前消息的id{}",correlationData.getId());

                if (ack){
                    log.info("消息已成功发入交换机中----------------");
                }else {
                    log.error("消息没有发送到交换机中!!!!!!!!!  原因未{}" ,  cause);
                    //  这边进行业务重新发送
                }
            }
        });
        rabbitTemplate.setReturnCallback(new RabbitTemplate.ReturnCallback() {
            /**
             *  这个方法触发,代表消息没能正确的路由到队列,被mq返回回来了
             * @param message  返回的消息对象
             * @param replyCode   // 回复的状态编码
             * @param replyTest // 回复的内容
             * @param exchange // 交换机
             * @param routingKey // 路由key
             */
            @Override
            public void returnedMessage(Message message, int replyCode, String replyTest, String exchange, String routingKey) {
                log.info("消息发送失败,应答码{},原因{},交换机{},路由键{},消息{}",
                        replyCode,replyTest,exchange,routingKey,message.toString());
                //  这边进行业务重新发送
            }
        });
    }


    /**
     * 声明交换机
     * @return Fanout类型交换机
     */
    @Bean
    public DirectExchange simpleExchange(){
        return new DirectExchange("simple.direct",false ,false);
    }

    /**
     * 第1个队列
     */
    @Bean
    public Queue simpleQueue(){
        return new Queue("fanout.queue" ,false);
    }

    /**
     * 绑定队列和交换机
     */
    @Bean
    public Binding binding(){
        return BindingBuilder.bind(simpleQueue()).to(simpleExchange()).with("simple");
    }
}
- 1
- 2
- 3
- 4
- 5
- 6
- 7
- 8
- 9
- 10
- 11
- 12
- 13
- 14
- 15
- 16
- 17
- 18
- 19
- 20
- 21
- 22
- 23
- 24
- 25
- 26
- 27
- 28
- 29
- 30
- 31
- 32
- 33
- 34
- 35
- 36
- 37
- 38
- 39
- 40
- 41
- 42
- 43
- 44
- 45
- 46
- 47
- 48
- 49
- 50
- 51
- 52
- 53
- 54
- 55
- 56
- 57
- 58
- 59
- 60
- 61
- 62
- 63
- 64
- 65
- 66
- 67
- 68
- 69
- 70
- 71
- 72
- 73
- 74
- 75
- 76
- 77
- 78
- 79
- 80
- 81
- 82
- 83
- 84
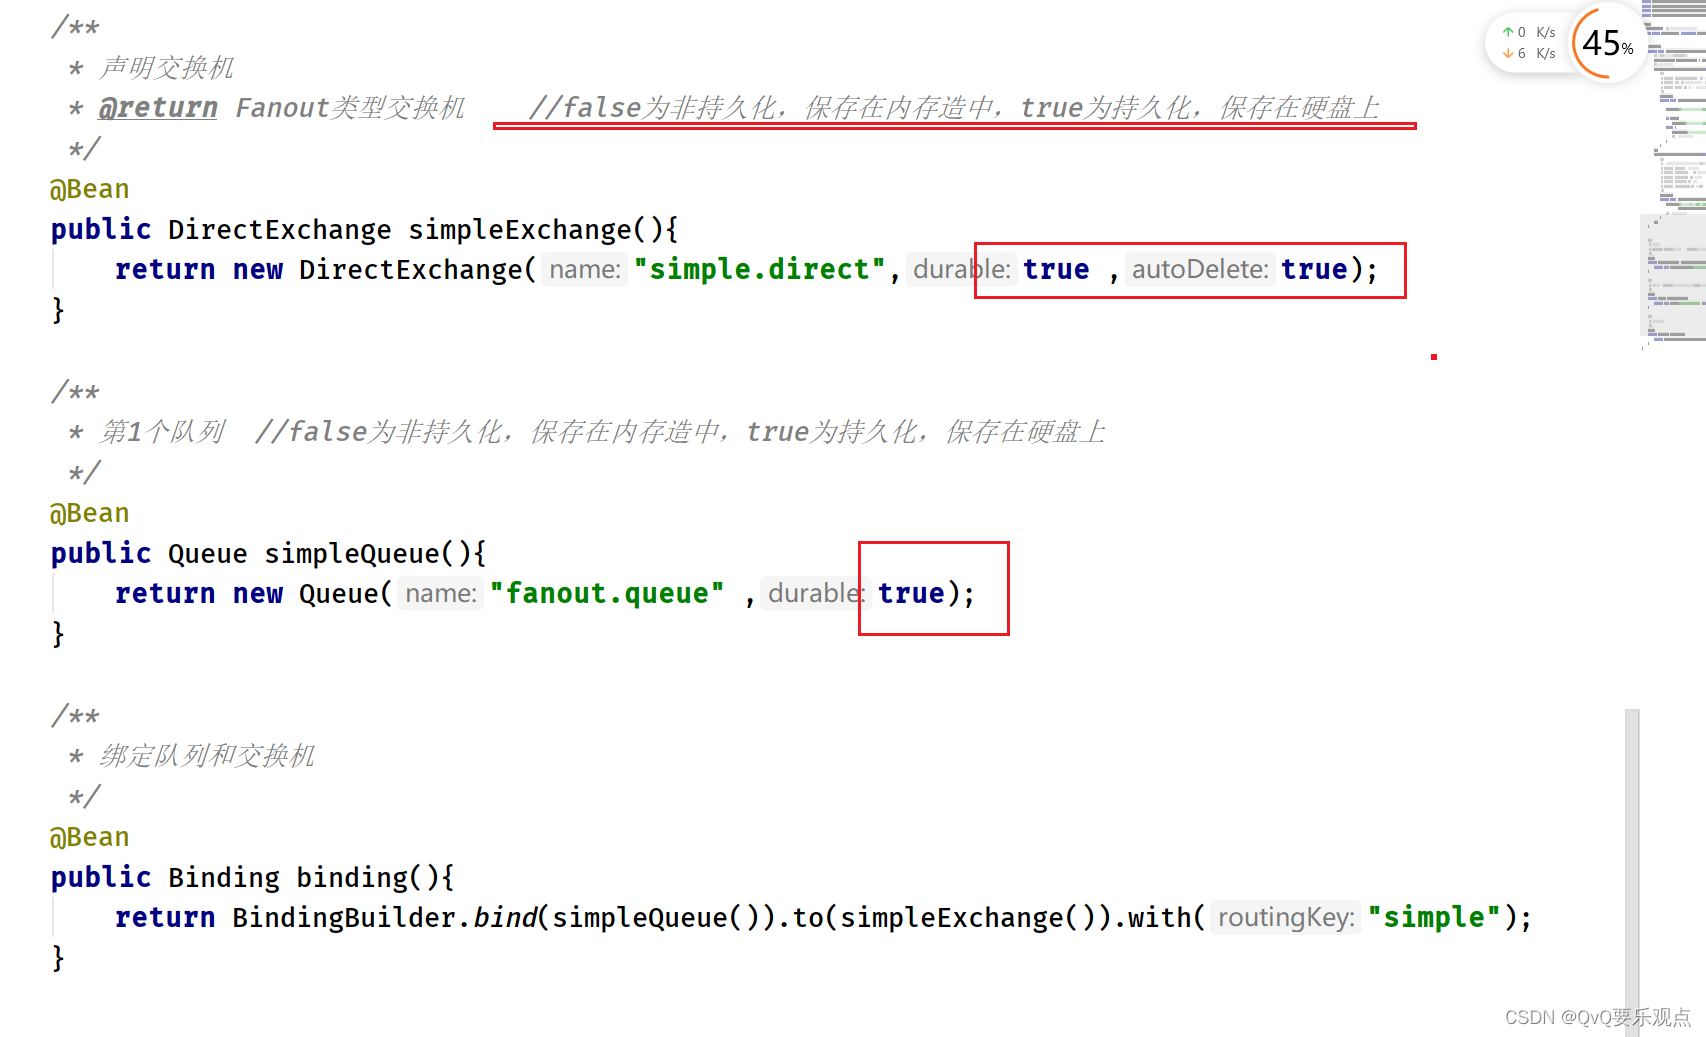
消息持久化
- 交换机与队列是否持久化
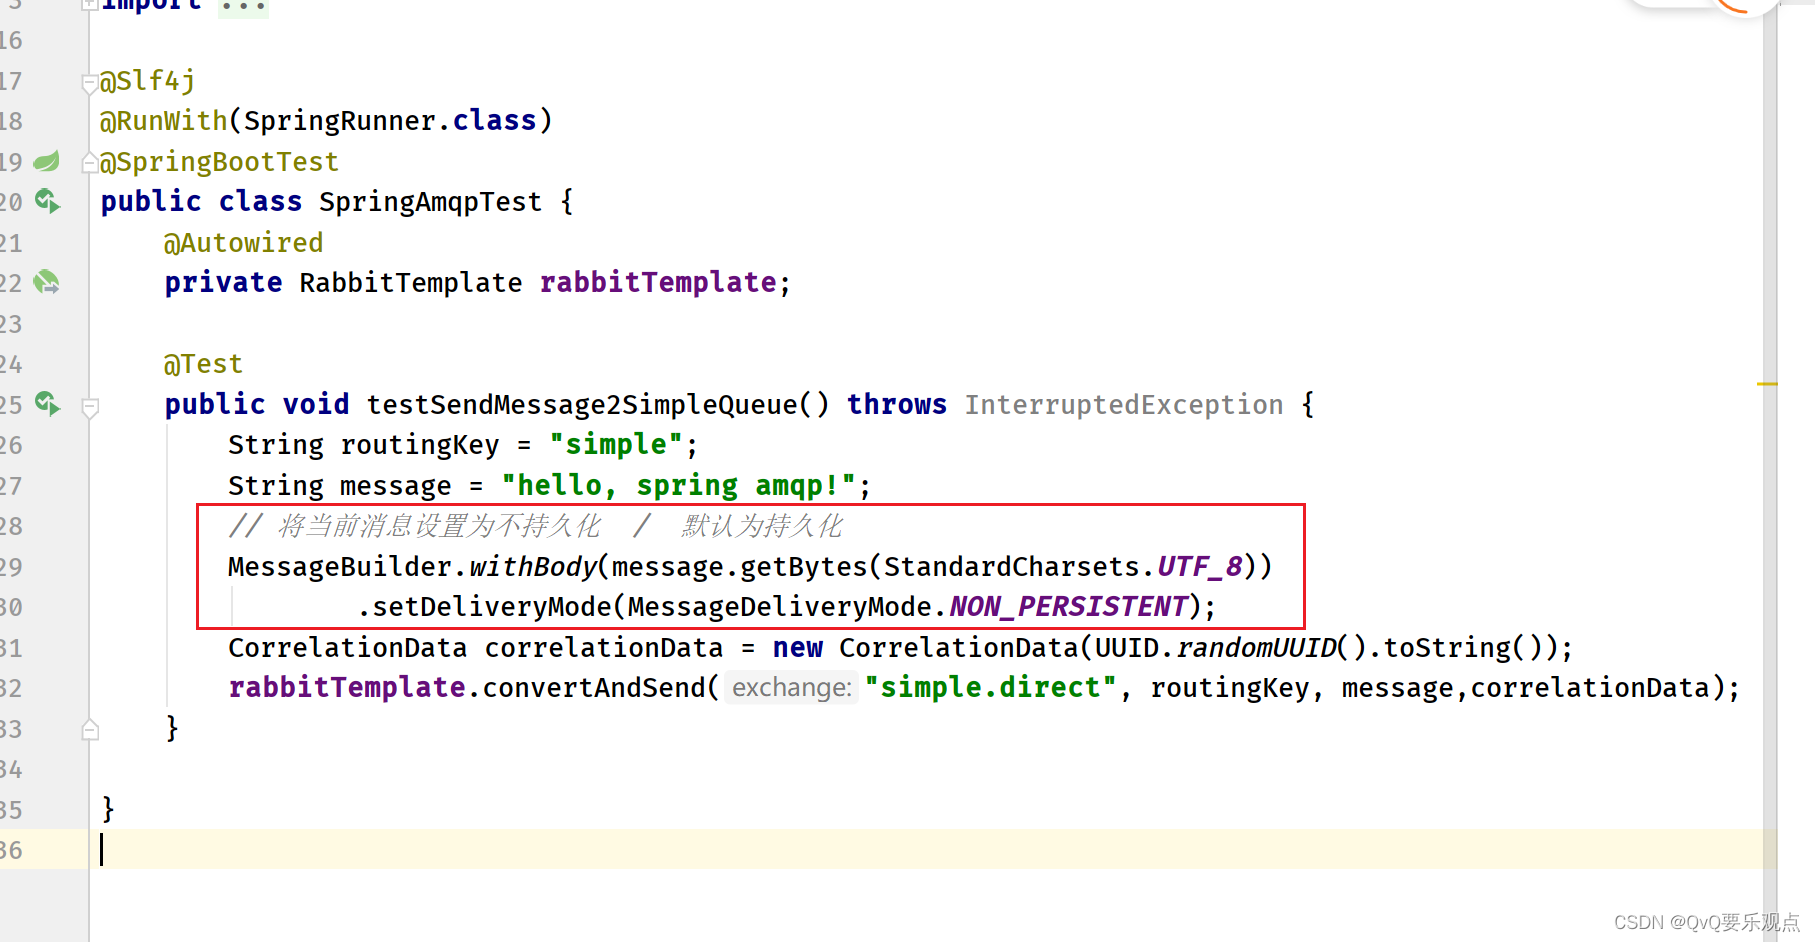
- 发送的消息是否持久化
消费者确认机制
- 只有消费者确认了,这条消息才会从rabbit MQ中删除
- 有三种模式
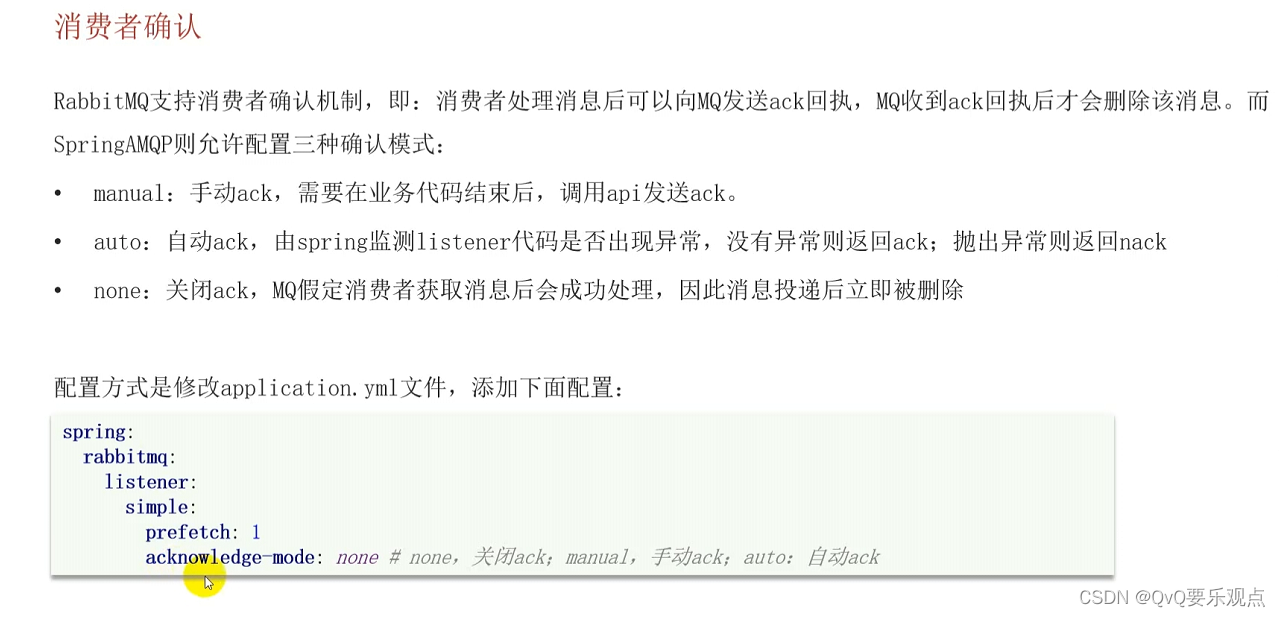
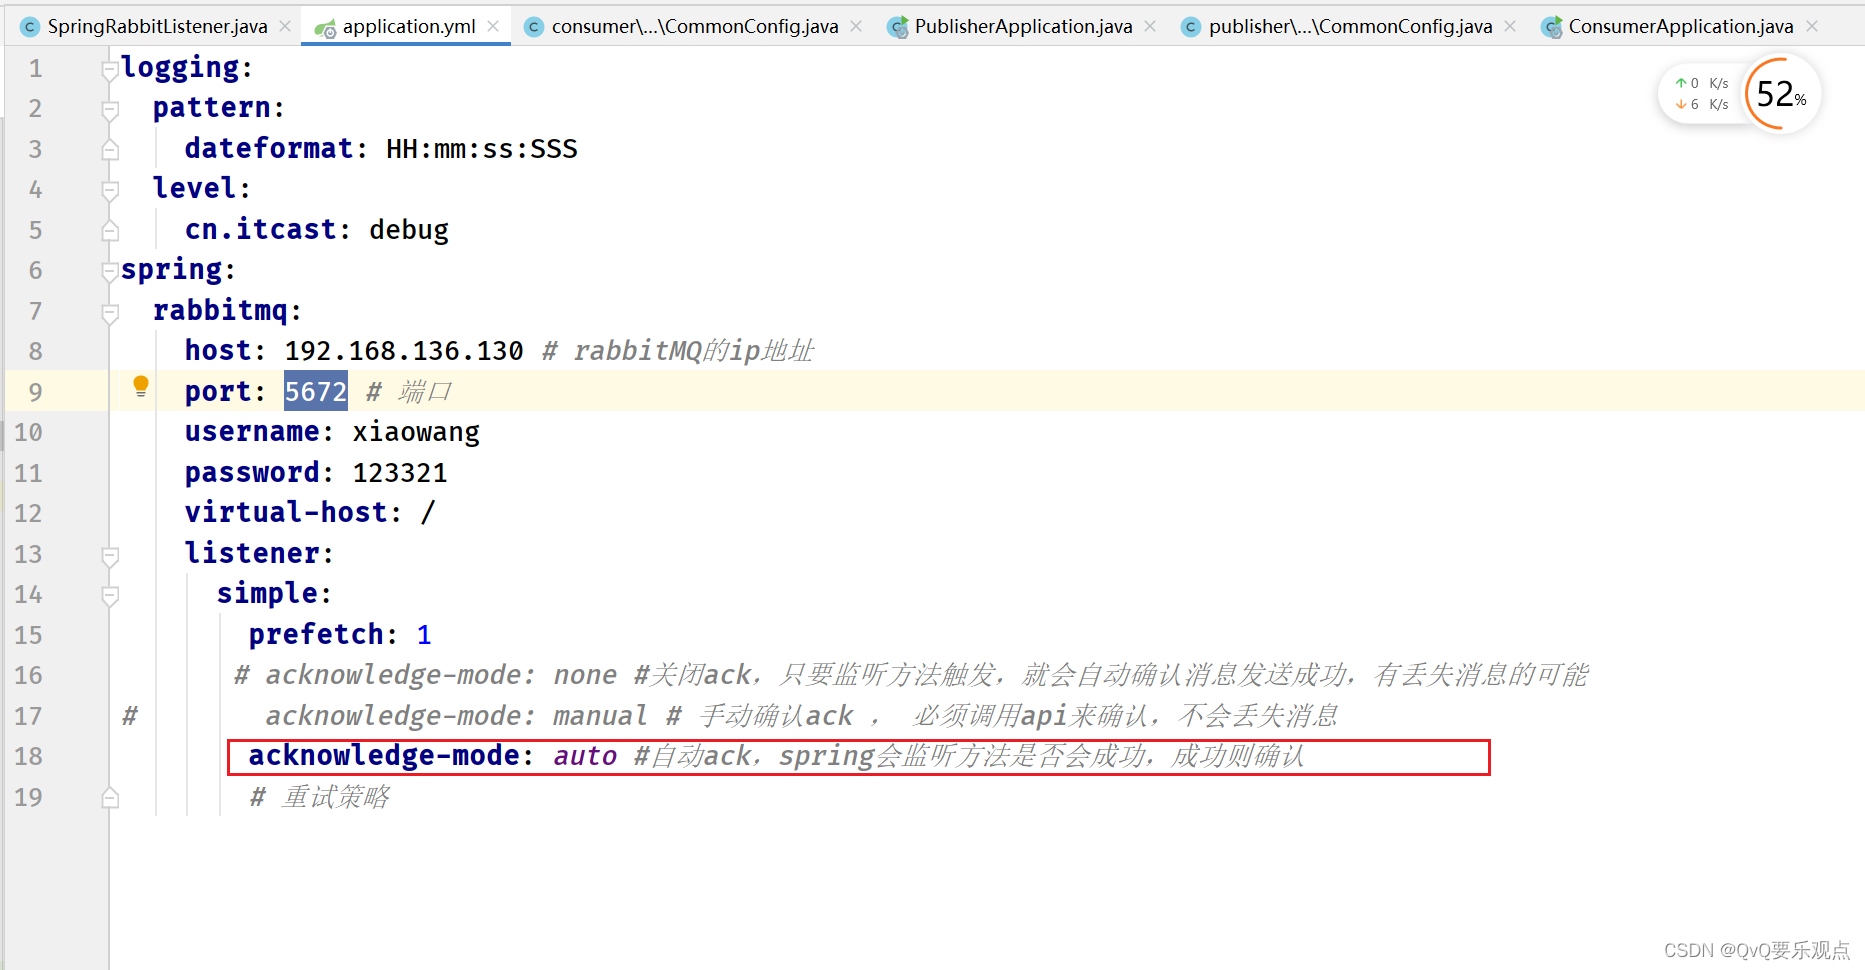
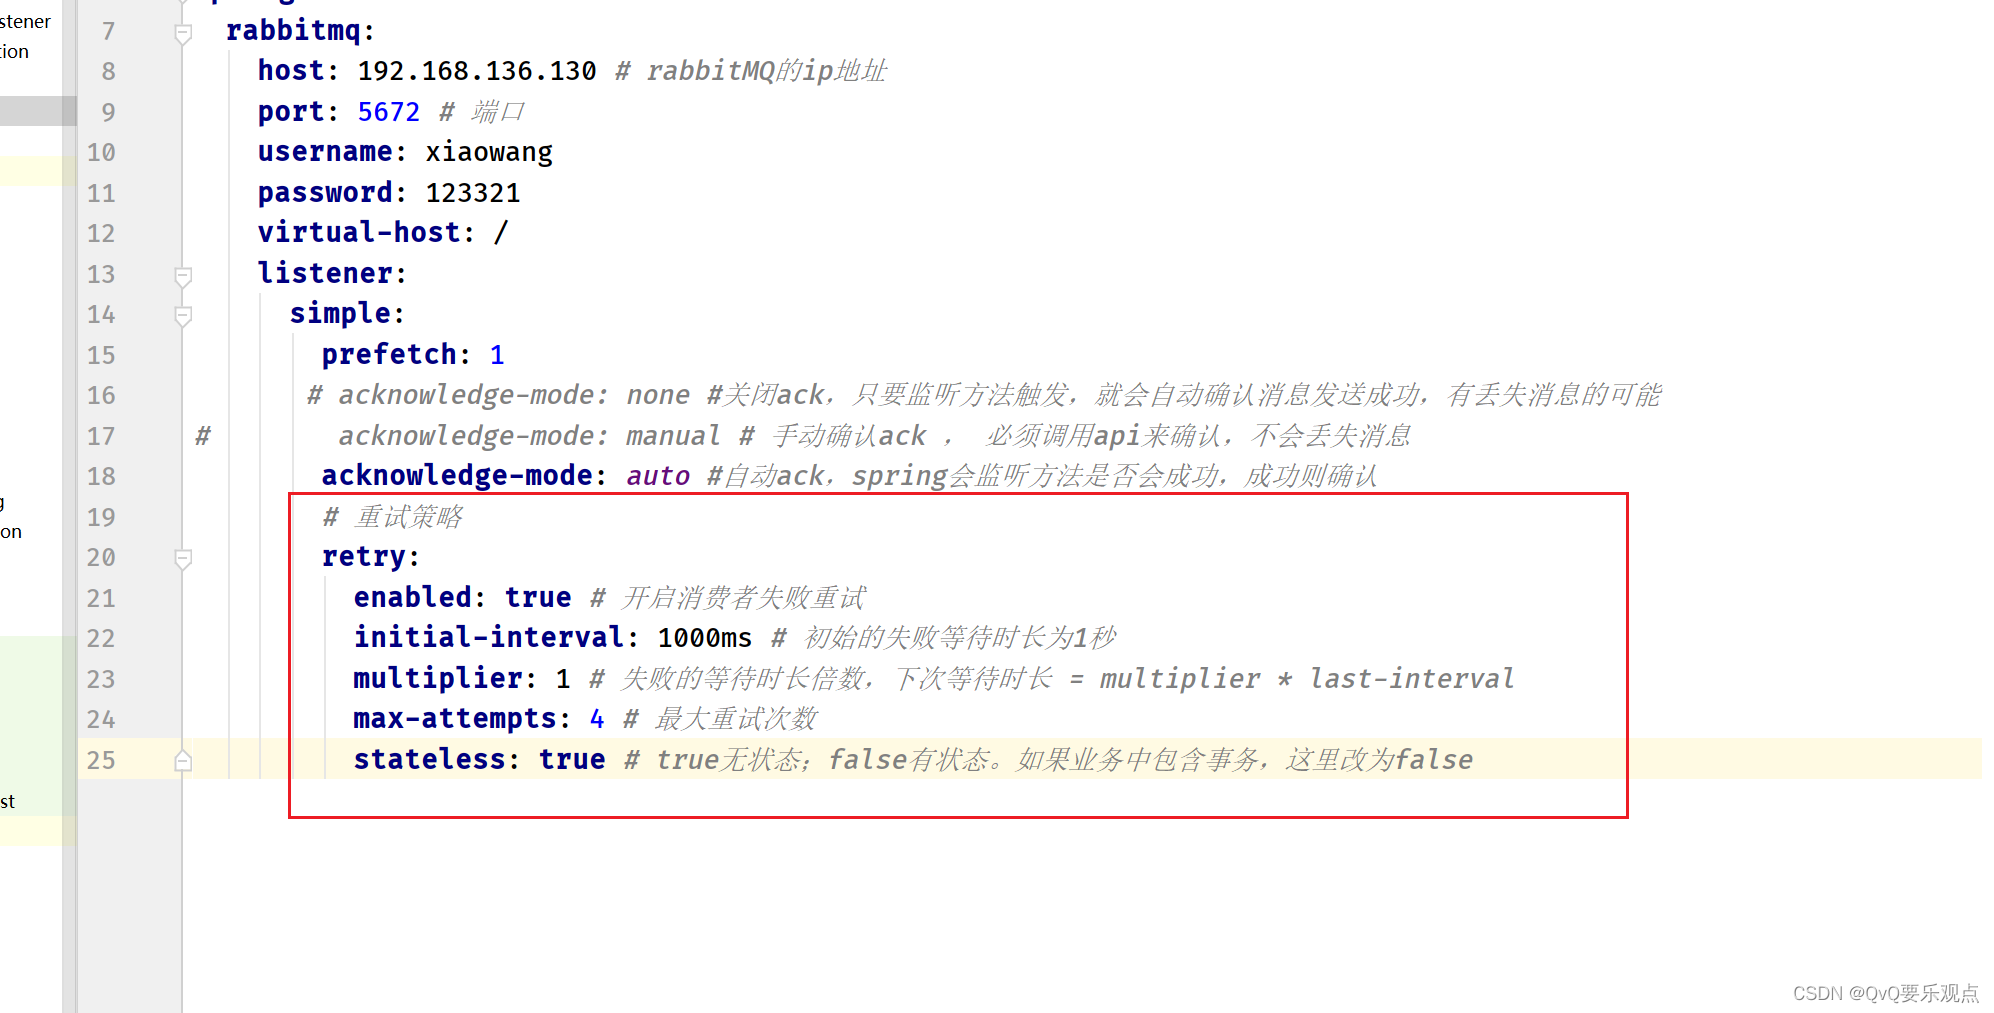
自动ack的重试策略 -> 根据设定的最大次数重置后,如果还没有读取到这条消息,这条消息就会丢失
消费者重复失败策略,重试耗尽后,将消息投递到指定交换机->修复问题: 根据设定的最大次数重置后,如果还没有读取到这条消息,这条消息就会丢失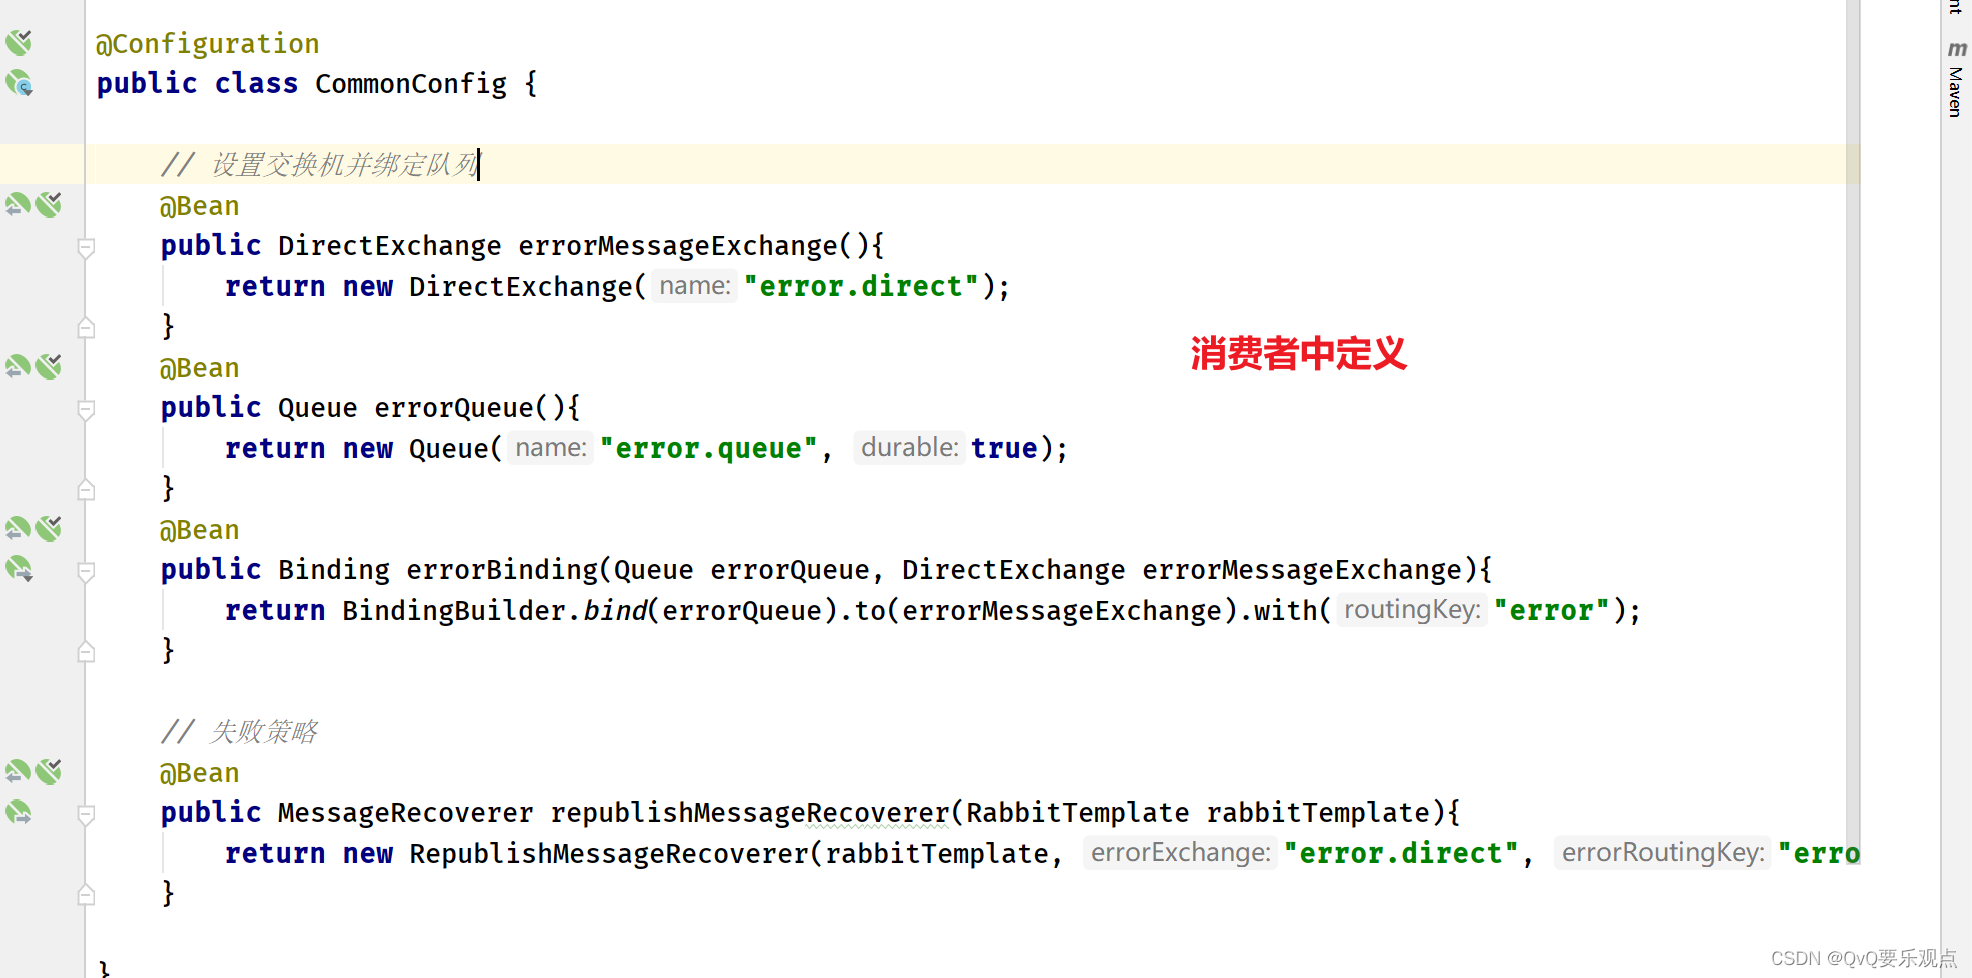
import org.springframework.amqp.core.Binding;
import org.springframework.amqp.core.BindingBuilder;
import org.springframework.amqp.core.DirectExchange;
import org.springframework.amqp.core.Queue;
import org.springframework.amqp.rabbit.core.RabbitTemplate;
import org.springframework.amqp.rabbit.retry.MessageRecoverer;
import org.springframework.amqp.rabbit.retry.RepublishMessageRecoverer;
import org.springframework.amqp.support.converter.Jackson2JsonMessageConverter;
import org.springframework.amqp.support.converter.MessageConverter;
import org.springframework.context.annotation.Bean;
import org.springframework.context.annotation.Configuration;

@Configuration
public class CommonConfig {

    // 设置交换机并绑定队列
    @Bean
    public DirectExchange errorMessageExchange(){
        return new DirectExchange("error.direct");
    }
    @Bean
    public Queue errorQueue(){
        return new Queue("error.queue", true);
    }
    @Bean
    public Binding errorBinding(Queue errorQueue, DirectExchange errorMessageExchange){
        return BindingBuilder.bind(errorQueue).to(errorMessageExchange).with("error");
    }

    // 失败策略
    @Bean
    public MessageRecoverer republishMessageRecoverer(RabbitTemplate rabbitTemplate){
        return new RepublishMessageRecoverer(rabbitTemplate, "error.direct", "error");
    }

}
- 1
- 2
- 3
- 4
- 5
- 6
- 7
- 8
- 9
- 10
- 11
- 12
- 13
- 14
- 15
- 16
- 17
- 18
- 19
- 20
- 21
- 22
- 23
- 24
- 25
- 26
- 27
- 28
- 29
- 30
- 31
- 32
- 33
- 34
- 35
- 36
- 37
- 38
死信交换机
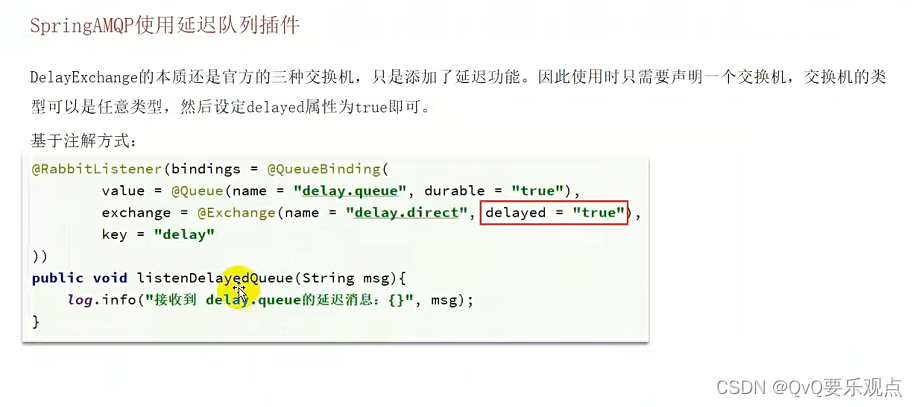
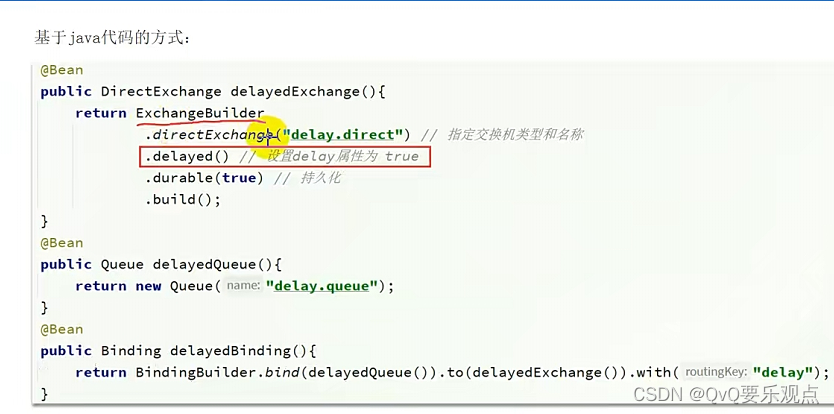
延时交换机
- 下载插件
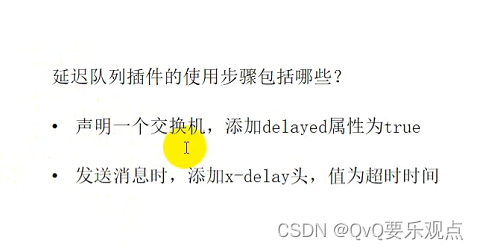
声明方式 1
声明方式 2
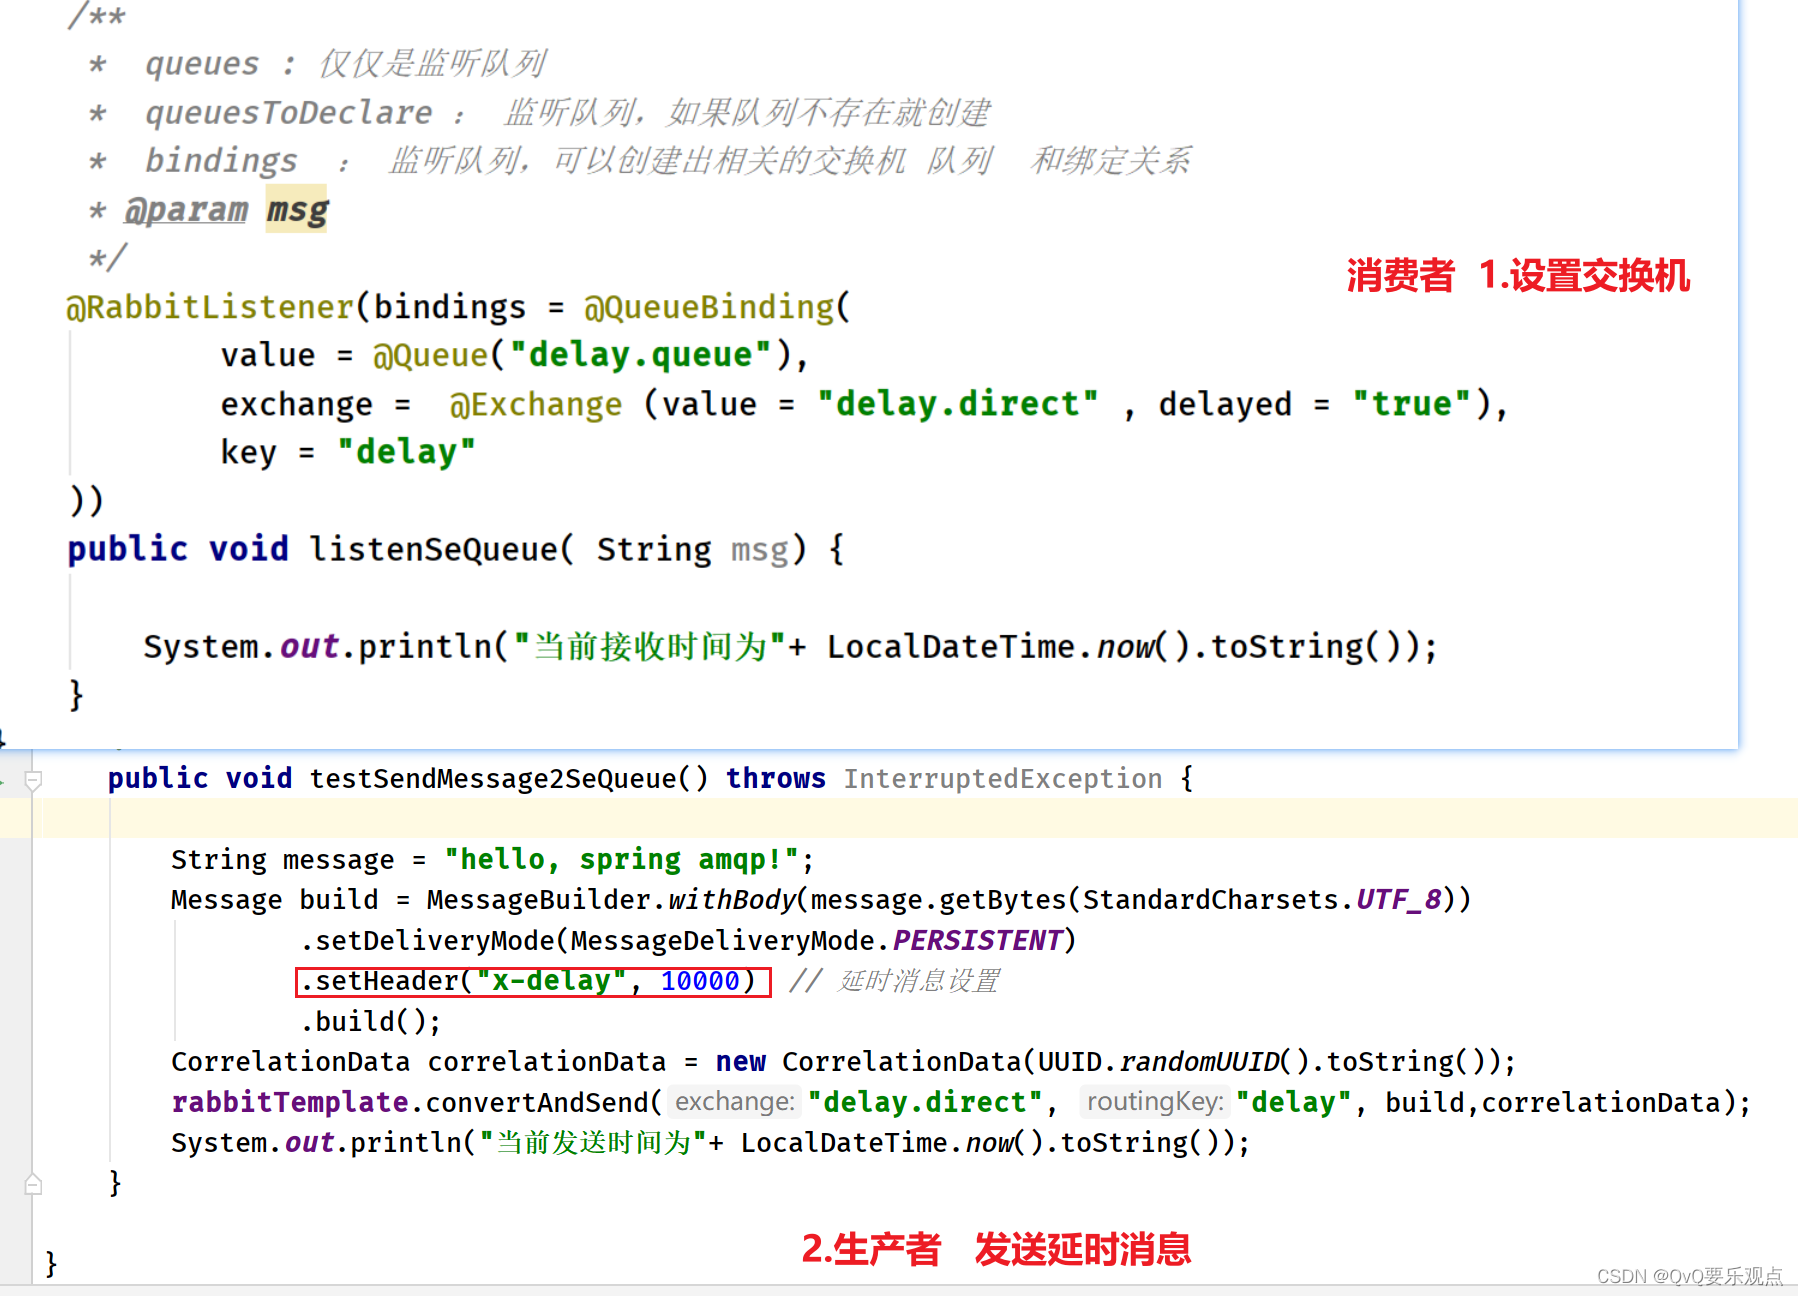
消息堆积
处理消息堆积的方法
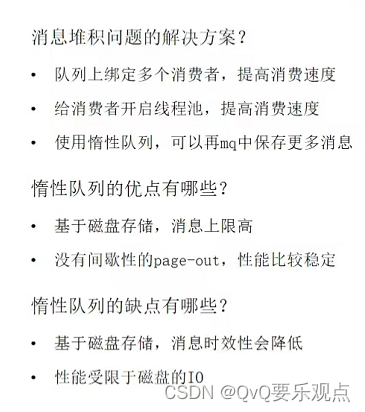
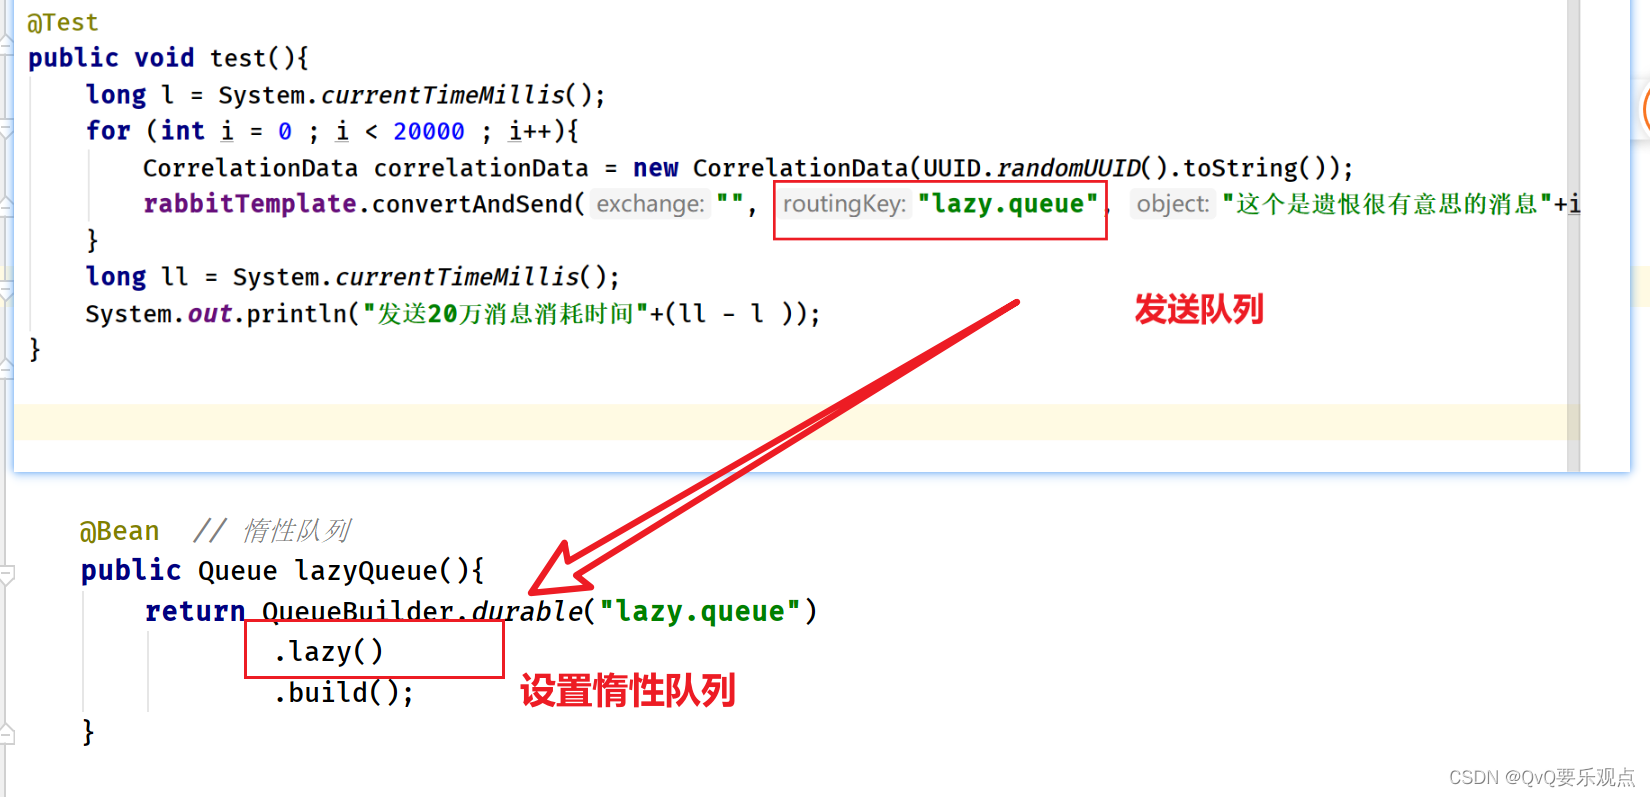
惰性队列存储更大量的数据,普通消息队列存储在内存上,向硬盘缓存同步,惰性队列直接存储在硬盘上
特点
实战
集群
