- 1ControlNet作者新作爆火:P照片换背景不求人,AI打光完美融入
- 2论文高质量翻译:The Claude 3 Model Family: Opus, Sonnet, Haiku Claude 3 模型系列:Opus、Sonnet、Haiku 超越GPT4_研究生级别的谷歌防护问答基准)
- 3使用SpringBoot完成excel表格导入导出_excel导入 spring boot
- 4浅谈——图像梯度算法中算子由来_图形梯度算子
- 52023年,程序员如何构建持续增长的被动收入?
- 6git命令推送本地到远程分支_git push 远程分支
- 7一文详解8种异常检测算法(附Python代码)
- 8Eureka搭建及使用_eureka搭建与使用
- 9ov5640介绍
- 10Excel表格和SpringBoot整合进行导入和导出操作_springboot excel 合并 导入
vue代码及打包优化,提高加载速度,减少内存占用_vue程序浏览器包内存不足
赞
踩
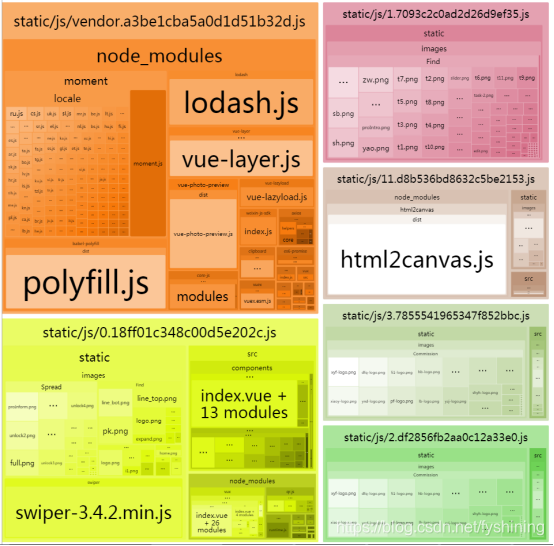
1.借助工具排查项目中占用包较大的部分,然后相应解决
vue-cli2.0 自带 webpack-bundle-analyzer 工具,可直接执行 npm run build --report,打包结束后会生成如下图视图分析
vue-cli3 需要做相应安装配置后方可使用
(1) 首先安装依赖 npm install webpack-bundle-analyzer --save-dev
(2) 在 vue.config.js 中添加如下配置
- //vue.config.js配置
-
- module.exports = {
- ...
- chainWebpack: config => {
- if (process.env.use_analyzer) {
- config
- .plugin('webpack-bundle-analyzer')
- .use(require('webpack-bundle-analyzer').BundleAnalyzerPlugin)
- }
- },
- ...
- };
-
- //package.json配置
- {
- "scripts": {
- "serve": "vue-cli-service serve",
- "build": "vue-cli-service build",
- "analyzer": "cross-env use_analyzer=true npm run build"
- },
- }
-
- 注:window可能需要先执行 npm install cross-env --save 安装 cross-env

以上配置完成后直接执行 npm run analyzer 就可以了
2. vue-route 加载方式优化
加载方式有多种,这里仅提供2种方式
(1) 路由懒加载
- import VueRouter from 'vue-router'
- Vue.use(VueRouter)
-
- export default new VueRouter({
- routes: [
- {
- path: '/login', name: 'login', component(resolve) { require(['@pages/login'], resolve) },
- meta: { title: '登录' }
- },
-
- ...
- ]
- })
(2) 路由异步加载(模块划分)
- import Router from 'vue-router'
- Vue.use(Router)
-
- var router = new Router ({
- mode: 'history',
- base: process.env.BASE_URL,
- routes: [
- {
- path: '/login',
- name: 'login',
- component: r => require.ensure([], () => r(require('@pages/login.vue')), 'Login'),
- meta: { title: '登录' }
- },
- {
- path: '/model',
- name: 'model',
- component: r => require.ensure([], () => r(require('@pages/model.vue')), 'Model'),
- meta: { title: '模块' },
- children: [
- {
- path: '/model1',
- name: 'model1',
- component: r => require.ensure([], () => r(require('@pages/model1.vue')), 'Model'),
- meta: { title: '模块1' }
- },
-
- ...
- ]
- }
- ]
- })
-
- export default router;

3. 在webpack打包的过程中,将多余文件去掉,如map文件
vue-cli2: build/webpack.base.conf.js
vue-cli3: vue.config.js
productionSourceMap: false,4. CDN加速
把那些不太可能改动的代码或者库分离出来,继续减小单个chunk-vendors,然后通过CDN加载进行加速加载资源
- // vue-cli2 配置
- const vuxLoader = require('vux-loader')
- module.exports = vuxLoader.merge({
- ...
- externals: {
- 'vue': 'Vue',
- 'vue-router': 'VueRouter',
- 'mint-ui': 'MINT',
- "echarts": "echarts",
- 'ali-oss': 'OSS',
- },
- ...
- })
-
-
- // vue-cli3 配置
- module.exports = {
- ...
- configureWebpack: config => {
- config.externals: {
- 'vue': 'Vue',
- 'vue-router': 'VueRouter',
- 'mint-ui': 'MINT',
- "echarts": "echarts",
- 'ali-oss': 'OSS',
- },
- ...
- },
- ...
- }

注意:CDN本身的加载也会影响首屏加载速度(特别是对于国外的网站),可查找相关CDN提供网站(如https://www.bootcdn.cn/,http://staticfile.org/ 等),可对比斟酌后使用;
好用分享:影响首屏加载速度的因素很多,对于网络和请求方面,可通过抓包工具(如Charles)查看具体影响的位置和原因(如cdn,js,css,接口等)
5. 服务器和webpack打包同时配置Gzip
Gzip是GNU zip的缩写,顾名思义是一种压缩技术。它将浏览器请求的文件先在服务器端进行压缩,然后传递给浏览器,浏览器解压之后再进行页面的解析工作。在服务端开启Gzip支持后,我们前端需要提供资源压缩包,通过Compression-Webpack-Plugin插件build提供压缩
(1) 安装插件
webpack版本为3.x时,需要安装低版本插件: npm install --save-dev compression-webpack-plugin@1.1.12 ,否则会报错
webpack版本为4.x以上,可直接安装 npm install --save-dev compression-webpack-plugin
(2) 代码配置
- // vue-cli2
- const vuxLoader = require('vux-loader')
- const CompressionWebpackPlugin = require('compression-webpack-plugin');
-
- module.exports = vuxLoader.merge({
- ...
- },{
- plugins: [
- 'vux-ui',
- new CompressionWebpackPlugin({
- asset: '[path].gz[query]',
- algorithm: 'gzip',
- test: new RegExp('\\.(' + config.build.productionGzipExtensions.join('|') + ')$'),
- threshold: 10240,
- minRatio: 0.8,
- deleteOriginalAssets: false //是否删除源文件(默认)
- })
- ]
- })
-
- 注意:在config/index.js中需要配置
- productionGzip: true,
- productionGzipExtensions: ['js', 'css'],
-
-
- // vue-cli3
- const CompressionWebpackPlugin = require('compression-webpack-plugin');
- const productionGzipExtensions = ["js", "css"];
-
- module.exports = {
- ....
- configureWebpack: config => {
- config.plugins = ....,
- config.plugins.push(new CompressionWebpackPlugin({
- filename: "[path].gz[query]",
- algorithm: 'gzip',
- test: new RegExp("\\.(" + productionGzipExtensions.join("|") + ")$"), //匹配文件名
- threshold: 10240,
- minRatio: 0.8,
- deleteOriginalAssets: false //是否删除源文件(默认)
- }))
- }
- }

此方向需要服务器端配合完成相关配置才能生效,参照 https://blog.csdn.net/qq_37653449/article/details/85101227 (根据自身需要做相应配置)
更多优化方式参照:https://juejin.im/post/5d9ff02df265da5baf4104d9


