热门标签
热门文章
- 1PCA降维算法(内含PCA可视化迷你案例+PCA人脸识别降维案例+PCA逆转降噪案例)_pca降维实例
- 2基于51单片机智能晾衣架控制系统设计( proteus仿真+程序+设计报告+原理图+讲解视频)
- 3Python-Flask框架之——图书管理系统 , 附详解源码和效果图 !
- 4机器学习/深度学习中的常用损失函数公式、原理与代码实践(持续更新ing...)_sparsemax函数
- 5vue3.0使用axios 解决跨域问题_vue3 axios跨域
- 6基于Vue框架的思源新闻发布平台设计与实现(论文+源码)_kaic_基于vue框架的实时新闻推送平台的设计与实现
- 7C语言实现输入 n 个字符串,将它们按字母由小到大的顺序排列并输出_字符串排序:输入n个字符串,按从小到大的顺序输出
- 8Java-时间复杂度和空间复杂度的概念和计算_java复杂度怎么算
- 9大学荒废4年,毕业后自学3个月软件测试,找到了15K的工作_大学混了四年能找到软件测试工作吗
- 10The TCP/IP connection to the host localhost, port 1433 has failed._verify the connection properties. make sure that a
当前位置: article > 正文
YOLOv5-2.0如何更改标签颜色和字体大小_yolov5怎么调整标签大小
作者:笔触狂放9 | 2024-06-03 11:00:21
赞
踩
yolov5怎么调整标签大小
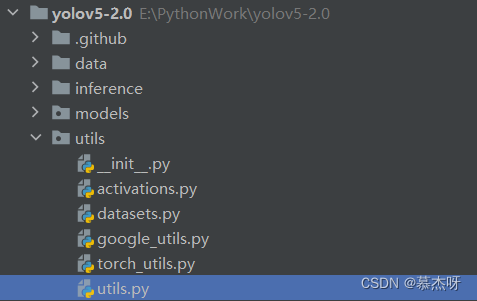
在yolov5-2.0项目文件下找到utils目录,打开utils.py文件,找到“plot_one_box()”函数,大概是在第940行位置。

内容如下:
- def plot_one_box(x, img, color=None, label=None, line_thickness=None):
- # Plots one bounding box on image img
- tl = line_thickness or round(0.002 * (img.shape[0] + img.shape[1]) / 2) + 1 # line/font thickness
- color = color or [random.randint(0, 255) for _ in range(3)]
- c1, c2 = (int(x[0]), int(x[1])), (int(x[2]), int(x[3]))
- cv2.rectangle(img, c1, c2, color, thickness=tl, lineType=cv2.LINE_AA)
- if label:
- tf = max(tl - 1, 1) # font thickness
- t_size = cv2.getTextSize(label, 0, fontScale=tl / 3, thickness=tf)[0]
- c2 = c1[0] + t_size[0], c1[1] - t_size[1] - 3
- cv2.rectangle(img, c1, c2, color, -1, cv2.LINE_AA) # filled
- cv2.putText(img, label, (c1[0], c1[1] - 2), 0, tl / 3, [225, 255, 255], thickness=tf, lineType=cv2.LINE_AA)
1、修改标签背景框,即找到下面代码,修改参数“ fontScale”,如“ fontScale=3=5”。
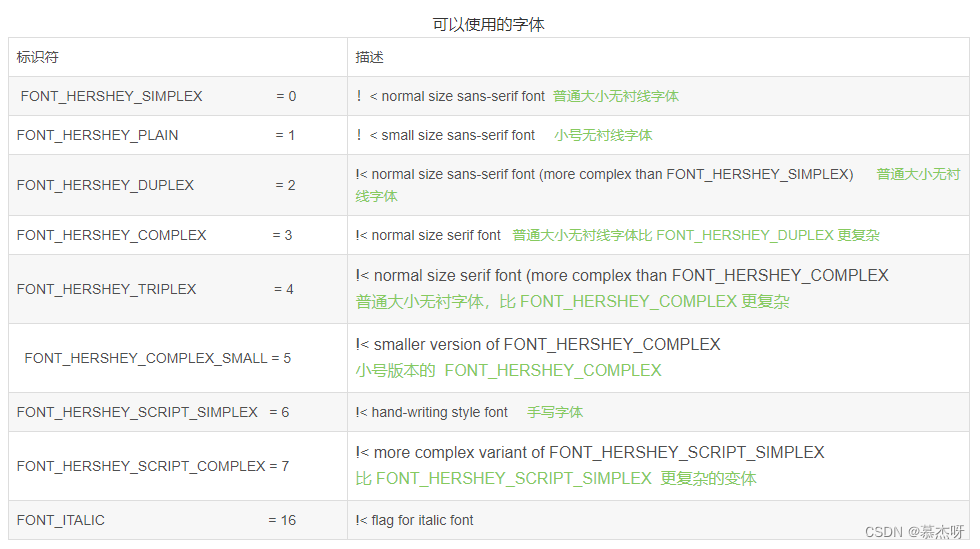
t_size = cv2.getTextSize(label, 0, fontScale=tl / 3, thickness=tf)[0]2、修改标签字体格式,即找到下面代码 进行修改,参数“img, label, (c1[0], c1[1] - 2), 0, tl / 3, [225, 255, 255], thickness=tf”依次代表“图片,添加的文字,左上角坐标,字体样式,字体大小,颜色,字体粗细”,参数的值可以是0、1、2、3、4、5等等。
cv2.putText(img, label, (c1[0], c1[1] - 2), 0, tl / 3, [225, 255, 255], thickness=tf, lineType=cv2.LINE_AA)字体样式如下:

3、取消检测标签,只保留检测框,注释掉若干行代码即可。
- def plot_one_box(x, img, color=None, label=None, line_thickness=None):
- # Plots one bounding box on image img
- tl = line_thickness or round(0.002 * (img.shape[0] + img.shape[1]) / 2) + 1 # line/font thickness
- color = color or [random.randint(0, 255) for _ in range(3)]
- c1, c2 = (int(x[0]), int(x[1])), (int(x[2]), int(x[3]))
- cv2.rectangle(img, c1, c2, color, thickness=tl, lineType=cv2.LINE_AA)
- # if label:
- # tf = max(tl - 1, 1) # font thickness
- # t_size = cv2.getTextSize(label, 0, fontScale=tl / 3, thickness=tf)[0]
- # c2 = c1[0] + t_size[0], c1[1] - t_size[1] - 3
- # cv2.rectangle(img, c1, c2, color, -1, cv2.LINE_AA) # filled
- # cv2.putText(img, label, (c1[0], c1[1] - 2), 0, tl / 3, [225, 255, 255], thickness=tf, lineType=cv2.LINE_AA)
4、修改随机颜色,可见每次detect后颜色都是随机生成的,因此我们需要把每类标签的颜色固定。把colors改为你想要的颜色,有多少个类别就选择多少颜色,也可以多列举几个颜色 :
- # Get names and colors
- names = model.module.names if hasattr(model, 'module') else model.names
- colors = [[random.randint(0, 255) for _ in range(3)] for _ in range(len(names))]
修改后:
- colors = [[0, 255, 0], [0, 0, 255], [255, 0, 0],[255, 150, 0],
- [255, 0, 150], [0, 150, 255], [150, 0, 255]]
声明:本文内容由网友自发贡献,不代表【wpsshop博客】立场,版权归原作者所有,本站不承担相应法律责任。如您发现有侵权的内容,请联系我们。转载请注明出处:https://www.wpsshop.cn/w/笔触狂放9/article/detail/666963
推荐阅读
相关标签


