- 12024年网络安全最新k8s学习-k8s资源对象与yaml结构_容器服务yaml配置 status(2),2024年最新网络安全开发学习视频
- 2ChatGLM-6B的部署步骤_A1_chatglm3-6b 硬件要求
- 3C#进阶-ASP.NET WebForms调用ASMX的WebService接口
- 4sqlserver.jdbc.SQLServerException: 驱动程序无法通过使用安全套接字层(SSL)加密与 SQL Server 建立安全连接_failed to obtain jdbc connection; nested exception
- 5vulnhub靶机渗透 FRISTILEAKS: 1.3_vulnhub: fristileaks安装
- 6AttentionOCR Pytorch中文识别程序_torch bilstm接cnncsdn
- 7(ARM-Linux) ORACLE JDK 22 的下载安装及环境变量的配置_jdk22下载安装
- 8一文详解Softmax函数_python 里的softmax函数的概率代表什么
- 9linux 日常使用命令_跑显存命令
- 10金融业开源软件研究评测(一)——分布式消息中间件评测模型_金融业开源软件评测
从OCR到(旋转)目标检测:四点标注转VOC和roLabelImg_旋转目标标注
赞
踩
0 项目背景
本项目来源于一个PaddleOCR垂类场景,该场景对检测模型准确率需求较高,由于担心PaddleOCR的检测器模型效果可能不能满足需求,因此希望尝试通过PaddleDetection模型库提高对目标框的检测效果。
1 PaddleOCR模型原理
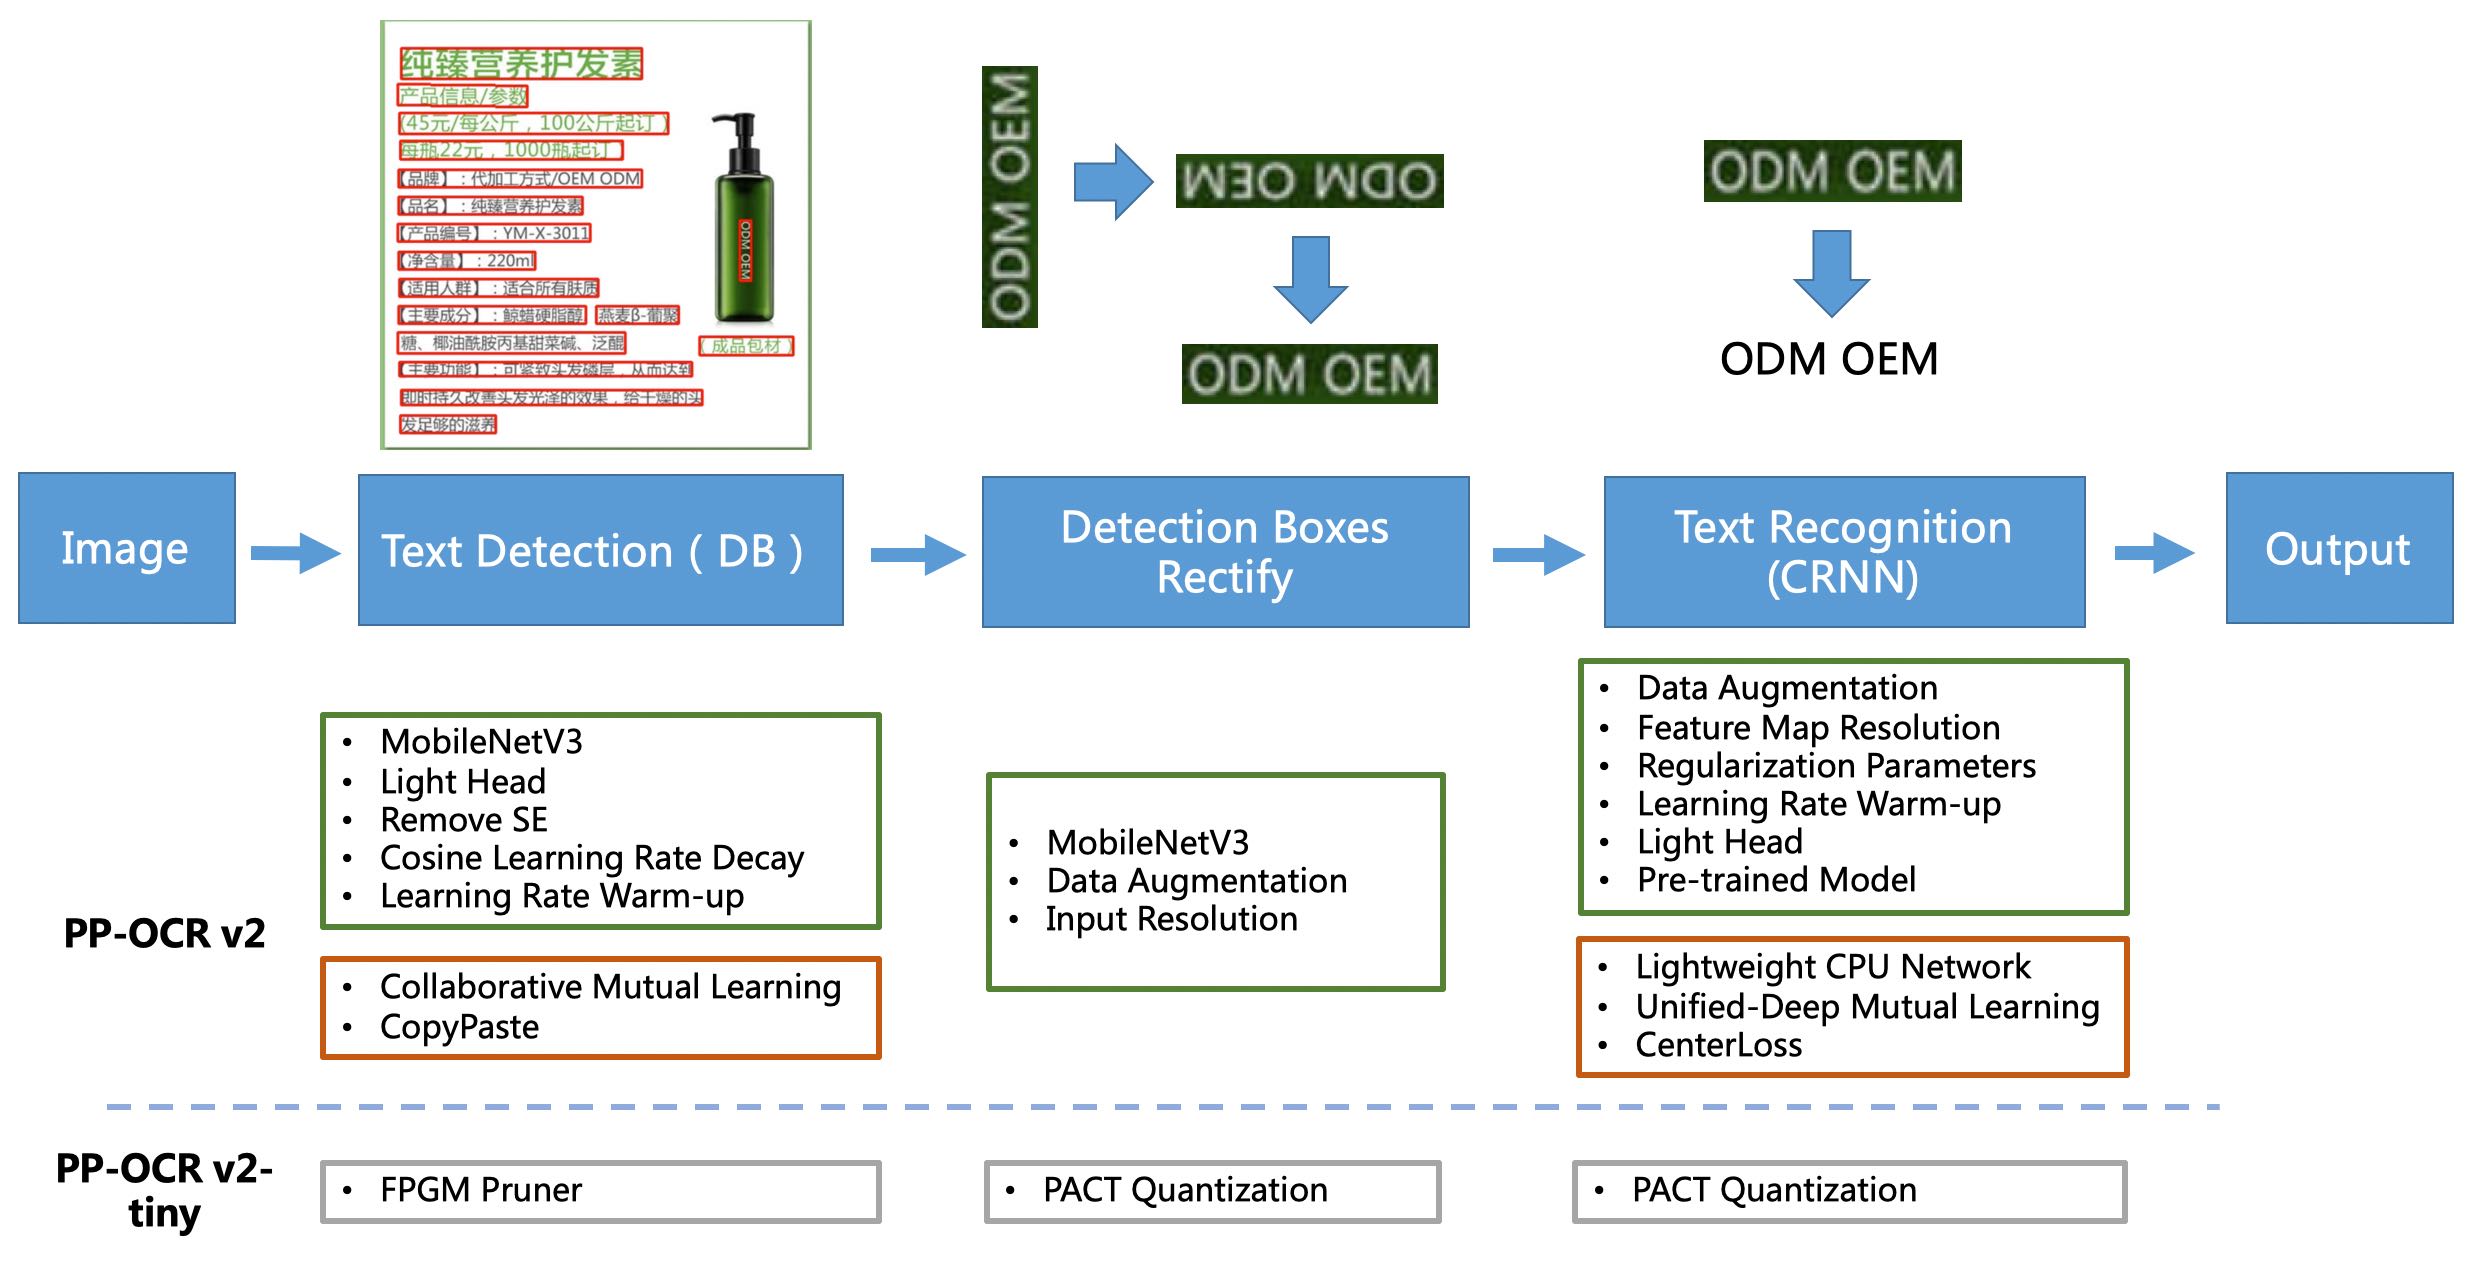
PP-OCR是一个实用的超轻量OCR系统。主要由DB文本检测、检测框矫正和CRNN文本识别三部分组成。该系统从骨干网络选择和调整、预测头部的设计、数据增强、学习率变换策略、正则化参数选择、预训练模型使用以及模型自动裁剪量化8个方面,采用19个有效策略,对各个模块的模型进行效果调优和瘦身(如绿框所示),最终得到整体大小为3.5M的超轻量中英文OCR和2.8M的英文数字OCR。
因此,我们知道PP-OCR其实是三个模型的串接,它们分别是:
- 文本检测模型
- 文本识别模型
- 文本方向分类器模型
2 场景分析
本项目面临的是一个电表读数和编号识别场景,在该垂类场景中,由于并不是需要全部的文本,同时场景情况又比较复杂,比如存在反光、甚至电表读数也不是全部需要识别的(只需识别整数位)。
使用PPOCRLabel半自动标注工具标注后,其中一条结果如下所示:
M2021/IMG_20210712_101222.jpg [{"transcription": "02995", "points": [[1151.0, 1394.0], [1898.0, 1411.0], [1894.0, 1558.0], [1146.0, 1541.0]], "difficult": false}, {"transcription": "2002-00053452", "points": [[1152.0, 2543.0], [1801.0, 2543.0], [1801.0, 2651.0], [1152.0, 2651.0]], "difficult": false}]
- 1
所以,用的是四点标注模式,显然,是一个不规则的四边形。
但是我们知道,如果不使用PP-OCR的检测器,而希望用PaddleDetection模型库的话,需要的是标准的矩形框(无论是否旋转),因此本文主要解决从四点标注到矩形标注转换的问题,希望能减少标注工作量,避免标两次。
- (标注一次方案)PPOCRLabel四点模式半自动标注,通过规则和格式转换,构建检测数据集
- 目标检测数据集标注一次,裁剪后构成新的的数据集,再用OCR标注一次
使用PaddleDetection替代PP-OCR的检测器还有另一个好处,因为在该场景需要区分表号和电表读数,用检测模型自然会带出文字框的类别,这样就不需要对PP-OCR输出的结果再进行后处理了。
3 数据格式转换
3.1 四点标注转VOC数据集
3.1.1 VOC数据集格式要求
首先还是先来看看VOC数据集的目录结构。
.
├── Annotations
├── ImageSets(不需要)
│   ├── Action
│   ├── Layout
│   ├── Main
│   └── Segmentation
├── JPEGImages
├── SegmentationClass(不需要)
└── SegmentationObject(不需要)
- 1
- 2
- 3
- 4
- 5
- 6
- 7
- 8
- 9
- 10
因为我们只考虑构成基础的矩形框,不打算做实例分割,所以这里其实很多目录都不需要,只要有图片、对应标注的xml文件,其实就可以了。
数据集切分的话,完全可以使用PaddleX自带的一键划分工具,所以,也不需要太操心。
接下来我们需要关心下标注文件的内容,当然,对比标准的VOC格式,仍然有很多字段可以删掉。
<annotation>
	<filename>2012_004331.jpg</filename>
	<folder>VOC2012</folder>
	<object>
		<name>person</name>
		<actions>
			<jumping>1</jumping>
			<other>0</other>
			<phoning>0</phoning>
			<playinginstrument>0</playinginstrument>
			<reading>0</reading>
			<ridingbike>0</ridingbike>
			<ridinghorse>0</ridinghorse>
			<running>0</running>
			<takingphoto>0</takingphoto>
			<usingcomputer>0</usingcomputer>
			<walking>0</walking>
		</actions>
		<bndbox>
			<xmax>208</xmax>
			<xmin>102</xmin>
			<ymax>230</ymax>
			<ymin>25</ymin>
		</bndbox>
		<difficult>0</difficult>
		<pose>Unspecified</pose>
		<point>
			<x>155</x>
			<y>119</y>
		</point>
	</object>
	<segmented>0</segmented>
	<size>
		<depth>3</depth>
		<height>375</height>
		<width>500</width>
	</size>
	<source>
		<annotation>PASCAL VOC2012</annotation>
		<database>The VOC2012 Database</database>
		<image>flickr</image>
	</source>
</annotation>
- 1
- 2
- 3
- 4
- 5
- 6
- 7
- 8
- 9
- 10
- 11
- 12
- 13
- 14
- 15
- 16
- 17
- 18
- 19
- 20
- 21
- 22
- 23
- 24
- 25
- 26
- 27
- 28
- 29
- 30
- 31
- 32
- 33
- 34
- 35
- 36
- 37
- 38
- 39
- 40
- 41
- 42
- 43
我们的极简版目标检测数据集,只需要:
<annotation>
	<filename>2012_004331.jpg</filename>
	<folder>VOC2012</folder>
	<object>
		<name>person</name>
		<bndbox>
			<xmax>208</xmax>
			<xmin>102</xmin>
			<ymax>230</ymax>
			<ymin>25</ymin>
		</bndbox>
		<difficult>0</difficult>
	</object>
	<size>
		<depth>3</depth>
		<height>375</height>
		<width>500</width>
	</size>
</annotation>
- 1
- 2
- 3
- 4
- 5
- 6
- 7
- 8
- 9
- 10
- 11
- 12
- 13
- 14
- 15
- 16
- 17
- 18
- 19
3.1.2 定位标注框位置
这步的转换还是比较简单的,对于VOC数据集,需要找到xmin, ymin, xmax, ymax,而四点标注格式为(x1, y1), (x2, y2), (x3, y3), (x4, y4), (x1, y1),其实只需要稍加计算就能解决边框点的位置。
3.1.3 确定打标逻辑
从OCR到Detection,还有一个需要解决的就是标签问题,我们需要把电表读数和表号区分开来,分别打标。在该场景中,主要是通过规则进行判定,原因很简单,一般读数超过8位的都是电表编号,相对而言,电表读数位数还是比较少的。当然,也是刚好,这个场景可以区分开来。
如果是其它场景,也需要做OCR到Detection的打标,那么可能就要看OCR识别的具体内容。
3.1.4 关键代码
在下面这段代码中,我们就成功整理出了需要构建VOC数据集的基础元素。
import json
import cv2
with open('./M2021/Labels.txt','r',encoding='utf8')as fp:
    s = [i[:-1].split('\t') for i in fp.readlines()]
    for i in enumerate(s):
        # 四点标注的第一个字符串,表示文件相对路径
        path = i[1][0]
        # 解析标注内容,需要import json
        anno = json.loads(i[1][1])
        # 通过规则筛选出文件名
        filename = i[1][0][6:-4]
        # 读取图片
        img = cv2.imread(path)
        # 读取图片的高、宽,因为构造VOC的格式需要
        height, weight = img.shape[:-1]
        # 有的电表有表号,有的没有,需要逐一遍历
        for j in range(len(anno)):
            # 识别结果超过8位的,被判定为是电表编号
            if len(anno[j-1]['transcription']) > 8:
                label = 'No.'
            # 其它标注为读数
            else:
                label = 'indicator'
            # xmin, xmax, ymin, ymax的计算逻辑
            x1 = min(int(anno[j-1]['points'][0][0]),int(anno[j-1]['points'][1][0]),int(anno[j-1]['points'][2][0]),int(anno[j-1]['points'][3][0]))
            x2 = max(int(anno[j-1]['points'][0][0]),int(anno[j-1]['points'][1][0]),int(anno[j-1]['points'][2][0]),int(anno[j-1]['points'][3][0]))
            y1 = min(int(anno[j-1]['points'][0][1]),int(anno[j-1]['points'][1][1]),int(anno[j-1]['points'][2][1]),int(anno[j-1]['points'][3][1]))
            y2 = max(int(anno[j-1]['points'][0][1]),int(anno[j-1]['points'][1][1]),int(anno[j-1]['points'][2][1]),int(anno[j-1]['points'][3][1]))
            # 打印出结果印证
            print(path, filename, label, x1, x2, y1, y2)
- 1
- 2
- 3
- 4
- 5
- 6
- 7
- 8
- 9
- 10
- 11
- 12
- 13
- 14
- 15
- 16
- 17
- 18
- 19
- 20
- 21
- 22
- 23
- 24
- 25
- 26
- 27
- 28
- 29
- 30
M2021/IMG_20210712_101215.jpg IMG_20210712_101215 No. 1038 1636 2554 2702
M2021/IMG_20210712_101215.jpg IMG_20210712_101215 indicator 1043 1769 1453 1612
M2021/IMG_20210712_101222.jpg IMG_20210712_101222 No. 1152 1801 2543 2651
M2021/IMG_20210712_101222.jpg IMG_20210712_101222 indicator 1146 1898 1394 1558
- 1
- 2
- 3
- 4
3.1.5 生成数据集
import os
from collections import defaultdict
import cv2
# import misc_utils as utils  # pip3 install utils-misc==0.0.5 -i https://pypi.douban.com/simple/
import json

os.makedirs('./Annotations', exist_ok=True)
print('建立Annotations目录', 3)
# os.makedirs('./PaddleOCR/train_data/ImageSets/Main', exist_ok=True)
# print('建立ImageSets/Main目录', 3)

mem = defaultdict(list)

with open('./M2021/Labels.txt','r',encoding='utf8')as fp:
    s = [i[:-1].split('\t') for i in fp.readlines()]
    for i in enumerate(s):
        path = i[1][0]
        print(path)
        anno = json.loads(i[1][1])
        filename = i[1][0][6:-4]
        img = cv2.imread(path)
        height, width = img.shape[:-1]
        for j in range(len(anno)):
            if len(anno[j-1]['transcription']) > 8:
                label = 'No.'
            else:
                label = 'indicator'
            x1 = min(int(anno[j-1]['points'][0][0]),int(anno[j-1]['points'][1][0]),int(anno[j-1]['points'][2][0]),int(anno[j-1]['points'][3][0]))
            x2 = max(int(anno[j-1]['points'][0][0]),int(anno[j-1]['points'][1][0]),int(anno[j-1]['points'][2][0]),int(anno[j-1]['points'][3][0]))
            y1 = min(int(anno[j-1]['points'][0][1]),int(anno[j-1]['points'][1][1]),int(anno[j-1]['points'][2][1]),int(anno[j-1]['points'][3][1]))
            y2 = max(int(anno[j-1]['points'][0][1]),int(anno[j-1]['points'][1][1]),int(anno[j-1]['points'][2][1]),int(anno[j-1]['points'][3][1]))
            mem[filename].append([label, x1, y1, x2, y2])

# for i, filename in enumerate(mem):
#     img = cv2.imread(os.path.join('train', filename))
    # height, width, _ = img.shape


            with open(os.path.join('./Annotations', filename.rstrip('.jpg')) + '.xml', 'w') as f:
                f.write(f"""<annotation>
            <folder>JPEGImages</folder>
            <filename>{filename}.jpg</filename>
            <size>
                <width>{width}</width>
                <height>{height}</height>
                <depth>3</depth>
            </size>
            <segmented>0</segmented>\n""")
                for label, x1, y1, x2, y2 in mem[filename]:
                    f.write(f"""    <object>
                <name>{label}</name>
                <pose>Unspecified</pose>
                <truncated>0</truncated>
                <difficult>0</difficult>
                <bndbox>
                    <xmin>{x1}</xmin>
                    <ymin>{y1}</ymin>
                    <xmax>{x2}</xmax>
                    <ymax>{y2}</ymax>
                </bndbox>
            </object>\n""")
                f.write("</annotation>")
- 1
- 2
- 3
- 4
- 5
- 6
- 7
- 8
- 9
- 10
- 11
- 12
- 13
- 14
- 15
- 16
- 17
- 18
- 19
- 20
- 21
- 22
- 23
- 24
- 25
- 26
- 27
- 28
- 29
- 30
- 31
- 32
- 33
- 34
- 35
- 36
- 37
- 38
- 39
- 40
- 41
- 42
- 43
- 44
- 45
- 46
- 47
- 48
- 49
- 50
- 51
- 52
- 53
- 54
- 55
- 56
- 57
- 58
- 59
- 60
- 61
- 62
- 63
这样,就轻松生成了Annotations目录,可以核实下转换效果。
<annotation>
            <folder>JPEGImages</folder>
            <filename>IMG_20210712_101215.jpg</filename>
            <size>
                <width>3024</width>
                <height>4032</height>
                <depth>3</depth>
            </size>
            <segmented>0</segmented>
    <object>
                <name>No.</name>
                <pose>Unspecified</pose>
                <truncated>0</truncated>
                <difficult>0</difficult>
                <bndbox>
                    <xmin>1038</xmin>
                    <ymin>2554</ymin>
                    <xmax>1636</xmax>
                    <ymax>2702</ymax>
                </bndbox>
            </object>
    <object>
                <name>indicator</name>
                <pose>Unspecified</pose>
                <truncated>0</truncated>
                <difficult>0</difficult>
                <bndbox>
                    <xmin>1043</xmin>
                    <ymin>1453</ymin>
                    <xmax>1769</xmax>
                    <ymax>1612</ymax>
                </bndbox>
            </object>
</annotation>
- 1
- 2
- 3
- 4
- 5
- 6
- 7
- 8
- 9
- 10
- 11
- 12
- 13
- 14
- 15
- 16
- 17
- 18
- 19
- 20
- 21
- 22
- 23
- 24
- 25
- 26
- 27
- 28
- 29
- 30
- 31
- 32
- 33
- 34
3.2 四点标注转roLabelImg格式
3.2.1 roLabelImg格式要求
roLabelImg是基于labelImg改进的,也是用来标注为VOC格式的数据,但是在labelImg的基础上增加了能够使标注的框进行旋转的功能。
<annotation verified="yes">
  <folder>hsrc</folder>
  <filename>100000001</filename>
  <path>/Users/haoyou/Library/Mobile Documents/com~apple~CloudDocs/OneDrive/hsrc/100000001.bmp</path>
  <source>
    <database>Unknown</database>
  </source>
  <size>
    <width>1166</width>
    <height>753</height>
    <depth>3</depth>
  </size>
  <segmented>0</segmented>
  <object>
    <type>bndbox</type>
    <name>ship</name>
    <pose>Unspecified</pose>
    <truncated>0</truncated>
    <difficult>0</difficult>
    <bndbox>
      <xmin>178</xmin>
      <ymin>246</ymin>
      <xmax>974</xmax>
      <ymax>504</ymax>
    </bndbox>
  </object>
  <object>
    <type>robndbox</type>
    <name>ship</name>
    <pose>Unspecified</pose>
    <truncated>0</truncated>
    <difficult>0</difficult>
    <robndbox>
      <cx>580.7887</cx>
      <cy>343.2913</cy>
      <w>775.0449</w>
      <h>170.2159</h>
      <angle>2.889813</angle>
    </robndbox>
  </object>
</annotation>
- 1
- 2
- 3
- 4
- 5
- 6
- 7
- 8
- 9
- 10
- 11
- 12
- 13
- 14
- 15
- 16
- 17
- 18
- 19
- 20
- 21
- 22
- 23
- 24
- 25
- 26
- 27
- 28
- 29
- 30
- 31
- 32
- 33
- 34
- 35
- 36
- 37
- 38
- 39
- 40
- 41
可以看出,其实唯一的差异就在于这里:
  <object>
    <type>robndbox</type>
    <name>ship</name>
    <pose>Unspecified</pose>
    <truncated>0</truncated>
    <difficult>0</difficult>
    <robndbox>
      <cx>580.7887</cx>
      <cy>343.2913</cy>
      <w>775.0449</w>
      <h>170.2159</h>
      <angle>2.889813</angle>
    </robndbox>
  </object>
- 1
- 2
- 3
- 4
- 5
- 6
- 7
- 8
- 9
- 10
- 11
- 12
- 13
- 14
-
cx, cy表示bndbox的中心点坐标(坐标系方向和一般的图像坐标系相同,左上角为原点,向右为x正方向,向下为y正方向)
-
h和w是标记目标的高和宽
-
angle是旋转角度信息,水平bndbox,angle=0,,顺时针方向旋转,得到的角度值是一个弧度单位的正值,且旋转一周为pi,没有负值
3.2.2 寻找最小外接矩形
画一个**任意四边形(任意多边形都可以)**的最小外接矩形,显然,这个最小外接矩形就是我们希望找到的旋转矩形框。
函数 cv2.minAreaRect() 返回一个Box2D结构rect:(最小外接矩形的中心(x,y),(宽度,高度),旋转角度),但是要绘制这个矩形,我们需要矩形的4个顶点坐标box, 通过函数 cv2.cv.BoxPoints() 获得,返回形式[ [x0,y0], [x1,y1], [x2,y2], [x3,y3] ]。得到的最小外接矩形的4个顶点顺序、中心坐标、宽度、高度、旋转角度(是度数形式,不是弧度数)。
不过,需要注意的是,不同版本的OpenCV,在cv2.minAreaRect()函数上是有显著变化的,差异就在于最后的旋转角度如何计算,请参见关于不同版本opencv的cv2.minAreaRect函数输出角度范围不同的问题有非常详尽的分析。
由于在AIStudio上,是无法切换OpenCV版本的,因此,我们这里采用的还是OpenCV4.1.1当中的cv2.minAreaRect()函数,它的特点如下:
- 旋转角度θ是水平轴(x轴)逆时针旋转,直到碰到矩形的第一条边停住,此时该边与水平轴的夹角。并且这个边的边长是width,另一条边边长是height。也就是说,在这里,width与height不是按照长短来定义的。
- 坐标系原点在左上角,相对于x轴,逆时针旋转角度为负,顺时针旋转角度为正。所以,θ∈(-90度,0]。
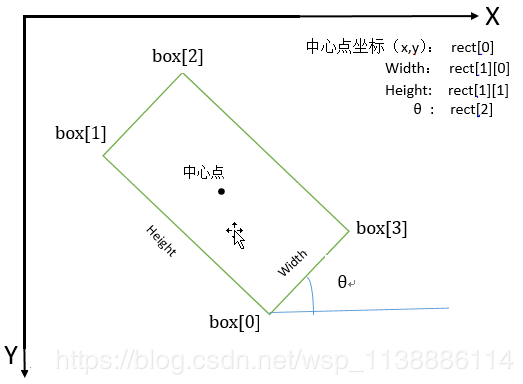
因此,我们可以发现,通过使用cv2.minAreaRect()函数,roLabelImg格式需要的cx,cy,w,h直接就可以得到,唯一麻烦的是angle怎么换算。
接下来,我们先把绘制外接矩形的操作画出来,看看效果。
import math
import numpy as np
import os
from collections import defaultdict
import cv2
import matplotlib.pyplot as plt
import json
%matplotlib inline
- 1
- 2
- 3
- 4
- 5
- 6
- 7
- 8
def order_points(pts):
    # sort the points based on their x-coordinates
    # 将输入的四个顶点进行排序
    xSorted = pts[np.argsort(pts[:, 0]), :]

    # grab the left-most and right-most points from the sorted
    # x-roodinate points
    leftMost = xSorted[:2, :]
    rightMost = xSorted[2:, :]
    if leftMost[0,1]!=leftMost[1,1]:
        leftMost=leftMost[np.argsort(leftMost[:,1]),:]
    else:
        leftMost=leftMost[np.argsort(leftMost[:,0])[::-1],:]
    (tl, bl) = leftMost
    if rightMost[0,1]!=rightMost[1,1]:
        rightMost=rightMost[np.argsort(rightMost[:,1]),:]
    else:
        rightMost=rightMost[np.argsort(rightMost[:,0])[::-1],:]
    (tr,br)=rightMost
    # return the coordinates in top-left, top-right,
    # bottom-right, and bottom-left order
    # 返回的结果是,左上,右上,右下,左下的顺时针顶点序列
    return np.array([tl, tr, br, bl], dtype="float32")

# 输入一个四点标注框的坐标,来源于文件 M2021/16号中继站护路生活区.jpg
pts = np.array([[1035.8125000000002, 2260.5], [1038.8125000000002, 2400.5], [1760.8125000000002, 2444.5], [1760.8125000000002, 2310.5]])
# 顶点排序
clock_points = order_points(pts)
# 获得最小外接矩形
rect = cv2.minAreaRect(clock_points)
# 打印下(cx,cy),(w,h),angle
print(rect)
# 将((cx,cy),(w,h),angle)格式表示的多边形数据转成点集表示
rect_pts = cv2.boxPoints(rect).astype(np.int32)
img = np.ones((3456,4608,3)).astype(np.uint8) * 255
cv2.polylines(img,np.int32([clock_points]),True,(255,0,0),2)
cv2.polylines(img,np.int32([rect_pts]),True,(0,0,255),1)
(img,np.int32([rect_pts]),True,(0,0,255),1)
plt.imsave('test.jpg',img)
- 1
- 2
- 3
- 4
- 5
- 6
- 7
- 8
- 9
- 10
- 11
- 12
- 13
- 14
- 15
- 16
- 17
- 18
- 19
- 20
- 21
- 22
- 23
- 24
- 25
- 26
- 27
- 28
- 29
- 30
- 31
- 32
- 33
- 34
- 35
- 36
- 37
- 38
- 39
((1398.3125, 2352.5), (139.55825805664062, 734.8499755859375), -86.51260375976562)
- 1
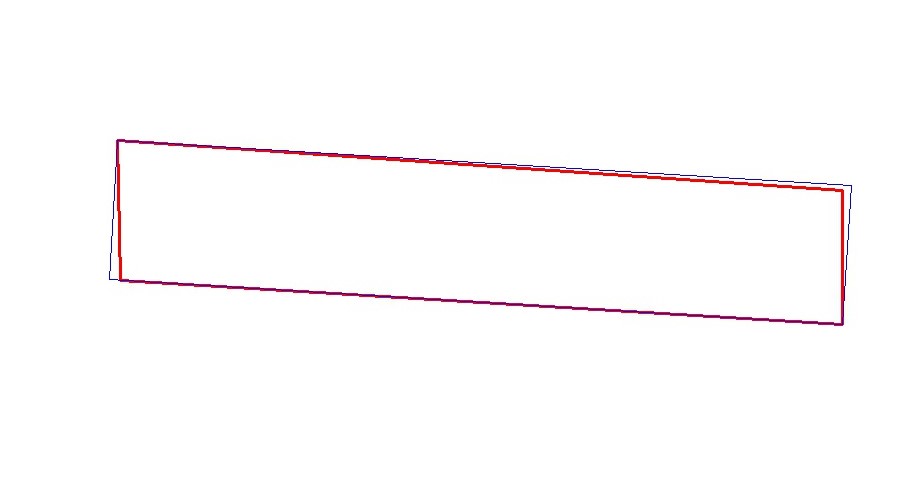
最小外接矩形绘制效果如下:
3.2.3 生成旋转目标检测数据集
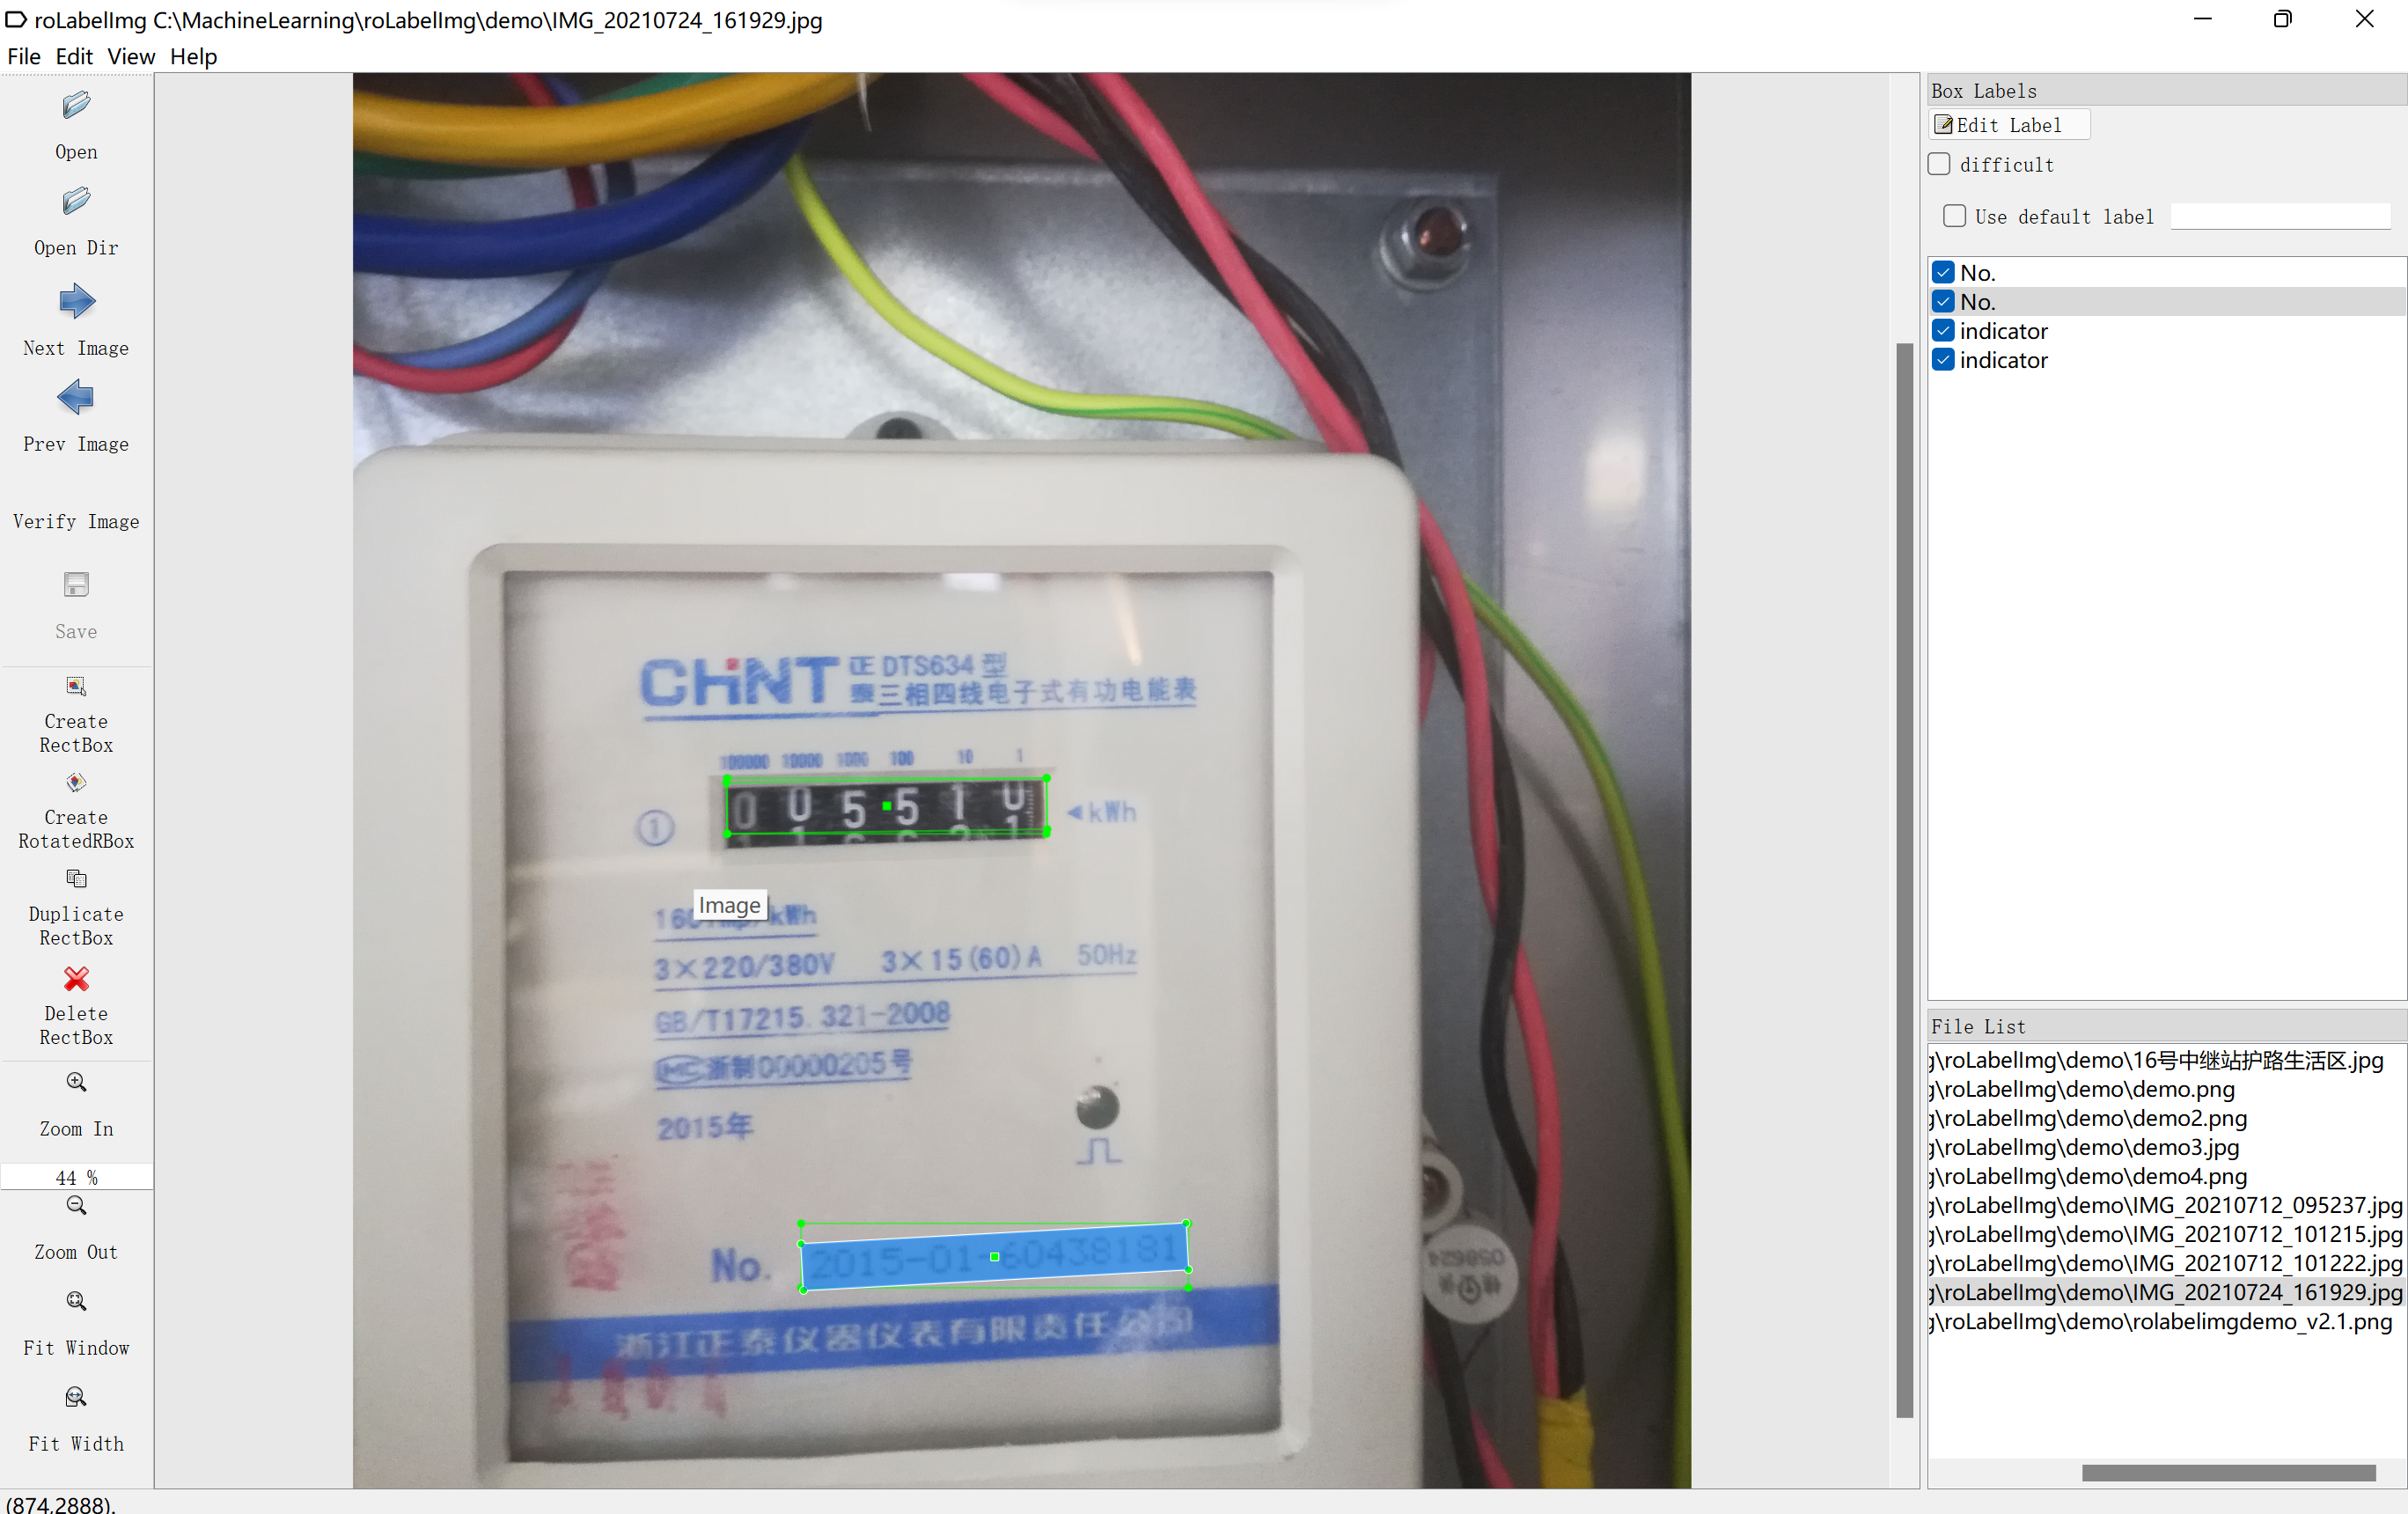
关于旋转角度的计算,这里参考了coordinate_convert.py,并根据实际测试结果进行了调整。主要还是因为OpenCV的版本问题,最后生成的数据集转换效果如下:
四点标注
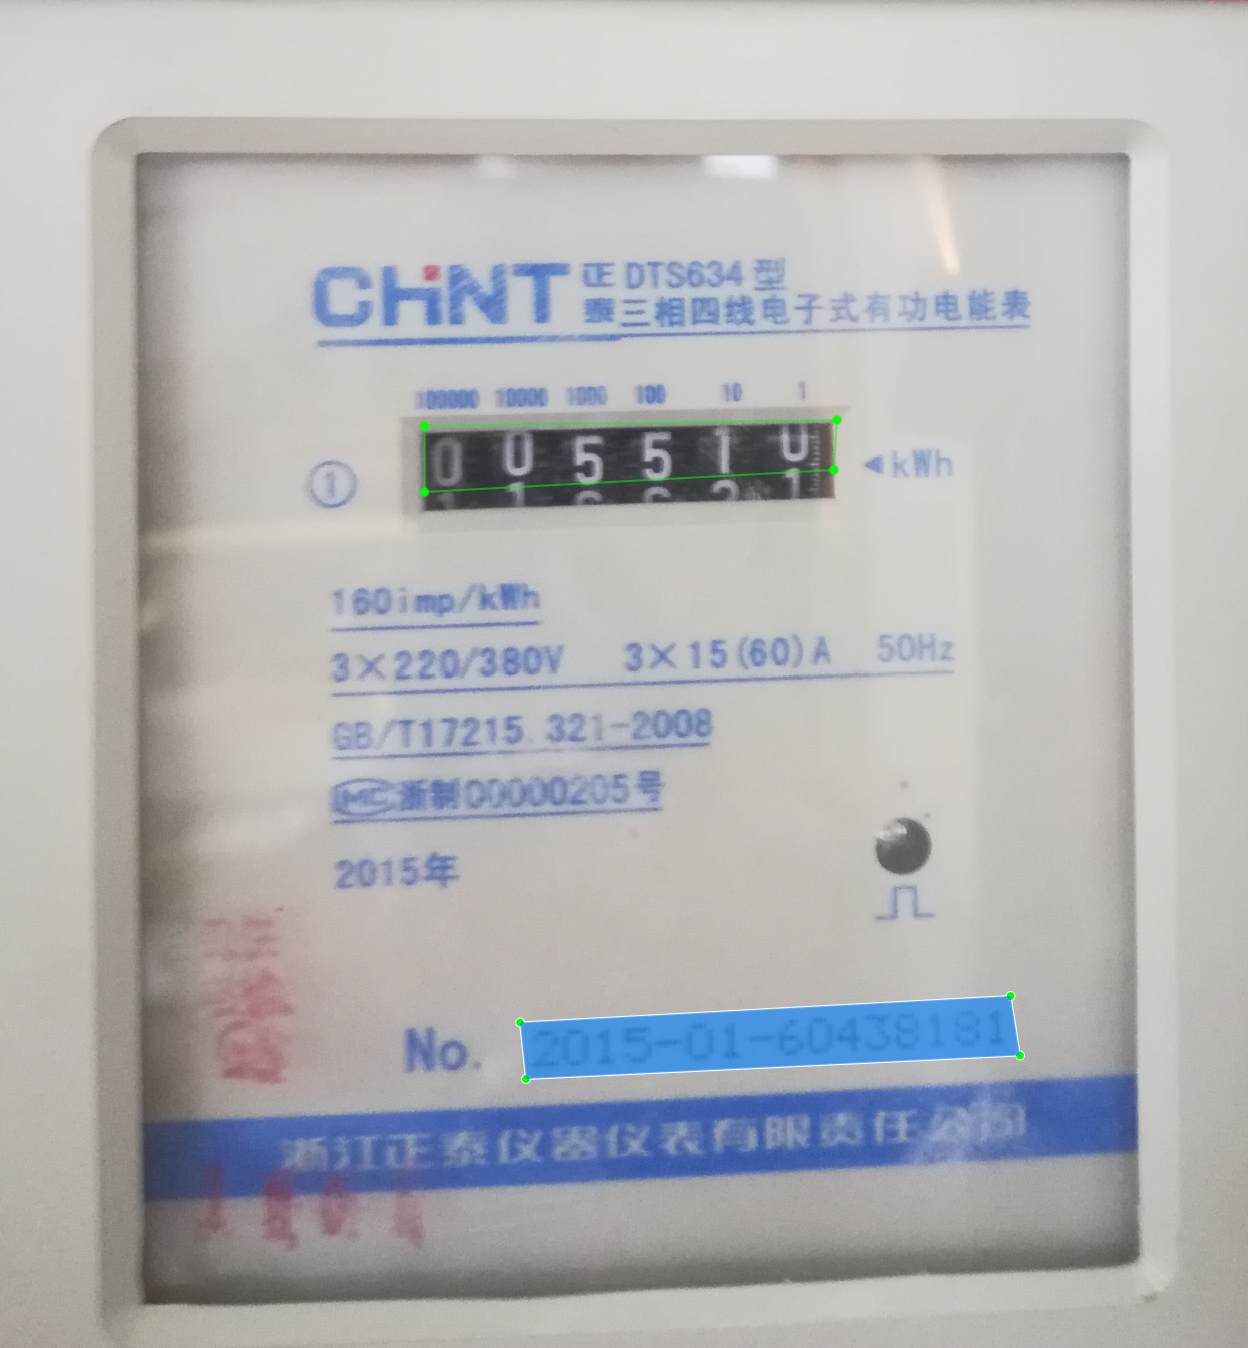
roLabelImg转换效果
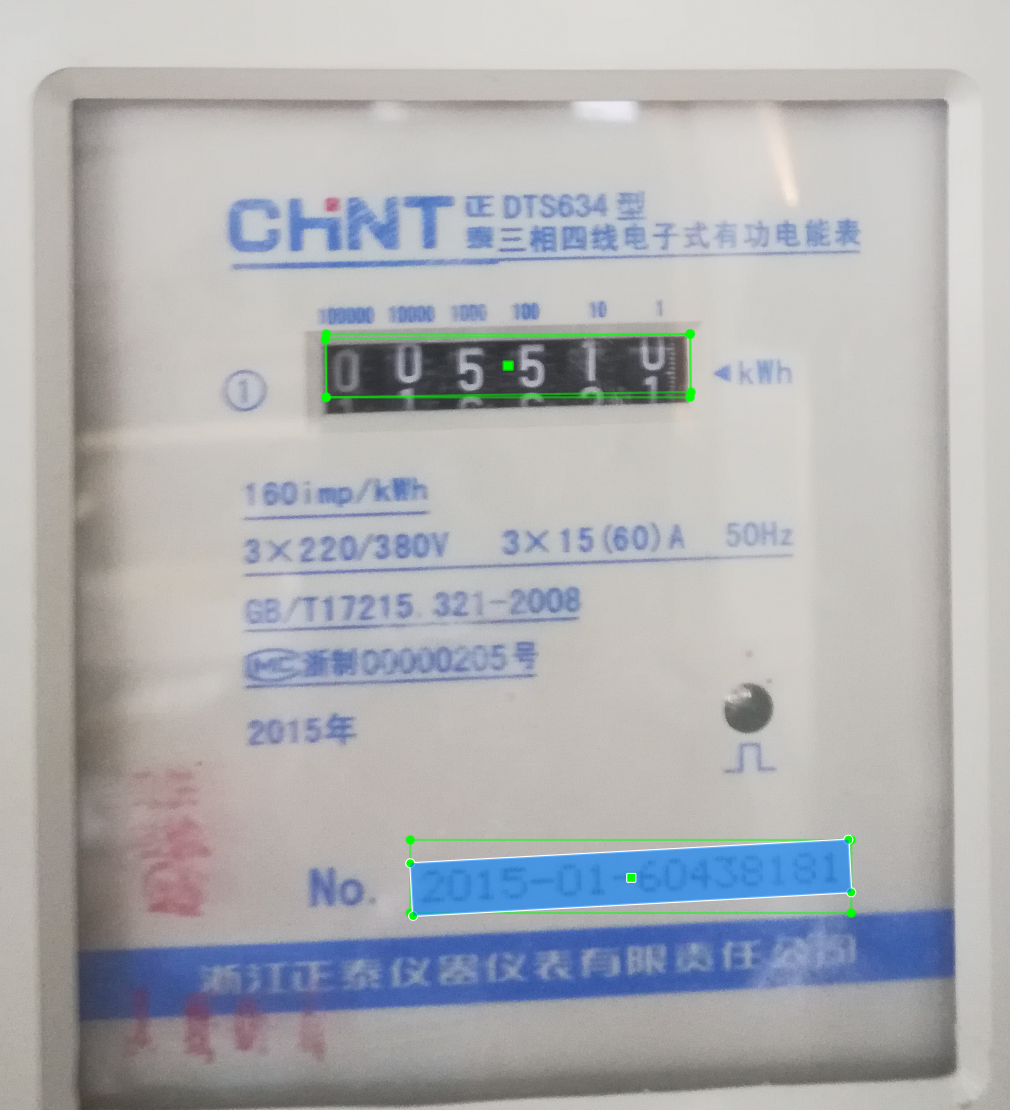
格式转换是否成功,可以以roLabelImg中查看的实际效果为依据。
def coordinate_present_convert(coords, shift=True):
    """
    :param coords: shape [-1, 5]
    :param shift: [-90, 90) --> [-180, 0)
    :return: shape [-1, 5]
    """
    # angle range from [-90, 0) to [0,180)
    w, h = coords[:, 2], coords[:, 3]

    remain_mask = np.greater(w, h)
    convert_mask = np.logical_not(remain_mask).astype(np.int32)
    remain_mask = remain_mask.astype(np.int32)

    remain_coords = coords * np.reshape(remain_mask, [-1, 1])

    coords[:, [2, 3]] = coords[:, [3, 2]]
    coords[:, 4] += 90

    convert_coords = coords * np.reshape(convert_mask, [-1, 1])

    coords_new = remain_coords + convert_coords


    if shift:
        if coords_new[:, 4] >= 0:
            coords_new[:, 4] = 180 + coords_new[:, 4]

    return np.array(coords_new, dtype=np.float32)

def backward_convert(coordinate):
    """
    :param coordinate: format [x1, y1, x2, y2, x3, y3, x4, y4]
    :return: format [x_c, y_c, w, h, theta, (label)]
    """
    boxes = []
    box = np.int0(coordinate)
    box = box.reshape([4, 2])
    rect1 = cv2.minAreaRect(box)

    x, y, w, h, theta = rect1[0][0], rect1[0][1], rect1[1][0], rect1[1][1], rect1[2]

    if theta == 0:
        w, h = h, w
        theta -= 90

    boxes.append([x, y, w, h, theta])

    return np.array(boxes, dtype=np.float32)


os.makedirs('./roAnnotations', exist_ok=True)
print('建立roAnnotations目录', 3)

mem = defaultdict(list)

with open('./M2021/Labels.txt','r',encoding='utf8')as fp:
    s = [i[:-1].split('\t') for i in fp.readlines()]
    for i in enumerate(s):
        path = i[1][0]
        print(path)
        anno = json.loads(i[1][1])
        filename = i[1][0][6:-4]
        img = cv2.imread(path)
        height, width = img.shape[:-1]
        for j in range(len(anno)):
            if len(anno[j-1]['transcription']) > 8:
                label = 'No.'
            else:
                label = 'indicator'
            x1 = min(int(anno[j-1]['points'][0][0]),int(anno[j-1]['points'][1][0]),int(anno[j-1]['points'][2][0]),int(anno[j-1]['points'][3][0]))
            x2 = max(int(anno[j-1]['points'][0][0]),int(anno[j-1]['points'][1][0]),int(anno[j-1]['points'][2][0]),int(anno[j-1]['points'][3][0]))
            y1 = min(int(anno[j-1]['points'][0][1]),int(anno[j-1]['points'][1][1]),int(anno[j-1]['points'][2][1]),int(anno[j-1]['points'][3][1]))
            y2 = max(int(anno[j-1]['points'][0][1]),int(anno[j-1]['points'][1][1]),int(anno[j-1]['points'][2][1]),int(anno[j-1]['points'][3][1]))

            # 用OpenCV的最小矩形转换成-90到0的角度
            boxes = backward_convert([anno[j-1]['points'][0][0],anno[j-1]['points'][0][1],int(anno[j-1]['points'][1][0]),int(anno[j-1]['points'][1][1]),
            int(anno[j-1]['points'][2][0]),int(anno[j-1]['points'][2][1]),int(anno[j-1]['points'][3][0]),int(anno[j-1]['points'][3][1])])
            # 根据长短边转成 0 到 180
            new_boxes = coordinate_present_convert(boxes)
            # 转成弧度:
            new_boxes[0][-1] = new_boxes[0][-1] * math.pi/180
            new_boxes = new_boxes.astype(np.float32)
            cx,cy,w,h,angle = new_boxes[0]
            mem[filename].append([label, x1, y1, x2, y2, cx, cy, w, h, angle])

            with open(os.path.join('./roAnnotations', filename.rstrip('.jpg')) + '.xml', 'w') as f:
                f.write(f"""<annotation>
            <folder>JPEGImages</folder>
            <filename>{filename}.jpg</filename>
            <size>
                <width>{width}</width>
                <height>{height}</height>
                <depth>3</depth>
            </size>
            <segmented>0</segmented>\n""")
                for label, x1, y1, x2, y2, cx, cy, w, h, angle in mem[filename]:
                    f.write(f"""<object>
                <type>bndbox</type>
                <name>{label}</name>
                <pose>Unspecified</pose>
                <truncated>0</truncated>
                <difficult>0</difficult>
                <bndbox>
                    <xmin>{x1}</xmin>
                    <ymin>{y1}</ymin>
                    <xmax>{x2}</xmax>
                    <ymax>{y2}</ymax>
                </bndbox>
            </object><object>
            <type>robndbox</type>
            <name>{label}</name>
            <pose>Unspecified</pose>
            <truncated>0</truncated>
            <difficult>0</difficult>
            <robndbox>
            <cx>{cx}</cx>
            <cy>{cy}</cy>
            <w>{w}</w>
            <h>{h}</h>
            <angle>{angle}</angle>
            </robndbox>
            </object>\n""")
                f.write("</annotation>")
- 1
- 2
- 3
- 4
- 5
- 6
- 7
- 8
- 9
- 10
- 11
- 12
- 13
- 14
- 15
- 16
- 17
- 18
- 19
- 20
- 21
- 22
- 23
- 24
- 25
- 26
- 27
- 28
- 29
- 30
- 31
- 32
- 33
- 34
- 35
- 36
- 37
- 38
- 39
- 40
- 41
- 42
- 43
- 44
- 45
- 46
- 47
- 48
- 49
- 50
- 51
- 52
- 53
- 54
- 55
- 56
- 57
- 58
- 59
- 60
- 61
- 62
- 63
- 64
- 65
- 66
- 67
- 68
- 69
- 70
- 71
- 72
- 73
- 74
- 75
- 76
- 77
- 78
- 79
- 80
- 81
- 82
- 83
- 84
- 85
- 86
- 87
- 88
- 89
- 90
- 91
- 92
- 93
- 94
- 95
- 96
- 97
- 98
- 99
- 100
- 101
- 102
- 103
- 104
- 105
- 106
- 107
- 108
- 109
- 110
- 111
- 112
- 113
- 114
- 115
- 116
- 117
- 118
- 119
- 120
- 121
- 122
- 123
- 124
建立roAnnotations目录 3
M2021/IMG_20210712_101215.jpg
M2021/IMG_20210712_101222.jpg
M2021/IMG_20210712_095237.jpg
M2021/IMG_20210724_161929.jpg
M2021/16号中继站护路生活区.jpg
- 1
- 2
- 3
- 4
- 5
- 6
4 小结
本文实现了PP-OCR四点标注结果到VOC和roLabelImg数据格式的批量转换,下一步,将根据转换结果,训练基于PaddleDetection的电表读数和编号数字框检测模型。


