- 1安装ollama并部署大模型并测试_ollama 测试
- 2MATLAB求解微分方程_matlab解微分方程
- 3管理Windows/Mac混合环境的三个选项_域控管理的环境有macos怎么办
- 4【详讲】手把手带你 Typora+PicGoo 配置 gitee 图床_typora+gitee配置picgo图床
- 5算术逻辑单元 —— 串行加法器和并行加法器
- 6java xml transformer_Java xml出现错误 javax.xml.transform.TransformerException: java.lang.NullPointerExc...
- 7python哈希值与地址值_什么时候计算python对象的哈希值,为什么是-1的哈希值是不同的?...
- 8Linux学习系列(二十):在Linux系统中使用Git上传代码到GitHub仓库_linux github
- 9关于warp操作_warp+
- 10头歌MySQL数据库实训答案 有目录_头歌数据库答案mysql
CLIP再研究以及和视频异常检测的结合_clip 异常检测
赞
踩
CLIP原理
Introduction
以前也有人尝试利用文本的语义来辅助训练视觉模型,但是效果都不是很好,作者指出原因可能是以前没有现在这么大的算力、模型(VIT)、自监督训练(也就是数据量可以很大但是不需要很贵的标注成本)。
在这篇文章,作者收集了4亿个(文本、图像)的数据对通过对比学习的方式对模型进行训练,发现在很多领域如OCR、分类等都能表现出很好的Zero-shot能力,有很好的泛化性,还发现模型的尺寸与精度成正比。
Method

预训练思路
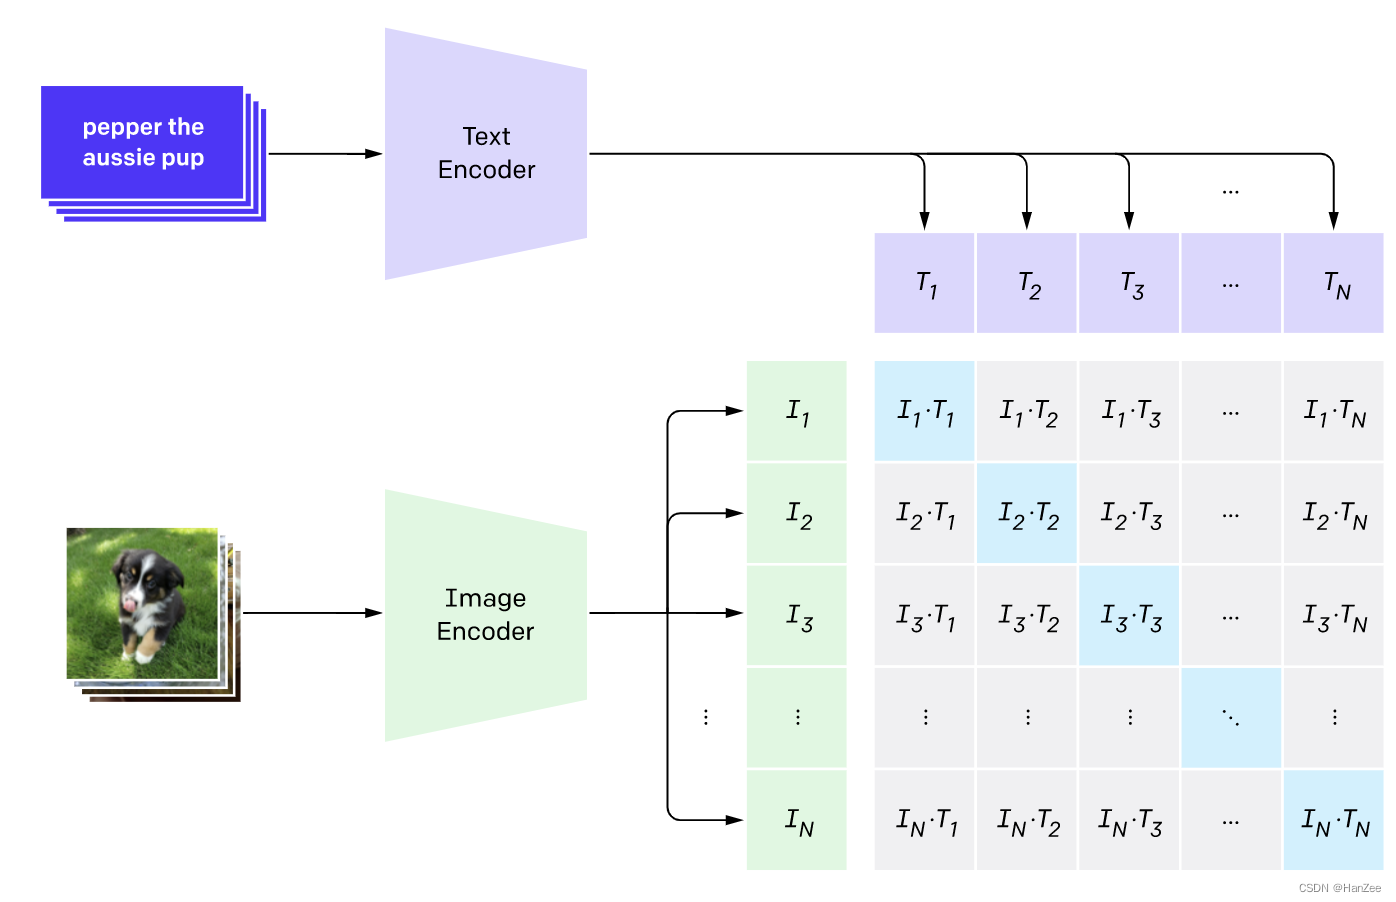
预训练模型时期,如上图,描述图像的文本与图像分别通过Text Encoder、与Image Encoder 转换成对应的向量,其中Ti表示一个batch中第i个图像表示的特征,Ii表示第i张图像表示的特征。
之后采用对比学习的形式对这两组特征做点乘,结果作为模型的logits,对角线的元素表示了对应的文本与图像的乘积,优化目标就是让对角线的元素softmax后的结果趋近于1,其他趋近于0,分别以图像与文本两个维度做cross_entropy_loss,然后对二者loss加权求和计算总loss。
训练要领:如何做到从图像中读取的信息和自然语言信息相匹配,从理解的正确顺序上看,就是如何正确表达出一个图像的意思以及该如何表达显得自然合理,当然预测时需要加入prompt。
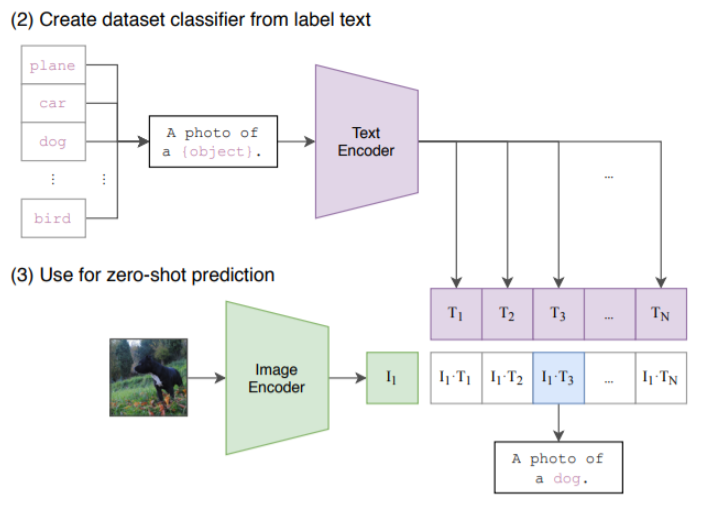
预测过程

简要来说:输入图片向量,找相关程度最高的的N个向量(N个词)中的一个
CLIP实验
预装虚拟环境:
- $ conda install --yes -c pytorch pytorch=1.7.1 torchvision cudatoolkit=11.0
- $ pip install ftfy regex tqdm
- $ pip install git+https://github.com/openai/CLIP.git
那么需要注意一点:版本预转pillow是9.3.0,引入Image报错,你需要安装版本为pillow==9.5.0
简单demo分类:
- import os
- import clip
- import torch
- from torchvision.datasets import CIFAR100
-
- # Load the model
- device = "cuda" if torch.cuda.is_available() else "cpu"
- model, preprocess = clip.load('ViT-B/32', device)
-
- # Download the dataset
- cifar100 = CIFAR100(root=os.path.expanduser("~/.cache"), download=True, train=False)
-
- # Prepare the inputs
- image, class_id = cifar100[3637]
- image_input = preprocess(image).unsqueeze(0).to(device)
- text_inputs = torch.cat([clip.tokenize(f"a photo of a {c}") for c in cifar100.classes]).to(device)
-
- # Calculate features
- with torch.no_grad():
- image_features = model.encode_image(image_input)
- text_features = model.encode_text(text_inputs)
-
- # Pick the top 5 most similar labels for the image
- image_features /= image_features.norm(dim=-1, keepdim=True)
- text_features /= text_features.norm(dim=-1, keepdim=True)
- similarity = (100.0 * image_features @ text_features.T).softmax(dim=-1)
- values, indices = similarity[0].topk(5)
-
- # Print the result
- print("\nTop predictions:\n")
- for value, index in zip(values, indices):
- print(f"{cifar100.classes[index]:>16s}: {100 * value.item():.2f}%")

视频异常检测基础
使用UCF_Crime数据集作为视频异常检测的数据集的话,可以得到一个分类标签和图像的对其结果
如果直接利用预训练模型进行zeroshort的话,效果不甚理想,下面是代码:
- import os
- import clip
- import torch
- from torchvision.datasets import CIFAR100
- from torchvision import transforms
- from PIL import Image
-
-
-
- folder_path = "archive/Train"
- classes = os.listdir(folder_path)
-
-
-
-
- device = "cuda" if torch.cuda.is_available() else "cpu"
- model, preprocess = clip.load('ViT-B/32', device)
-
- input_image_path = "archive/Train/Abuse/Abuse001_x264_610.png"
-
-
-
-
- # Prepare the inputs
- image = Image.open(input_image_path)
- image_input = preprocess(image).unsqueeze(0).to(device)
-
- text_inputs = torch.cat([clip.tokenize(f"a photo of a {c}") for c in classes]).to(device)
-
- # Calculate features
- with torch.no_grad():
- image_features = model.encode_image(image_input)
- text_features = model.encode_text(text_inputs)
-
- # Pick the top 5 most similar labels for the image
- image_features /= image_features.norm(dim=-1, keepdim=True)
- text_features /= text_features.norm(dim=-1, keepdim=True)
- similarity = (100.0 * image_features @ text_features.T).softmax(dim=-1)
- values, indices = similarity[0].topk(5)
-
- # Print the result
- print("\nTop predictions:\n")
- for value, index in zip(values, indices):
- print(f"{classes[index]:>16s}: {100 * value.item():.2f}%")
-
-
-

结果如下,abuse的标签得到的最困难结果是这几个,非常不正确,又试了几个不同的标签数据,效果不好
- Top predictions:
-
- NormalVideos: 33.01%
- Shooting: 16.24%
- Burglary: 14.46%
- Assault: 10.37%
- Arrest: 6.54%
直接使用预训练权重不好。
现在可以解决的方案有两种,一种是在原有基础上进行微调,还是以图片对图片标签形式进行微调训练;一种是建构模型,当然还是CLiP的思想,建构视频序列输入和文本对其,因为这样可以获取到行为序列特征,对判断异常行为非常重要,当然需要解决的问题就是一个不同视频序列的长度不同,如果按照文本的解决方案的话就是采用一个固定的token长度,不足的用zero补齐,多的cut掉,到行为检测中我认为可以将不足的用同一个序列补齐,这样同一个输入数据输入的是同一种行为,而不会出现为zero的情况
对于第一种方案实现起来不难,项目源码如下
GitHub - laoniandisko/CLIP_Crime at master
- import os
- from PIL import Image
- import numpy as np
- import torch
- import clip
- from loguru import logger
- from torch.utils.data import Dataset, DataLoader, ConcatDataset
- import torch.optim as optim
- from torch.optim import lr_scheduler
- import torch.nn as nn
- from tqdm import tqdm
-
- class YDataset(Dataset):
- def __init__(self,img_root,meta_root,is_train,preprocess):
-
- self.img_root = img_root
- self.meta_root = meta_root
- self.train_set_file = meta_root+'/path_tag_train.txt'
- self.test_set_file = meta_root+'/path_tag_test.txt'
- self.is_train = is_train
- self.img_process = preprocess
- self.samples = []
- self.sam_labels = []
- self.read_file = ""
- if is_train:
- self.read_file = self.train_set_file
- else:
- self.read_file = self.test_set_file
- with open(self.read_file,'r') as f:
- path_tag = f.readlines()
- for line in path_tag:
- img_path = line.split("\t")[0]
- label = line.split("\t")[1]
- label = "a photo of " + label
- self.samples.append(img_path)
- self.sam_labels.append(label)
- # 转换为token
- self.tokens = clip.tokenize(self.sam_labels)
-
- def __len__(self):
- return len(self.samples)
-
- def __getitem__(self, idx):
- img_path = self.samples[idx]
- token = self.tokens[idx]
- # 加载图像
- image = Image.open(img_path).convert('RGB')
- # 对图像进行转换
- image = self.img_process(image)
- return image,token
- if __name__ == '__main__':
-
- device = torch.device("cuda:0" if torch.cuda.is_available() else "cpu")
- net, preprocess = clip.load("RN50",device=device,jit=False)
-
- optimizer = optim.Adam(net.parameters(), lr=1e-6,betas=(0.9,0.98),eps=1e-6,weight_decay=0.001)
- scheduler = lr_scheduler.StepLR(
- optimizer, step_size=10, gamma=0.1)
-
- # 创建损失函数
- loss_img = nn.CrossEntropyLoss()
- loss_txt = nn.CrossEntropyLoss()
-
-
- ydataset = YDataset(img_root= '../archive',meta_root= '../archive',is_train=True,preprocess=preprocess)
- dataset_size_y = len(ydataset)
- ydataloader = DataLoader(ydataset,batch_size=4,shuffle=True,num_workers=4,pin_memory=False)
-
-
- phase = "train"
- model_name = "CLIP_Crime"
- ckt_gap = 4
- epoches = 30
- for epoch in range(epoches):
- scheduler.step()
- total_loss = 0
- batch_num = 0
- # 使用混合精度,占用显存更小
- with torch.cuda.amp.autocast(enabled=True):
- for images,label_tokens in tqdm(ydataloader) :
- # 将图片和标签token转移到device设备
- images = images.to(device)
- label_tokens = label_tokens.to(device)
- batch_num += 1
- # 优化器梯度清零
- optimizer.zero_grad()
- with torch.set_grad_enabled(phase == "train"):
- logits_per_image, logits_per_text = net(images, label_tokens)
- ground_truth = torch.arange(len(images),dtype=torch.long,device=device)
- cur_loss = (loss_img(logits_per_image,ground_truth) + loss_txt(logits_per_text,ground_truth))/2
- total_loss += cur_loss
- if phase == "train":
- cur_loss.backward()
- if device == "cpu":
- optimizer.step()
- else:
- optimizer.step()
- clip.model.convert_weights(net)
- if batch_num % 4 == 0:
- logger.info('{} epoch:{} loss:{}'.format(phase,epoch,cur_loss))
- epoch_loss = total_loss / dataset_size_y
- torch.save(net.state_dict(),f"{model_name}_epoch_{epoch}.pth")
- logger.info(f"weights_{epoch} saved")
- if epoch % ckt_gap == 0:
- checkpoint_path = f"{model_name}_ckt.pth"
- checkpoint = {
- 'it': epoch,
- 'network': net.state_dict(),
- 'optimizer': optimizer.state_dict(),
- 'scheduler': scheduler.state_dict()}
- torch.save(checkpoint, checkpoint_path)
- logger.info(f"checkpoint_{epoch} saved")
- logger.info('{} Loss: {:.4f}'.format(
- phase, epoch_loss))
-

关于第三个任务,使用BLIP进行解决,BLIP的思想和处理流程如下:
使用编码器-解码器的多模式混合(MED),
文本编码器是 BERT
image编码器使用 ViT
图像文本编码器
通过在自自注意力(SA)层和前馈网络(FFN)之间为文本编码器的每个 变压器块插入一个附加的交叉注意(CA)层来注入视觉信息。
图像文本解码器
用因果自注意力层替换基于图像的文本编码器中的双向自注意力层。[decode]标记用于表示序列的开始,序列结束标记用于表示其结束
我使用官方给的预训练权重进行caption生成:
- from transformers import BlipForConditionalGeneration, AutoProcessor
-
- model = BlipForConditionalGeneration.from_pretrained("ybelkada/blip-image-captioning-base-football-finetuned").to(device)
- processor = AutoProcessor.from_pretrained("ybelkada/blip-image-captioning-base-football-finetuned")
-
-
- from matplotlib import pyplot as plt
-
- fig = plt.figure(figsize=(18, 14))
-
- # prepare image for the model
- for i, example in enumerate(dataset):
- image = example["image"]
- inputs = processor(images=image, return_tensors="pt").to(device)
- pixel_values = inputs.pixel_values
-
- generated_ids = model.generate(pixel_values=pixel_values, max_length=50)
- generated_caption = processor.batch_decode(generated_ids, skip_special_tokens=True)[0]
- fig.add_subplot(2, 3, i+1)
- plt.imshow(image)
- plt.axis("off")
- plt.title(f"Generated caption: {generated_caption}")

使用BLIP预训练模型进行微调,代码如下:
-
- from transformers.utils import send_example_telemetry
- send_example_telemetry("image_captioning_blip_notebook", framework="pytorch")
- from datasets import load_dataset
- dataset = load_dataset("ybelkada/football-dataset", split="train")
- from torch.utils.data import Dataset, DataLoader
-
- class ImageCaptioningDataset(Dataset):
- def __init__(self, dataset, processor):
- self.dataset = dataset
- self.processor = processor
-
- def __len__(self):
- return len(self.dataset)
-
- def __getitem__(self, idx):
- item = self.dataset[idx]
- encoding = self.processor(images=item["image"], text=item["text"], padding="max_length", return_tensors="pt")
- # remove batch dimension
- encoding = {k:v.squeeze() for k,v in encoding.items()}
- return encoding
-
- from transformers import AutoProcessor, BlipForConditionalGeneration
-
- processor = AutoProcessor.from_pretrained("Salesforce/blip-image-captioning-base")
- model = BlipForConditionalGeneration.from_pretrained("Salesforce/blip-image-captioning-base")
-
-
- train_dataset = ImageCaptioningDataset(dataset, processor)
- train_dataloader = DataLoader(train_dataset, shuffle=True, batch_size=2)
-
-
-
- import torch
-
- optimizer = torch.optim.AdamW(model.parameters(), lr=5e-5)
-
- device = "cuda" if torch.cuda.is_available() else "cpu"
- model.to(device)
-
- model.train()
-
- for epoch in range(50):
- print("Epoch:", epoch)
- for idx, batch in enumerate(train_dataloader):
- input_ids = batch.pop("input_ids").to(device)
- pixel_values = batch.pop("pixel_values").to(device)
-
- outputs = model(input_ids=input_ids,
- pixel_values=pixel_values,
- labels=input_ids)
-
- loss = outputs.loss
-
- print("Loss:", loss.item())
-
- loss.backward()
-
- optimizer.step()
- optimizer.zero_grad()
-
-
- # load image
- example = dataset[0]
- image = example["image"]
-
- # prepare image for the model
- inputs = processor(images=image, return_tensors="pt").to(device)
- pixel_values = inputs.pixel_values
-
- generated_ids = model.generate(pixel_values=pixel_values, max_length=50)
- generated_caption = processor.batch_decode(generated_ids, skip_special_tokens=True)[0]
- print(generated_caption)


