- 1【PAT乙级】1012 数字分类
- 2ET前端重点类梳理_yooasset
- 3某赛通电子文档安全管理系统 44处 反序列化RCE漏洞复现
- 4Idea配置Maven并添加阿里源详解(2020)_maven setting 增加阿里
- 5matlab实现三自由度机械臂旋转_设计一个带旋转抓取功能的机械臂,该机械臂至少具备三个自由度,动力源为步进电机
- 6记录使用Echarts-gl实现3D地图
- 7开源鸿蒙南向嵌入学习笔记——NAPI框架学习(一)_鸿蒙 napi
- 8react渲染流程是怎样的
- 9【必读】从MII到RGMII,一文了解以太网PHY芯片不同传输接口信号时序!_以太网驱动通信时序
- 10一文了解网络地址转换(NAT)_目的nat
ThreeJS基本坐标设置_threejs修改默认坐标
赞
踩
1 绘制基本的场景面板,XY平面绘制网格线,建立起基本的坐标。左右为为X轴,右为正;前后为Y轴,前为正;山下为Z轴,上为正。
2 ThreeJS中的点对象,比如:默认都用 camera.lookAt(scene.position);其实,也可以自己修改: camera.lookAt(new THREE.Vector3(0, 0, 0));
3 线条绘制:
var geometryX = new THREE.Geometry();
geometryX.vertices.push(new THREE.Vector3(-12,0,0),new THREE.Vector3( 12,0,0));
var materialX = new THREE.LineBasicMaterial({ color: 0xff0000 });
var lineX = new THREE.Line(geometryX, materialX);
scene.add(lineX);
也可以绘制多条线段,Line:单纯线条;LineLoop:封闭区间;LineSegments:每两个顶点一条线段
4 直接上代码
- <html>
- <head>
- <title>第2个threejs三维场景</title>
- <style type="text/css">
- body
- {
- margin: 0;
- overflow: hidden; /* 隐藏body窗口区域滚动条 */
- }
- </style>
- <!--引入three.js三维引擎-->
-
- <script type="text/javascript" src="threejsmaster/build/three.js"></script>
- <script type="text/javascript" src="threejsmaster/build/js/controls/OrbitControls.js"></script>
- <script type="text/javascript" src="threejsmaster/build/js/libs/dat.gui.min.js"></script>
-
- </head>
- <body>
- <!-- 作为Three.js渲染器输出元素 -->
- <div id="WebGLwxp" style="width: 600px; height: 450px;">
- </div>
-
- <script type="text/javascript">
-
- //网页加载完毕后会被调用
- function init() {
-
- //创建一个场景(场景是一个容器,用于保存、跟踪所要渲染的物体和使用的光源)
- var scene = new THREE.Scene();
-
- //创建一个摄像机对象(摄像机决定了能够在场景里看到什么)
- var camera = new THREE.PerspectiveCamera(45,
- window.innerWidth / window.innerHeight, 0.1, 200);
-
- //设置摄像机的位置,并让其指向场景的中心(0,0,0)
- camera.position.set(10.0, -20, 13);
- camera.up.set(0, 0, 1);
- // camera.lookAt(scene.position);
- camera.lookAt(new THREE.Vector3(0, 0, 0));
-
- //线条绘制:
- //Line:单纯线条;LineLoop:封闭区间;LineSegments:每两个顶点一条线段
- //绘制X坐标
- var geometryX = new THREE.Geometry();
- geometryX.vertices.push(new THREE.Vector3(-12, 0, 0), new THREE.Vector3(12, 0, 0));
- var materialX = new THREE.LineBasicMaterial({ color: 0xff0000 });
- var lineX = new THREE.Line(geometryX, materialX);
- scene.add(lineX);
-
- //绘制Y坐标
- var geometryY = new THREE.Geometry();
- geometryY.vertices.push(new THREE.Vector3(0, -12, 0), new THREE.Vector3(0, 12, 0));
- var materialY = new THREE.LineBasicMaterial({ color: 0x00ff00 });
- var lineY = new THREE.Line(geometryY, materialY);
- scene.add(lineY);
-
- //绘制Z坐标
- var geometryZ = new THREE.Geometry();
- geometryZ.vertices.push(new THREE.Vector3(0, 0, 0), new THREE.Vector3(0, 0, 12));
- var materialZ = new THREE.LineBasicMaterial({ color: 0x0000ff });
- var lineZ = new THREE.Line(geometryZ, materialZ);
- scene.add(lineZ);
-
- //绘制XY平面
- //绘制平行于X的线条
- geometry = new THREE.Geometry();
- geometry.vertices.push(new THREE.Vector3(-10.5, 0, 0), new THREE.Vector3(10.5, 0, 0));
- material = new THREE.LineBasicMaterial({ color: 0xffffff, opacity: 0.5 });
- for (var index = 0; index < 11; index++) {
- if (index == 5) continue; //中间不绘制
- var lineX = new THREE.Line(geometry, material);
- lineX.position.y = (index * 2) - 10
- scene.add(lineX);
- }
-
- //绘制平行于Y的线条
- geometry = new THREE.Geometry();
- geometry.vertices.push(new THREE.Vector3(0, -10.5, 0), new THREE.Vector3(0, 10.5, 0));
- material = new THREE.LineBasicMaterial({ color: 0xffffff, opacity: 0.5 });
- for (var index = 0; index < 11; index++) {
- if (index == 5) continue; //中间不绘制
- var lineX = new THREE.Line(geometry, material);
- lineX.position.x = (index * 2) - 10
- scene.add(lineX);
- }
-
- //创建一个WebGL渲染器并设置其大小,设置抗锯齿设置
- var renderer = new THREE.WebGLRenderer({antialias: true });
- renderer.setClearColor(new THREE.Color(0x7696f1));
- renderer.setSize(window.innerWidth, window.innerHeight);
- renderer.setPixelRatio(window.devicePixelRatio); //框锯齿设置
-
- //创建一个立方体
- var cubeGeometry = new THREE.BoxGeometry(1, 1, 1);
-
- //将线框(wireframe)属性设置为true,这样物体就不会被渲染为实物物体
- var cubeMaterial = new THREE.MeshLambertMaterial({ color: 0xff0000 });
- var cube = new THREE.Mesh(cubeGeometry, cubeMaterial);
- cube.castShadow = true;
-
- //设置立方体的位置
- cube.position.set(0, 0, 0);
- //将立方体添加到场景中
- scene.add(cube);
-
- //系统坐标系标定
- // var axesHelper = new THREE.AxesHelper(100);
- // scene.add(axesHelper);
-
- //创建点光源 正上面
- var spotLight = new THREE.SpotLight(0xffffff);
- spotLight.position.set(0, 0, 50);
- spotLight.castShadow = true;
- // scene.add(spotLight);
-
- //右上角
- var spotLight2 = new THREE.SpotLight(0xffffff);
- spotLight2.position.set(10, 10, 5);
- spotLight.castShadow = true;
- scene.add(spotLight2);
-
- //右下角
- var spotLight3 = new THREE.SpotLight(0xffffff);
- spotLight3.position.set(10, -10, 0);
- spotLight3.castShadow = true;
- scene.add(spotLight3);
-
- //左下角
- var spotLight4 = new THREE.SpotLight(0xffffff);
- spotLight4.position.set(-10, -10, -5);
- spotLight4.castShadow = true;
- scene.add(spotLight4);
-
- //将渲染的结果输出到指定页面元素中
- document.getElementById("WebGLwxp").appendChild(renderer.domElement);
-
- //存放有所有需要改变的属性的对象
- var controls = new function() {
- this.rotationSpeed = 0.02;
- this.cubPositionX = 0.00;
- this.cubPositionY = 0.00;
- this.cubPositionZ = 0.00;
-
- this.camerPositionX = 10.00;
- this.camerPositionY = -20.00;
- this.camerPositionZ = 13.00;
- };
-
- //创建dat.GUI,传递并设置属性
- var gui = new dat.GUI();
- gui.add(controls, 'rotationSpeed', 0, 0.5);
- gui.add(controls, 'cubPositionX', -10.0, 10.0);
- gui.add(controls, 'cubPositionY', -10.0, 10.0);
- gui.add(controls, 'cubPositionZ', -10.0, 10.0);
-
- gui.add(controls, 'camerPositionX', -40.0, 20.0);
- gui.add(controls, 'camerPositionY', -40.0, 10.0);
- gui.add(controls, 'camerPositionZ', 0.0, 40.0);
- //渲染场景
- render();
-
- //渲染场景
- function render() {
-
- cube.rotation.z += controls.rotationSpeed;
- cube.position.x = controls.cubPositionX;
- cube.position.y = controls.cubPositionY;
- cube.position.z = controls.cubPositionZ;
-
- camera.position.x = controls.camerPositionX;
- camera.position.y = controls.camerPositionY;
- camera.position.z = controls.camerPositionZ;
-
-
- //通过requestAnimationFrame方法在特定时间间隔重新渲染场景
- requestAnimationFrame(render);
- //渲染场景
- renderer.render(scene, camera);
- }
- //innit结束
- }
-
- //确保init方法在网页加载完毕后被调用
- window.onload = init;
-
- </script>
-
- </body>
- </html>

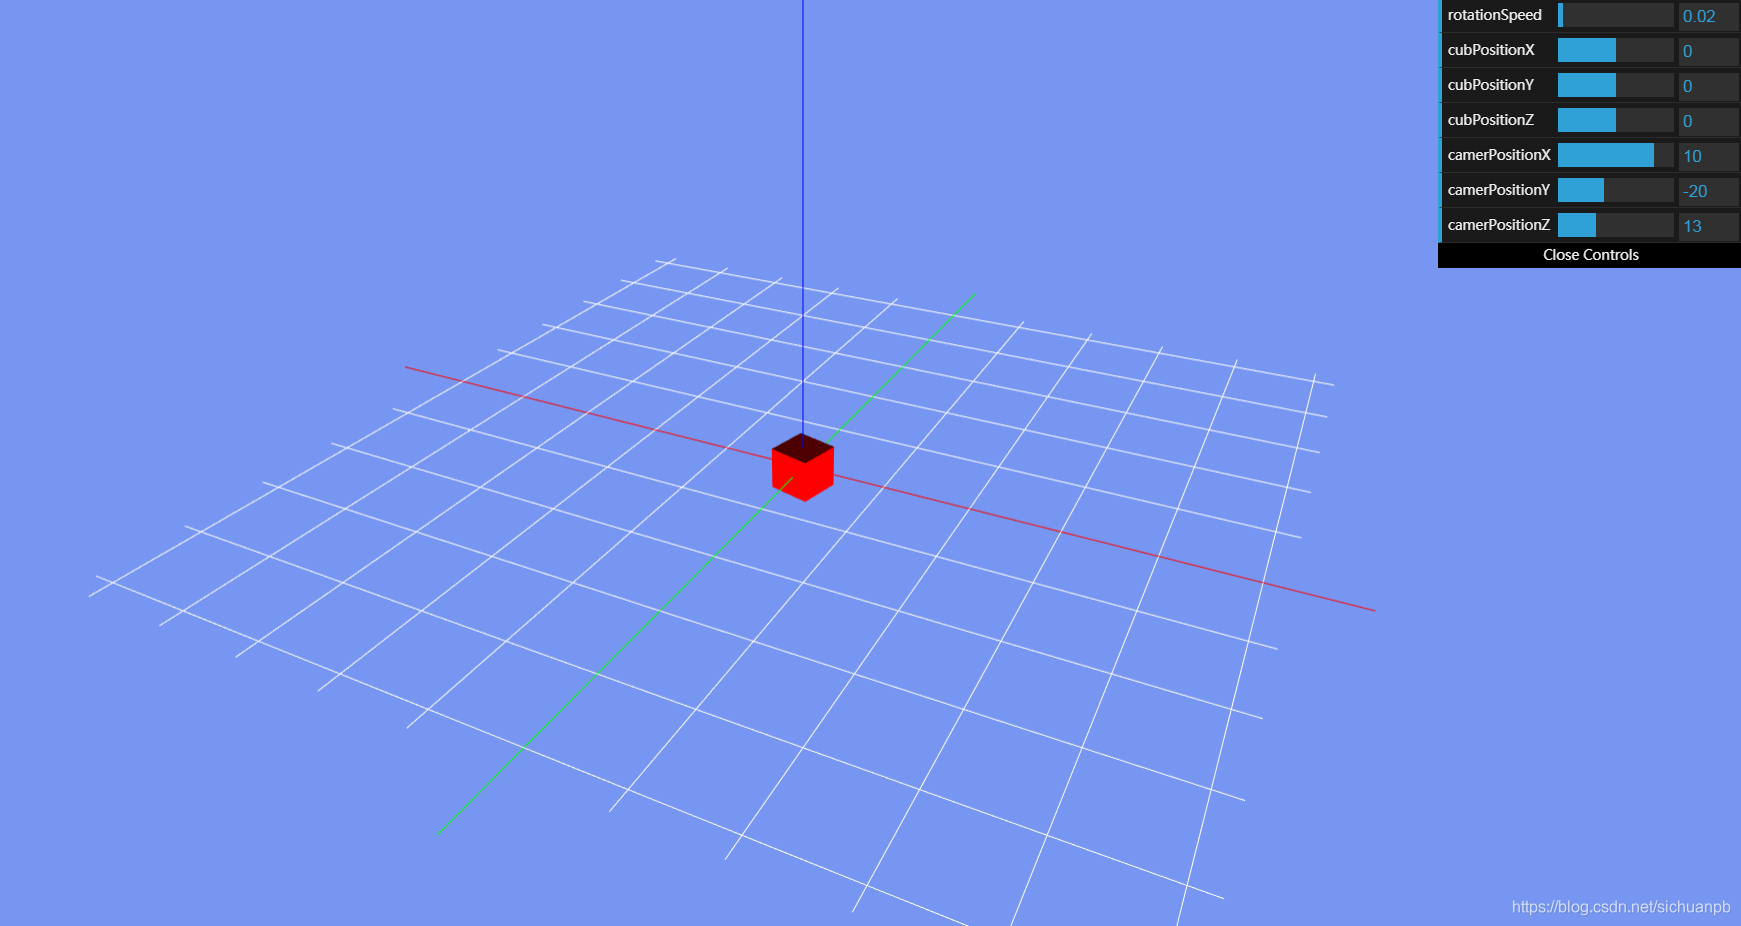
最后是效果图 ,
//创建一个WebGL渲染器并设置其大小,设置抗锯齿设置
var renderer = new THREE.WebGLRenderer({antialias: true });
renderer.setClearColor(new THREE.Color(0x7696f1));
renderer.setSize(window.innerWidth, window.innerHeight);
renderer.setPixelRatio(window.devicePixelRatio); //框锯齿设置
锯齿处理前后,效果很明显