- 1【送书福利-第三十八期】《 SaaS产品实践方法论:从0到N构建SaaS产品》
- 26-闭包和装饰器_带参数的装饰器。定义一个没有参数的函数foo,用于输出语句;定义一个装饰器函
- 3迅为RK3568开发板Debian系统安装ToDesk_debian rk3568版本
- 4php 生成水印输出图片,PHP的生成图片或文字水印的类
- 5SpringBoot3.x整合Nacos和Redis
- 6365天挑战LeetCode1000题——Day 109 贝壳周赛
- 7kubernetes 二进制部署
- 8Mysql-基本练习(07-修改表-添加主键、唯一、外键约束、添加/删除默认约束、删除约束)_alter table tb1 drop foreign key tb1____ibfk ____1
- 9神经网络学习笔记——神经网络基础(一)
- 10SpringBoot如何正确连接SqlServer_spring sqlserver
ROS 导航实现(A*,DWA)
赞
踩
由于我们已经成功保存了SLAM建图的地图,后面就能在这个地图进行导航
ros实现导航可以在move base和amcl两个功能包基础上完成,首先我们使用amcl,
AMCL(adaptive Monte Carlo Localization) 是用于2D移动机器人的概率定位系统,它实现了自适应(或KLD采样)蒙特卡洛定位方法,可以根据已有地图使用粒子滤波器推算机器人位置。
amcl已经被集成到了navigation包,navigation安装前面也有介绍,命令如下:
sudo apt install ros-<ROS版本>-navigation
关于launch文件的实现,在amcl功能包下的example目录已经给出了示例,可以作为参考,具体实现:
roscd amcl
ls examples
该目录下会列出两个文件: amcl_diff.launch 和 amcl_omni.launch 文件,前者适用于差分移动机器人,后者适用于全向移动机器人,可以按需选择,此处参考前者,新建 launch 文件,复制 amcl.launch 文件内容并修改如下:
- <launch>
- <node pkg="amcl" type="amcl" name="amcl" output="screen">
- <!-- Publish scans from best pose at a max of 10 Hz -->
- <param name="odom_model_type" value="diff"/>
- <param name="odom_alpha5" value="0.1"/>
- <param name="transform_tolerance" value="0.2" />
- <param name="gui_publish_rate" value="10.0"/>
- <param name="laser_max_beams" value="30"/>
- <param name="min_particles" value="500"/>
- <param name="max_particles" value="5000"/>
- <param name="kld_err" value="0.01"/>
- <param name="kld_z" value="0.5"/>
- <param name="odom_alpha1" value="0.005"/>
- <param name="odom_alpha2" value="0.005"/>
- <!-- translation std dev, m -->
- <param name="odom_alpha3" value="0.005"/>
- <param name="odom_alpha4" value="0.005"/>
- <param name="laser_z_hit" value="0.9"/>
- <param name="laser_z_short" value="0.05"/>
- <param name="laser_z_max" value="0.05"/>
- <param name="laser_z_rand" value="0.5"/>
- <param name="laser_sigma_hit" value="0.1"/>
- <param name="laser_lambda_short" value="0.1"/>
- <param name="laser_lambda_short" value="0.1"/>
- <param name="laser_model_type" value="likelihood_field"/>
- <!-- <param name="laser_model_type" value="beam"/> -->
- <param name="laser_likelihood_max_dist" value="4.0"/>
- <param name="update_min_d" value="0.2"/>
- <param name="update_min_a" value="0.5"/>
-
- <param name="odom_frame_id" value="odom"/>
- <param name="base_frame_id" value="base_footprint"/>
- <param name="global_frame_id" value="map"/>
-
- <param name="resample_interval" value="1"/>
- <param name="transform_tolerance" value="0.1"/>
- <param name="recovery_alpha_slow" value="0.0"/>
- <param name="recovery_alpha_fast" value="0.0"/>
- </node>
- </launch>

上面完成了amcl定位编写,接下来使用move base集成A*和DWA算法进行路径规划
move_base已经被集成到了navigation包,navigation安装前面也有介绍,命令如下:
sudo apt install ros-<ROS版本>-navigation然后就要编写代价地图
关于ros代价地图和详细导航指导,可以参考navguide.pdf (kaiyuzheng.me)
我现在就描述一下我的编写过程
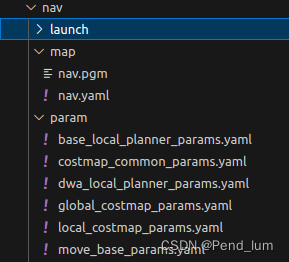
我们需要定义地图的参数,机器人具体避障信息等等,具体目录如下

(我已经使用DWA作为local planner了,base local planner在后面不会继续使用,这里只是没删掉)
costmap_common_params.yaml
该文件是move_base 在全局路径规划与本地路径规划时调用的通用参数,包括:机器人的尺寸、距离障碍物的安全距离、传感器信息等。配置参考如下:
dwa_local_planner_params.yaml
global_costmap_params.yaml
该文件用于全局代价地图参数设置:
local_costmap_params.yaml
该文件用于局部代价地图参数设置:
move_base_params.yaml
关于move_base节点的调用,代码如下(文件名为path)
- <launch>
-
- <node pkg="move_base" type="move_base" respawn="false" name="move_base" output="screen" clear_params="true">
- <rosparam file="$(find nav)/param/costmap_common_params.yaml" command="load" ns="global_costmap" />
- <rosparam file="$(find nav)/param/costmap_common_params.yaml" command="load" ns="local_costmap" />
- <rosparam file="$(find nav)/param/local_costmap_params.yaml" command="load" />
- <rosparam file="$(find nav)/param/global_costmap_params.yaml" command="load" />
- <!--<rosparam file="$(find nav)/param/base_local_planner_params.yaml" command="load" /> -->
- <rosparam file="$(find nav)/param/move_base_params.yaml" command="load" />-
- <rosparam file="$(find nav)/param/dwa_local_planner_params.yaml" command="load" />
- </node>
-
- </launch>
-
如果要实现导航,需要集成地图服务、amcl 、move_base 与 Rviz 等,集成示例如下:
- <launch>
- <!-- 设置地图的配置文件 -->
- <arg name="map" default="nav.yaml" />
- <!-- 运行地图服务器,并且加载设置的地图-->
- <node name="map_server" pkg="map_server" type="map_server" args="$(find nav)/map/$(arg map)"/>
- <!-- 启动AMCL节点 -->
- <include file="$(find nav)/launch/amcl.launch" />
-
- <!-- 运行move_base节点 -->
- <include file="$(find nav)/launch/path.launch" />
- <!-- 运行rviz -->
- <node pkg="rviz" type="rviz" name="rviz"/>
-
- </launch>
-
打开之后,我们加入全局和局部代价地图,加入A*算法和DWA算法,就可以全局和局部路径规划同时使用了,效果在B站,性能我还不确定是不是很好
接下来就把A*和DWA算法配置提一下
ros集成了算法C++接口,我们可以自定义算法,并把算法以插件的形式的输入进去,在此就不多过于赘述,大家可以参考这篇A*的例子在ROS中实现A*路径规划 - 知乎 (zhihu.com)
关于DWA的文件放在我GitHub中了X1yz/dwa_local_planner (github.com),可能会有一些问题,我测试的时候动态避障有点不尽人意。配置大家可以参考我上面那个A*的,基本大差不差
Copyright © 2003-2013 www.wpsshop.cn 版权所有,并保留所有权利。


