
热门标签
热门文章
- 115个顶级Java多线程面试题及答案_java 多线程面试题
- 2python变量类型有几种_Python变量类型
- 3【无标题】如何去写高质量个人简历模板?哪里能下载免费的简历模板? meimg.com_简历无标题是什么意思
- 4leetcode:232. 用栈实现队列_leetcode 两个栈实现队列
- 5Android Java笔试题(带大部分答案)_下列哪一个对inner类
- 6物品6D位姿估计与抓取_非规则6d抓取
- 7Python知识点汇总--Python基础(组合数据类型)_字典的表现形式为一组包含在大括号“{}”中的键值对,每个键值对为一个字典元
- 8pyqt5 python3.7教程_Python3.7安装PyQt5的方法
- 92023什么电脑配置适合机器学习和人工智能_平时用于 ai开发的主机 一般配置
- 10Docker 安全及日志管理_docker日志的操作
当前位置: article > 正文
python使用Tensorflow检测GPU运行与使用Pytorch_tensorflow gpu测试
作者:羊村懒王 | 2024-05-26 20:35:47
赞
踩
tensorflow gpu测试
GPU运行状态检测
在先前,博主完成了GPU环境的配置,那么今天博主来实验一下使用GPU来运行我们的项目
使用cmd 输入nvidia-smi查看GPU使用情况,下面是Linux里面的一个显示

下面是我的运行状态:
PS:在运行前需要安装tensflow-gpu与CUDA,cuDNN对应好,这里折磨了博主好久
https://tensorflow.google.cn/install/source_windows
- 1
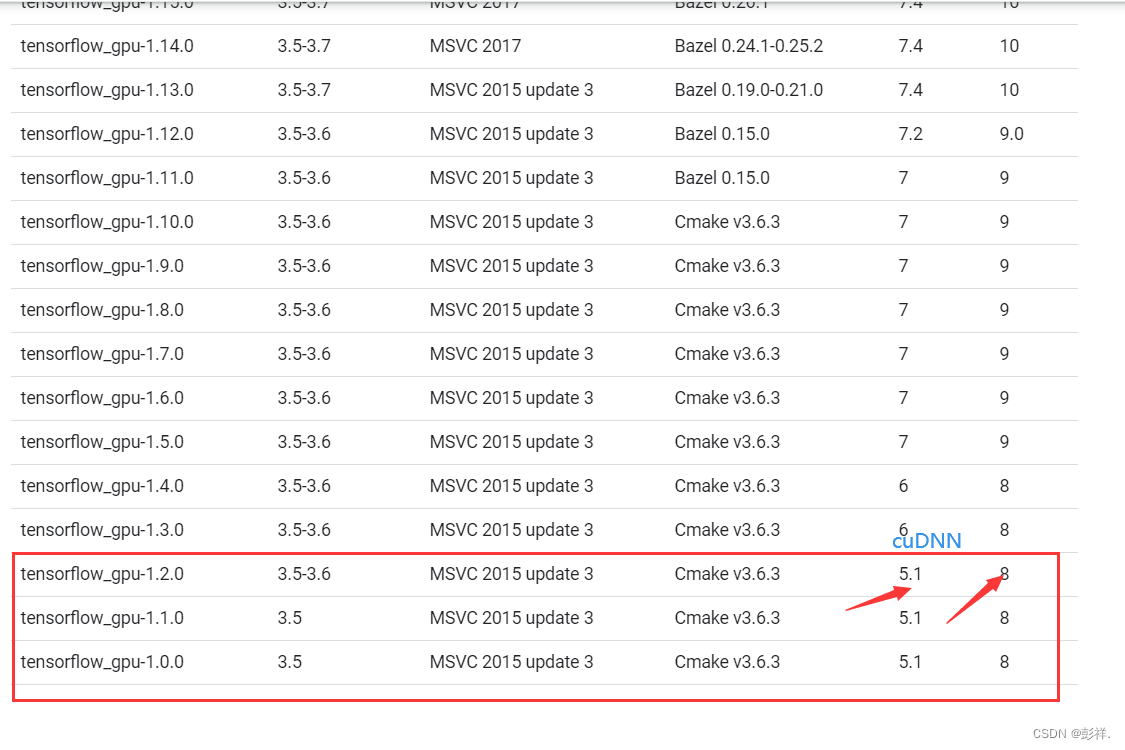
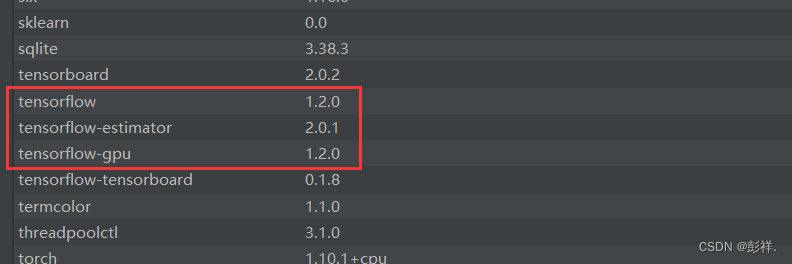
安装对应的tensorflow-gpu
pip install tensorflow_gpu==1.2.0 -i https://pypi.tuna.tsinghua.edu.cn/simple
- 1
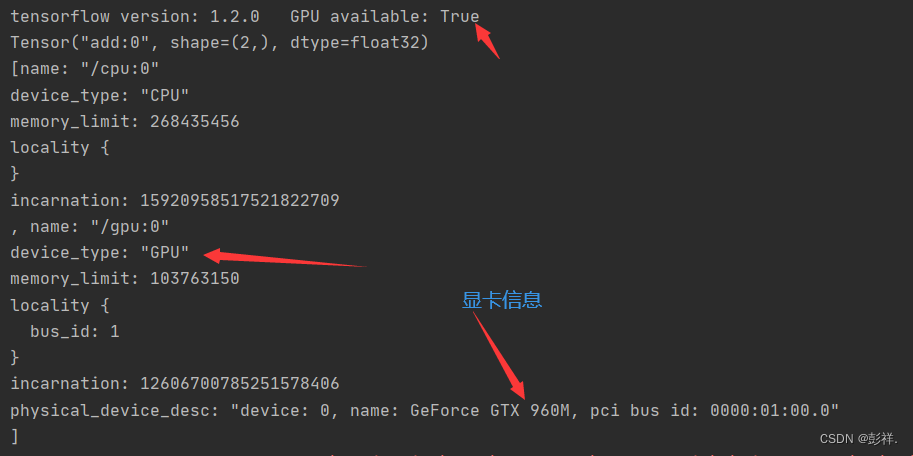
测试:
import tensorflow as tf
tensorflow_version = tf.__version__
gpu_available = tf.test.is_gpu_available()
print('tensorflow version:',tensorflow_version, '\tGPU available:', gpu_available)
a = tf.constant([1.0, 2.0], name='a')
b = tf.constant([1.0, 2.0], name='b')
result = tf.add(a,b, name='add')
print(result)
import os
from tensorflow.python.client import device_lib
os.environ["TF_CPP_MIN_LOG_LEVEL"] = "99"
if __name__ == "__main__":
    print(device_lib.list_local_devices())
- 1
- 2
- 3
- 4
- 5
- 6
- 7
- 8
- 9
- 10
- 11
- 12
- 13
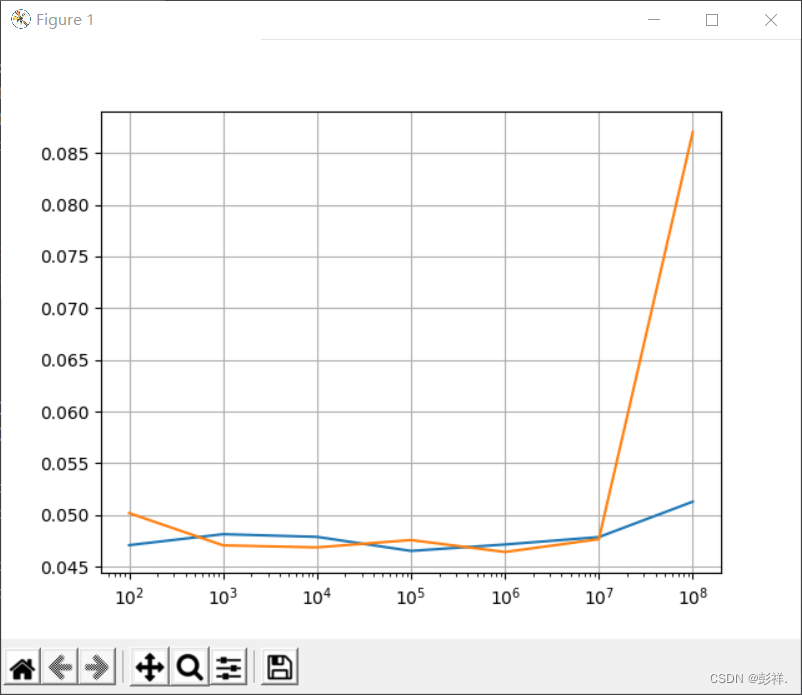
接下来,我们跑个程序来比较一下CPU和GPU性能上的差距:
import tensorflow as tf
import timeit
import numpy as np
import matplotlib.pyplot as plt
def cpu_run(num):
  with tf.device('/cpu:0'):
    cpu_a=tf.random_normal([1,num])
    cpu_b=tf.random_normal([num,1])
    c=tf.matmul(cpu_a,cpu_b)
  return c
def gpu_run(num):
  with tf.device('/gpu:0'):
    gpu_a=tf.random_normal([1,num])
    gpu_b=tf.random_normal([num,1])
    c=tf.matmul(gpu_a,gpu_b)
  return c
k=10
m=7
cpu_result=np.arange(m,dtype=np.float32)
gpu_result=np.arange(m,dtype=np.float32)
x_time=np.arange(m)
for i in range(m):
  k=k*10
  x_time[i]=k
  cpu_str='cpu_run('+str(k)+')'
  gpu_str='gpu_run('+str(k)+')'
  #print(cpu_str)
  cpu_time=timeit.timeit(cpu_str,'from __main__ import cpu_run',number=10)
  gpu_time=timeit.timeit(gpu_str,'from __main__ import gpu_run',number=10)
  # 正式计算10次,取平均时间
  cpu_time=timeit.timeit(cpu_str,'from __main__ import cpu_run',number=10)
  gpu_time=timeit.timeit(gpu_str,'from __main__ import gpu_run',number=10)
  cpu_result[i]=cpu_time
  gpu_result[i]=gpu_time
print(cpu_result)
print(gpu_result)
fig, ax = plt.subplots()
ax.set_xscale("log")
ax.set_adjustable("datalim")
ax.plot(x_time,cpu_result)
ax.plot(x_time,gpu_result)
ax.grid()
plt.draw()
plt.show()
- 1
- 2
- 3
- 4
- 5
- 6
- 7
- 8
- 9
- 10
- 11
- 12
- 13
- 14
- 15
- 16
- 17
- 18
- 19
- 20
- 21
- 22
- 23
- 24
- 25
- 26
- 27
- 28
- 29
- 30
- 31
- 32
- 33
- 34
- 35
- 36
- 37
- 38
- 39
- 40
- 41
- 42
- 43
- 44
Pytorch的使用
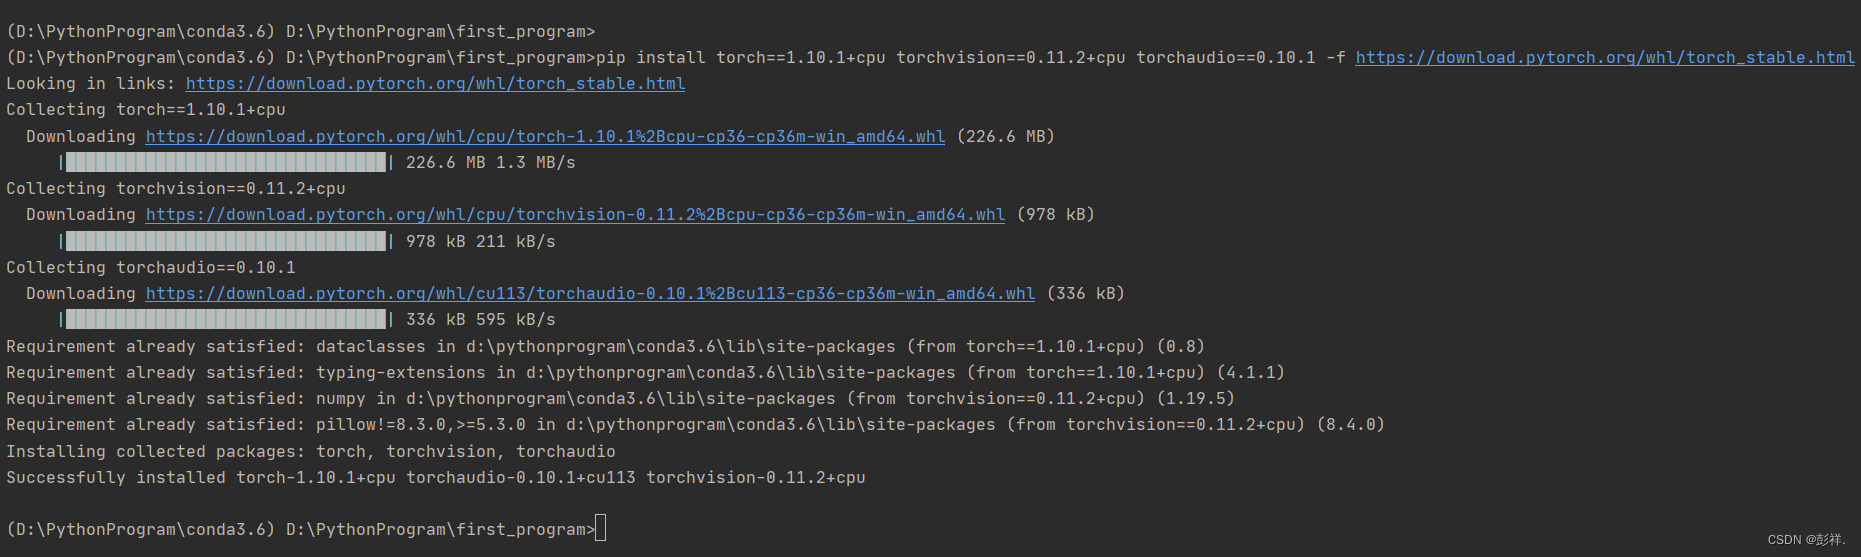
在不同CUDA版本下的安装,由于博主的显卡太拉跨导致CUDA版本太低不支持,只能安装CPU版本的了
pip install torch1.10.1+cpu torchvision0.11.2+cpu torchaudio==0.10.1 -f https://download.pytorch.org/whl/torch_stable.html
其他命令:
# CUDA 11.1
pip install torch==1.10.1+cu111 torchvision==0.11.2+cu111 torchaudio==0.10.1 -f https://download.pytorch.org/whl/torch_stable.html

# CUDA 10.2
pip install torch==1.10.1+cu102 torchvision==0.11.2+cu102 torchaudio==0.10.1 -f https://download.pytorch.org/whl/torch_stable.html

# CPU only
pip install torch==1.10.1+cpu torchvision==0.11.2+cpu torchaudio==0.10.1 -f https://download.pytorch.org/whl/torch_stable.html
- 1
- 2
- 3
- 4
- 5
- 6
- 7
- 8
Pytorch实现手写数字识别
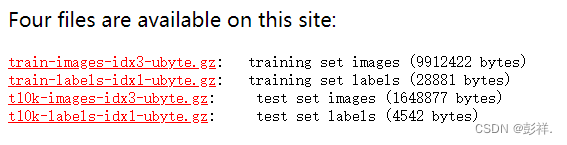
数据集下载地址:
http://yann.lecun.com/exdb/mnist/
手写数字识别是一个比较简单的任务,数字只可能是0-9中的一个,这是个10分类的问题。
MNIST手写数字识别项目因为数据量小,识别任务简单而成为图像识别入门的第一课,MNIST手写数字识别项目有如下特点:
(1) 识别难度低,即使把图片展开为一维数据,且只使用全连接层也能获得超过98%的识别准确度。
(2)计算量小,不需要GPU加速也可以快速训练完成。
(3)数据容易得到,教程容易得到。
# coding=utf-8
import os
import torch
from torch import nn, optim
import torch.nn.functional as F
# from torch.autograd import Variable
from torchvision import datasets, transforms
transform = transforms.Compose([
transforms.ToTensor(),
transforms.Normalize((0.1307,), (0.3081,))
])
trainset = datasets.MNIST('data', train=True, download=True, transform=transform)#下载,加载数据
testset = datasets.MNIST('data', train=False, download=True, transform=transform)
class LeNet(nn.Module):
# 定义Net的初始化函数,本函数定义了神经网络的基本结构
def __init__(self):
# 继承父类的初始化方法,即先运行nn.Module的初始化函数
super(LeNet, self).__init__()
# C1卷积层:输入1张灰度图片,输出6张特征图,卷积核5x5
self.c1 = nn.Conv2d(1, 6, (5, 5))
# C3卷积层:输入6张特征图,输出16张特征图,卷积核5x5
self.c3 = nn.Conv2d(6, 16, 5)
# 全连接层S4->C5:从S4到C5是全连接,S4层中16*4*4个节点全连接到C5层的120个节点上
self.fc1 = nn.Linear(16 * 4 * 4, 120)
# 全连接层C5->F6:C5层的120个节点全连接到F6的84个节点上
self.fc2 = nn.Linear(120, 84)
# 全连接层F6->OUTPUT:F6层的84个节点全连接到OUTPUT层的10个节点上,10个节点的输出代表着0到9的不同分值。
self.fc3 = nn.Linear(84, 10)
# 定义向前传播函数
def forward(self, x):
# 输入的灰度图片x经过c1的卷积之后得到6张特征图,然后使用relu函数,增强网络的非线性拟合能力,接着使用2x2窗口的最大池化,然后更新到x
x = F.max_pool2d(F.relu(self.c1(x)), 2)
# 输入x经过c3的卷积之后由原来的6张特征图变成16张特征图,经过relu函数,并使用最大池化后将结果更新到x
x = F.max_pool2d(F.relu(self.c3(x)), 2)
# 使用view函数将张量x(S4)变形成一维向量形式,总特征数不变,为全连接层做准备
x = x.view(-1, self.num_flat_features(x))
# 输入S4经过全连接层fc1,再经过relu,更新到x
x = F.relu(self.fc1(x))
# 输入C5经过全连接层fc2,再经过relu,更新到x
x = F.relu(self.fc2(x))
# 输入F6经过全连接层fc3,更新到x
x = self.fc3(x)
return x
# 计算张量x的总特征量
def num_flat_features(self, x):
# 由于默认批量输入,第零维度的batch剔除
size = x.size()[1:]
num_features = 1
for s in size:
num_features *= s
return num_features
CUDA = torch.cuda.is_available()
if CUDA:
lenet = LeNet().cuda()
else:
lenet = LeNet()
criterion = nn.CrossEntropyLoss()
optimizer = optim.SGD(lenet.parameters(), lr=0.001, momentum=0.9)
trainloader = torch.utils.data.DataLoader(trainset, batch_size=4, shuffle=True, num_workers=2)
testloader = torch.utils.data.DataLoader(testset, batch_size=4, shuffle=False, num_workers=2)
def train(model, criterion, optimizer, epochs=1):
for epoch in range(epochs):
running_loss = 0.0
for i, data in enumerate(trainloader, 0):
inputs, labels = data
if CUDA:
inputs, labels = inputs.cuda(), labels.cuda()
optimizer.zero_grad()
outputs = model(inputs)
loss = criterion(outputs, labels)
loss.backward()
optimizer.step()
running_loss += loss.item()
if i % 1000 == 999:
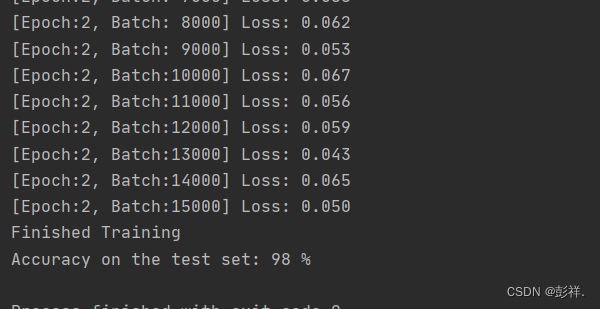
print('[Epoch:%d, Batch:%5d] Loss: %.3f' % (epoch + 1, i + 1, running_loss / 1000))
running_loss = 0.0
print('Finished Training')
def test(testloader, model):
correct = 0
total = 0
for data in testloader:
images, labels = data
if CUDA:
images = images.cuda()
labels = labels.cuda()
outputs = model(images)
_, predicted = torch.max(outputs.data, 1)
total += labels.size(0)
correct += (predicted == labels).sum()
print('Accuracy on the test set: %d %%' % (100 * correct / total))
def load_param(model, path):
if os.path.exists(path):
model.load_state_dict(torch.load(path))
def save_param(model, path):
torch.save(model.state_dict(), path)
if __name__ =="__main__":
load_param(lenet, 'model.pkl')
train(lenet, criterion, optimizer, epochs=2)
save_param(lenet, 'model.pkl')
test(testloader, lenet)
- 1
- 2
- 3
- 4
- 5
- 6
- 7
- 8
- 9
- 10
- 11
- 12
- 13
- 14
- 15
- 16
- 17
- 18
- 19
- 20
- 21
- 22
- 23
- 24
- 25
- 26
- 27
- 28
- 29
- 30
- 31
- 32
- 33
- 34
- 35
- 36
- 37
- 38
- 39
- 40
- 41
- 42
- 43
- 44
- 45
- 46
- 47
- 48
- 49
- 50
- 51
- 52
- 53
- 54
- 55
- 56
- 57
- 58
- 59
- 60
- 61
- 62
- 63
- 64
- 65
- 66
- 67
- 68
- 69
- 70
- 71
- 72
- 73
- 74
- 75
- 76
- 77
- 78
- 79
- 80
- 81
- 82
- 83
- 84
- 85
- 86
- 87
- 88
- 89
- 90
- 91
- 92
- 93
- 94
- 95
- 96
- 97
- 98
- 99
- 100
- 101
- 102
- 103
- 104
- 105
- 106
- 107
- 108
- 109
- 110
- 111
- 112
- 113
- 114
- 115
- 116
- 117
- 118
- 119
- 120
- 121
- 122
- 123
- 124
声明:本文内容由网友自发贡献,不代表【wpsshop博客】立场,版权归原作者所有,本站不承担相应法律责任。如您发现有侵权的内容,请联系我们。转载请注明出处:https://www.wpsshop.cn/w/羊村懒王/article/detail/628290
推荐阅读
相关标签

