热门标签
热门文章
- 1博睿数据重塑APM,引领IT运维新标杆_深入用户体验,揪出罪魁祸首——由【npm+apm】完成性能故障点快速定位和解决
- 2VSCode学习【5】: setting.json的两种配置位置_vscode setting.json
- 3NLP预训练模型之后文本表达---BERT、RoBERTa、GPT和OpenAI_embedding
- 4大数据毕业设计hadoop+spark+hive电商订单分析可视化大屏 电商用户行为分析 电商用户画像 淘宝订单可视化 电商大数据 电商数据分析可视化 计算机毕业设计_基于hadoop+spark+大数据+机器学习+大屏的电商商品数据分析可视化系统设计源代码
- 5RabbitMQ3.7.8集群分区(脑裂现象)模拟及恢复处置全场景测试
- 6【人工智能高频面试题--基础篇】_不具备学习能力,依赖于预先定义的规则执行特定的任务。
- 7模电(四)放大电路_怎样让直接耦合放大电路输出截止失真图形
- 8bootstrap + django的简单后台管理系统_bootstrap django
- 9自然语言处理(NLP)实验——比较各大翻译系统_自然语言机器翻译实验结果
- 10You are using the legacy behaviour of the <class ‘transformers.models.t5.tokenization_t5.T5Tokenizer_you are using the default legacy behaviour of the
当前位置: article > 正文
Llama 架构分析_llama 网络结构
作者:很楠不爱3 | 2024-04-05 08:38:43
赞
踩
llama 网络结构
Llama 架构分析
前言
Meta 开发并公开发布了 Llama系列大型语言模型 (LLM),这是一组经过预训练和微调的生成文本模型,参数规模从 70 亿到 700 亿不等。
在大多数任务中,LLaMA-13B要比GPT-3(175B)的性能要好,LLaMA-65B和组好的模型Chinchilla-70B以及PaLM-540B的实力相当。
Llama 架构分析
分词
分词部分主要做的是利用文本分词器对文本进行分词

tokenizer = AutoTokenizer.from_pretrained(PATH_TO_CONVERTED_TOKENIZER)
text = "Hey, are you conscious? Can you talk to me?"
inputs = tokenizer(text, return_tensors="pt")
- 1
- 2
- 3
网络主干
主干网络部分主要是将分词得到的input_ids输入到embedding层中进行文本向量化,得到hidden_states(中间结果),然后输入到layers层中,得到hidden_states(中间结果),用于下游任务。
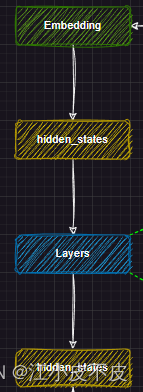
self.embed_tokens = nn.Embedding(config.vocab_size, config.hidden_size, self.padding_idx)
        self.layers = nn.ModuleList(
            [MixtralDecoderLayer(config, layer_idx) for layer_idx in range(config.num_hidden_layers)]
        )
        self._use_flash_attention_2 = config._attn_implementation == "flash_attention_2"
        self.norm = MixtralRMSNorm(config.hidden_size, eps=config.rms_norm_eps)
- 1
- 2
- 3
- 4
- 5
- 6
DecoderLayer
主干网络的layers层就是由多个DecoderLayer组成的,由num_hidden_layers参数决定,一般我们说的模型量级就取决于这个数量,7b的模型DecoderLayer层的数量是32。
DecoderLayer层中又包含了Attention层和MLP层,主要的一个思想是利用了残差结构。
如下图所示,分为两个部分
第一部分
- 首先,将hidden_states(文本向量化的结构)进行复制,即残差
- 归一化
- 注意力层
- 残差相加
第二部分
- 首先将第一部分得到的hidden_states进行复制,即残差
- 归一化
- MLP层
- 残差相加
外链图片转存失败,源站可能有防盗链机制,建议将图片保存下来直接上传
#复制一份
residual = hidden_states
#归一化
hidden_states = self.input_layernorm(hidden_states)

#注意力层
hidden_states, self_attn_weights, present_key_value = self.self_attn(
    hidden_states=hidden_states,
    attention_mask=attention_mask,
    position_ids=position_ids,
    past_key_value=past_key_value,
    output_attentions=output_attentions,
    use_cache=use_cache,
    padding_mask=padding_mask,
)
#加上残差
hidden_states = residual + hidden_states

#复制一份
residual = hidden_states
#归一化
hidden_states = self.post_attention_layernorm(hidden_states)
#mlp
hidden_states = self.mlp(hidden_states)
#加上残差
hidden_states = residual + hidden_states

outputs = (hidden_states,)

if output_attentions:
    outputs += (self_attn_weights,)

if use_cache:
        outputs += (present_key_value,)

return outputs
- 1
- 2
- 3
- 4
- 5
- 6
- 7
- 8
- 9
- 10
- 11
- 12
- 13
- 14
- 15
- 16
- 17
- 18
- 19
- 20
- 21
- 22
- 23
- 24
- 25
- 26
- 27
- 28
- 29
- 30
- 31
- 32
- 33
- 34
- 35
- 36
Attention
进行位置编码,让模型更好的捕捉上下文信息
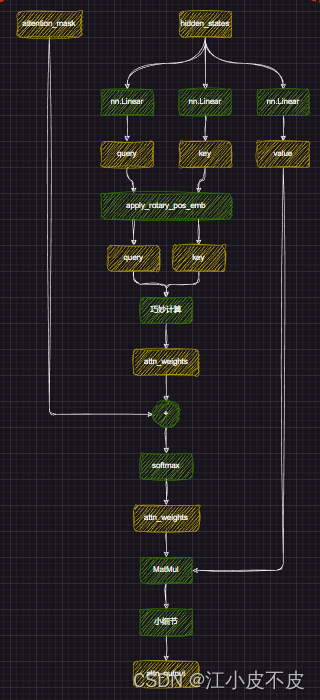
#经过线性层
query_states = self.q_proj(hidden_states)
key_states = self.k_proj(hidden_states)
value_states = self.v_proj(hidden_states)

#多头注意力形状变换
query_states = query_states.view(bsz, q_len, self.num_heads, self.head_dim).transpose(1, 2)
key_states = key_states.view(bsz, q_len, self.num_key_value_heads, self.head_dim).transpose(1, 2)
value_states = value_states.view(bsz, q_len, self.num_key_value_heads, self.head_dim).transpose(1, 2)
kv_seq_len = key_states.shape[-2]

#计算cos、sin
#计算旋转位置嵌入
cos, sin = self.rotary_emb(value_states, seq_len=kv_seq_len)
query_states, key_states = apply_rotary_pos_emb(query_states, key_states, cos, sin, position_ids)

#计算权重
key_states = repeat_kv(key_states, self.num_key_value_groups)
value_states = repeat_kv(value_states, self.num_key_value_groups)
attn_weights = torch.matmul(query_states, key_states.transpose(2, 3)) / math.sqrt(self.head_dim)

#加上掩码
attn_weights = attn_weights + attention_mask
#计算softmax
attn_weights = nn.functional.softmax(attn_weights, dim=-1, dtype=torch.float32).to(query_states.dtype)
attn_output = torch.matmul(attn_weights, value_states)

attn_output = self.o_proj(attn_output)
- 1
- 2
- 3
- 4
- 5
- 6
- 7
- 8
- 9
- 10
- 11
- 12
- 13
- 14
- 15
- 16
- 17
- 18
- 19
- 20
- 21
- 22
- 23
- 24
- 25
- 26
- 27
- 28
- 29
MLP
mlp层的主要作用是应用非线性激活函数和线性投影。
- 首先将attention层得到的结果经过两个线性层得到gate_proj和up_proj
- gate_proj经过激活函数,再和up_proj相乘
- 最后经过一个线性层得到最后的结果
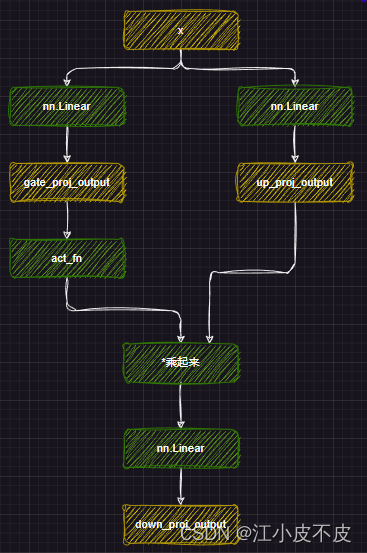
self.gate_proj = nn.Linear(self.hidden_size, self.intermediate_size, bias=False)
self.up_proj = nn.Linear(self.hidden_size, self.intermediate_size, bias=False)
self.down_proj = nn.Linear(self.intermediate_size, self.hidden_size, bias=False)
self.act_fn = ACT2FN[config.hidden_act]
down_proj = self.down_proj(self.act_fn(self.gate_proj(x)) * self.up_proj(x))
- 1
- 2
- 3
- 4
- 5
下游任务
因果推理
所谓因果推理,就是回归任务。
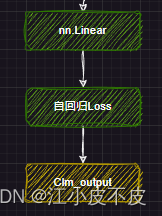
self.lm_head = nn.Linear(config.hidden_size, config.vocab_size, bias=False)
- 1
文本分类
即分类任务
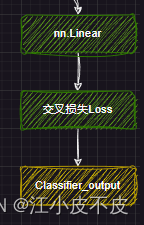
self.score = nn.Linear(config.hidden_size, self.num_labels, bias=False)
- 1
- 2
声明:本文内容由网友自发贡献,不代表【wpsshop博客】立场,版权归原作者所有,本站不承担相应法律责任。如您发现有侵权的内容,请联系我们。转载请注明出处:https://www.wpsshop.cn/w/很楠不爱3/article/detail/364568
推荐阅读
相关标签


