- 1go 短连接和长连接 超时处理_go实现tcp长链接,心跳、以及超时
- 2CSS 实现小球的曲线运动_css 曲线运动
- 3android metaRTC编译
- 4Chatgpt如何共享可以防止封号!_gpt4两个人一起用会封号吗
- 5玩转群晖NAS套件系列二:synology Drive的安装使用保姆级教程!_synology drive 教程
- 6卷积神经网络(CNN)实现mnist手写数字识别_设计一个卷积神经网络,实现mnist手写数字识别
- 7学习笔记:AAU-net: An Adaptive Attention U-net for Breast Lesions Segmentation in Ultrasound Images
- 8jieba 自定义词库(海量词语)以及模型复用_jieba自定义词库
- 9MySQL的utf8与utf8mb4编码,以及utf8_bin、utf8_general_ci编码区别_mysql utf8_bin
- 10STM32讲解
【画龙迎春】 HarmonyOS Image 组件的基本使用之画龙迎春,“码”上“鸿”福到
赞
踩
前言
各位朋友们大家好! 本想再摸鱼几天, 然后一看今天已经28号了, 真实“锤死梦中惊坐起”啊! 时间太快了,今天遍接着这篇博文简单的说一下本人今年的大体博文知识更新计划,有兴趣的朋友记得关于一下哦!
- 鸿蒙从入门到实战
- 软考高项知识点分享
- 技术测评
- 粉丝福利【送书大爆发】
24年若城将从以上四个方向进行博文更新!
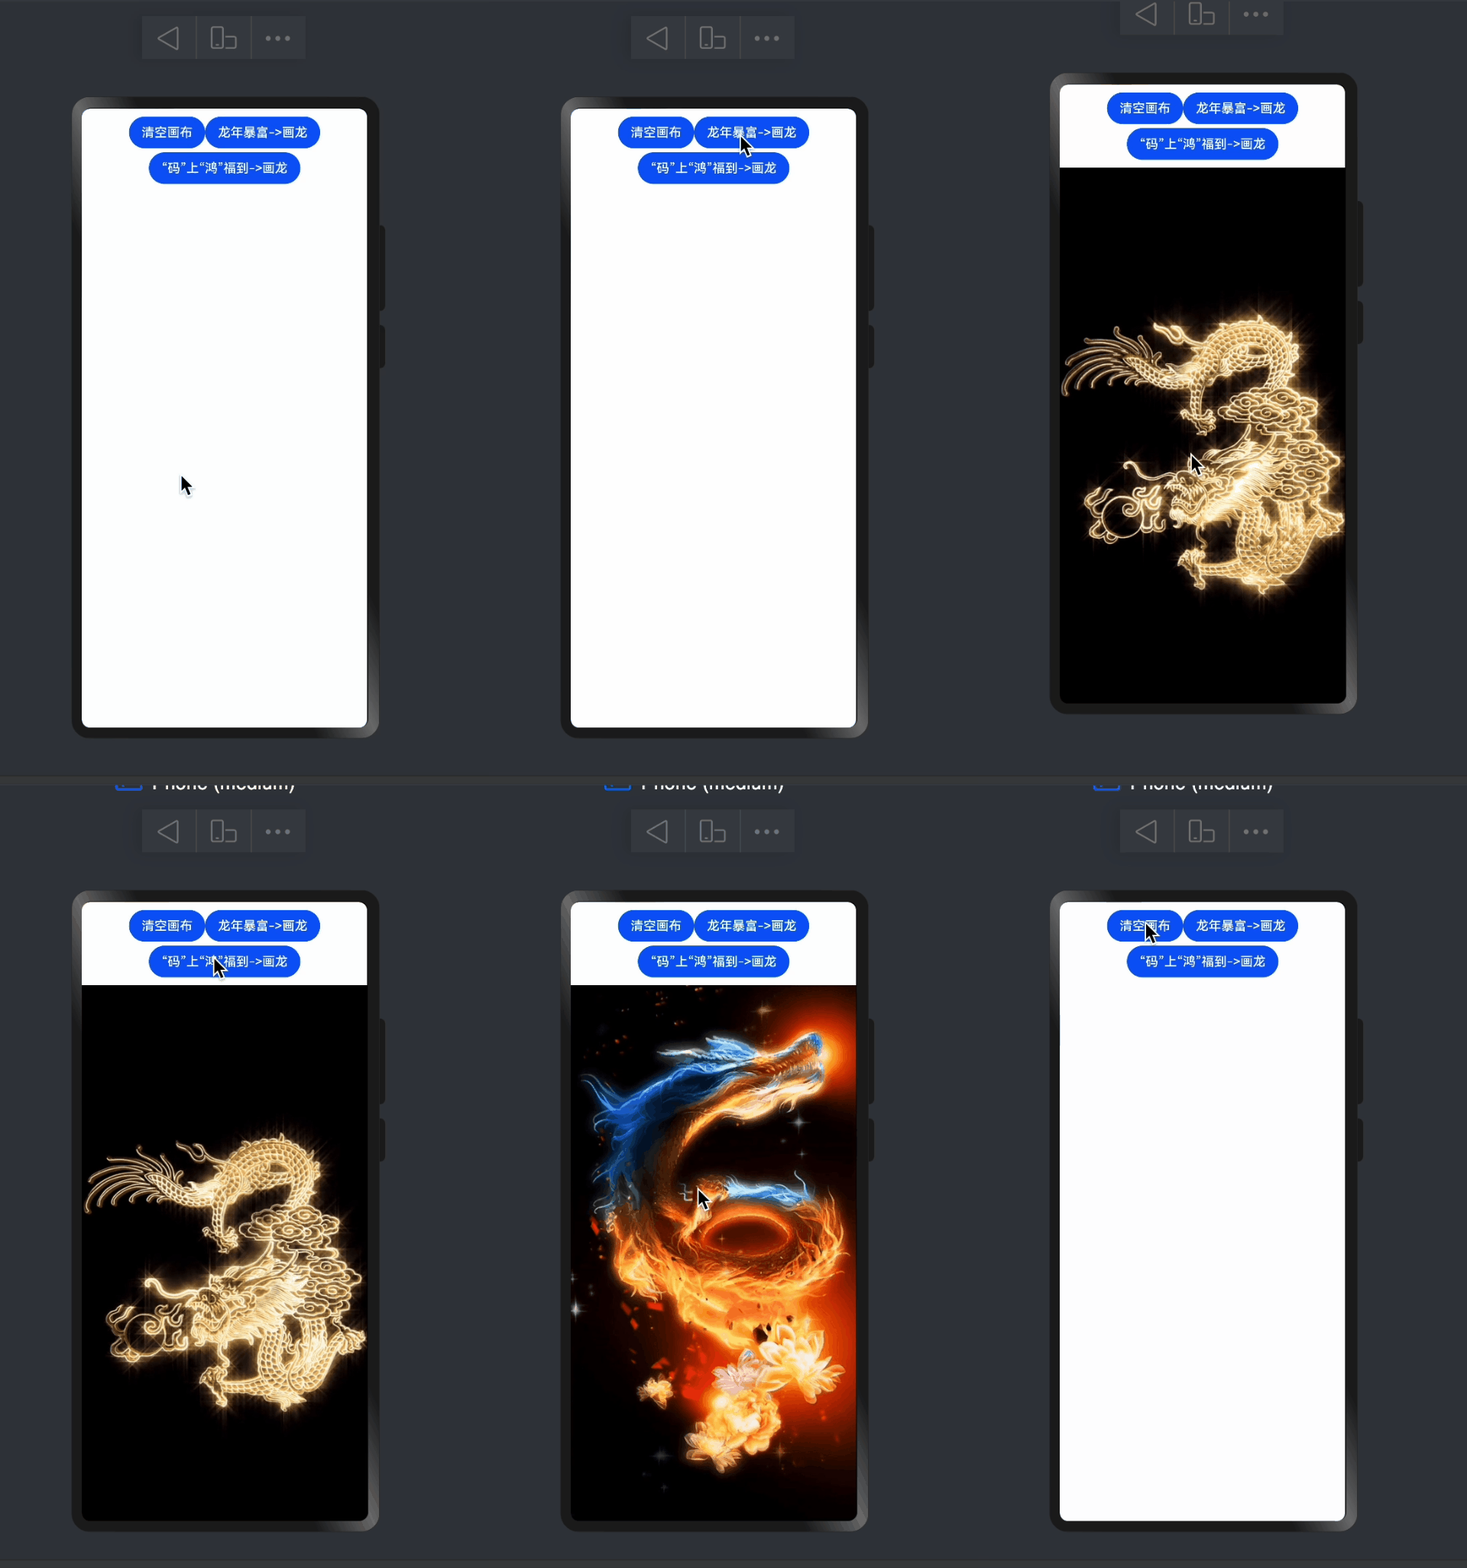
废话不多说啦, 龙年就从画一个龙来开始本年的幸福之旅吧! let’s go!!!
效果展示

素材
已将素材文件上传至oss 服务器中,链接如下
| 素材一 | 素材二 |
|---|---|
| http://s9g9q4h1t.hb-bkt.clouddn.com/myimg/dino.gif | http://s9g9q4h1t.hb-bkt.clouddn.com/myimg/dinofx.gif |
代码开发
申请权限
本次的demo 开发因为我们使用的是http链接来访问的图片地址, 因此需要申请权限,步骤如下:
- 找到路劲
entry->src->main->module.json5 - 在
module.json5中添加网络权限的申请
"requestPermissions": [
  {
    "name": "ohos.permission.INTERNET",
  }
]
- 1
- 2
- 3
- 4
- 5
设置变量
  @State imgSrc: string = 'http://s9g9q4h1t.hb-bkt.clouddn.com/myimg/dino.gif'
  @State hasgit:boolean=false
  @State hasMp:boolean=false
  @State img2Src:string ='http://s9g9q4h1t.hb-bkt.clouddn.com/myimg/dinofx.gif'
- 1
- 2
- 3
- 4
- 5
变量解释
imgSrc和img2Src是图片展示的地址
hasgit和hasMp用于判断对应图片的展示与隐藏
按钮设置
 Row(){
            Column({space:5}){
             Row(){
               Button('清空画布').onClick(()=>{
                 this.hasgit=false
                 this.hasMp=false
               })
               Button('龙年暴富->画龙').onClick(()=>{
                 this.hasgit=true
                 this.hasMp=false
               })
             }
              Button('“码”上“鸿”福到->画龙').onClick(()=>{
                this.hasgit=false
                this.hasMp=true
              })
            }

          }.padding(10)
- 1
- 2
- 3
- 4
- 5
- 6
- 7
- 8
- 9
- 10
- 11
- 12
- 13
- 14
- 15
- 16
- 17
- 18
- 19
代码中设置三个 button按钮 第一个button 主要用于清空画布, 第二个和第三个按钮用于展示对应的图片
通过按钮来设置 hasgit和 hasMp两个变量的状态
图片展示
        Row(){
          if (this.hasgit){
             Image(this.imgSrc).width('100%').height('100%')

          }else if(this.hasMp){
            Image(this.img2Src).width('100%').height('100%')

          }
        }
        .layoutWeight(1)
- 1
- 2
- 3
- 4
- 5
- 6
- 7
- 8
- 9
- 10
通过if … else if … 来控制不同图片的展示与隐藏
layoutWeight属性讲解
父容器尺寸确定时,设置了layoutWeight属性的子元素与兄弟元素占主轴尺寸按照权重进行分配,忽略元素本身尺寸设置,表示自适应占满剩余空间。
注意
layoutWeight 仅在Row/Column/Flex布局中生效。可选值为大于等于0的数字,或者可以转换为数字的字符串。
完整代码
@Entry
@Component
struct Index {
  @State imgSrc: string = 'http://s9g9q4h1t.hb-bkt.clouddn.com/myimg/dino.gif'
  @State hasgit:boolean=false
  @State hasMp:boolean=false
  @State img2Src:string ='http://s9g9q4h1t.hb-bkt.clouddn.com/myimg/dinofx.gif'

  build() {
    Row() {
      Column() {
          Row(){
            Column({space:5}){
             Row(){
               Button('清空画布').onClick(()=>{
                 this.hasgit=false
                 this.hasMp=false
               })
               Button('龙年暴富->画龙').onClick(()=>{
                 this.hasgit=true
                 this.hasMp=false
               })
             }
              Button('“码”上“鸿”福到->画龙').onClick(()=>{
                this.hasgit=false
                this.hasMp=true
              })
            }

          }.padding(10)
        Row(){
          if (this.hasgit){
             Image(this.imgSrc).width('100%').height('100%')

          }else if(this.hasMp){
            Image(this.img2Src).width('100%').height('100%')

          }
        }
        .layoutWeight(1)
      }
      .height('100%')
      .width('100%')
    }
    .width('100%')
    .height('100%')
  }
}
- 1
- 2
- 3
- 4
- 5
- 6
- 7
- 8
- 9
- 10
- 11
- 12
- 13
- 14
- 15
- 16
- 17
- 18
- 19
- 20
- 21
- 22
- 23
- 24
- 25
- 26
- 27
- 28
- 29
- 30
- 31
- 32
- 33
- 34
- 35
- 36
- 37
- 38
- 39
- 40
- 41
- 42
- 43
- 44
- 45
- 46
- 47
- 48
- 49
拓展Image 组件
Image 组件的详细使用及基本案例 ,会在3月份进行逐渐更新博文的呦, 本次先简单的介绍一下 Image 组件
- Image支持加载string、PixelMap和Resource类型的数据源,支持png、jpg、bmp、svg和gif类型的图片格式。
- 使用网络图片时,需要申请权限ohos.permission.INTERNET
参数类型说明

总结
harmonyos 的Image 组件使用起来还是比较顺手的, 其中包含了多个参数以及事件方法, 可以尝试的去跟着本博文的教程体验一下的呦
声明
我的博客即将同步至腾讯云开发者社区,邀请大家一同入驻:https://cloud.tencent.com/developer/support-plan?invite_code=3j77fcogj14ws


