
- 1PlatformIO开发之STM32点灯(基于arduino框架)
- 2业务中台建设与应用_终于有人把前台、中台、后台都讲明白了
- 3握手信号学习记录_握手信号的打拍
- 4原来R语言还有这些不为人知的用处!
- 5【SpringMVC】Spring Web MVC入门(一)
- 6挑战杯 基于深度学习的人脸表情识别
- 7【华为OD机考 统一考试机试C卷】生成哈夫曼树(C++ Java JavaScript Python C语言)_华为od机试 - 生成哈夫曼树(java & js & python & c)
- 8XSS渗透与防御
- 9git 跳过 ssl_git ssl跳过
- 10ssh连接出现的错误及解决方法!!!!!!!_ssh 链接以后两个×
ResNet网络结构及pytorch实现_resnet结构
赞
踩
1、ResNet网络结构
参考文献:Deep Residual Learning for Image Recognition
参考视频:霹雳吧啦Wz:ResNet网络结构,BN以及迁移学习详解
ResNet文章主要解决的问题如下:
-
梯度消失或梯度爆炸问题:
— 随着网络层数加深梯度消失或梯度爆炸会越来越明显。这是因为每向前传播一层,都要乘以一个小于1的梯度误差,就越来越小造成梯度消失的问题;反之每向前传播一层,都要乘以一个大于1的梯度误差,就造成梯度爆炸问题。
— 通常通过对数据进行Batch Normalization(丢弃dropout)标准化处理,权重初始化,来解决此问题 -
退化问题:网络越深反而识别错误率变高
– 通过残差结构来解决退化的问题
1.1 不同深度的ResNet结构
网络层数:指的是带权重的层数,包括卷积层和全连接层,不包括池化层和BN层。如resnet18就是17个卷积层+1个全连接层。

1.2 残差模块结构
下图是残差模块的结构,中间的是针对网络层数较少(18,34)的残差结构,右边的是针对网络层数较多(50,101等)的残差结构。
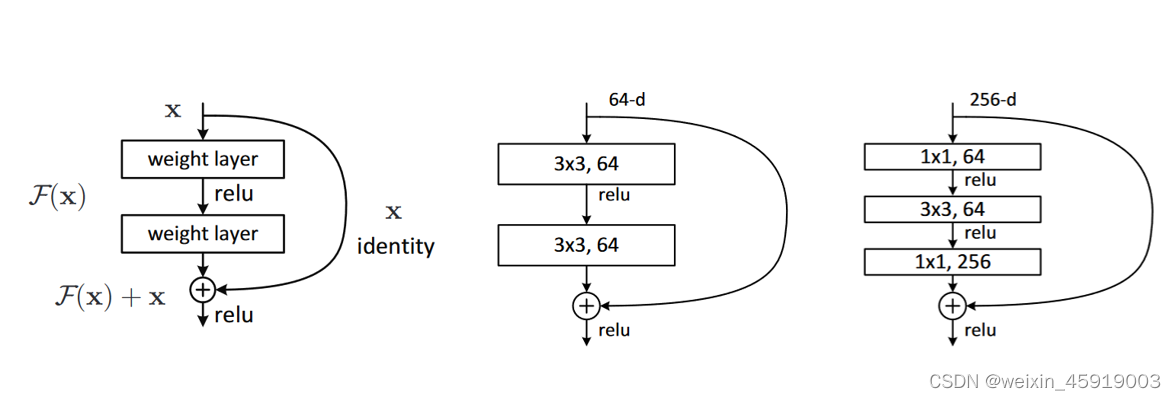
从图中可以看出在主分支上经过一系列卷积后与输入相加再进行relu
侧面的分支在论文中被称为shortcut,并且主分支与shortcut的输出特征矩阵shape必须相同
右边的残差模块中1 x 1的卷积核用来降维和升维
1.2.1 卷积相关的部分计算
- 卷积输出特征矩阵宽和高的计算公式:向下取整
w o u t = ( w i n − k + 2 p ) s + 1 {w_{out}} = \frac{{\left( {{w_{in}} - k + 2p} \right)}}{s} + 1 wout=s(win−k+2p)+1
— 其中 w为输入特征矩阵的长或宽;k为卷积核大小;p为padding;s为stride - 参数量 (parameters) 计算公式:
p a r a m s = k w × k h × c i n × c o u t params = {k_w} \times {k_h} \times {c_{in}} \times {c_{out}} params=kw×kh×cin×cout
上图中间残差模块的参数量:3 x 3 x 64 x 64+ 3 x 3 x 64x 64 = 73728
右边模块:1 x 1 x 256 x 64 + 3 x 3 x 64 x 64 x 1 x 1 x 64 x 256 = 69632 - 计算量 (Flops) 计算公式:
F L O P s = c i n × k × k × c o u t × w × h FLOPs = {c_{in}} \times k \times k \times {c_{out}} \times w \times h FLOPs=cin×k×k×cout×w×h
得到输出特征图(feature map) 的一个像素点,需要进行 c i n × k × k {c_{in}} \times k \times k cin×k×k次乘法操作,因此为了得到整个feature map需要进行 c i n × k × k × c o u t × w × h {c_{in}} \times k \times k \times {c_{out}} \times w \times h cin×k×k×cout×w×h次乘法。
1.2.2 ResNet整体的网络结构中shortcut实线和虚线结构的区别
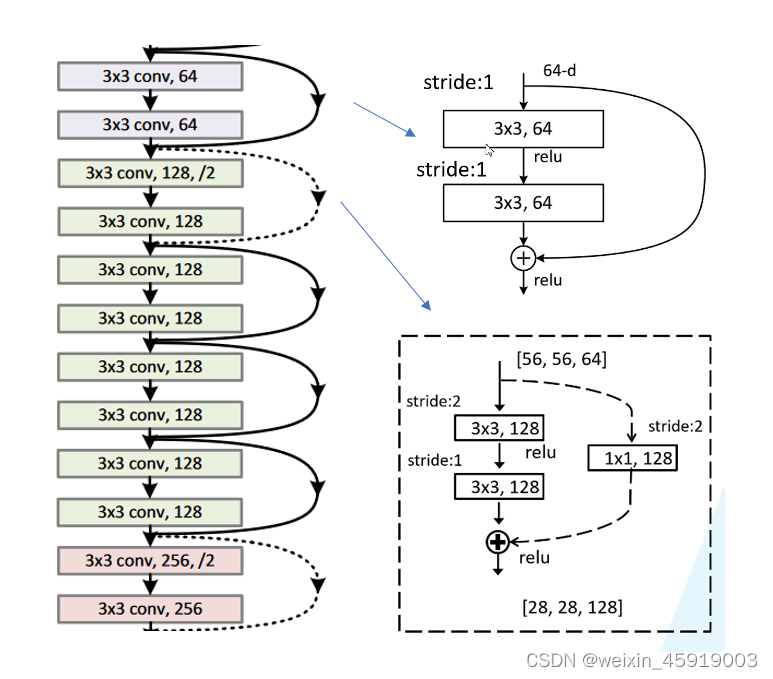
图中实线shortcut的输出和主分支的输出shape是相同的,可以直接相加;虚线对应的shape不同,输入特征矩阵的shape是[56,56,64],输出的特征矩阵shape是[28,28,128]
二者不同之处:步距stride不同,通过stride=2使特征矩阵高和宽从56变到28;shortcut使用128个卷积核将深度变成128。stride=2时输出特征矩阵的宽计算如:
w
o
u
t
=
56
−
3
+
2
×
1
2
+
1
=
28
{w_{out}} = \frac{{56 - 3 + 2 \times 1}}{2} + 1 = 28
wout=256−3+2×1+1=28
注意:在原论文中虚线残差结构主分支第一个1 x 1卷积层的stride=2,第二个3 x 3卷积层的stride=1,但再pytorch官方实现过程主分支第一个1 x 1卷积层的stride=1,第二个3 x 3卷积层的stride=2,这样可以在ImageNet的top1上大概提升0.5%的准确率。
网络最开始通过最大池化下采样后得到的输出是[56,56,64], 刚好是18、34层conv2_x实现残差结构所需要的输入shape;对于50、101、152层conv2需要的输入shape是[56,56,256],因此conv2_x第一个残差模块为虚线结构,仅仅调整了深度。后面的虚线结构不仅改变了深度还改变了高和宽。
2、pytorch实现
2.1 BasicBlock():定义18层和34层的残差结构
class BasicBlock(nn.Module):
    expansion = 1

    def __init__(self, in_channel, out_channel, stride=1, downsample=None, **kwargs):
        super(BasicBlock, self).__init__()
        self.conv1 = nn.Conv2d(in_channels=in_channel, out_channels=out_channel,
                               kernel_size=3, stride=stride, padding=1, bias=False)
        self.bn1 = nn.BatchNorm2d(out_channel)
        self.relu = nn.ReLU()
        self.conv2 = nn.Conv2d(in_channels=out_channel, out_channels=out_channel,
                               kernel_size=3, stride=1, padding=1, bias=False)
        self.bn2 = nn.BatchNorm2d(out_channel)
        self.downsample = downsample

    def forward(self, x):
        identity = x
        if self.downsample is not None:
            identity = self.downsample(x)

        out = self.conv1(x)
        out = self.bn1(out)
        out = self.relu(out)

        out = self.conv2(out)
        out = self.bn2(out)

        out += identity
        out = self.relu(out)

        return out

- 1
- 2
- 3
- 4
- 5
- 6
- 7
- 8
- 9
- 10
- 11
- 12
- 13
- 14
- 15
- 16
- 17
- 18
- 19
- 20
- 21
- 22
- 23
- 24
- 25
- 26
- 27
- 28
- 29
- 30
expansion参数对应着残差结构主分支中卷积核个数有没有发生变化,例如18和34层在同一个残差结构中的两个卷积核个数都是一样的;更深网络(50、101、152)的残差结构中第一层和第二层一样,第三层是第一二层的四倍。
传入的参数: in_channel为输入特征矩阵的深度;out_channel为输出特征矩阵的深度(对应残差模块主分支中卷积核的个数); stride=1;downsample下采样参数,默认为None,对应的虚线的残差结构,在2.3章节中的_make_layer中对downsample进行了定义。
conv1计算如下:输入[56,56,64],输出[56,56,64]
w
o
u
t
=
56
−
3
+
2
×
1
1
+
1
=
56
{w_{out}} = \frac{{56 - 3 + 2 \times 1}}{1} + 1 = 56
wout=156−3+2×1+1=56
conv1中stride为传入的参数,默认为1,若为虚线结构则为传入参数2;bias参数为false,这是因为使用BN层不需要。
conv2中stride=1
downsample 定义了下采样方法
前向传播过程:
首先将输入特征矩阵赋值给identity(shortcut分支上的输出值);
然后对下采样downsample进行判断,若为None则跳过,不为None则将输入特征矩阵x输入到下采样函数中得到shortcut分支的输出并重新赋值给identity
conv2后面没有激活,加上了shortcut分支的输出后再relu。
2.2 Bottleneck():定义50、101和152层的残差结构
class Bottleneck(nn.Module):
    """
    注意:原论文中,在虚线残差结构的主分支上,第一个1x1卷积层的步距是2,第二个3x3卷积层步距是1。
    但在pytorch官方实现过程中是第一个1x1卷积层的步距是1,第二个3x3卷积层步距是2,
    """
    expansion = 4

    def __init__(self, in_channel, out_channel, stride=1, downsample=None,
                 groups=1, width_per_group=64):
        super(Bottleneck, self).__init__()

        width = int(out_channel * (width_per_group / 64.)) * groups

        self.conv1 = nn.Conv2d(in_channels=in_channel, out_channels=width,
                               kernel_size=1, stride=1, bias=False)  # squeeze channels
        self.bn1 = nn.BatchNorm2d(width)
        # -----------------------------------------
        self.conv2 = nn.Conv2d(in_channels=width, out_channels=width, groups=groups,
                               kernel_size=3, stride=stride, bias=False, padding=1)
        self.bn2 = nn.BatchNorm2d(width)
        # -----------------------------------------
        self.conv3 = nn.Conv2d(in_channels=width, out_channels=out_channel*self.expansion,
                               kernel_size=1, stride=1, bias=False)  # unsqueeze channels
        self.bn3 = nn.BatchNorm2d(out_channel*self.expansion)
        self.relu = nn.ReLU(inplace=True)
        self.downsample = downsample

    def forward(self, x):
        identity = x
        if self.downsample is not None:
            identity = self.downsample(x)

        out = self.conv1(x)
        out = self.bn1(out)
        out = self.relu(out)

        out = self.conv2(out)
        out = self.bn2(out)
        out = self.relu(out)

        out = self.conv3(out)
        out = self.bn3(out)

        out += identity
        out = self.relu(out)

        return out
- 1
- 2
- 3
- 4
- 5
- 6
- 7
- 8
- 9
- 10
- 11
- 12
- 13
- 14
- 15
- 16
- 17
- 18
- 19
- 20
- 21
- 22
- 23
- 24
- 25
- 26
- 27
- 28
- 29
- 30
- 31
- 32
- 33
- 34
- 35
- 36
- 37
- 38
- 39
- 40
- 41
- 42
- 43
- 44
- 45
- 46
- 47
conv2中stride可能为1或2(虚线结构),因此为传入参数。
conv3输出通道数为out_channel的4倍数,所以out_channels=out_channel*self.expansion,所以bn3的参数也是out_channel*self.expansion。
前向传播过程:
前面与18层的一样,conv3后面没有激活,加上了shortcut分支的输出后再relu。
2.3 ResNet整个网络框架的定义
传入的参数:
- block:传入不同的残差模块(BasicBlock or Bottleneck);
- blocks_num:所使用残差模块的数量,比如34层对应的就是[3, 4, 6, 3];
- num_classes=1000:训练集分类个数;
- include_top=True:为了便于搭建更复杂的网络 ,默认为true,在初始化时将其传给类变量self.include_top = include_top
class ResNet(nn.Module):

    def __init__(self,
                 block,
                 blocks_num,
                 num_classes=1000,
                 include_top=True,
                 groups=1,
                 width_per_group=64):
        super(ResNet, self).__init__()
        self.include_top = include_top
        self.in_channel = 64

        self.groups = groups
        self.width_per_group = width_per_group

        self.conv1 = nn.Conv2d(3, self.in_channel, kernel_size=7, stride=2,
                               padding=3, bias=False)
        self.bn1 = nn.BatchNorm2d(self.in_channel)
        self.relu = nn.ReLU(inplace=True)
        self.maxpool = nn.MaxPool2d(kernel_size=3, stride=2, padding=1)
        self.layer1 = self._make_layer(block, 64, blocks_num[0])
        self.layer2 = self._make_layer(block, 128, blocks_num[1], stride=2)
        self.layer3 = self._make_layer(block, 256, blocks_num[2], stride=2)
        self.layer4 = self._make_layer(block, 512, blocks_num[3], stride=2)
        if self.include_top:
            self.avgpool = nn.AdaptiveAvgPool2d((1, 1))  # output size = (1, 1)
            self.fc = nn.Linear(512 * block.expansion, num_classes)

        for m in self.modules():
            if isinstance(m, nn.Conv2d):
                nn.init.kaiming_normal_(m.weight, mode='fan_out', nonlinearity='relu')

    def _make_layer(self, block, channel, block_num, stride=1):
        downsample = None
        if stride != 1 or self.in_channel != channel * block.expansion:
            downsample = nn.Sequential(
                nn.Conv2d(self.in_channel, channel * block.expansion, kernel_size=1, stride=stride, bias=False),
                nn.BatchNorm2d(channel * block.expansion))

        layers = []
        layers.append(block(self.in_channel,
                            channel,
                            downsample=downsample,
                            stride=stride,
                            groups=self.groups,
                            width_per_group=self.width_per_group))
        self.in_channel = channel * block.expansion

        for _ in range(1, block_num):
            layers.append(block(self.in_channel,
                                channel,
                                groups=self.groups,
                                width_per_group=self.width_per_group))

        return nn.Sequential(*layers)

    def forward(self, x):
        x = self.conv1(x)
        x = self.bn1(x)
        x = self.relu(x)
        x = self.maxpool(x)

        x = self.layer1(x)
        x = self.layer2(x)
        x = self.layer3(x)
        x = self.layer4(x)

        if self.include_top:
            x = self.avgpool(x)
            x = torch.flatten(x, 1)
            x = self.fc(x)

        return x
- 1
- 2
- 3
- 4
- 5
- 6
- 7
- 8
- 9
- 10
- 11
- 12
- 13
- 14
- 15
- 16
- 17
- 18
- 19
- 20
- 21
- 22
- 23
- 24
- 25
- 26
- 27
- 28
- 29
- 30
- 31
- 32
- 33
- 34
- 35
- 36
- 37
- 38
- 39
- 40
- 41
- 42
- 43
- 44
- 45
- 46
- 47
- 48
- 49
- 50
- 51
- 52
- 53
- 54
- 55
- 56
- 57
- 58
- 59
- 60
- 61
- 62
- 63
- 64
- 65
- 66
- 67
- 68
- 69
- 70
- 71
- 72
- 73
- 74
初始化:
-
in_channel = 64:64是后面max pool后得到的特征矩阵的深度;
-
conv1:输入channel为3,即RGB图像分深度,使用的卷积核个数为64,即in_channel 。stride=2,为了使高和宽缩减为原来的一半,设置padding=3
-
maxpool:stride=2,padding=1
-
layer1、2、3、4:对应前文中resnet网络结构中的con1_x、con2_x、con3_x、conv4_x。这一系列残差结构是通过 _make_layer函数生成的。
-
_make_layer函数 :
– 输入参数:block;channel对应的残差结构中第一层卷积核的个数;block_num为残差结构的数量;stride默认1。
– 定义下采样downsample = None;然后判断输入的stride是否不等于1 或 in_channel 是否不等于 channel x block.expansion。对于layer1是默认为1,18和34层的网络in_channel = channel x 1,对于50层的不等于,进入下面的语句,定义下采样downsample 。对于50层的layer1的第一个虚线shortcut只改变深度不改变高和宽,因此layer1的stride可以默认为1。
– 空列表layers = [ ]:通过append把block添加进去(即一层残差结构),
– 经过一层残差结构后in_channel发生改变。18和34层不变;50及以上需要乘以4(expansion)。
– 通过for将后面的实线残差结构压入进去range从1开始,因为layer中第一层残差结构已经搭建好了。
– 构建好列表layer后,再通过非关键字参数(*layer)的形式传入到nn.Sequential()函数,通过此函数将前面定义的一系列层结构组合再一起并返回。 -
include_top:初始化了一个平均池化下采样和一个全连接层,全连接层的输入为512 x block.expansion,输出为分类类别个数。
定义resnet34:
def resnet34(num_classes=1000, include_top=True):
    # https://download.pytorch.org/models/resnet34-333f7ec4.pth
    return ResNet(BasicBlock, [3, 4, 6, 3], num_classes=num_classes, include_top=include_top)
- 1
- 2
- 3
定义resnet50:
def resnet50(num_classes=1000, include_top=True):
    # https://download.pytorch.org/models/resnet50-19c8e357.pth
    return ResNet(Bottleneck, [3, 4, 6, 3], num_classes=num_classes, include_top=include_top)
- 1
- 2
- 3
定义resnet101:
def resnet101(num_classes=1000, include_top=True):
    # https://download.pytorch.org/models/resnet101-5d3b4d8f.pth
    return ResNet(Bottleneck, [3, 4, 23, 3], num_classes=num_classes, include_top=include_top)
- 1
- 2
- 3

