- 1【物联网应用案例】智能农业的 9 个技术用例
- 2tcp、http中的保活机制keep-alive_tcp连接多久会自动断开
- 3linux传输数据包丢失,pcap_next偶尔会丢失Linux上的数据包
- 4第27期:索引设计(全文索引原理)_mysql 无符号 int64
- 5web开发之即时通讯数据库设计_web im数据库设计
- 6JAVA300第四章作业_3、编写 java 程序,用于显示人的姓名和年龄。定义一个学生类student。 该类中应该
- 7dell服务器怎么看硬件状态,DELL服务器硬件报错解决方法对照表.pdf
- 8RTSP客户端接收H264的RTP包并解析遇到的问题_rtsp流无法解析出pps信息怎么办
- 9Html基本结构、语法规则、常用标记/标签_请列出与创建标记语言文档相关的文档技术、网页组件、组织程序和指南的五条规则?
- 10常见的服务器操作系统和工作站操作系统_电脑、工作站、服务器正版系统有哪些
CDH大数据平台入门篇之搭建与部署_cdh安装部署
赞
踩
一、CDH介绍
1.CDH 是一个强大的商业版数据中心管理工具
- 提供了各种能够快速稳定运行的数据计算框架,如Spark;
- 使用Apache Impala做为对HDFS、HBase的高性能SQL查询引擎;
- 使用Hive数据仓库工具帮助用户分析数据;
- 提供CM安装HBase分布式列式NoSQL数据库;
- 包含原生的Hadoop搜索引擎以及Cloudera Navigator Optimizer去对Hadoop上的计算任务进行一个可视化的协调优化,提高运行效率;
- 提供的各种软件能让用户在一个可视化的UI界面中方便地管理、配置和监控Hadoop以及其它所有相关组件,并有一定的容错容灾处理;
- 提供了基于角色的访问控制安全管理。
2.CDH提供一下特性
- 灵活性:能够存储各种类型的数据,并使用各种不同的计算框架进行操作,包括批处理、交互式sql、文本搜索、机器学习和统计计算;
- 集成性:能够快速集成和运行一个完整的Hadoop平台,适用于各种不同的硬件和软件;
- 安全性:处理和控制敏感数据;
- 扩展性:能够部署多种应用,并扩展和扩充它们以满足你的需求;
- 高可用性;可以放心地用于关键的商业任务;
- 兼容性:可以利用你现有的IT基础设施和资源。
二、Cloudera Manager
1.CM介绍
CM是一种管理CDH集群的端到端的应用
- CM通过对CDH集群的各部分提供精细的可视化和控制,建立了企业级部署的标准,增强了操作人员的能力以提升性能、提升服务质量、提高合规性、降低管理成本;
- 安装过程自动化,使集群部署时间从几个星期减少到几分钟;
- 集群范围、实时的主机和服务运行情况的视图;
- 单一的中央控制台,以对集群配置进行变更;
- 采用全方位的报告和诊断工具来帮助你优化性能和利用率;
- CM的核心是Cloudera Manager Server。Server承载了管理员控制台(Admin Console Web Server)和应用逻辑,并负责安装软件、配置、启动、停止服务,以及管理运行有服务的集群。
2.与Cloudera Manager Server一同工作的组件
- 代理:在每个主机上安装,负责启动和停止进行、解包配置、触发安装、监控主机;
- 管理服务:由一组角色组成的服务,执行各种监视、告警、报告功能;
- 数据库:存储配置和监控信息。通常,多个逻辑数据库在一个或多个数据库服务器上运行。例如CMS和监控服务使用不同的逻辑数据库;
- Cloudera仓库:CM提供的用于软件分发的仓库;
- 客户端:与服务器交互的借口,包括管理控制台(管理员使用该基于web的界面以管理集群和CM)、API(开发者可使用API创建自定义的CM应用)。
3.CM功能
(1)状态管理
- CMS维护了集群的各种状态。状态可分为两类:模块和运行时,两者都存储于CMS的数据库中;
- 模块中包含集群、主机、服务、角色、配置。运行时包含进程、命令。
(2)配置管理
CM在多个层面定义了配置,如:
- 服务层面,可定义整个服务实例层面的配置,如HDFS服务的默认副本因子;
- 角色组层面,可定义某个角色组的配置,如DataNode的处理线程数量,可根据DataNodes的不同分组进行不同的配置;
- 角色层面,可覆盖从角色组层面继承的配置。这种配置需要谨慎使用,因为会造成角色组中的配置分歧。如因为排错需求临时启用某个角色实例的DEBUG日志;
- 主机层面,根据监控、软件管理、资源管理的不同有不同的配置;
- CM自身也有很多与管理操作相关的配置。
(3)进程管理
- 非CM管理的集群使用脚本进行角色进程的启动,但在CM管理的集群中这类脚本不起作用;
- CM管理的集群中,只能使用CM进行角色进程的启停。CM使用开源的进程管理工具名为supervisord,其会启动进程、重定向日志、通知进程失 败、为进程设置正确的用户ID等等,CM支持自动重启一个崩溃的进程。 如果一个进程在启动后频繁崩溃,还会被打上非健康标记;
- 停止CMS和CM代理不会使正在运行的进程被中止。
(4)软件管理
CM支持两种软件分发格式:packages和parcels:
- package是一种二进制分发格式,包含编译的代码和元数据如包 述、版本、依赖项。包管理系统评估此元数据以允许包搜索、执行升级、确保包的所有依赖关系得到满足。CM使用本地操作系统支持的包管理程序;
- parcel也是一种二进制分发格式,包含CM需要使用的附加元数据。其与package的区别有:可安装同一个parcel的多个版本,并激活其中一个; parcel可安装到任何路径;通过parcel安装,CM会自动下载并激活和每 个节点操作系统版本匹配的parcel包,解决某些操作系统版本不一致问 题。
(5)主机管理
- CM 供了多种功能以管理Hadoop集群的主机。第一次运行CM管理员控制台时,可搜索主机并添加到集群,一旦选中了主机就可以为其分配CDH 角色。CM会在主机上自动部署作为集群托管节点的所有软件:JDK,CM 代理,CDH,Impala,Solr等等;
- 服务部署并运行后,管理员控制台中的“Hosts”区域显示集群中托管 主机的总体状态。 供的信息包括主机上的CDH版本、主机所属的集群、 运行在主机上的角色的数量。Cloudera管理服务中的主机监控角色执行 健康检查并收集主机的统计信息,以允许你监控主机的健康和性能。
(6)资源管理
CM允许使用两种资源管理方式:
- 静态资源池:使用Linux cgroups在多个服务间静态地进行资源隔离,如 HBase、Impala、YARN分别使用一定百分比的资源。静态资源池默认不启 用;
- 动态资源池:用于某些服务内部的资源管理,如YARN的各种资源调度器; Impala也可对不同池中的查询动态分配资源。
(7)用户管理
- 访问CM通过用户账户进行控制。用户账户标识如何对用户进行身份验证,并确定授予用户的权限;
- CM 供了多种用户认证机制。可以配置CM使用CM数据库认证用户,或使用某种外部认证服务。外部认证服务可以是LDAP服务器,或者指定的其 他服务。CM还支持使用安全断言标记语言(SAML)来实现单点登录
(8)安全管理
- 认证:认证是指用户或服务证明其有访问某种系统资源的权限。Cloudera集群支持操作系统账号认证、LDAP、Kerberos等认证方式。LDAP和Kerberos并不是互斥的,很多时候可以一起使用;
- 授权:授权关注谁可以存取或控制指定的资源或服务。CDH目前支持以 下几种权限控制:传统的POSIX形式的目录和文件权限控制;HDFS扩展 的ACL细粒度权限控制;HBase可对用户和组设置各种操作的ACL;使用Apache Sentry进行基于角色的权限控制;
- 加密:集群不同层面存储和传输的数据支持不同的加密方式。
(9)监控管理
- Cloudera Management Service实现了多种管理特性,包括活动监控、主机监控、服务监控、事件服务、告警发布、报表管理等。
三、Cloudera Manager 服务部署
1.环境准备
(1)服务器资源配置
A.配置不用过于纠结,部署学习的4核、8核都可以,内存最好16G以上,不然后期安装服务的时候可能安装几个就满了,web 监控部分会实时显示资源使用情况的。
| ip | hostname | 配置 | 作用 |
| 192.168.101.105 | hadoop105 | 20核32G、200G | server、agent |
| 192.168.101.106 | hadoop106 | 16核16G、100G | agent |
| 192.168.101.107 | hadoop107 | 16核16G、100G | agent |
B.firewalld、hostname 、selinux 配置
- #第一次安装部署建议关闭防火墙,可以避免后面过程出现很多问题,后面在 web 中配置集群时安装软件,会用到不同的端口,三台节点都执行
- [root@hadoop105 ~]# systemctl stop firewalld
- [root@hadoop105 ~]# systemctl disable firewalld
-
- #三台服务器都需要配置 hostname 解析:
- [root@localhost ~]# vi /etc/hosts
- 192.168.101.105 hadoop105
- 192.168.101.106 hadoop106
- 192.168.101.107 hadoop107
- #测试解析是否正常:
- [root@localhost ~]# ping hadoop105
- PING hadoop105 (192.168.101.105) 56(84) bytes of data.
- 64 bytes from hadoop105 (192.168.101.105): icmp_seq=1 ttl=64 time=0.270 ms
- 64 bytes from hadoop105 (192.168.101.105): icmp_seq=2 ttl=64 time=0.117 ms
- 64 bytes from hadoop105 (192.168.101.105): icmp_seq=3 ttl=64 time=0.097 ms
- 64 bytes from hadoop105 (192.168.101.105): icmp_seq=4 ttl=64 time=0.102 ms
-
- [root@localhost ~]# ping hadoop106
- PING hadoop106 (192.168.101.106) 56(84) bytes of data.
- 64 bytes from hadoop106 (192.168.101.106): icmp_seq=1 ttl=64 time=0.235 ms
- 64 bytes from hadoop106 (192.168.101.106): icmp_seq=2 ttl=64 time=0.109 ms
- 64 bytes from hadoop106 (192.168.101.106): icmp_seq=3 ttl=64 time=0.096 ms
- 64 bytes from hadoop106 (192.168.101.106): icmp_seq=4 ttl=64 time=0.103 ms
-
- [root@localhost ~]# ping hadoop107
- PING hadoop107 (192.168.101.107) 56(84) bytes of data.
- 64 bytes from hadoop107 (192.168.101.107): icmp_seq=1 ttl=64 time=0.131 ms
- 64 bytes from hadoop107 (192.168.101.107): icmp_seq=2 ttl=64 time=0.094 ms
- 64 bytes from hadoop107 (192.168.101.107): icmp_seq=3 ttl=64 time=0.083 ms
- 64 bytes from hadoop107 (192.168.101.107): icmp_seq=4 ttl=64 time=0.093 ms
-
- #关闭selinux
- [root@hadoop105 ~]# setenforce 0
- [root@hadoop106 ~]# setenforce 0
- [root@hadoop107 ~]# setenforce 0
-
- #永久关闭selinux
- sed -ri 's/SELINUX=enforcing/SELINUX=disabled/' /etc/selinux/config
(2)服务器SSH免密配置
SSH免密配置用于部署过程方便个人操作,文件传输等,此步骤于CM服务部署没有直接关系,可忽略不做,但后期文件互传工作会相对麻烦。
- #生成公钥和私钥
- [root@hadoop105 ~]# ssh-keygen -t rsa
- Generating public/private rsa key pair.
- Enter file in which to save the key (/root/.ssh/id_rsa):
- Created directory '/root/.ssh'.
- Enter passphrase (empty for no passphrase):
- Enter same passphrase again:
- Your identification has been saved in /root/.ssh/id_rsa.
- Your public key has been saved in /root/.ssh/id_rsa.pub.
- The key fingerprint is:
- SHA256:AmIOLBmYoOEVJHpFtC11MCkeDZOH/mH/4vbk/aR9bs4 root@hadoop105
- The key's randomart image is:
- +---[RSA 2048]----+
- |*o.*B=+o. |
- |B+o.==+o |
- |*o+o++. |
- |.= .ooo |
- | . o.oS |
- | ... |
- | .. . |
- | oo.. + .o|
- | o.oo o.o=E|
- +----[SHA256]-----+
- #公钥发送到目标主机上
- [root@hadoop105 ~]# ssh-copy-id hadoop105
- /usr/bin/ssh-copy-id: INFO: Source of key(s) to be installed: "/root/.ssh/id_rsa.pub"
- The authenticity of host 'hadoop105 (192.168.101.105)' can't be established.
- ECDSA key fingerprint is SHA256:BbZRGioTZY+eFPNUrXxuZoIE3zXuooz5Lg6g4kascIE.
- ECDSA key fingerprint is MD5:28:70:64:a2:b1:09:3f:1c:c3:27:2a:45:12:ac:5b:b9.
- Are you sure you want to continue connecting (yes/no)? yes
- /usr/bin/ssh-copy-id: INFO: attempting to log in with the new key(s), to filter out any that are already installed
- /usr/bin/ssh-copy-id: INFO: 1 key(s) remain to be installed -- if you are prompted now it is to install the new keys
- root@hadoop105's password:
- Number of key(s) added: 1
- Now try logging into the machine, with: "ssh 'hadoop105'"
- and check to make sure that only the key(s) you wanted were added.
- [root@hadoop105 ~]# ssh-copy-id hadoop106
- /usr/bin/ssh-copy-id: INFO: Source of key(s) to be installed: "/root/.ssh/id_rsa.pub"
- The authenticity of host 'hadoop106 (192.168.101.106)' can't be established.
- ECDSA key fingerprint is SHA256:79uhkuskGIRi/wotMr5Lr3rXis+pB9u75B/SzOIvf3k.
- ECDSA key fingerprint is MD5:63:41:6c:83:9a:f6:d2:96:ed:27:22:79:f9:f8:90:bf.
- Are you sure you want to continue connecting (yes/no)? yes
- /usr/bin/ssh-copy-id: INFO: attempting to log in with the new key(s), to filter out any that are already installed
- /usr/bin/ssh-copy-id: INFO: 1 key(s) remain to be installed -- if you are prompted now it is to install the new keys
- root@hadoop106's password:
- Number of key(s) added: 1
- Now try logging into the machine, with: "ssh 'hadoop106'"
- and check to make sure that only the key(s) you wanted were added.
- [root@hadoop105 ~]# ssh-copy-id hadoop107
- /usr/bin/ssh-copy-id: INFO: Source of key(s) to be installed: "/root/.ssh/id_rsa.pub"
- The authenticity of host 'hadoop107 (192.168.101.107)' can't be established.
- ECDSA key fingerprint is SHA256:IUjVYd8gXsS9JHyWMxB56JK56o4sUPzZkWoJ3tW1x08.
- ECDSA key fingerprint is MD5:98:30:97:44:7f:7c:9f:87:7b:63:7f:ac:81:24:71:bb.
- Are you sure you want to continue connecting (yes/no)? yes
- /usr/bin/ssh-copy-id: INFO: attempting to log in with the new key(s), to filter out any that are already installed
- /usr/bin/ssh-copy-id: INFO: 1 key(s) remain to be installed -- if you are prompted now it is to install the new keys
- root@hadoop107's password:
- Number of key(s) added: 1
- Now try logging into the machine, with: "ssh 'hadoop107'"
- and check to make sure that only the key(s) you wanted were added
- =========================================================================================
- #测试免密登录是否成功(不需要输入密码登录目标即成功)
- [root@hadoop105 ~]# ssh hadoop106
- Last login: Thu Feb 23 13:43:31 2023 from 192.168.101.144
- [root@hadoop106 ~]# exit
- 登出
- Connection to hadoop106 closed.
- [root@hadoop105 ~]# ssh hadoop107
- Last login: Thu Feb 23 13:43:33 2023 from 192.168.101.144
- #另外两台也按此操作即可(主要用于server端为agent下发文件,agent可以不配置,即另外两台可以不做)
(3)同步脚本配置
- #安装rsync同步服务(服务三台都需要安装)
- [root@hadoop105 ~]# yum install -y rsync
- #创建脚本,信息如下:
- [root@hadoop105 ~]# vi xsync.sh
- #!/bin/bash
- #1 获取输入参数个数,如果没有参数,直接退出
- pcount=$#
- if((pcount==0)); then
- echo no args;
- exit;
- fi
-
- #2 获取文件名称
- p1=$1
- fname=`basename $p1`
- echo fname=$fname
-
- #3 获取上级目录到绝对路径
- pdir=`cd -P $(dirname $p1); pwd`
- echo pdir=$pdir
-
- #4 获取当前用户名称
- user=`whoami`
-
- #5 循环
- for((host=105; host<108; host++)); do
- echo ------------------- hadoop$host --------------
- rsync -av $pdir/$fname $user@hadoop$host:$pdir
- done
- #赋予执行权限
- [root@hadoop105 ~]# chmod 755 xsync.sh
-
- #测试同步文件(在另外两台/root目录下看到文件即为成功)
- [root@hadoop105 ~]# touch test
- [root@hadoop105 ~]# ./xsync.sh test
- fname=test
- pdir=/root
- ------------------- hadoop105 --------------
- sending incremental file list
-
- sent 43 bytes received 12 bytes 110.00 bytes/sec
- total size is 0 speedup is 0.00
- ------------------- hadoop106 --------------
- sending incremental file list
- test
-
- sent 86 bytes received 35 bytes 242.00 bytes/sec
- total size is 0 speedup is 0.00
- ------------------- hadoop107 --------------
- sending incremental file list
- test
-
- sent 86 bytes received 35 bytes 80.67 bytes/sec
- total size is 0 speedup is 0.00
(4)JDK环境配置
- #上传jdk文件,并同步给另外两台(注意这里要在另外节点上先创建好 /opt/soft 目录)
- [root@hadoop105 ~]# /root/xsync.sh /opt/soft/oracle-j2sdk1.8-1.8.0+update181-1.x86_64.rpm
- #安装jdk服务(三台同步安装,也可安装其中一台,把/usr/java/同步到另外两台)
- [root@hadoop105 soft]# rpm -ivh oracle-j2sdk1.8-1.8.0+update181-1.x86_64.rpm
- 警告:oracle-j2sdk1.8-1.8.0+update181-1.x86_64.rpm: 头V3 RSA/SHA256 Signature, 密钥 ID b0b19c9f: NOKEY
- 准备中... ################################# [100%]
- 正在升级/安装...
- 1:oracle-j2sdk1.8-1.8.0+update181-1################################# [100%]
- #编辑profile新增配置
- [root@hadoop105 ~]# vi /etc/profile
- export JAVA_HOME=/usr/java/jdk1.8.0_181-cloudera
- export CLASSPATH=.:$CLASSPATH:$JAVA_HOME/lib
- export PATH=$PATH:$JAVA_HOME/bin
- #生效文件
- [root@hadoop105 ~]# source /etc/profile
- #检测安装结果
- [root@hadoop105 ~]# java -version
- java version "1.8.0_181"
- Java(TM) SE Runtime Environment (build 1.8.0_181-b13)
- Java HotSpot(TM) 64-Bit Server VM (build 25.181-b13, mixed mode)
- #同步配置到另外两台
- [root@hadoop105 ~]# /root/xsync.sh /etc/profile
- #另外两台生效配置
- [root@hadoop106 ~]# source /etc/profile
- [root@hadoop107 ~]# source /etc/profile
(5)集群整体操作脚本配置
- #创建脚本
- [root@hadoop105 ~]# vi xcall.sh
- #! /bin/bash
- for i in hadoop105 hadoop106 hadoop107
- do
- echo --------- $i ----------
- ssh $i "$*"
- done
- #修改脚本权限
- [root@hadoop105 ~]# chmod 755 xcall.sh
- #环境变量配置追加到.bashrc文件
- [root@hadoop105 ~]# cat /etc/profile >> ~/.bashrc
- [root@hadoop106 ~]# cat /etc/profile >> ~/.bashrc
- [root@hadoop107 ~]# cat /etc/profile >> ~/.bashrc
- #测试集群
- [root@hadoop105 ~]# ./xcall.sh jps
- --------- hadoop105 ----------
- 3583 Jps
- --------- hadoop106 ----------
- 3300 Jps
- --------- hadoop107 ----------
- 3276 Jps
-
(6)mysql安装与配置
- #mysql仅安装在server节点
- #卸载掉本机自带的mariadb服务
- [root@hadoop105 ~]# rpm -qa |grep mari
- mariadb-libs-5.5.68-1.el7.x86_64
- [root@hadoop105 ~]# rpm -e mariadb-libs-5.5.68-1.el7.x86_64 --nodeps
- #安装相关依赖
- [root@hadoop105 soft]# yum install -y net-tools
- [root@hadoop105 soft]# yum install -y perl
- #安装mysql服务
- [root@hadoop105 soft]# rpm -ivh mysql*
- 警告:mysql57-community-release-el7-10.noarch.rpm: 头V3 DSA/SHA1 Signature, 密钥 ID 5072e1f5: NOKEY
- 准备中... ################################# [100%]
- 正在升级/安装...
- 1:mysql-community-common-5.7.26-1.e################################# [ 17%]
- 2:mysql-community-libs-5.7.26-1.el7################################# [ 33%]
- 3:mysql-community-client-5.7.26-1.e################################# [ 50%]
- 4:mysql-community-server-5.7.26-1.e################################# [ 67%]
- 5:mysql-community-libs-compat-5.7.2################################# [ 83%]
- 6:mysql57-community-release-el7-10 ################################# [100%]
- #启动数据库
- [root@hadoop105 soft]# systemctl start mysqld
- #查看mysql初始密码
- [root@hadoop105 soft]# cat /var/log/mysqld.log |grep pass
- 2023-02-24T08:32:49.190770Z 1 [Note] A temporary password is generated for root@localhost: nMNGt3nm=y!V
- #使用默认密码登录
- [root@hadoop105 soft]# mysql -uroot -p
- Enter password:
- Welcome to the MySQL monitor. Commands end with ; or \g.
- Your MySQL connection id is 2
- Server version: 5.7.26
-
- Copyright (c) 2000, 2019, Oracle and/or its affiliates. All rights reserved.
-
- Oracle is a registered trademark of Oracle Corporation and/or its
- affiliates. Other names may be trademarks of their respective
- owners.
-
- Type 'help;' or '\h' for help. Type '\c' to clear the current input statement.
-
- mysql>
-
- #修改mysql密码
- mysql> alter user 'root'@'localhost' identified by '你的密码';
- Query OK, 0 rows affected (0.00 sec)
- #创建scm用户
- mysql> GRANT ALL ON scm.* TO 'scm'@'%' IDENTIFIED BY 'scm用户密码';
- Query OK, 0 rows affected, 1 warning (0.00 sec)
- #创建scm数据库
- mysql> CREATE DATABASE scm DEFAULT CHARACTER SET utf8 DEFAULT COLLATE utf8_general_ci;
- Query OK, 1 row affected (0.00 sec)
- #创建hive数据库
- mysql> CREATE DATABASE hive DEFAULT CHARSET utf8 COLLATE utf8_general_ci;
- Query OK, 1 row affected (0.00 sec)
- #创建oozie数据库
- mysql> CREATE DATABASE oozie DEFAULT CHARSET utf8 COLLATE utf8_general_ci;
- Query OK, 1 row affected (0.00 sec)
- #创建hue数据库
- mysql> CREATE DATABASE hue DEFAULT CHARSET utf8 COLLATE utf8_general_ci;
- Query OK, 1 row affected (0.00 sec)
-
- #开启远程登录数据库
- mysql> use mysql;
- Reading table information for completion of table and column names
- You can turn off this feature to get a quicker startup with -A
-
- Database changed
- mysql> update user set host="%" where user='root';
- Query OK, 1 row affected (0.00 sec)
- Rows matched: 1 Changed: 1 Warnings: 0
-
- mysql> flush privileges;
- Query OK, 0 rows affected (0.00 sec)
(7)时间同步配置
- #安装ntp服务
- [root@hadoop105 ~]# yum install -y ntp
- [root@hadoop106 ~]# yum install -y ntp
- [root@hadoop107 ~]# yum install -y ntp
-
- #server节点配置(ntp服务端)
- [root@hadoop105 ~]# vi /etc/ntp.conf
- #注释掉所有的restrict开头的配置
- #注释掉所有的server开头的配置
- #新增如下配置:
- restrict 192.168.101.105 mask 255.255.255.0 nomodify notrap
- server 127.127.1.0
- fudge 127.127.1.0 stratum 10
- #启动ntp服务
- [root@hadoop105 ~]# systemctl start ntpd
- [root@hadoop105 ~]# netstat -tunlp
- Active Internet connections (only servers)
- Proto Recv-Q Send-Q Local Address Foreign Address State PID/Program name
- tcp 0 0 127.0.0.1:25 0.0.0.0:* LISTEN 1611/master
- tcp 0 0 0.0.0.0:22 0.0.0.0:* LISTEN 1360/sshd
- tcp6 0 0 ::1:25 :::* LISTEN 1611/master
- tcp6 0 0 :::3306 :::* LISTEN 1801/mysqld
- tcp6 0 0 :::22 :::* LISTEN 1360/sshd
- udp 0 0 192.168.101.105:123 0.0.0.0:* 1999/ntpd
- udp 0 0 127.0.0.1:123 0.0.0.0:* 1999/ntpd
- udp 0 0 0.0.0.0:123 0.0.0.0:* 1999/ntpd
- udp6 0 0 fe80::35e9:7b14:664:123 :::* 1999/ntpd
- udp6 0 0 ::1:123 :::* 1999/ntpd
- udp6 0 0 :::123 :::* 1999/ntpd
-
- #agent节点配置(ntp客户端)
- [root@hadoop105 ~]# vi /etc/ntp.conf
- #注释掉所有的restrict开头的配置
- #注释掉所有的server开头的配置
- #新增如下配置:
- server 192.168.101.105
-
- #进行手动测试ntp
- [root@hadoop106 ~]# ntpdate 192.168.101.105
- 24 Feb 17:24:01 ntpdate[1894]: no server suitable for synchronization found
-
- #这里no server suitable for synchronization found是因为server端防火墙没有开发ntp服务端口
- #ntp服务端开放ntp端口,如果前面没有操作关闭防火墙,则需要执行如下操作
- [root@hadoop105 ~]# firewall-cmd --permanent --add-port=123/udp
- success
- [root@hadoop105 ~]# firewall-cmd --reload
- success
-
- #重新测试
- [root@hadoop106 ~]# ntpdate 192.168.101.105
- 24 Feb 17:27:17 ntpdate[1897]: adjust time server 192.168.101.105 offset 0.005958 sec
- [root@hadoop107 ~]# ntpdate 192.168.101.105
- 24 Feb 17:27:43 ntpdate[1887]: adjust time server 192.168.101.105 offset 0.003158 sec
-
- #测试成功,启动客户端ntp服务
- [root@hadoop106 ~]# systemctl start ntpd
- [root@hadoop107 ~]# systemctl start ntpd
-
- #配置ntp服务开机自启
- [root@hadoop105 ~]# systemctl enable ntpd.service
- [root@hadoop106 ~]# systemctl enable ntpd.service
- [root@hadoop107 ~]# systemctl enable ntpd.service
2.安装配置
(1)CM部署安装
- #创建java目录
- [root@hadoop105 ~]# mkdir /usr/share/java
-
- #上传mysql-connector-java-5.1.47.jar到此目录下,重命名并同步至其他节点
- [root@hadoop105 java]# mv mysql-connector-java-5.1.47.jar mysql-connector-java.jar
- [root@hadoop105 java]# /root/xsync.sh /usr/share/java/mysql-connector-java.jar
- fname=mysql-connector-java.jar
- pdir=/usr/share/java
- ------------------- hadoop105 --------------
- sending incremental file list
-
- sent 64 bytes received 12 bytes 152.00 bytes/sec
- total size is 1,007,502 speedup is 13,256.61
- ------------------- hadoop106 --------------
- sending incremental file list
- mysql-connector-java.jar
-
- sent 1,007,849 bytes received 35 bytes 2,015,768.00 bytes/sec
- total size is 1,007,502 speedup is 1.00
- ------------------- hadoop107 --------------
- sending incremental file list
- mysql-connector-java.jar
-
- sent 1,007,849 bytes received 35 bytes 2,015,768.00 bytes/sec
- total size is 1,007,502 speedup is 1.00
-
- #上传cm服务文件并解压
- [root@hadoop105 soft]# tar -zxvf cm6.3.1-redhat7.tar.gz
- [root@hadoop105 soft]# cd ../
-
- #创建cm_soft目录存放cm安装文件
- [root@hadoop105 opt]# mkdir cm_soft
- [root@hadoop105 opt]# cp /opt/soft/cm6.3.1/RPMS/
- noarch/ x86_64/
- [root@hadoop105 opt]# cp /opt/soft/cm6.3.1/RPMS/x86_64/cloudera-manager-agent-6.3.1-1466458.el7.x86_64.rpm /opt/cm_soft/
- [root@hadoop105 opt]# cp /opt/soft/cm6.3.1/RPMS/x86_64/cloudera-manager-daemons-6.3.1-1466458.el7.x86_64.rpm /opt/cm_soft/
-
- #将agent和daemons安装包同步至其他两个节点
- [root@hadoop105 opt]# /root/xsync.sh /opt/cm_soft/
- fname=cm_soft
- pdir=/opt
- ------------------- hadoop105 --------------
- sending incremental file list
-
- sent 181 bytes received 17 bytes 132.00 bytes/sec
- total size is 1,214,316,032 speedup is 6,132,909.25
- ------------------- hadoop106 --------------
- sending incremental file list
- cm_soft/
- cm_soft/cloudera-manager-agent-6.3.1-1466458.el7.x86_64.rpm
- cm_soft/cloudera-manager-daemons-6.3.1-1466458.el7.x86_64.rpm
-
- sent 1,214,612,758 bytes received 58 bytes 127,853,980.63 bytes/sec
- total size is 1,214,316,032 speedup is 1.00
- ------------------- hadoop107 --------------
- sending incremental file list
- cm_soft/
- cm_soft/cloudera-manager-agent-6.3.1-1466458.el7.x86_64.rpm
- cm_soft/cloudera-manager-daemons-6.3.1-1466458.el7.x86_64.rpm
-
- sent 1,214,612,758 bytes received 58 bytes 161,948,375.47 bytes/sec
- total size is 1,214,316,032 speedup is 1.00
- #将server服务也复制到cm目录
- [root@hadoop105 opt]# cp /opt/soft/cm6.3.1/RPMS/x86_64/cloudera-manager-server-6.3.1-1466458.el7.x86_64.rpm /opt/cm_soft/
-
- #每个节点都安装相关依赖服务
- [root@hadoop105 ~]# yum install -y chkconfig python bind-utils psmisc libxslt zlib sqlite cyrus-sasl-plain cyrus-sasl-gssapi fuse fuse-libs redhat-lsb bind-utils psmisc cyrus-sasl-plain cyrus-sasl-gssapi fuse portmap fuse-libs /lib/lsb/init-functions httpd mod_ssl openssl-devel python-psycopg2 MySQL-python libxslt
- [root@hadoop106 ~]# yum install -y chkconfig python bind-utils psmisc libxslt zlib sqlite cyrus-sasl-plain cyrus-sasl-gssapi fuse fuse-libs redhat-lsb bind-utils psmisc cyrus-sasl-plain cyrus-sasl-gssapi fuse portmap fuse-libs /lib/lsb/init-functions httpd mod_ssl openssl-devel python-psycopg2 MySQL-python libxslt
- [root@hadoop106 ~]# yum install -y chkconfig python bind-utils psmisc libxslt zlib sqlite cyrus-sasl-plain cyrus-sasl-gssapi fuse fuse-libs redhat-lsb bind-utils psmisc cyrus-sasl-plain cyrus-sasl-gssapi fuse portmap fuse-libs /lib/lsb/init-functions httpd mod_ssl openssl-devel python-psycopg2 MySQL-python libxslt
-
- #每个节点都安装daemon和agent服务
- [root@hadoop105 ~]# rpm -ivh /opt/cm_soft/cloudera-manager-daemons-6.3.1-1466458.el7.x86_64.rpm
- 警告:/opt/cm_soft/cloudera-manager-daemons-6.3.1-1466458.el7.x86_64.rpm: 头V3 RSA/SHA256 Signature, 密钥 ID b0b19c9f: NOKEY
- 准备中... ################################# [100%]
- 正在升级/安装...
- 1:cloudera-manager-daemons-6.3.1-14################################# [100%]
- [root@hadoop105 ~]# rpm -ivh /opt/cm_soft/cloudera-manager-agent-6.3.1-1466458.el7.x86_64.rpm
- 警告:/opt/cm_soft/cloudera-manager-agent-6.3.1-1466458.el7.x86_64.rpm: 头V3 RSA/SHA256 Signature, 密钥 ID b0b19c9f: NOKEY
- 准备中... ################################# [100%]
- 正在升级/安装...
- 1:cloudera-manager-agent-6.3.1-1466################################# [100%]
- Created symlink from /etc/systemd/system/multi-user.target.wants/cloudera-scm-agent.service to /usr/lib/systemd/system/cloudera-scm-agent.service.
- Created symlink from /etc/systemd/system/multi-user.target.wants/supervisord.service to /usr/lib/systemd/system/supervisord.service.
-
- #修改server端的agent配置
- [root@hadoop105 ~]# vi /etc/cloudera-scm-agent/config.ini
- #修改该参数
- server_host=hadoop105
-
- #将该配置同步到另外两个节点
- [root@hadoop105 ~]# /root/xsync.sh /etc/cloudera-scm-agent/config.ini
- fname=config.ini
- pdir=/etc/cloudera-scm-agent
- ------------------- hadoop105 --------------
- sending incremental file list
-
- sent 77 bytes received 12 bytes 178.00 bytes/sec
- total size is 9,826 speedup is 110.40
- ------------------- hadoop106 --------------
- sending incremental file list
- config.ini
-
- sent 880 bytes received 125 bytes 670.00 bytes/sec
- total size is 9,826 speedup is 9.78
- ------------------- hadoop107 --------------
- sending incremental file list
- config.ini
-
- sent 880 bytes received 125 bytes 2,010.00 bytes/sec
- total size is 9,826 speedup is 9.78
-
- #server端安装cm server服务
- [root@hadoop105 ~]# rpm -ivh /opt/cm_soft/cloudera-manager-server-6.3.1-1466458.el7.x86_64.rpm
- 警告:/opt/cm_soft/cloudera-manager-server-6.3.1-1466458.el7.x86_64.rpm: 头V3 RSA/SHA256 Signature, 密钥 ID b0b19c9f: NOKEY
- 准备中... ################################# [100%]
- 正在升级/安装...
- 1:cloudera-manager-server-6.3.1-146################################# [100%]
- Created symlink from /etc/systemd/system/multi-user.target.wants/cloudera-scm-server.service to /usr/lib/systemd/system/cloudera-scm-server.service.
-
- #修改cm server服务配置文件
- [root@hadoop105 ~]# vi /etc/cloudera-scm-server/db.properties
- com.cloudera.cmf.db.type=mysql
- com.cloudera.cmf.db.host=hadoop102:3306
- com.cloudera.cmf.db.name=scm
- com.cloudera.cmf.db.user=scm
- com.cloudera.cmf.db.password=你设置的密码
- com.cloudera.cmf.db.setupType=EXTERNAL
-
- #上传CDH包到/opt/cloudera/parcel-repo/目录下
- [root@hadoop105 ~]# ll /opt/cloudera/parcel-repo/
- 总用量 2033428
- -rw-r--r--. 1 root root 2082186246 2月 8 16:37 CDH-6.3.2-1.cdh6.3.2.p0.1605554-el7.parcel
- -rw-r--r--. 1 root root 40 2月 8 16:37 CDH-6.3.2-1.cdh6.3.2.p0.1605554-el7.parcel.sha
- -rw-r--r--. 1 root root 33887 2月 8 16:37 manifest.json
-
- #初始化数据库
- [root@hadoop105 ~]# /opt/cloudera/cm/schema/scm_prepare_database.sh mysql scm scm
- Enter SCM password:
- JAVA_HOME=/usr/java/jdk1.8.0_181-cloudera
- Verifying that we can write to /etc/cloudera-scm-server
- Creating SCM configuration file in /etc/cloudera-scm-server
- Executing: /usr/java/jdk1.8.0_181-cloudera/bin/java -cp /usr/share/java/mysql-connector-java.jar:/usr/share/java/oracle-connector-java.jar:/usr/share/java/postgresql-connector-java.jar:/opt/cloudera/cm/schema/../lib/* com.cloudera.enterprise.dbutil.DbCommandExecutor /etc/cloudera-scm-server/db.properties com.cloudera.cmf.db.
- Wed Mar 01 11:30:39 CST 2023 WARN: Establishing SSL connection without server's identity verification is not recommended. According to MySQL 5.5.45+, 5.6.26+ and 5.7.6+ requirements SSL connection must be established by default if explicit option isn't set. For compliance with existing applications not using SSL the verifyServerCertificate property is set to 'false'. You need either to explicitly disable SSL by setting useSSL=false, or set useSSL=true and provide truststore for server certificate verification.
- [ main] DbCommandExecutor INFO Successfully connected to database.
- All done, your SCM database is configured correctly!
-
- #如果提示ERROR JDBC Driver com.mysql.jdbc.Driver not found ,那一定是上面的mysql-connector-java-5.1.47.jar没有重命名成mysql-connector-java.jar
-
- #启动cm server服务并查看状态
- [root@hadoop105 ~]# systemctl start cloudera-scm-server
- [root@hadoop105 ~]# systemctl status cloudera-scm-server
- ● cloudera-scm-server.service - Cloudera CM Server Service
- Loaded: loaded (/usr/lib/systemd/system/cloudera-scm-server.service; enabled; vendor preset: disabled)
- Active: active (running) since 三 2023-03-01 11:32:51 CST; 14s ago
- Process: 12093 ExecStartPre=/opt/cloudera/cm/bin/cm-server-pre (code=exited, status=0/SUCCESS)
- Main PID: 12098 (java)
- CGroup: /system.slice/cloudera-scm-server.service
- └─12098 /usr/java/jdk1.8.0_181-cloudera/bin/java -cp .:/usr/share/java/mysql-connector-java.jar:/usr/share/java/oracle-connector-java.jar:/usr/...
-
- 3月 01 11:33:05 hadoop105 cm-server[12098]: Wed Mar 01 11:33:05 CST 2023 WARN: Establishing SSL connection without server's identity verificatio...ng applic
- 3月 01 11:33:05 hadoop105 cm-server[12098]: Wed Mar 01 11:33:05 CST 2023 WARN: Establishing SSL connection without server's identity verificatio...ng applic
- 3月 01 11:33:05 hadoop105 cm-server[12098]: Wed Mar 01 11:33:05 CST 2023 WARN: Establishing SSL connection without server's identity verificatio...ng applic
- 3月 01 11:33:05 hadoop105 cm-server[12098]: Wed Mar 01 11:33:05 CST 2023 WARN: Establishing SSL connection without server's identity verificatio...ng applic
- 3月 01 11:33:06 hadoop105 cm-server[12098]: Wed Mar 01 11:33:06 CST 2023 WARN: Establishing SSL connection without server's identity verificatio...ng applic
- 3月 01 11:33:06 hadoop105 cm-server[12098]: Wed Mar 01 11:33:06 CST 2023 WARN: Establishing SSL connection without server's identity verificatio...ng applic
- 3月 01 11:33:06 hadoop105 cm-server[12098]: Wed Mar 01 11:33:06 CST 2023 WARN: Establishing SSL connection without server's identity verificatio...ng applic
- 3月 01 11:33:06 hadoop105 cm-server[12098]: Wed Mar 01 11:33:06 CST 2023 WARN: Establishing SSL connection without server's identity verificatio...ng applic
- 3月 01 11:33:06 hadoop105 cm-server[12098]: Wed Mar 01 11:33:06 CST 2023 WARN: Establishing SSL connection without server's identity verificatio...ng applic
- 3月 01 11:33:06 hadoop105 cm-server[12098]: Wed Mar 01 11:33:06 CST 2023 WARN: Establishing SSL connection without server's identity verificatio...ng applic
- Hint: Some lines were ellipsized, use -l to show in full.
-
- #如上面没有执行关闭防火墙操作,则server端需开放agent连接端口7182和web服务端口7180
- [root@hadoop105 ~]# firewall-cmd --permanent --add-port=7182/tcp --add-port=7180/tcp
- [root@hadoop105 ~]# firewall-cmd --reload
-
- #启动agent节点
- [root@hadoop105 ~]# systemctl start cloudera-scm-agent
- [root@hadoop106 ~]# systemctl start cloudera-scm-agent
- [root@hadoop107 ~]# systemctl start cloudera-scm-agent
-
3.集群部署
(1)浏览器登录web服务进行机器配置
web连接:http://hadoop105:7180 或者 http://ip:7180,账户密码默认为 admin。

(2)选择安装CM服务安装许可版本
使用免费版即可,具体看个人需求,也可先使用60天。


(3)进入集群安装
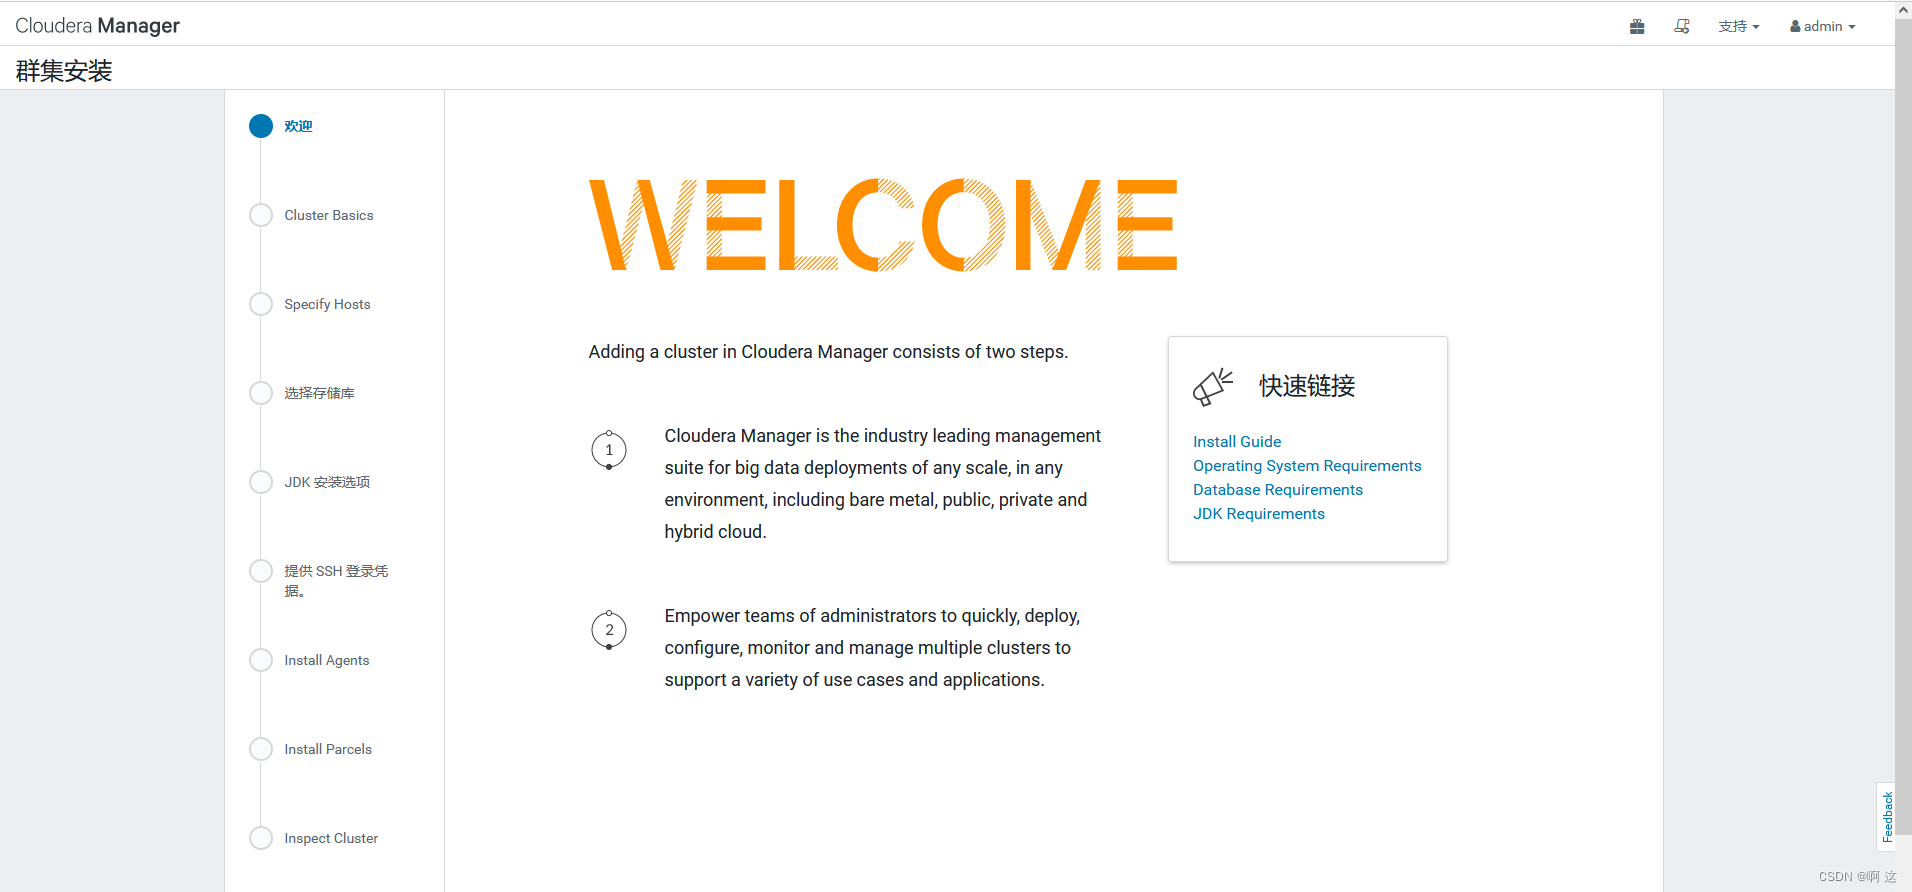
A.欢迎界面,直接选继续。
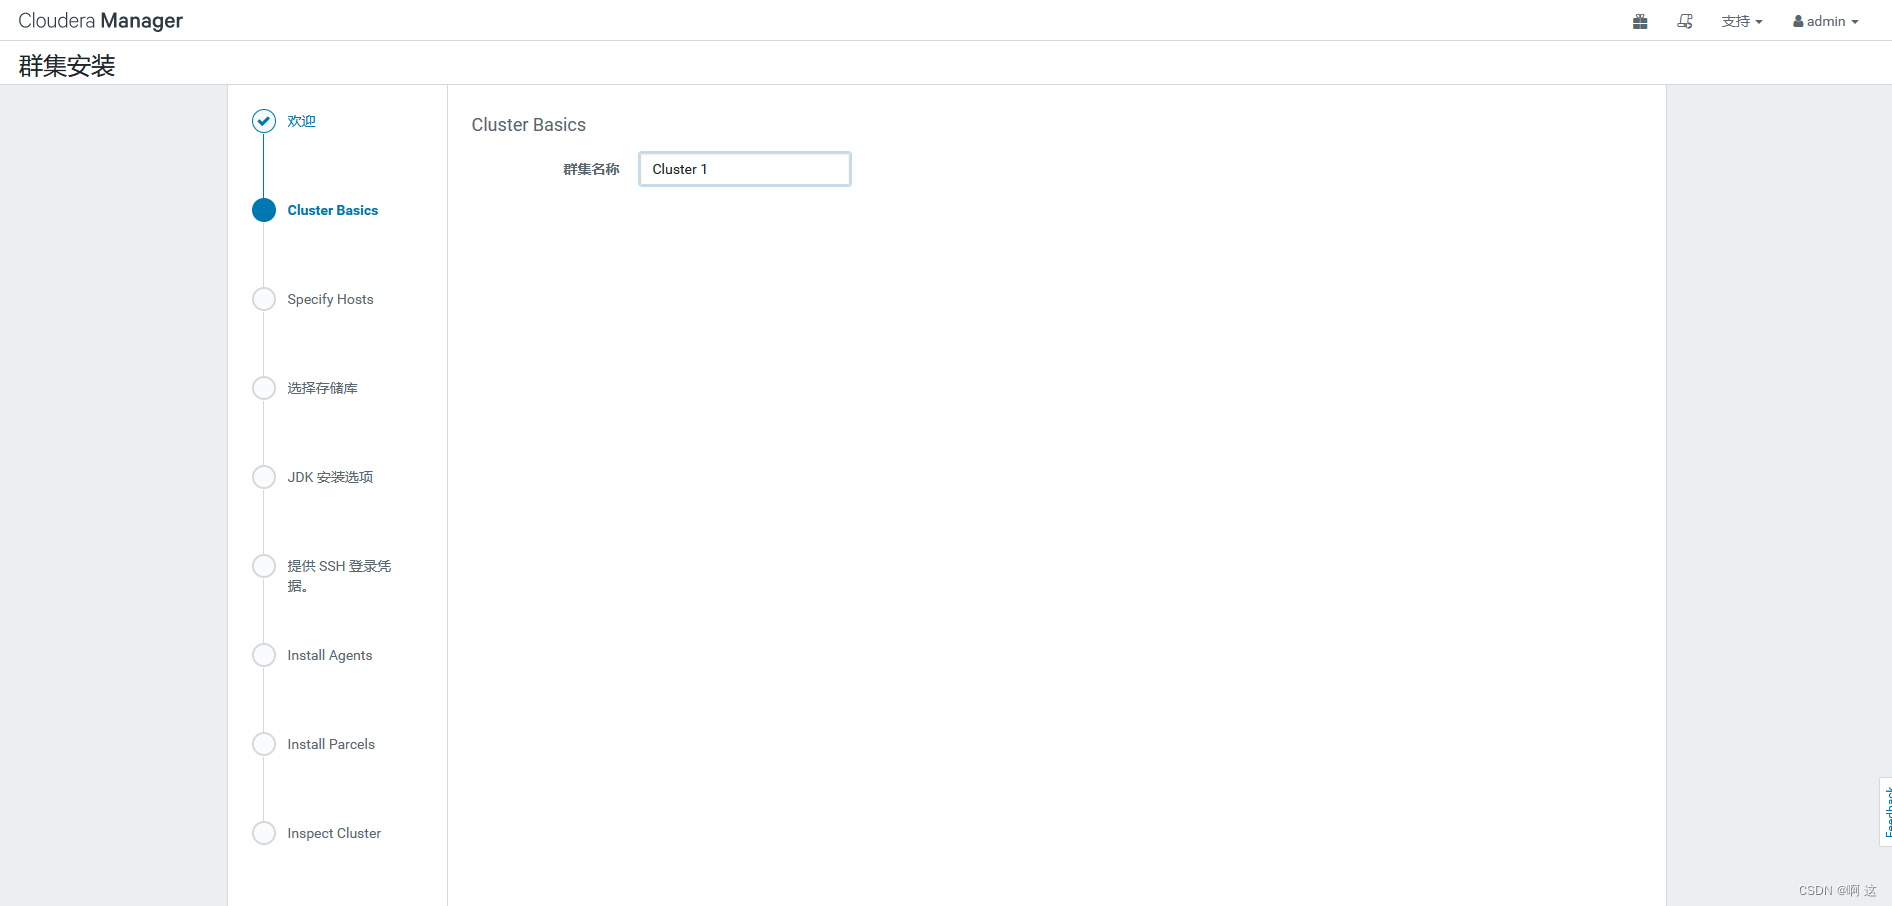
B.集群名称。
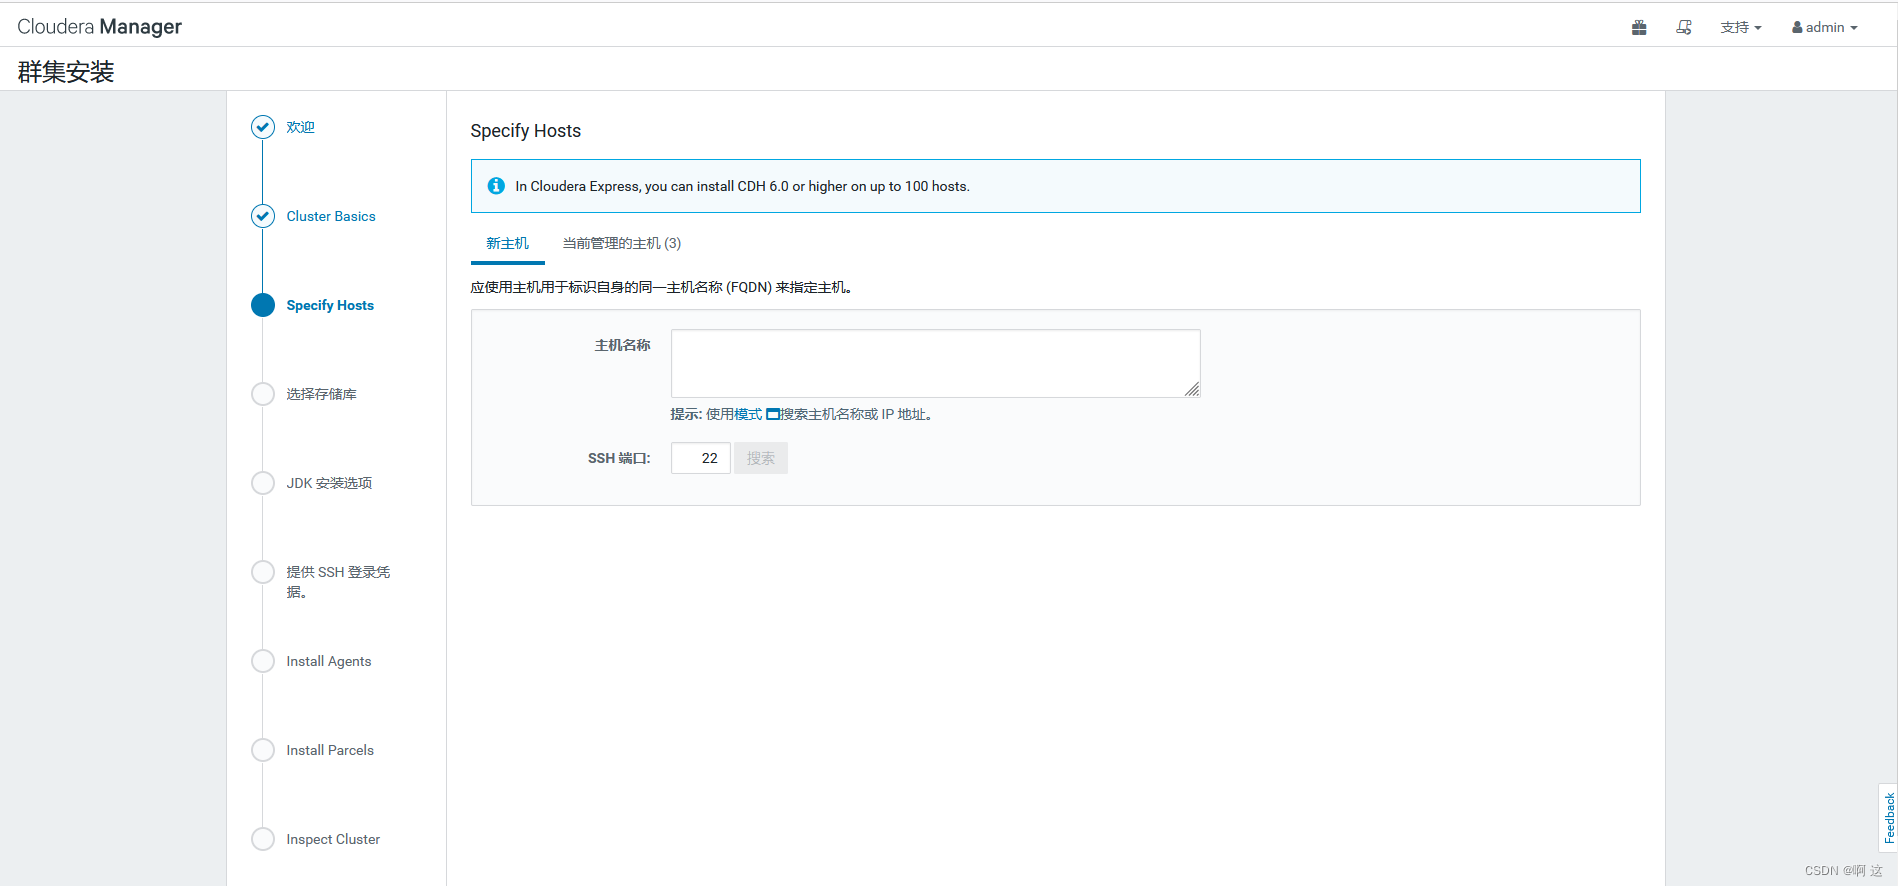
C.选择集群主机、或者选择当前管理的主机,因为agent服务已经连接到server端,所以会显示有三台主机可管理,此处我选择当前管理主机,勾选并继续。
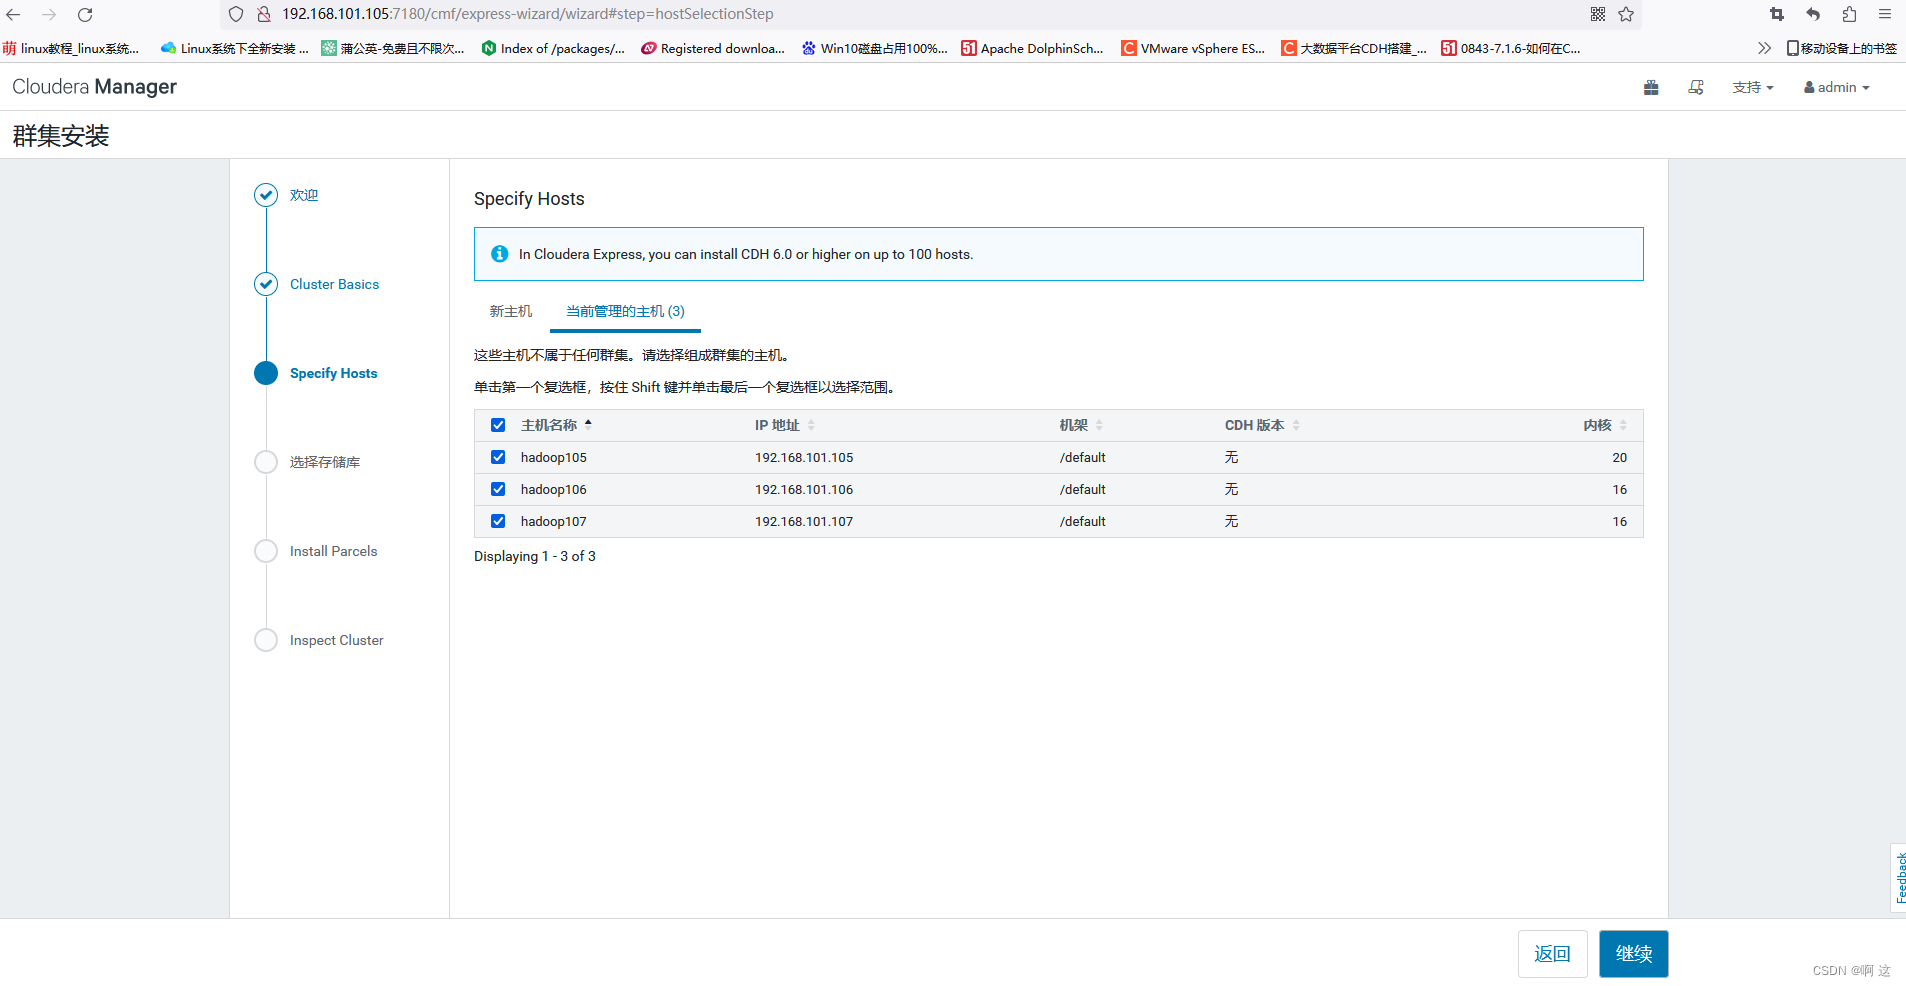 D.默认选择并继续。
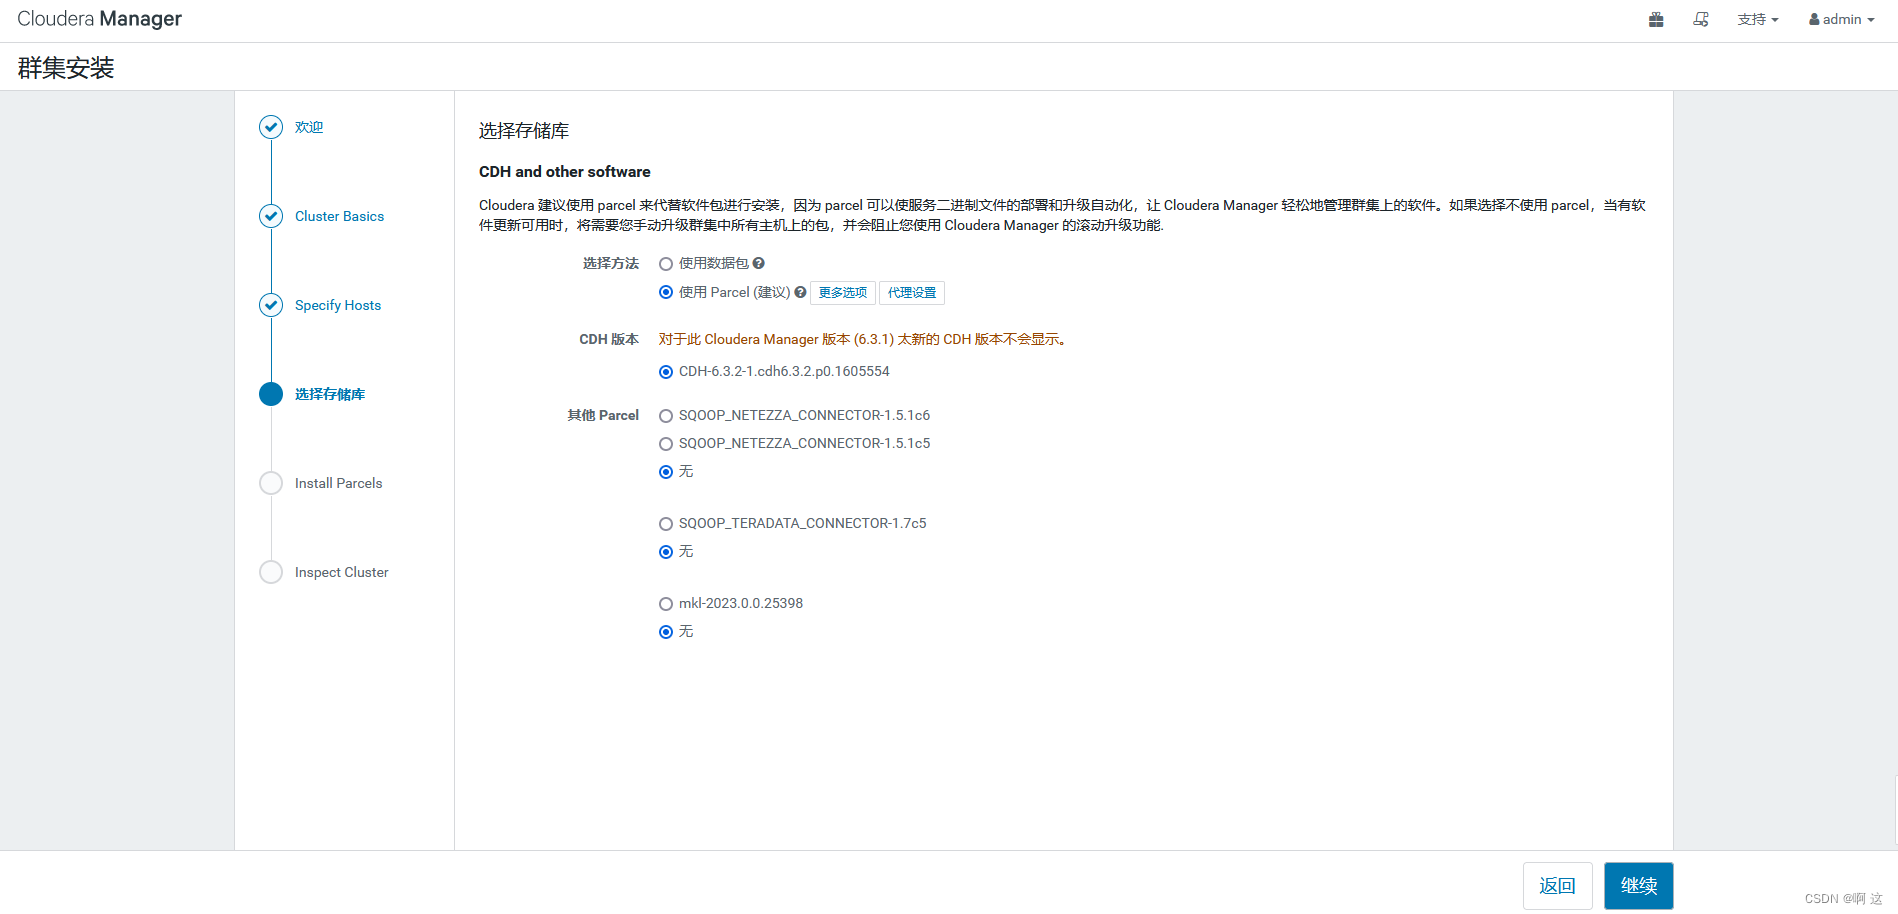
E.Parcels分配安装(这里显示有问题,先不管)。

F.执行网络检查和主机检查,点击即可。

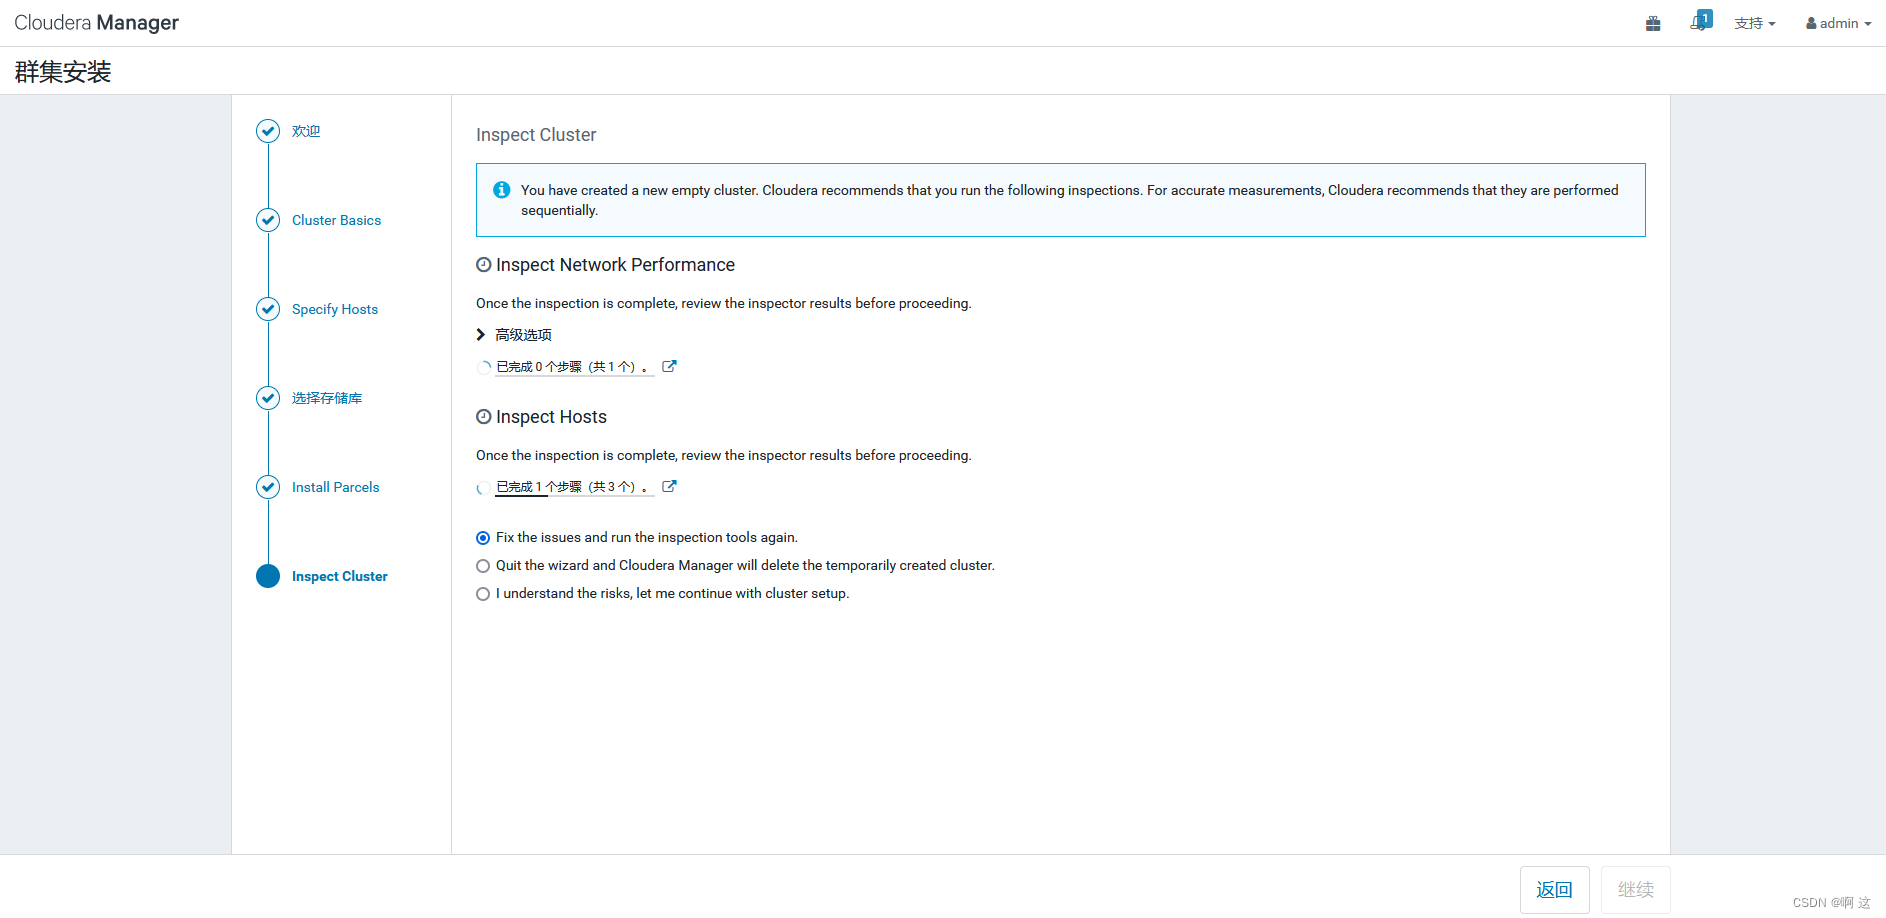
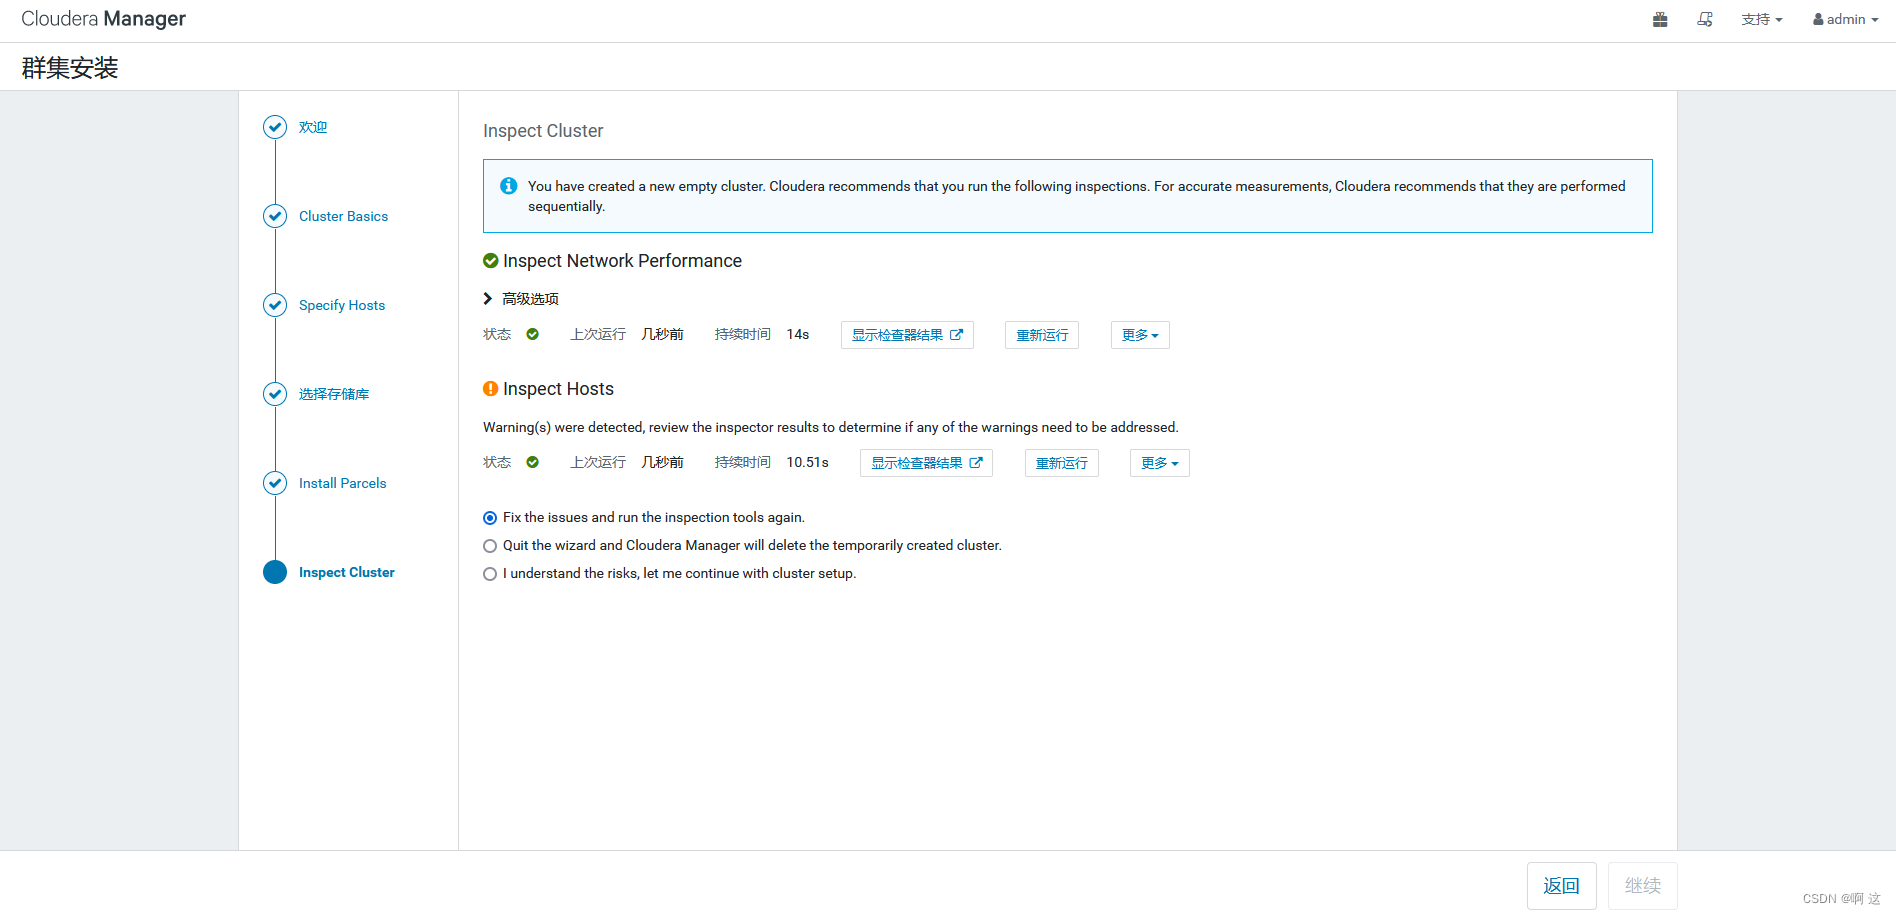
G.Inspect Hosts的警告可以忽略,直接跳过并安装。
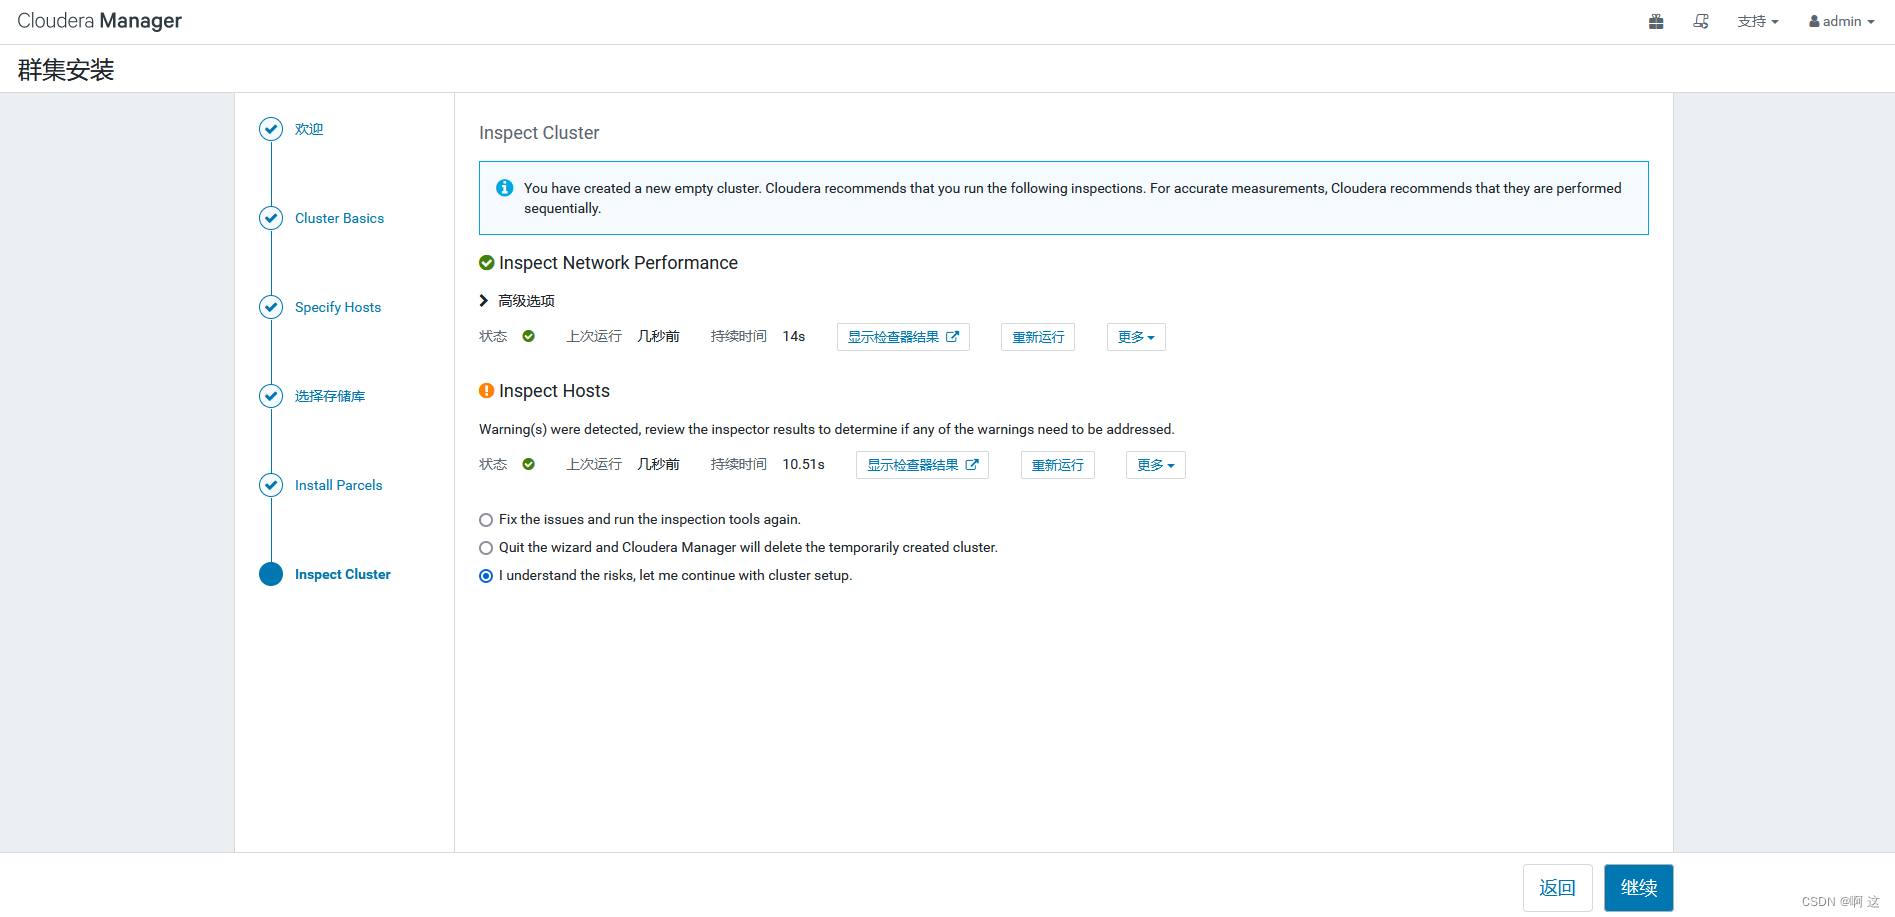
H.也可点击显示检查器结果,对相关问题进行修复,按下列对每一个节点进行操作即可。
- #对每个节点进行操作
- [root@hadoop105 ~]# echo 10 > /proc/sys/vm/swappiness
- [root@hadoop105 ~]# echo never > /sys/kernel/mm/transparent_hugepage/defrag
- [root@hadoop105 ~]# echo never > /sys/kernel/mm/transparent_hugepage/enabled
I.重新检查并继续。

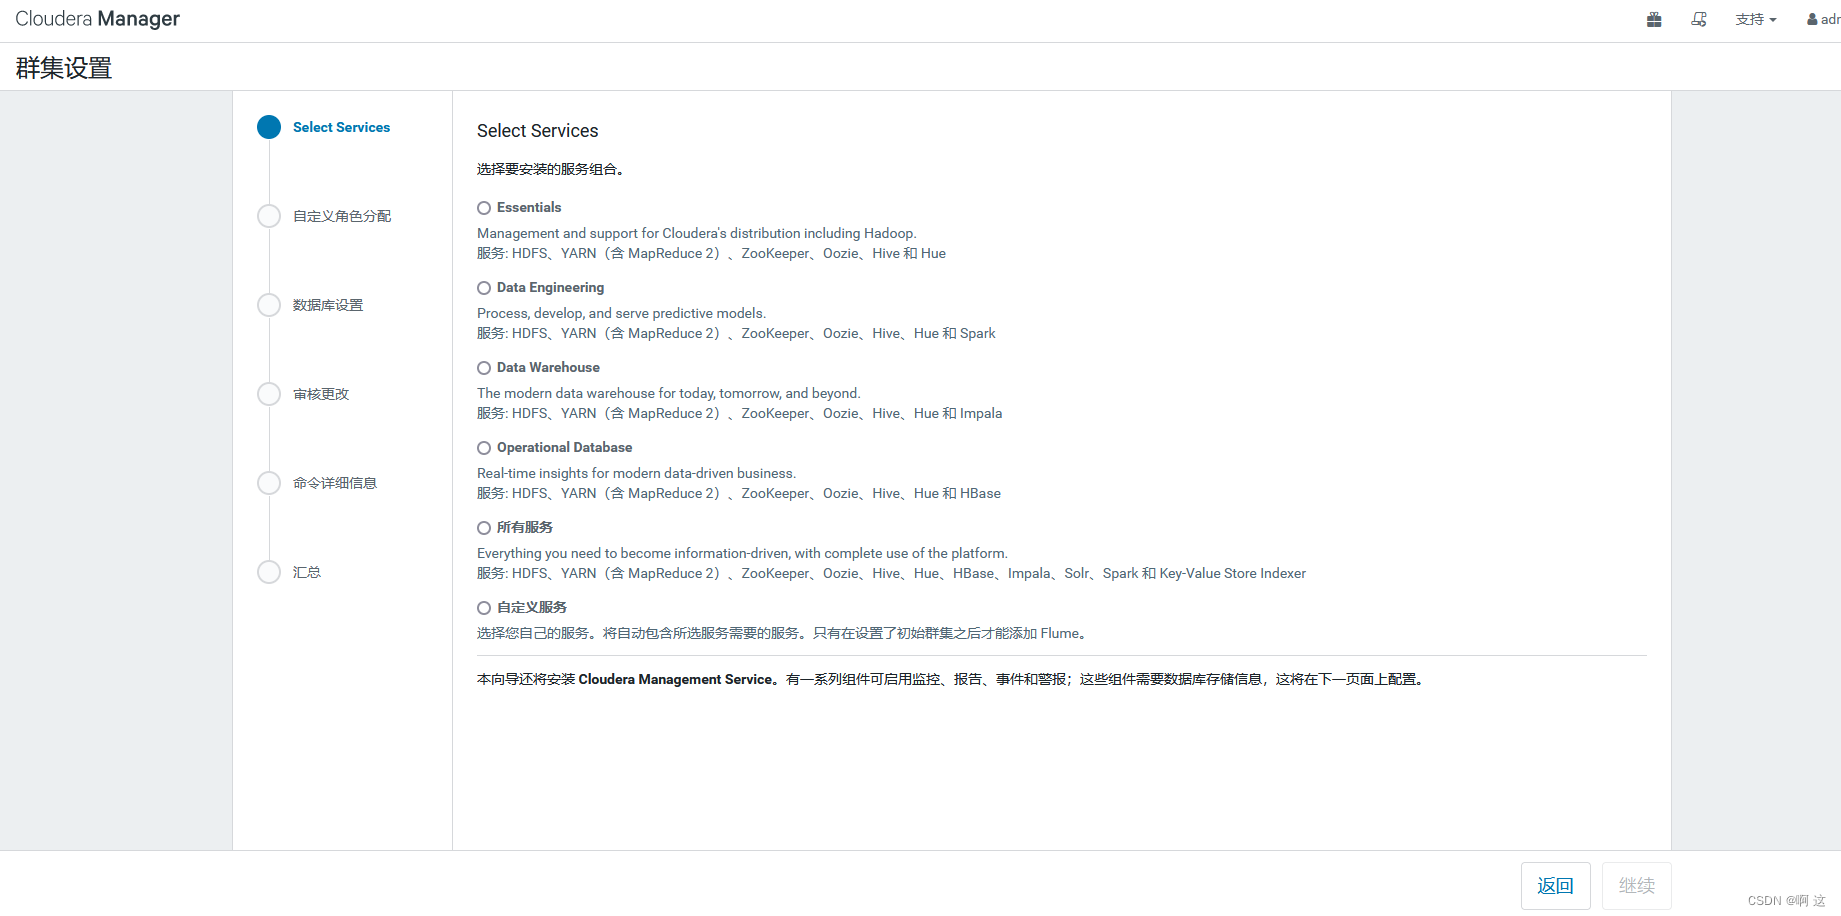
J.选择要安装的服务搭配,或者自定义安装
K.选择服务安装的节点(这里我为了方便以下部分都是默认)


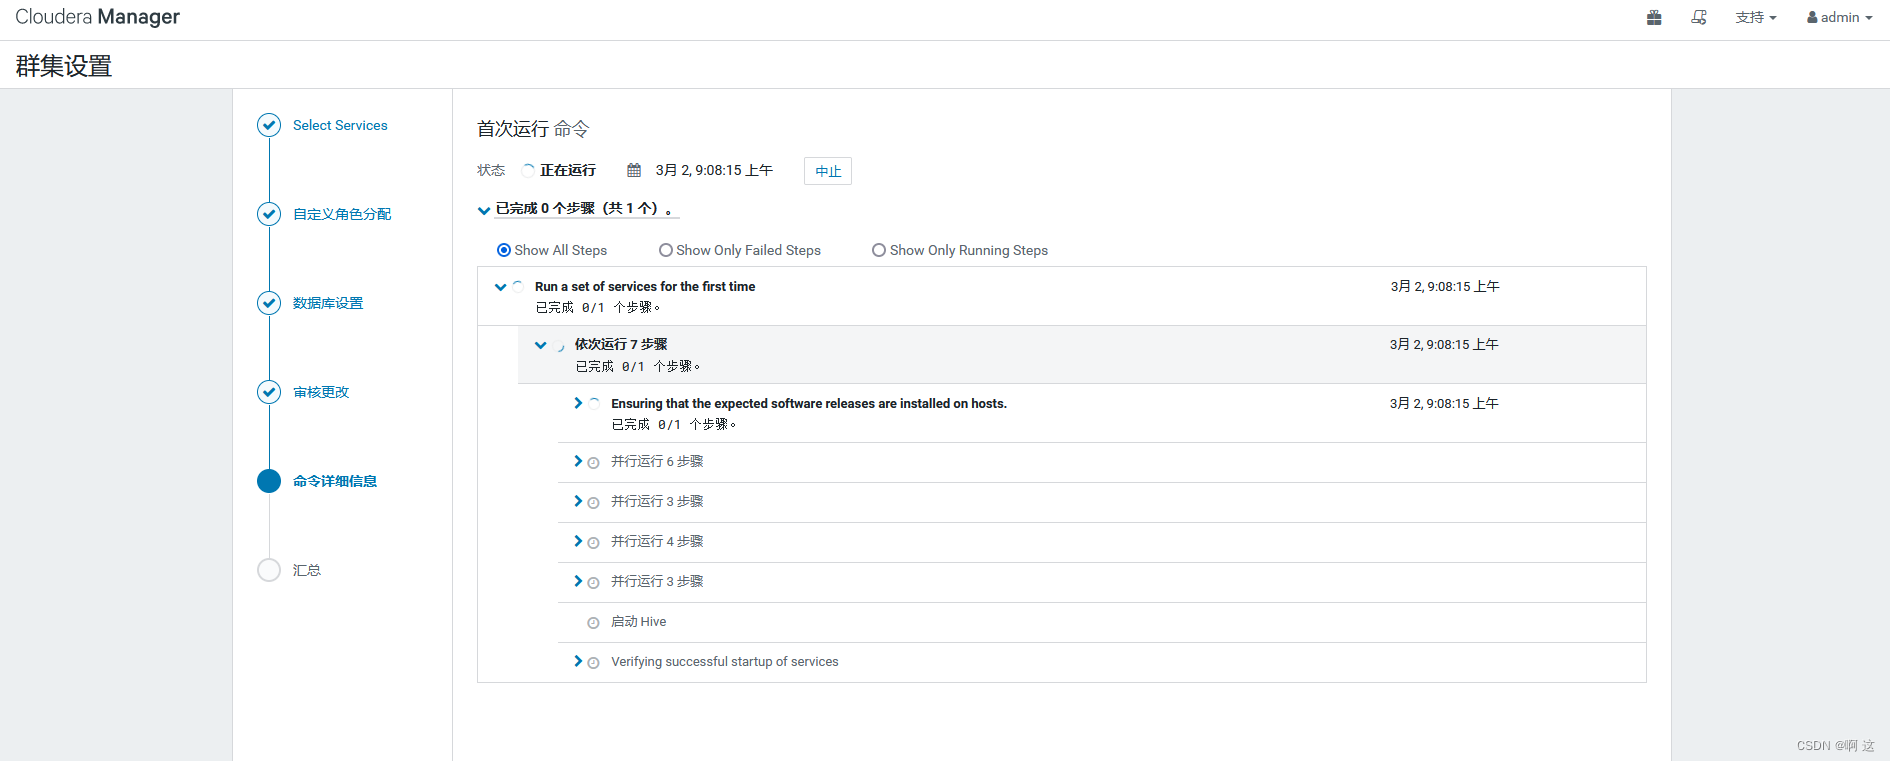


L.最后根据图示警告或者错误,点击查看并按相关信息去修正问题即可,服务器本身资源不够,很难满足系统需求,此博客作学习搭建使用,提供给有需要的人及自己查阅。

4.错误集锦
错误1:数据库测试连接失败

处理:mysql服务没有开启,或者没有开启远程登录,查看 三-1-(6) 进行操作
错误2:如果在选择存储库步骤出现让你选择存储库位置,那么一般是你配置了域名解析之后没有重启服务器进行生效,虽然测试实际是可以解析的,但在这里不行。
- 需要shell显示 [root@hadoop105 ~]#
- 而不是 [root@localhost ~]#
错误3:org.apache.hadoop.hdfs.server.namenode.SafeModeException: Cannot create directory /tmp. Name node is in safe mode ,此处报错,查看详细信息得到报错原因是出于hdfs安全模式中

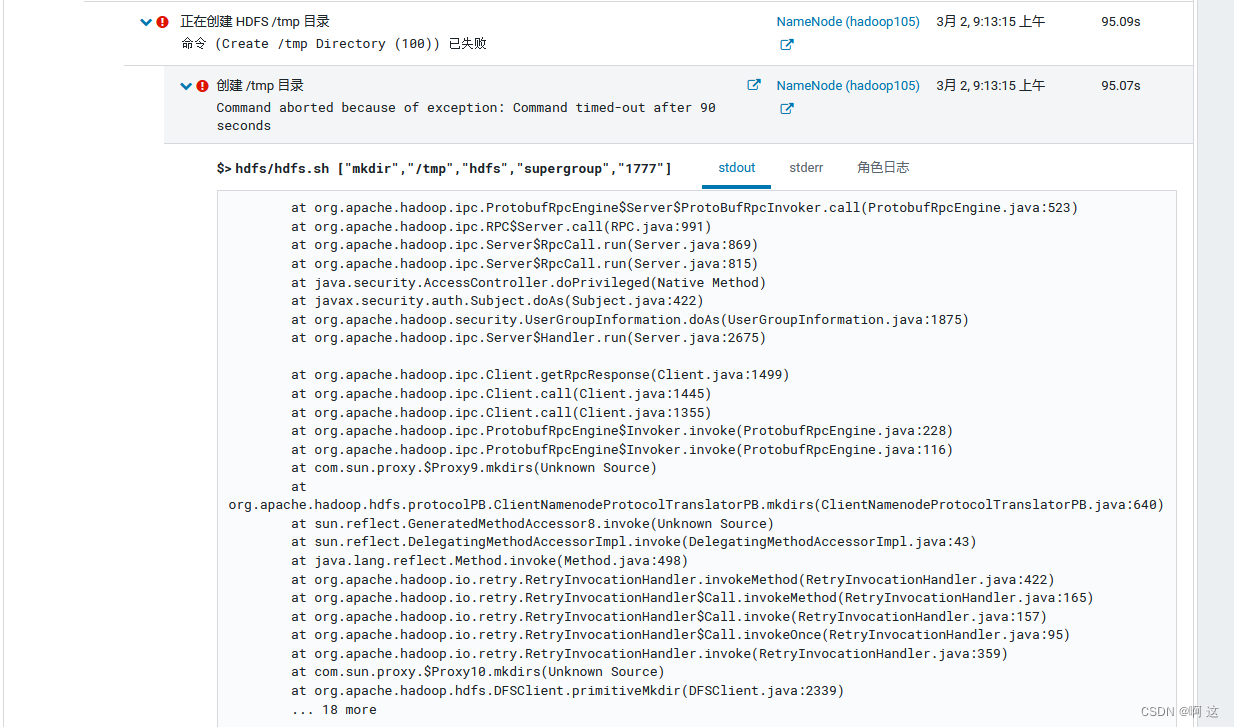
处理:解除安全模式之后点击 Resume
- #如何解除安全模式
-
- #查看运行用户
- [root@hadoop105 ~]# ps -ef |grep hdfs
- hdfs 15275 12499 0 09:08 ? 00:00:00 /usr/bin/python2 /opt/cloudera/cm-agent/bin/cm proc_watcher 15309
- hdfs 15276 12499 0 09:08 ? 00:00:00 /usr/bin/python2 /opt/cloudera/cm-agent/bin/cm proc_watcher 15313
- hdfs 15309 15275 2 09:08 ? 00:00:19 /usr/java/jdk1.8.0_181-cloudera/bin/java -Dproc_namenode -Dhdfs.audit.logger=INFO,RFAAUDIT -Dsecurity.audit.logger=INFO,RFAS -Djava.net.preferIPv4Stack=true -Xms2390753280 -Xmx2390753280 -XX:+UseParNewGC -XX:+UseConcMarkSweepGC -XX:CMSInitiatingOccupancyFraction=70 -XX:+CMSParallelRemarkEnabled -XX:+HeapDumpOnOutOfMemoryError -XX:HeapDumpPath=/tmp/hdfs_hdfs-NAMENODE-9dbc330521cc4b5d25350c6b4cc6294f_pid15309.hprof -XX:OnOutOfMemoryError=/opt/cloudera/cm-agent/service/common/killparent.sh -Dyarn.log.dir=/var/log/hadoop-hdfs -Dyarn.log.file=hadoop-cmf-hdfs-NAMENODE-hadoop105.log.out -Dyarn.home.dir=/opt/cloudera/parcels/CDH-6.3.2-1.cdh6.3.2.p0.1605554/lib/hadoop-yarn -Dyarn.root.logger=INFO,console -Djava.library.path=/opt/cloudera/parcels/CDH-6.3.2-1.cdh6.3.2.p0.1605554/lib/hadoop/lib/native -Dhadoop.log.dir=/var/log/hadoop-hdfs -Dhadoop.log.file=hadoop-cmf-hdfs-NAMENODE-hadoop105.log.out -Dhadoop.home.dir=/opt/cloudera/parcels/CDH-6.3.2-1.cdh6.3.2.p0.1605554/lib/hadoop -Dhadoop.id.str=hdfs -Dhadoop.root.logger=INFO,RFA -Dhadoop.policy.file=hadoop-policy.xml -Dhadoop.security.logger=INFO,RFAS org.apache.hadoop.hdfs.server.namenode.NameNode
- hdfs 15310 15275 0 09:08 ? 00:00:00 /usr/bin/python2 /opt/cloudera/cm-agent/bin/cm redactor --fds 3 5
- hdfs 15313 15276 1 09:08 ? 00:00:11 /usr/java/jdk1.8.0_181-cloudera/bin/java -Dproc_secondarynamenode -Dhdfs.audit.logger=INFO,RFAAUDIT -Dsecurity.audit.logger=INFO,RFAS -Djava.net.preferIPv4Stack=true -Xms2390753280 -Xmx2390753280 -XX:+UseParNewGC -XX:+UseConcMarkSweepGC -XX:CMSInitiatingOccupancyFraction=70 -XX:+CMSParallelRemarkEnabled -XX:+HeapDumpOnOutOfMemoryError -XX:HeapDumpPath=/tmp/hdfs_hdfs-SECONDARYNAMENODE-9dbc330521cc4b5d25350c6b4cc6294f_pid15313.hprof -XX:OnOutOfMemoryError=/opt/cloudera/cm-agent/service/common/killparent.sh -Dyarn.log.dir=/var/log/hadoop-hdfs -Dyarn.log.file=hadoop-cmf-hdfs-SECONDARYNAMENODE-hadoop105.log.out -Dyarn.home.dir=/opt/cloudera/parcels/CDH-6.3.2-1.cdh6.3.2.p0.1605554/lib/hadoop-yarn -Dyarn.root.logger=INFO,console -Djava.library.path=/opt/cloudera/parcels/CDH-6.3.2-1.cdh6.3.2.p0.1605554/lib/hadoop/lib/native -Dhadoop.log.dir=/var/log/hadoop-hdfs -Dhadoop.log.file=hadoop-cmf-hdfs-SECONDARYNAMENODE-hadoop105.log.out -Dhadoop.home.dir=/opt/cloudera/parcels/CDH-6.3.2-1.cdh6.3.2.p0.1605554/lib/hadoop -Dhadoop.id.str=hdfs -Dhadoop.root.logger=INFO,RFA -Dhadoop.policy.file=hadoop-policy.xml -Dhadoop.security.logger=INFO,RFAS org.apache.hadoop.hdfs.server.namenode.SecondaryNameNode
- hdfs 15314 15276 0 09:08 ? 00:00:00 /usr/bin/python2 /opt/cloudera/cm-agent/bin/cm redactor --fds 3 5
- root 20784 15132 0 09:23 pts/1 00:00:00 grep --color=auto hdfs
-
- #进hdfs用户解除安全模式,不能用root用户解除
- [root@hadoop105 ~]# hadoop dfsadmin -safemode leave
- WARNING: Use of this script to execute dfsadmin is deprecated.
- WARNING: Attempting to execute replacement "hdfs dfsadmin" instead.
- safemode: Access denied for user root. Superuser privilege is required
-
- #切换hdfs用户发现用户不可用
- [root@hadoop105 ~]# su - hdfs
- This account is currently not available.
-
- #修改passwd文件,将hdfs用户 /sbin/nologin 改为 /bin/bash
- [root@hadoop105 ~]# vi /etc/passwd
- hdfs:x:995:992:Hadoop HDFS:/var/lib/hadoop-hdfs:/bin/bash
-
- #执行解除安全模式命令
- [root@hadoop105 ~]# su - hdfs
- 上一次登录:四 3月 2 09:23:59 CST 2023pts/1 上
- [hdfs@hadoop105 ~]$ hadoop dfsadmin -safemode leave
- WARNING: Use of this script to execute dfsadmin is deprecated.
- WARNING: Attempting to execute replacement "hdfs dfsadmin" instead.
-
- Safe mode is OFF
-
其他错误:基本上过程遇到了其他安装失败的问题,都是server端没有关闭防火墙且未开启相关端口导致,所以建议部署过程中直接关闭防火墙,如果因为安全问题需要开着防火墙,就需要对一些基本端口进行开放操作


