- 1elasticsearch分布式搜索引擎详细使用总结_分布式搜索引擎作用
- 2重大更新!Stable Diffusion WebUI 1.8.0来了!!!_stable duffision webui最新镜像
- 3 top-k 算法浅析
- 4【2024】基于springboot的扶贫农产品商城系统课题设计
- 5语言模型 ChatGPT & MOSS 使用体验分享_python chatmoss 历史记录
- 6笔记本python运行按哪个键,笔记本电脑怎么用python_笔记本电脑运行pathon
- 7python中开n次方根_fortron中开n次方根
- 8django项目
- 9zk Linux下的启动常用命令_linux. zk. 重启
- 10docker拉取pull速度太慢解决办法(全)_docker pull很慢
[Android14] SystemUI的启动_android 14 systemui 初始化
赞
踩
1. 什么是System UI
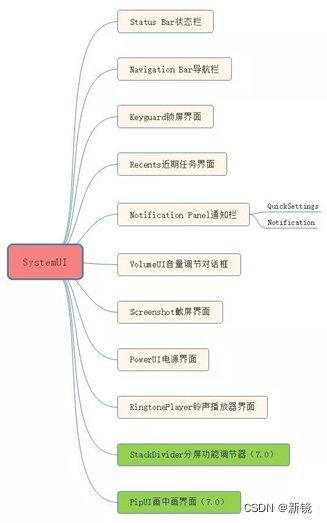
SystemUI是Android系统级应用,负责反馈系统及应用状态并与用户保持大量的交互。业务主要涉及的组成部分包括状态栏(Status Bar),通知栏(Notification Panel),锁屏(Keyguard),控制中心(Quick Setting),音量调节(VolumeUI), 近期任务(Recents)等等。
图例如下所示:

2. 源码位置
package name: com.android.systemui
SystemUI源码目录位于: framework/base/packages/SystemUI
Application位于: frameworks\base\packages\SystemUI\SystemUIApplication
Service位于: frameworks\base\services\java\com\android\server\
3. systemUI 启动流程
SystemServer.run()-> startOtherServices()-> startSystemUi()
SystemServer由ZygoteInit进程创建并启动
- frameworks/base/services/java/com/android/server/SystemServer.java
-
- /**
- * The main entry point from zygote.
- */
- public static void main(String[] args) {
- new SystemServer().run();
- }
-
-
-
- private void run() {
- ......
- // Start services.
- try {
- t.traceBegin("StartServices");
- startBootstrapServices(t);
- startCoreServices(t);
- startOtherServices(t); //在这里会启动startSystemUi()
- } catch (Throwable ex) {
- Slog.e("System", "******************************************");
- Slog.e("System", "************ Failure starting system services", ex);
- throw ex;
- } finally {
- t.traceEnd(); // StartServices
- }
- ......
- }
-
-
- /**
- * Starts a miscellaneous grab bag of stuff that has yet to be refactored and organized.
- */
- private void startOtherServices(@NonNull TimingsTraceAndSlog t) {
- ......
- try {
- startSystemUi(context, windowManagerF);
- } catch (Throwable e) {
- reportWtf("starting System UI", e);
- }
- ......
- }
-
- private static void startSystemUi(Context context, WindowManagerService windowManager) {
- PackageManagerInternal pm = LocalServices.getService(PackageManagerInternal.class);
- Intent intent = new Intent();
- intent.setComponent(pm.getSystemUiServiceComponent()); //这里
- intent.addFlags(Intent.FLAG_DEBUG_TRIAGED_MISSING);
- //Slog.d(TAG, "Starting service: " + intent);
- context.startServiceAsUser(intent, UserHandle.SYSTEM);
- windowManager.onSystemUiStarted();
- }

注意看这一段
intent.setComponent(pm.getSystemUiServiceComponent());
pm是PackageManagerInternal实例,它的getSystemUiServiceComponent()方法是一个抽象方法
- frameworks/base/services/core/java/android/content/pm/PackageManagerInternal.java
-
- /**
- * @return The SystemUI service component name.
- */
- public abstract ComponentName getSystemUiServiceComponent();
PackageManagerService实现了该方法,如下:
- frameworks/base/services/core/java/com/android/server/pm/PackageManagerService.java
-
- @Override
- public ComponentName getSystemUiServiceComponent() {
- return ComponentName.unflattenFromString(mContext.getResources().getString(
- com.android.internal.R.string.config_systemUIServiceComponent));
- }
com.android.internal.R.string.config_systemUIServiceComponent的值是
- frameworks/base/core/res/res/values/config.xml
-
- <!-- SystemUi service component -->
- <string name="config_systemUIServiceComponent" translatable="false"
- >com.android.systemui/com.android.systemui.SystemUIService</string>
unflattenFromString返回的是ComponentName(“com.android.systemui”, “com.android.systemui.SystemUIService”);
unflattenFromString 具体方法如下,很简单,感兴趣的可以看看,不感兴趣的直接跳过就好,这个方法不是重点。
- /**
- * Recover a ComponentName from a String that was previously created with
- * {@link #flattenToString()}. It splits the string at the first '/',
- * taking the part before as the package name and the part after as the
- * class name. As a special convenience (to use, for example, when
- * parsing component names on the command line), if the '/' is immediately
- * followed by a '.' then the final class name will be the concatenation
- * of the package name with the string following the '/'. Thus
- * "com.foo/.Blah" becomes package="com.foo" class="com.foo.Blah".
- *
- * @param str The String that was returned by flattenToString().
- * @return Returns a new ComponentName containing the package and class
- * names that were encoded in <var>str</var>
- *
- * @see #flattenToString()
- */
- public static @Nullable ComponentName unflattenFromString(@NonNull String str) {
- int sep = str.indexOf('/');
- if (sep < 0 || (sep+1) >= str.length()) {
- return null;
- }
- String pkg = str.substring(0, sep);
- String cls = str.substring(sep+1);
- if (cls.length() > 0 && cls.charAt(0) == '.') {
- cls = pkg + cls;
- }
- return new ComponentName(pkg, cls);
- }

以上代码功能为通过Intent启动了SystemUIService。
于是走到SystemUIService的onCreate()方法
- frameworks/base/packages/SystemUI/src/com/android/systemui/SystemUIService.java
-
- public void onCreate() {
- super.onCreate();
-
- // Start all of SystemUI
- ((SystemUIApplication) getApplication()).startServicesIfNeeded();
- ......
- }
-
-
- public void startServicesIfNeeded() {
- String[] names = SystemUIFactory.getInstance().getSystemUIServiceComponents(getResources());
- startServicesIfNeeded(/* metricsPrefix= */ "StartServices", names);
- }
通过工厂模式获得SystemUI组件列表
- frameworks/base/packages/SystemUI/src/com/android/systemui/SystemUIFactory.java
- public String[] getSystemUIServiceComponents(Resources resources) {
- return resources.getStringArray(R.array.config_systemUIServiceComponents);
- }
列表如下:
- frameworks/base/packages/SystemUI/res/values/config.xml
- <!-- SystemUI Services: The classes of the stuff to start. -->
- <string-array name="config_systemUIServiceComponents" translatable="false">
- <item>com.android.systemui.util.NotificationChannels</item>
- <item>com.android.systemui.keyguard.KeyguardViewMediator</item>
- <item>com.android.systemui.recents.Recents</item>
- <item>com.android.systemui.volume.VolumeUI</item>
- <item>com.android.systemui.stackdivider.Divider</item>
- <item>com.android.systemui.statusbar.phone.StatusBar</item>
- <item>com.android.systemui.usb.StorageNotification</item>
- <item>com.android.systemui.power.PowerUI</item>
- <item>com.android.systemui.media.RingtonePlayer</item>
- <item>com.android.systemui.keyboard.KeyboardUI</item>
- <item>com.android.systemui.pip.PipUI</item>
- <item>com.android.systemui.shortcut.ShortcutKeyDispatcher</item>
- <item>@string/config_systemUIVendorServiceComponent</item>
- <item>com.android.systemui.util.leak.GarbageMonitor$Service</item>
- <item>com.android.systemui.LatencyTester</item>
- <item>com.android.systemui.globalactions.GlobalActionsComponent</item>
- <item>com.android.systemui.ScreenDecorations</item>
- <item>com.android.systemui.biometrics.AuthController</item>
- <item>com.android.systemui.SliceBroadcastRelayHandler</item>
- <item>com.android.systemui.SizeCompatModeActivityController</item>
- <item>com.android.systemui.statusbar.notification.InstantAppNotifier</item>
- <item>com.android.systemui.theme.ThemeOverlayController</item>
- <item>com.android.systemui.accessibility.WindowMagnification</item>
- <item>com.android.systemui.accessibility.SystemActions</item>
- <item>com.android.systemui.toast.ToastUI</item>
- </string-array>

这个列表是要传到上面的String[] names里的,作为参数,下一步执行startServicesIfNeeded(/* metricsPrefix= */ "StartServices", names);
方法如下:
大致内容就是通过反射获得上面列表的类的构造函数,然后通过构造函数创建上面那些类的实例,然后调用这些类的start方法,启动这些systemuI组件。
- private void startServicesIfNeeded(String metricsPrefix, String[] services) {
- if (mServicesStarted) {
- return;
- }
- mServices = new SystemUI[services.length];
-
- if (!mBootCompleteCache.isBootComplete()) {
- // check to see if maybe it was already completed long before we began
- // see ActivityManagerService.finishBooting()
- if ("1".equals(SystemProperties.get("sys.boot_completed"))) {
- mBootCompleteCache.setBootComplete();
- if (DEBUG) {
- Log.v(TAG, "BOOT_COMPLETED was already sent");
- }
- }
- }
-
- final DumpManager dumpManager = mRootComponent.createDumpManager();
-
- Log.v(TAG, "Starting SystemUI services for user " +
- Process.myUserHandle().getIdentifier() + ".");
- TimingsTraceLog log = new TimingsTraceLog("SystemUIBootTiming",
- Trace.TRACE_TAG_APP);
- log.traceBegin(metricsPrefix);
- final int N = services.length;
- for (int i = 0; i < N; i++) {
- String clsName = services[i]; //获取类名
- if (DEBUG) Log.d(TAG, "loading: " + clsName);
- log.traceBegin(metricsPrefix + clsName);
- long ti = System.currentTimeMillis();
- try {
- SystemUI obj = mComponentHelper.resolveSystemUI(clsName);
- if (obj == null) {
- Constructor constructor = Class.forName(clsName).getConstructor(Context.class); //获取构造函数
- obj = (SystemUI) constructor.newInstance(this); //通过构造函数获取实例
- }
- mServices[i] = obj; //把实例放入到mServices数组中
- } catch (ClassNotFoundException
- | NoSuchMethodException
- | IllegalAccessException
- | InstantiationException
- | InvocationTargetException ex) {
- throw new RuntimeException(ex);
- }
-
- if (DEBUG) Log.d(TAG, "running: " + mServices[i]);
- mServices[i].start(); //执行start方法
- log.traceEnd();
-
- // Warn if initialization of component takes too long
- ti = System.currentTimeMillis() - ti;
- if (ti > 1000) {
- Log.w(TAG, "Initialization of " + clsName + " took " + ti + " ms");
- }
- if (mBootCompleteCache.isBootComplete()) {
- mServices[i].onBootCompleted();
- }
-
- dumpManager.registerDumpable(mServices[i].getClass().getName(), mServices[i]);
- }
- mRootComponent.getInitController().executePostInitTasks();
- log.traceEnd();
-
- mServicesStarted = true;
- }

SystemUI的启动就是这样。剩下的就是启动具体组件了,例如com.android.systemui.statusbar.phone.StatusBar。
StatusBar也就是状态栏,想看状态栏怎么启动的可以跟到它的start方法,这篇就先到这里。


