- 1Mac OS安装Docker容器的解决方案_mac docker
- 2Googletest 测试_google 测试free tail
- 3Macbook磁盘空间满了怎么办?Mac如何清理磁盘空间?_mac笔记本磁盘满了怎么办
- 4手机免root安装kali linux 步骤,离线版(最终可行版)_kali linux手机版安装
- 5Copilot在PyCharm的应用_copilot pycharm
- 6强化学习3——马尔可夫性质、马尔科夫决策、状态转移矩阵和回报与策略(上)_强化学习 马可尔科夫特性
- 7前端高并发请求该怎么做?手摸手做实践_前端处理并发请求
- 8微信小程序中input控件自动聚焦、软键盘的关闭和打开_小程序中键盘自动聚焦是什么意思
- 9微信小程序实现图片上传_微信小程序上传图片
- 10如何忽略Chrome最小字号的限制
Transformer模型各模块详解及代码实现_transformer模块
赞
踩
前言
transformer在各个领域的应用越来越广,本文从实用的角度出发,对transformer各个模块进行讲解与实现。
主要参考如下:
1、论文参考:Atttion is all you need。
2、NLP理论参考:预训练模型的前世今生。
3、代码参考:hyunwoongko。
4、代码参考:Pytorch官方文档。
1、Transformer模型整体架构
下图是论文:Attention is all you need 中的transformer原图,要想完整的将transformer模型给复现并理解,我们需要对模型的每一个部分进行拆分和理解,包括:Input/Output Embedding、Positional Encoding、(Masked) Multi-Head Attention、Add&Norm、Feed Forward。
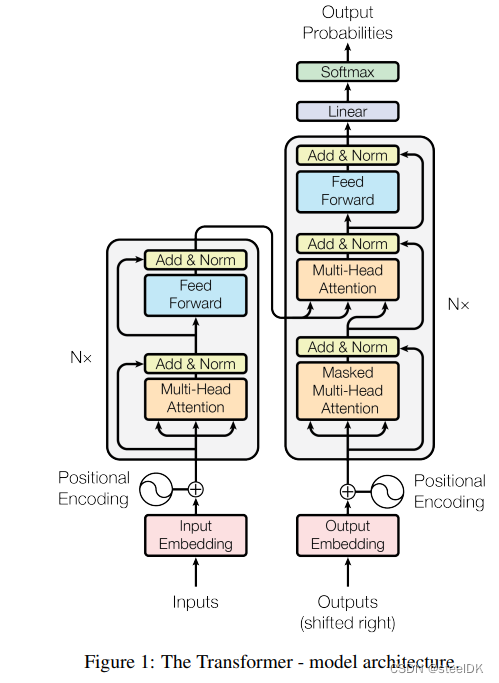
transformer模型包括一个Encoder和Decoder,简单来说,Encoder就是将输入的词向量通过N层的自注意力机制(qkv同源),转换成具有语义信息的向量,然后通过注意力机制(q来自Decoder,k、v来自Endocer)与Decoder建立联系。transformer的原理这里不在做过多解释。
2、Embeeding
在一个Encoder-Decoder结构中,数据的输入都会经过一个Embedding层,它的作用是将词语嵌入到一个多维空间里,一个词语用一个向量来表示。关于词向量相关解释可以参考:预训练模型的前世今生。
2.1 词向量
2.1.1 独热编码
我们都知道自然语言模型针对的数据是语言数据,比如:I love machine learning。计算机不认识这些词,因此我们需要对这些语言数据进行数学转化。最早使用的就是独热编码,假设有一个词典,这个词典中只有“I”、“love”、”machine“、“learning”这四个词,则可以用一个4x4的矩阵来表示这个词典:
“I” :1000
”love“:0100
“machine”:0010
“learning”:0001
但是利用独热编码的表示方法存在一个重要的问题,任何两个词之间都是独立的,对于独热表示的向量,如果采用余弦相似度计算向量间的相似度,可以明显的发现任意两者向量的相似度结果都为 0,即任意二者都不相关,也就是说独热表示无法解决词之间的相似性问题。
2.1.2 Word Embedding
核心思想:通过乘以一个可训练的矩阵Q对独热编码进行变换,从而得到词向量。假设独热编码的矩阵大小为VxV,Q矩阵的大小为VxM,得到的词向量矩阵的大小为VxM。其中V为词典中单词的个数,对于每一个单词,假设其独热编码为[0 0 0 1 0],Q矩阵为5行3列,词向量的计算过程如下:

将[0 0 0 1 0]用[10 12 19]代替,并且通过调节Q矩阵中的列数,我们还可以控制词向量的长度。如果采用上述方法再次采用余弦相似度计算两个词之间的相似度,结果不再是 0 ,既可以一定程度上描述两个词之间的相似度。
2.1.3 总结
① 词向量就是用一个向量来表示一个单词,词向量是一个矩阵,矩阵的行数代表单词个数,列数代表每个单词的长度。
② 词向量优点1:当词库中单词非常多时,独热编码维度非常高,用词向量可以实现降维。即从VxV变为VxM,M比V小,实现降维。
③ 词向量优点2:独热编码无法衡量两个单词之间的相似性,而转换成词向量之后可以很方便的计算单词之间的相似性。
2.2 代码实现
在pytorch中,torch.nn.Embedding提供了词嵌入的功能,我们只需要初始化nn.Embedding(n,m),n是单词数,m就是词向量的维度。一开始embedding是随机的,在训练的时候会自动更新。参考:Pytorch官方文档。
torch.nn.Embedding(num_embeddings,
					embedding_dim,
					padding_idx=None,
					max_norm=None,
					norm_type=2.0,
					scale_grad_by_freq=False,
					sparse=False,
					_weight=None,
					_freeze=False,
 					device=None,
 					dtype=None)
- 1
- 2
- 3
- 4
- 5
- 6
- 7
- 8
- 9
- 10
- 11
我们先看简单实例,然后在看参数详解会更容易。
import torch
import torch.nn as nn
# an Embedding module containing 10 tensors of size 3
embedding = nn.Embedding(10, 3)
# a batch of 2 samples of 4 indices each
input = torch.LongTensor([[1, 2, 4, 5], [4, 3, 2, 9]])
print(embedding(input))
print(embedding(input).shape)
- 1
- 2
- 3
- 4
- 5
- 6
- 7
- 8
embedding = nn.Embedding(10, 3)的意思是创建一个大小为10x3的词向量矩阵,也就是说我们的词典中有10个单词,每个单词的表示长度为3。input代表每个句子的索引,词向量中每一行都代表一个具体的单词,我们在训练模型时,针对每一个句子,我们需要通过索引从词向量中将对应的单词给取出来,input就是代表这个索引,上述代码中的input代表了一个batch,一个batch中包括了两个句子,两个句子的长度均为4,对应的索引分别是[1, 2, 4, 5]和[4, 3, 2, 9],其中[1,2,4,5]代表词向量的第1行、第2行、第4行、第5行。
下面来看一下参数解释:
① num_embeddings:(int),size of the dictionary of embeddings。词典的大小,就是词向量矩阵的行数。
②embedding_dim:(int),the size of each embedding vector。词向量的维度,即词向量矩阵的列数。
③padding_idx:(int, optional),If specified, the entries at padding_idx do not contribute to the gradient; therefore, the embedding vector at padding_idx is not updated during training, i.e. it remains as a fixed “pad”. For a newly constructed Embedding, the embedding vector at padding_idx will default to all zeros, but can be updated to another value to be used as the padding vector.意思是填充id,比如,输入长度为100,但是每次的句子长度并不一样,后面就需要用统一的数字填充,而这里就是指定这个数字的索引。
embedding = nn.Embedding(10, 3, padding_idx=0)
input = torch.LongTensor([[0, 2, 0, 5]])
embedding(input)
>>tensor([[[ 0.0000,  0.0000,  0.0000],
         [ 0.1535, -2.0309,  0.9315],
         [ 0.0000,  0.0000,  0.0000],
         [-0.1655,  0.9897,  0.0635]]])
- 1
- 2
- 3
- 4
- 5
- 6
- 7
padding_idx=0时,索引为0的词向量作为填充向量,初始化为0。如果padding_idx改为2,则索引为2的词向量作为填充向量,填充的值为0。见下面实例:
import torch
import torch.nn as nn
# an Embedding module containing 10 tensors of size 3
embedding = nn.Embedding(10, 3, padding_idx=2)
# a batch of 2 samples of 4 indices each
input = torch.LongTensor([[1, 2, 4, 5], [4, 3, 2, 9]])
print(embedding(input))
print(embedding(input).shape)

>>tensor([[[ 1.2693, -0.7569,  0.3018],
         [ 0.0000,  0.0000,  0.0000],
         [ 1.0716, -0.5189, -0.0093],
         [-0.8293, -1.4563, -0.0510]],

        [[ 1.0716, -0.5189, -0.0093],
         [ 0.2780,  1.1049,  0.7130],
         [ 0.0000,  0.0000,  0.0000],
         [ 0.5535,  1.4607, -0.3768]]], grad_fn=<EmbeddingBackward0>)
>>torch.Size([2, 4, 3])
- 1
- 2
- 3
- 4
- 5
- 6
- 7
- 8
- 9
- 10
- 11
- 12
- 13
- 14
- 15
- 16
- 17
- 18
- 19
④ max_norm (float, optional) – If given, each embedding vector with norm larger than max_norm is renormalized to have norm max_norm。最大范数,如果嵌入向量的范数超过了这个界限,就要进行再归一化。
⑤ norm_type (float, optional) – The p of the p-norm to compute for the max_norm option. Default 2。指定利用什么范数计算,并用于对比max_norm,默认为2范数。
⑥ scale_grad_by_freq (bool, optional) – If given, this will scale gradients by the inverse of frequency of the words in the mini-batch. Default False。根据单词在mini-batch中出现的频率,对梯度进行放缩。默认为False.
⑦ sparse (bool, optional) – If True, gradient w.r.t. weight matrix will be a sparse tensor. See Notes for more details regarding sparse gradients。若为True,则与权重矩阵相关的梯度转变为稀疏张量,默认为False。
变量:
① weight (Tensor) – the learnable weights of the module of shape (num_embeddings, embedding_dim) initialized from N(0,1)。权重矩阵,初始化为N(0,1)。
一些NOTE:
(1) 只有部分优化器支持sparse gradients:optim.SGD (CUDA and CPU), optim.SparseAdam (CUDA and CPU) and optim.Adagrad (CPU)。
(2) When max_norm is not None, Embedding’s forward method will modify the weight tensor in-place. Since tensors needed for gradient computations cannot be modified in-place, performing a differentiable operation on Embedding.weight before calling Embedding’s forward method requires cloning Embedding.weight when max_norm is not None. For example:
大意是当Embedding层的max_norm参数不为None时,调用forward函数会原地修改Embedding的weight的值,所以如果要在调用forward函数之前对weight进行可微操作需要对weight进行复制。(用的不多)
n, d, m = 3, 5, 7
embedding = nn.Embedding(n, d, max_norm=True)
W = torch.randn((m, d), requires_grad=True)
idx = torch.tensor([1, 2])
a = embedding.weight.clone() @ W.t()  # weight must be cloned for this to be differentiable
b = embedding(idx) @ W.t()  # modifies weight in-place
out = (a.unsqueeze(0) + b.unsqueeze(1))
loss = out.sigmoid().prod()
loss.backward()
- 1
- 2
- 3
- 4
- 5
- 6
- 7
- 8
- 9
备注:@代表矩阵相乘,W.t()是对矩阵W进行转置。.prod()返回矩阵中所有元素相乘的结果。
上面是随机创建的词向量矩阵,该词向量矩阵随着反向传播进行迭代更新,如果我们已经有了一个预训练的词向量矩阵,可以通过以下方法进行导入:
# FloatTensor containing pretrained weights
weight = torch.FloatTensor([[1, 2.3, 3], [4, 5.1, 6.3]])
embedding = nn.Embedding.from_pretrained(weight)
# Get embeddings for index 1
input = torch.LongTensor([1])
embedding(input)
>>tensor([[ 4.0000,  5.1000,  6.3000]])
- 1
- 2
- 3
- 4
- 5
- 6
- 7
3、Positional Encoding
3.1 位置编码简介
输入到transformer中的句子没有顺序信息,因此论文作者使用了正弦和余弦编码来刻画句子中单词的相对位置信息。

3.2 代码讲解
class PositionalEncoding(nn.Module):
    """
    compute sinusoid encoding.
    """
    def __init__(self, d_model, max_len, device):
        """
        constructor of sinusoid encoding class

        :param d_model: dimension of model
        :param max_len: max sequence length
        :param device: hardware device setting
        """
        super(PositionalEncoding, self).__init__()

        # same size with input matrix (for adding with input matrix)
        self.encoding = torch.zeros(max_len, d_model, device=device)
        self.encoding.requires_grad = False  # we don't need to compute gradient

        pos = torch.arange(0, max_len, device=device)
        pos = pos.float().unsqueeze(dim=1)
        # 1D => 2D unsqueeze to represent word's position

        _2i = torch.arange(0, d_model, step=2, device=device).float()
        # 'i' means index of d_model (e.g. embedding size = 50, 'i' = [0,50])
        # "step=2" means 'i' multiplied with two (same with 2 * i)

        self.encoding[:, 0::2] = torch.sin(pos / (10000 ** (_2i / d_model)))
        self.encoding[:, 1::2] = torch.cos(pos / (10000 ** (_2i / d_model)))
        # compute positional encoding to consider positional information of words

    def forward(self, x):
        # self.encoding
        # [max_len = 512, d_model = 512]

        batch_size, seq_len = x.size()
        # [batch_size = 128, seq_len = 30]

        return self.encoding[:seq_len, :]
        # [seq_len = 30, d_model = 512]
        # it will add with tok_emb : [128, 30, 512]
- 1
- 2
- 3
- 4
- 5
- 6
- 7
- 8
- 9
- 10
- 11
- 12
- 13
- 14
- 15
- 16
- 17
- 18
- 19
- 20
- 21
- 22
- 23
- 24
- 25
- 26
- 27
- 28
- 29
- 30
- 31
- 32
- 33
- 34
- 35
- 36
- 37
- 38
- 39
- 40
代码大白话解读:
创建一个PositionalEncoding的类,继承自nn.Module。__init__初始化参数有d_model、max_len和device。以transformer做机器翻译为例,首先我们应该明确的一点是,transformer输入的是一个句子,前两个参数d_model和max_len就和这个句子有关,由上面介绍可知,每个单词是用一列向量表示的,d_model表示的就是这列向量的长度,而max_len就表示句子的长度,即这个句子中有多少个单词。为什么要加一个max呢?因为tranformer每次传入的句子长短不一样,这里要取最长的句子。device就是指定该模型在什么设备上进行运算,可以是CPU也可以是指定的GPU。
4、Multi-Head Attention
注意力机制的原理之前总结过,这里不在讲解。可以参考:Transformer中的注意力机制及代码。在该博客中已经给出了代码,但未给出讲解,代码的编写可以是多种多样的,只要核心思路正确即可。
在编写多头注意力代码之前,我们应首先编写单头注意力机制,论文中给出的单头及多头自注意力机制图如下:
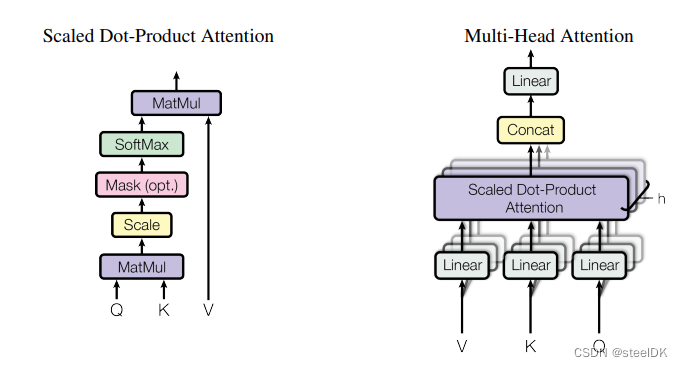
公式为:

首先先看单头注意力机制代码,即上图中的Scaled Dot-Product Attention。
class ScaleDotProductAttention(nn.Module):
    """
    compute scale dot product attention

    Query : given sentence that we focused on (decoder)
    Key : every sentence to check relationship with Qeury(encoder)
    Value : every sentence same with Key (encoder)
    """

    def __init__(self):
        super(ScaleDotProductAttention, self).__init__()
        self.softmax = nn.Softmax(dim=-1)

    def forward(self, q, k, v, mask=None, e=1e-12):
        # input is 4 dimension tensor
        # [batch_size, head, length, d_tensor]
        batch_size, head, length, d_tensor = k.size()

        # 1. dot product Query with Key^T to compute similarity
        k_t = k.transpose(2, 3)  # transpose
        score = (q @ k_t) / math.sqrt(d_tensor)  # scaled dot product

        # 2. apply masking (opt)
        if mask is not None:
            score = score.masked_fill(mask == 0, -10000)

        # 3. pass them softmax to make [0, 1] range
        score = self.softmax(score)

        # 4. multiply with Value
        v = score @ v

        return v, score
- 1
- 2
- 3
- 4
- 5
- 6
- 7
- 8
- 9
- 10
- 11
- 12
- 13
- 14
- 15
- 16
- 17
- 18
- 19
- 20
- 21
- 22
- 23
- 24
- 25
- 26
- 27
- 28
- 29
- 30
- 31
- 32
- 33
大白话讲代码:
① 首先定义一个ScaleDotProductAttention类,继承自nn.Module类,既然继承了nn.Module类,就必须实现forward函数。在__init__初始化函数中定义一个softmax函数,该函数对应于上述公式中的softmax。公式计算全部在forward函数中完成。
② 在forward函数中,需要传入q、k、v三个参数,对应计算公式中的Q、K、V,这里需要注意,q、k、v是同源的,都是由词向量x线性变换得到的。mask参数和e参数是为了masked attenton做准备的,masked attention主要用在transformer中的decoder过程。
③ 训练过程中进入transformer网络架构中的词向量大小为[batch_size, head, length, d_tensor],分别表示批量大小、多头注意力机制中头的数量、句子的长度、每个单词的维度。
④ k.transpose(2,3)对应公式中K的转置。score = (q @ k_t) / math.sqrt(d_tensor)对应公式中的softmax()部分,最后在乘以v,得到最终结果。
多头自注意力机制代码是在单头自注意力机制的基础上进行的,代码如下:
class MultiHeadAttention(nn.Module):

    def __init__(self, d_model, n_head):
        super(MultiHeadAttention, self).__init__()
        self.n_head = n_head
        self.attention = ScaleDotProductAttention()
        self.w_q = nn.Linear(d_model, d_model)
        self.w_k = nn.Linear(d_model, d_model)
        self.w_v = nn.Linear(d_model, d_model)
        self.w_concat = nn.Linear(d_model, d_model)

    def forward(self, q, k, v, mask=None):
        # 1. dot product with weight matrices
        q, k, v = self.w_q(q), self.w_k(k), self.w_v(v)

        # 2. split tensor by number of heads
        q, k, v = self.split(q), self.split(k), self.split(v)

        # 3. do scale dot product to compute similarity
        out, attention = self.attention(q, k, v, mask=mask)

        # 4. concat and pass to linear layer
        out = self.concat(out)
        out = self.w_concat(out)

        # 5. visualize attention map
        # TODO : we should implement visualization

        return out

    def split(self, tensor):
        """
        split tensor by number of head

        :param tensor: [batch_size, length, d_model]
        :return: [batch_size, head, length, d_tensor]
        """
        batch_size, length, d_model = tensor.size()

        d_tensor = d_model // self.n_head
        tensor = tensor.view(batch_size, length, self.n_head, d_tensor).transpose(1, 2)
        # it is similar with group convolution (split by number of heads)

        return tensor

    def concat(self, tensor):
        """
        inverse function of self.split(tensor : torch.Tensor)

        :param tensor: [batch_size, head, length, d_tensor]
        :return: [batch_size, length, d_model]
        """
        batch_size, head, length, d_tensor = tensor.size()
        d_model = head * d_tensor

        tensor = tensor.transpose(1, 2).contiguous().view(batch_size, length, d_model)
        return tensor
- 1
- 2
- 3
- 4
- 5
- 6
- 7
- 8
- 9
- 10
- 11
- 12
- 13
- 14
- 15
- 16
- 17
- 18
- 19
- 20
- 21
- 22
- 23
- 24
- 25
- 26
- 27
- 28
- 29
- 30
- 31
- 32
- 33
- 34
- 35
- 36
- 37
- 38
- 39
- 40
- 41
- 42
- 43
- 44
- 45
- 46
- 47
- 48
- 49
- 50
- 51
- 52
- 53
- 54
- 55
- 56
- 57
大白话讲多头自注意力机制:
① 在ScaleDotProductAttention类中,我们会发现q、k、v矩阵的形状变成了[batch_size, head, length, d_tensor],原本q、k、v的形状应该是[batch_size, length, d_tensor ],因此,这里需要先将增加head数量这个维度,代码作者通过定义split实例方法实现。
② 多头注意力机制计算完成之后,需要对各个头得到的结果进行拼接,是在d_tensor维度上的拼接,因此新的拼接后的向量的第三个维度d_tensor变成了headd_tensor,即代码concat函数中的d_model。
③ 在多头计算并concat完成后,需要经过一个线性层,讲concat后的向量由headd_tensor维度变成d_tensor维度,也就是说,词向量进入MultiHeadAttention类前后,大小不变。
④ 有关concat中contiguous()的使用可以参考:Pytorch中的contiguous。
5、Layer Norm
在transformer中使用的是layer norm而不是batch norm,其二者的区别及公式如下图:
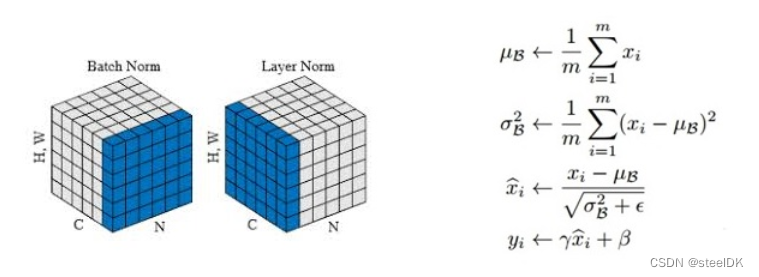
batch norm一般用与CV领域,而layer norm一般用于NLP领域,有关二者的区别可以参考:BatchNorm和LayerNorm—通俗易懂的理解。。为了方便快速理解,这里直接讲上述博客中的图片放进来:
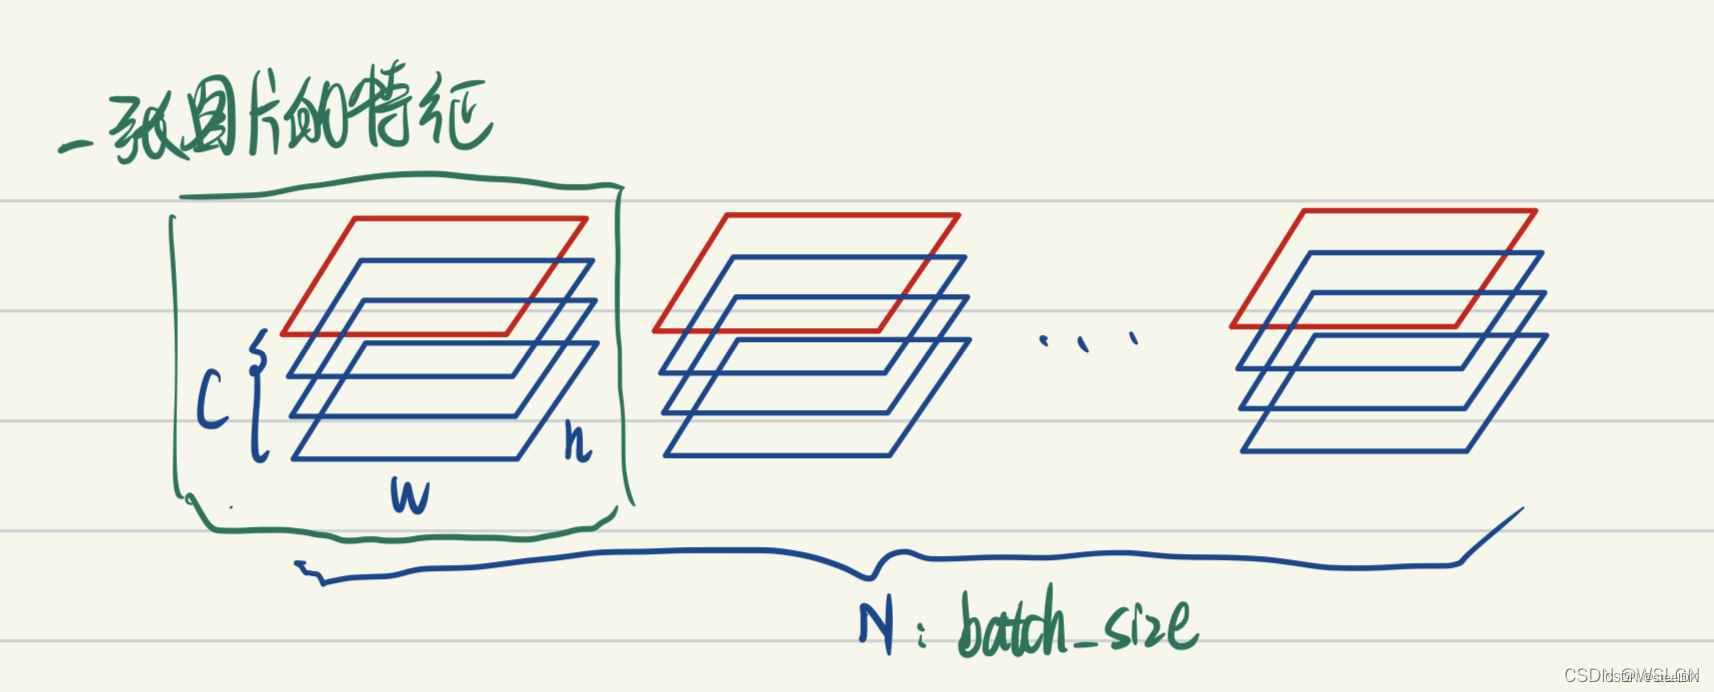
上图画的是一个batch_size为N的图像特征张量,BatchNorm把一个batch中同一通道的所有特征(如上图红色区域)视为一个分布(有几个通道就有几个分布),并将其标准化。
下面看layer norm:
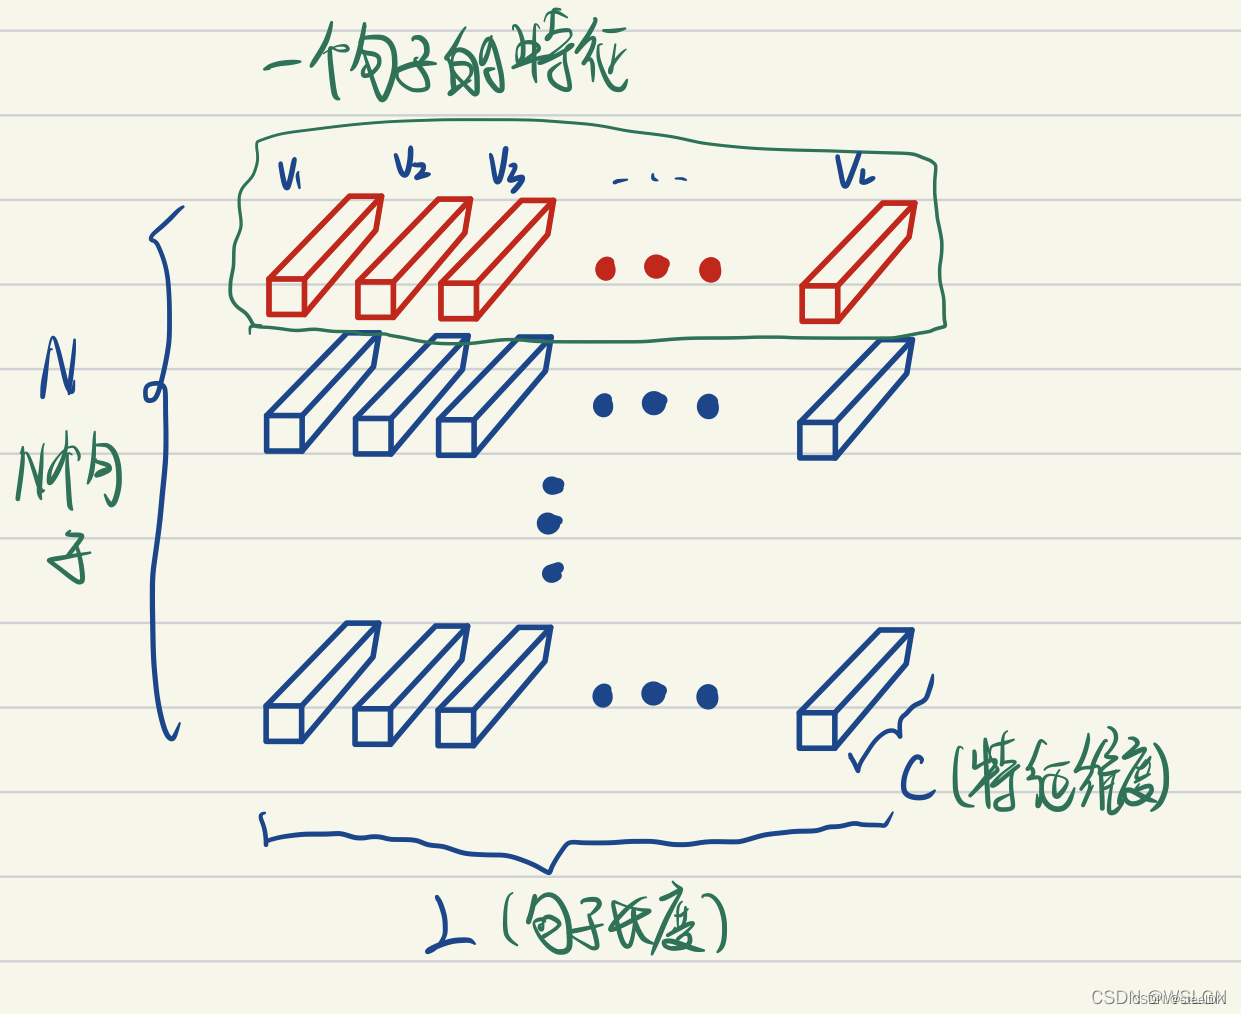
上图画的是一个N个句子的语义特征张量。如上图LayerNorm把一个样本的所有词义向量(如上图红色部分)视为一个分布(有几个句子就有几个分布),并将其标准化。
代码实现如下:
class LayerNorm(nn.Module):
    def __init__(self, d_model, eps=1e-12):
        super(LayerNorm, self).__init__()
        self.gamma = nn.Parameter(torch.ones(d_model))
        self.beta = nn.Parameter(torch.zeros(d_model))
        self.eps = eps

    def forward(self, x):
        mean = x.mean(-1, keepdim=True)
        var = x.var(-1, unbiased=False, keepdim=True)
        # '-1' means last dimension.

        out = (x - mean) / torch.sqrt(var + self.eps)
        out = self.gamma * out + self.beta
        return out
- 1
- 2
- 3
- 4
- 5
- 6
- 7
- 8
- 9
- 10
- 11
- 12
- 13
- 14
- 15
上述代码和上面的公式是一一对应的,其中self.gamma和self.beta是两个可学习的参数,eps对应公式中的ε。求均值和方差的维度是最后一个维度,即d_tensor维度。
6、Positionwise Feed Forward
对应transformer中的Feed Forward,其实就是一个全连接层,文中所给公式如下:

代码如下:
class PositionwiseFeedForward(nn.Module):

    def __init__(self, d_model, hidden, drop_prob=0.1):
        super(PositionwiseFeedForward, self).__init__()
        self.linear1 = nn.Linear(d_model, hidden)
        self.linear2 = nn.Linear(hidden, d_model)
        self.relu = nn.ReLU()
        self.dropout = nn.Dropout(p=drop_prob)

    def forward(self, x):
        x = self.linear1(x)
        x = self.relu(x)
        x = self.dropout(x)
        x = self.linear2(x)
        return x
- 1
- 2
- 3
- 4
- 5
- 6
- 7
- 8
- 9
- 10
- 11
- 12
- 13
- 14
- 15
- 16
7、Encoder and Decoder
在前6节,我们讲transformer涉及到的零件已经编写完毕,下面就要开始组装了,以下面的图中结构为例:
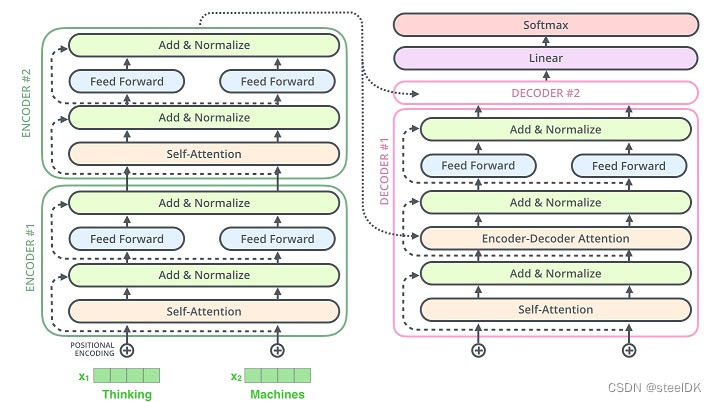
Encoder和Decoder过程实际上就是对前六节代码的拼凑,比较简单,这里不做讲解了。
7.1、Encoder过程编写
class EncoderLayer(nn.Module):

    def __init__(self, d_model, ffn_hidden, n_head, drop_prob):
        super(EncoderLayer, self).__init__()
        self.attention = MultiHeadAttention(d_model=d_model, n_head=n_head)
        self.norm1 = LayerNorm(d_model=d_model)
        self.dropout1 = nn.Dropout(p=drop_prob)

        self.ffn = PositionwiseFeedForward(d_model=d_model, hidden=ffn_hidden, drop_prob=drop_prob)
        self.norm2 = LayerNorm(d_model=d_model)
        self.dropout2 = nn.Dropout(p=drop_prob)

    def forward(self, x, src_mask):
        # 1. compute self attention
        _x = x
        x = self.attention(q=x, k=x, v=x, mask=src_mask)

        # 2. add and norm
        x = self.dropout1(x)
        x = self.norm1(x + _x)

        # 3. positionwise feed forward network
        _x = x
        x = self.ffn(x)

        # 4. add and norm
        x = self.dropout2(x)
        x = self.norm2(x + _x)
        return x

class Encoder(nn.Module):

    def __init__(self, enc_voc_size, max_len, d_model, ffn_hidden, n_head, n_layers, drop_prob, device):
        super().__init__()
        self.emb = TransformerEmbedding(d_model=d_model,
                                        max_len=max_len,
                                        vocab_size=enc_voc_size,
                                        drop_prob=drop_prob,
                                        device=device)

        self.layers = nn.ModuleList([EncoderLayer(d_model=d_model,
                                                  ffn_hidden=ffn_hidden,
                                                  n_head=n_head,
                                                  drop_prob=drop_prob)
                                     for _ in range(n_layers)])

    def forward(self, x, src_mask):
        x = self.emb(x)

        for layer in self.layers:
            x = layer(x, src_mask)

        return x
- 1
- 2
- 3
- 4
- 5
- 6
- 7
- 8
- 9
- 10
- 11
- 12
- 13
- 14
- 15
- 16
- 17
- 18
- 19
- 20
- 21
- 22
- 23
- 24
- 25
- 26
- 27
- 28
- 29
- 30
- 31
- 32
- 33
- 34
- 35
- 36
- 37
- 38
- 39
- 40
- 41
- 42
- 43
- 44
- 45
- 46
- 47
- 48
- 49
- 50
- 51
- 52
- 53
7.2、Decoder过程编写
class DecoderLayer(nn.Module):

    def __init__(self, d_model, ffn_hidden, n_head, drop_prob):
        super(DecoderLayer, self).__init__()
        self.self_attention = MultiHeadAttention(d_model=d_model, n_head=n_head)
        self.norm1 = LayerNorm(d_model=d_model)
        self.dropout1 = nn.Dropout(p=drop_prob)

        self.enc_dec_attention = MultiHeadAttention(d_model=d_model, n_head=n_head)
        self.norm2 = LayerNorm(d_model=d_model)
        self.dropout2 = nn.Dropout(p=drop_prob)

        self.ffn = PositionwiseFeedForward(d_model=d_model, hidden=ffn_hidden, drop_prob=drop_prob)
        self.norm3 = LayerNorm(d_model=d_model)
        self.dropout3 = nn.Dropout(p=drop_prob)

    def forward(self, dec, enc, trg_mask, src_mask):
        # 1. compute self attention
        _x = dec
        x = self.self_attention(q=dec, k=dec, v=dec, mask=trg_mask)

        # 2. add and norm
        x = self.dropout1(x)
        x = self.norm1(x + _x)

        if enc is not None:
            # 3. compute encoder - decoder attention
            _x = x
            x = self.enc_dec_attention(q=x, k=enc, v=enc, mask=src_mask)

            # 4. add and norm
            x = self.dropout2(x)
            x = self.norm2(x + _x)

        # 5. positionwise feed forward network
        _x = x
        x = self.ffn(x)

        # 6. add and norm
        x = self.dropout3(x)
        x = self.norm3(x + _x)
        return x

class Decoder(nn.Module):
    def __init__(self, dec_voc_size, max_len, d_model, ffn_hidden, n_head, n_layers, drop_prob, device):
        super().__init__()
        self.emb = TransformerEmbedding(d_model=d_model,
                                        drop_prob=drop_prob,
                                        max_len=max_len,
                                        vocab_size=dec_voc_size,
                                        device=device)

        self.layers = nn.ModuleList([DecoderLayer(d_model=d_model,
                                                  ffn_hidden=ffn_hidden,
                                                  n_head=n_head,
                                                  drop_prob=drop_prob)
                                     for _ in range(n_layers)])

        self.linear = nn.Linear(d_model, dec_voc_size)

    def forward(self, trg, src, trg_mask, src_mask):
        trg = self.emb(trg)

        for layer in self.layers:
            trg = layer(trg, src, trg_mask, src_mask)

        # pass to LM head
        output = self.linear(trg)
        return output
- 1
- 2
- 3
- 4
- 5
- 6
- 7
- 8
- 9
- 10
- 11
- 12
- 13
- 14
- 15
- 16
- 17
- 18
- 19
- 20
- 21
- 22
- 23
- 24
- 25
- 26
- 27
- 28
- 29
- 30
- 31
- 32
- 33
- 34
- 35
- 36
- 37
- 38
- 39
- 40
- 41
- 42
- 43
- 44
- 45
- 46
- 47
- 48
- 49
- 50
- 51
- 52
- 53
- 54
- 55
- 56
- 57
- 58
- 59
- 60
- 61
- 62
- 63
- 64
- 65
- 66
- 67
- 68
- 69


