热门标签
热门文章
- 1【学习笔记】C# 机械学习 ML.net_c# 机器学习
- 2CNN内部计算及卷积核、通道数关系_卷积核通道数
- 3ADB命令用法大全
- 4uniapp使用uview - DatetimePicker 时间选择器 /时间戳转化_uview datetimepicker 数据回显
- 5XTuner 低成本微调实战
- 6vue3.0+antdv的admin管理系统vue-admin-beautiful推荐
- 7Rabbitmq安装及连接错误问题_com.rabbitmq.client.connectionfactory$1$$externals
- 8Open Ai 常见接口参数说明以及常见报错总结_openai.error.invalidrequesterror: this model's max
- 9JVM常用性能分析工具_jvm分析工具
- 10全面了解Kotlin_kotlin实现android自动化
当前位置: article > 正文
使用MPLS解决BGP的路由黑洞(详解)
作者:weixin_40725706 | 2024-05-20 03:11:46
赞
踩
使用MPLS解决BGP的路由黑洞(详解)
我们知道在MPLS中数据的转发不再依靠路由表而是靠标签(注意:标签是在路由的基础上形成的)。所以在BGP中,我们依靠的就是这个特性来解决BGP的路由黑洞。
BGP路由黑洞的解释:BGP的路由黑洞其实就是路由层面可达,数据层面不可达。(你可以收到对方的路由,但是不能和对方通讯。)
实验前提
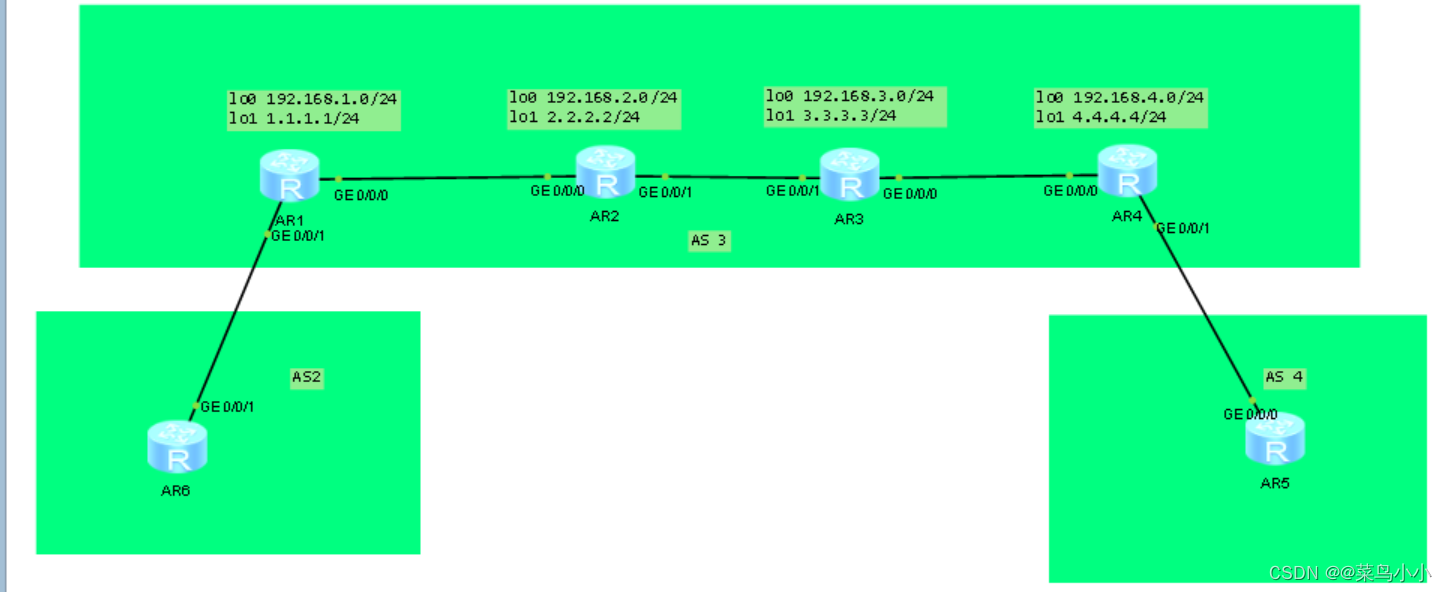
实验图如下:
实验要求:
- 在上述实验图中AR1与AR4建立IBGP邻居关系。AR6与AR1建立EBGP邻居关系,AR5与AR4建立EBGP邻居关系
- 在AS3中运行了OSPF协议来保证AS内部通讯
- 在AS3中开启了MPLS协议,注意AR1上的0/1口和AR4上的0/1口不能运行MPLS
- 使用MPLS协议使AR6上的6.6.6.0/24与AR5上的5.5.5.0/24可以通讯
开始实验
一:在AS3上运行OSPF
在AR1上 :
- [R1-ospf-10]dis this
- [V200R003C00]
- #
- ospf 10 router-id 1.1.1.1
- area 0.0.0.0
- network 1.1.1.0 0.0.0.255
- network 12.1.1.0 0.0.0.255
- network 192.168.1.0 0.0.0.255
- #
- return
- [R1-ospf-10]
在AR2上:
- [AR2-ospf-10]dis this
- [V200R003C00]
- #
- ospf 10 router-id 2.2.2.2
- area 0.0.0.0
- network 2.2.2.2 0.0.0.0
- network 12.1.1.0 0.0.0.255
- network 23.1.1.0 0.0.0.255
- #
- return
- [AR2-ospf-10]
在AR3上:
- [AR3-ospf-10]dis this
- [V200R003C00]
- #
- ospf 10 router-id 3.3.3.3
- area 0.0.0.0
- network 3.3.3.3 0.0.0.0
- network 23.1.1.0 0.0.0.255
- network 34.1.1.0 0.0.0.255
- #
- return
- [AR3-ospf-10]
在AR4上:
- [AR4-ospf-10]dis this
- [V200R003C00]
- #
- ospf 10 router-id 4.4.4.4
- area 0.0.0.0
- network 4.4.4.4 0.0.0.0
- network 34.1.1.0 0.0.0.255
- network 192.168.4.0 0.0.0.255
- #
- return
- [AR4-ospf-10]
二:在AS3内运行MPLS
在AR1上:
- [R1]mpls lsr-id 1.1.1.1 -----定义身份标识(其实就是router-id )
- [R1]mpls -----开启MPLS协议
- Info: Mpls starting, please wait... OK!
- [R1-mpls]mpls
- [R1-mpls]mpls ldp -----激活LDP协议
- [R1-mpls-ldp]q
- [R1]in g0/0/0 -----需要进入在所有标签经过的接口开启MPLS
- [R1-GigabitEthernet0/0/0]mpls ---开启MPLS
- [R1-GigabitEthernet0/0/0]mpls ldp ----再次激活LDP协议
- 当启动配置完成后,邻居间使用UDP报文组播收发hello包;之后基于hello包中的router-id地址进行TCP会话的建立;
- [AR1]mpls
- [AR1-mpls]lsp-trigger all -----开启该功能后所有的路由都会生成标签,全部基于标签进行转发。
在AR2上:
- [AR2]mpls lsr-id 2.2.2.2
- [AR2]mpls
- Info: Mpls starting, please wait... OK!
- [AR2-mpls]mpls ldp
- [AR2-mpls-ldp]q
- [AR2]in g0/0/0
- [AR2-GigabitEthernet0/0/0]mpls
- [AR2-GigabitEthernet0/0/0]mpls ldp
- [AR2-GigabitEthernet0/0/0]in g0/0/1
- [AR2-GigabitEthernet0/0/1]mpls
- [AR2-GigabitEthernet0/0/1]mpls ldp
- [AR2]mpls
- [AR2-mpls]lsp-trigger all -----开启该功能后所有的路由都会生成标签,全部基于标签进行转发。
在AR3上:
- [AR3]mpls lsr-id 3.3.3.3
- [AR3]mpls
- Info: Mpls starting, please wait... OK!
- [AR3-mpls]mpls ldp
- [AR3-mpls-ldp]q
- [AR3]in g0/0/1
- [AR3-GigabitEthernet0/0/1]mpls
- [AR3-GigabitEthernet0/0/1]mpls ldp
- [AR3-GigabitEthernet0/0/1]in g0/0/0
- [AR3-GigabitEthernet0/0/0]mpls
- [AR3-GigabitEthernet0/0/0]mpls ldp
- [AR3]mpls
- [AR3-mpls]lsp-trigger all -----开启该功能后所有的路由都会生成标签,全部基于标签进行转发。
在AR4上:
- [AR4]mpls lsr-id 4.4.4.4
- [AR4]mpls
- Info: Mpls starting, please wait... OK!
- [AR4-mpls]mpls ldp
- [AR4-mpls-ldp]q
- [AR4]in g0/0/0
- [AR4-GigabitEthernet0/0/0]mpls
- [AR4-GigabitEthernet0/0/0]mpls ldp
- [AR4-GigabitEthernet0/0/0]
- [AR4]mpls
- [AR4-mpls]lsp-trigger all -----开启该功能后所有的路由都会生成标签,全部基于标签进行转发。
三:在整个环境上运行BGP
在AR1上:
- [R1-bgp]display this
- [V200R003C00]
- #
- bgp 3
- peer 16.1.1.1 as-number 2
- peer 34.1.1.2 as-number 3
- #
- ipv4-family unicast
- undo synchronization
- peer 16.1.1.1 enable
- peer 34.1.1.2 enable
- peer 34.1.1.2 next-hop-local
- #
- return
- [R1-bgp]
在AR4上:
- [AR4-bgp]dis this
- [V200R003C00]
- #
- bgp 3
- peer 12.1.1.1 as-number 3
- peer 45.1.1.2 as-number 4
- #
- ipv4-family unicast
- undo synchronization
- peer 12.1.1.1 enable
- peer 12.1.1.1 next-hop-local
- peer 45.1.1.2 enable
- #
- return
- [AR4-bgp]
在AR5上:
- [AR5-bgp]dis this
- [V200R003C00]
- #
- bgp 4
- peer 45.1.1.1 as-number 3
- #
- ipv4-family unicast
- undo synchronization
- network 5.5.5.0 255.255.255.0
- peer 45.1.1.1 enable
- #
- return
- [AR5-bgp]
在AR6上:
- [AR6-bgp]dis this
- [V200R003C00]
- #
- bgp 2
- peer 16.1.1.2 as-number 3
- #
- ipv4-family unicast
- undo synchronization
- network 6.6.6.0 255.255.255.0
- peer 16.1.1.2 enable
- #
- return
- [AR6-bgp]
三:使用MPLS解决BGP路由黑洞
我们需要在运行bgp的设备上面去做,敲如下命令。
在AR1上:
[R1]route recursive-lookup tunnel
在AR4上:
[AR4]route recursive-lookup tunnel
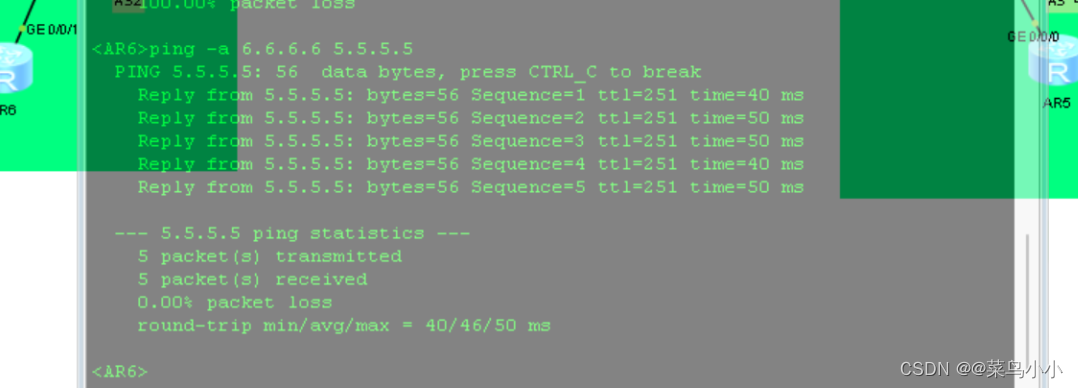
当我们去ping时,发现就可以通了,我们使用MPLS成功的解决的路由黑洞。

声明:本文内容由网友自发贡献,不代表【wpsshop博客】立场,版权归原作者所有,本站不承担相应法律责任。如您发现有侵权的内容,请联系我们。转载请注明出处:https://www.wpsshop.cn/w/weixin_40725706/article/detail/595827
推荐阅读
相关标签


