- 1梯度提升树GBDT模型原理及spark ML实现_pyspark gbdt subsamplingrate
- 2C++:继承与派生_c++继承与派生
- 3Springboot 中使用 Redisson+AOP+自定义注解 实现访问限流与黑名单拦截_spring redis 黑名单
- 4如何下载Idea专业版_idea专业版下载
- 5AWS S3 协议对接 minio/oss 等_minio s3协议
- 6Android字体大小多屏幕适配_android字体大小适配屏幕
- 7深入理解package.json中dependencies和devDependencies 的区别_dependencies packge.json会影响其他项目吗
- 8Hive collect_set与collect_list_hive的collect的底层数据结构
- 9基于STM32的ADC采样及各式滤波实现(HAL库,含VOFA+教程)_数据采集滤波算法stm32(2)_vofa+.tabviews
- 10基于51单片机的搬运机器人系统protues仿真_proteus机械臂仿真
Apache服务的搭建与配置(超详细版)_apache安装与配置
赞
踩
前言
Apache是一种常见的Web服务器软件,广泛用于Linux和其他UNIX操作系统上。它是自由软件,可以通过开放源代码的方式进行自由分发和修改。Apache提供了处理静态和动态内容的能力,而且还支持多种编程语言和脚本,如PHP、Python和Perl。此外,Apache还支持SSL、TLS和虚拟主机等功能,可以很好地满足大量的Web应用程序的需求。
目录
1 Apache服务的搭建
1.1 准备环境
(1)关闭防火墙
systemctl stop firewalld【永久关闭防火墙 systemctl disable firewalld】
systemctl disable firewalld
(2)关闭SELinux
修改配置文件
vi /etc/selinux/config#将SELINUX=enforcing修改为SELINUX=disabled。

setenforce 0【永久关闭SELinux,重启生效,使用reboot命令】
reboot1.2 安装Apache
yum -y install httpd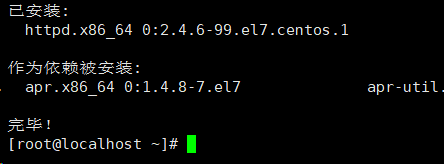
安装成功后,会产生下面两个文件:
#主配置文件 /etc/httpd/conf/httpd.conf
#默认网网站家目录 /var/www/html
1.3 Apache配置文件
/etc/httpd/conf/httpd.conf
serverRoot "/etc/httpd" #存放配置文件的目录
Listen 80 #Apache服务监听端口
User apache #子进程的用户
Group apache #子进程的组
serverAdmin root@locahost #设置管理员邮件地址
DocumentRoot "/var/www/html" #网站家目录
#设置DocumentRoot指定目录的属性
<Directory "/var/www/html"> # 网站容器开始标识
Options Indexes FollowSymLinks #找不到主页时,以目录的方式呈现,并允许链接到网站根目录以外
Allowoverride None # none不使用,htaccess控制,all允许
Require all granted # granted表示运行所有访问,denied表示拒绝所有访问
</Directory> #容器结束
DirectoryIndex index.html #定义主页文件,当访问到网站目录时如果有定义的主页文件,网站会自动访问
addDefaultCharset UTF-8 #字符编码,如果有中文的话,有可能需要修改为gb2312或者gbk,因你的网站文件的默认编码而异
1.4 启动Apache
systemctl start httpd1.5 查看服务是否启动
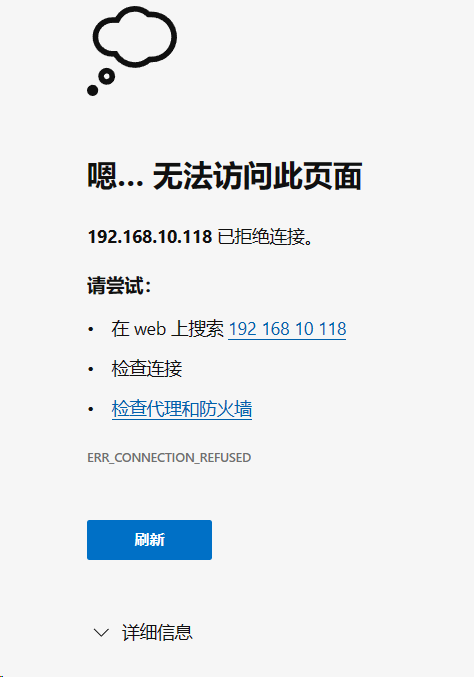
如果没有启动成功,原因是80端口被占用。
使用如下命令查看80端口:
lsof -i:80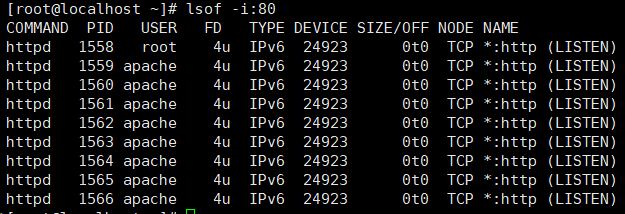
【确保安装了lsof(yum -y install lsof)】
yum -y install lsof 
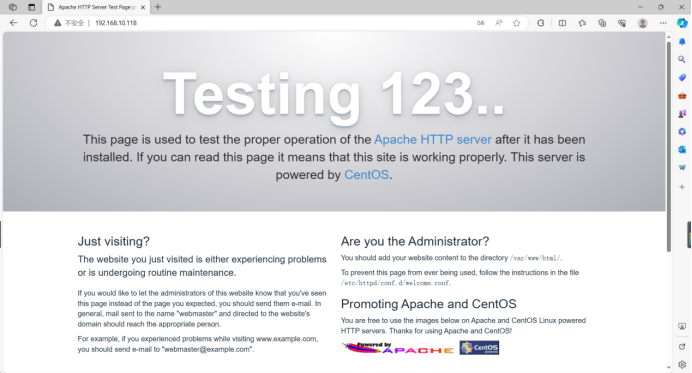
启动成功,使用浏览器访问ip地址即会出现Testing 123..页面
启动失败
1.6 访问验证httpd服务
curl +ip地址我们也可以使用文本浏览器,方便测试。
安装elinks文本浏览器
yum - y install elinks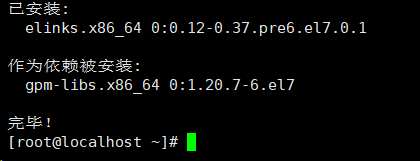
访问(Ctrl+c退出)
elinks +ip地址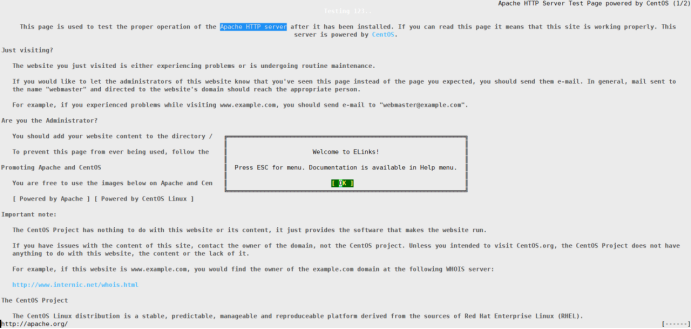
2 Apache配置实例
在网站根目录/var/www/html下面创建一个主页文件【切记,创建的后缀必须是html】
cd /var/www/htmltouch index.html 
2.1 实例一
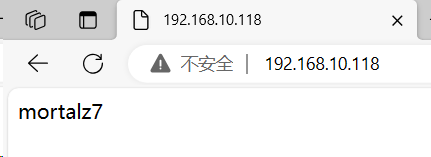
在 index.html 中添加内容
echo 'mortalz7' > /var/www/html/index.html重新启动服务
systemctl restart httpd接下来使用浏览器访问即可
2.2 实例二
编辑 index.html 文件
vi /var/www/html/index.html把主页文件写成html标签格式。
在index.html中添加如下内容:
- <html>
- <head>
- <title>测试</title>
- </head>
- <body>
- <h1 align="center">mortalz7</h1>
- </body>
- </html>
重新启动服务
systemctl restart httpd浏览器访问

2.3 实例三
修改家目录
创建www目录
mkdir /www编辑主配置文件
vi /etc/httpd/conf/httpd.conf显示行号
:set nu:119DocumentRoot "/var/www/html" 修改为 DocumentRoot "/www"
修改前:

修改后:

:131 <directory “var/www/html”>修改为<directory ”/www”>
修改前:

修改后:

重新启动服务
systemctl restart httpd测试:
cd /wwwvi index.html添加如下内容:
mortal重新启动服务
systemctl restart httpd浏览器访问

2.4 实例四
修改主页类型或者主页名
编辑主配置文件
vi /etc/httpd/conf/httpd.conf显示行号
:set nu:164 将index.html修改为indel.php
修改前:

修改后:

重新加载服务(重启服务也可以)
systemctl reload httpd或者
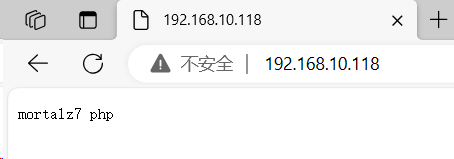
systemctl restart httpd添加内容
echo "mortalz7 php" > /www/index.php浏览器访问即可
2.5 Apache常用命令
#/usr/local/apache2/bin/apachectl -M #查看常见的模块(包括动态和静态)
#/usr/local/apache2/bin/apachectl -l #查看加载的静态模块
#/usr/local/apache2/bin/apachectl -t #检查配置文件有无语法错误
#/usr/local/apache2/bin/apachectl graceful #加载配置文件,但不重启
#/usr/local/apache2/bin/apachectl start/restart/stop #启动/重启/停止Apache服务
3 Apache配置用户认证
3.1 准备环境
yum -y install gcc gcc-c++ make pcre pcre-devel gd-devel openssl-devel zlib zlib-devel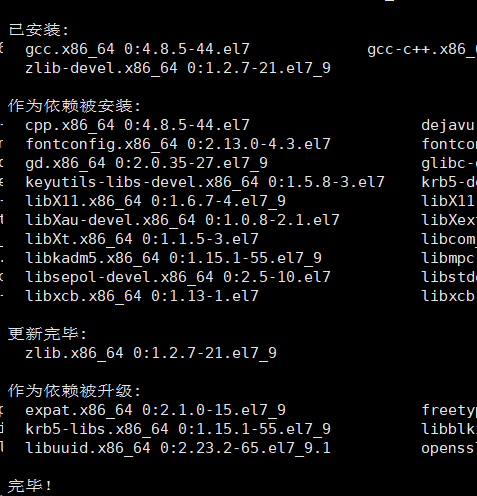
为了方便,先将/tmp目录下内容删掉。
cd /tmprm -rf *3.2 下载压缩包
先把wget下载好
yum -y install wget下载压缩包
wget https://mirrors.aliyun.com/apache/httpd/httpd-2.4.58.tar.gz
3.3 解压压缩包
tar xf httpd-2.4.58.tar.gz
3.4 配置
cd httpd-2.4.58/./configure --prefix=/usr/local/apache2
【问题解决】
发现出现configure: error: APR not found. Please read the documentation.问题,我们使用下面命令解决。
yum -y install apr-*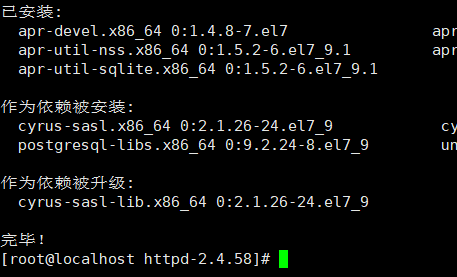
解决完重新执行一遍配置即可。
3.5 编译安装
make && make install 
3.6 检查配置文件有无语法错误
/usr/local/apache2/bin/apachectl -t 出现如图所示问题:
![]()
【问题解决】
原因:
ServerName有问题
解决方法:
编辑配置文件:
vi /usr/local/apache2/conf/httpd.conf添加如下内容:
ServerName localhost:80编辑完成后保存退出,重新执行指令,只显示Syntax OK即表示成功。

3.7 Apache配置用户认证
(用户认证的用途:当一个网站被访问的时候,需要输入用户名和密码才能进入,而不是直接登录网站,这种认证的形式可以针对网站的一个目录进行,也可以针对单个的访问文件进行)
3.7.1 编辑文件
vi /usr/local/apache2/conf/extra/httpd-vhosts.conf全部删除,写入如下内容:
- <VirtualHost *:80>
- DocumentRoot "/www/abc"
-
- <Directory /www/abc>
- AllowOverride AuthConfig
- AuthName "mortalz7"
- AuthType Basic
- AuthUserFile /www/.htpasswd
- require valid-user
- </Directory>
-
- </VirtualHost>
AllowOverride AuthConfig #允许对/www/abc 目录下的内容进行用户认证
/data/www/abc #为将要访问的页面的目录
AuthName #指定存放的用户
AuthUserFile /data/.htpasswd #指定存放用户名和密码的文件
3.7.2 打开模块
编辑Apache的主配置文件
vi /usr/local/apache2/conf/httpd.conf打开模块
:/httpd-vhost将Include conf/extra/httpd-vhosts.conf前面的#去掉
![]()
3.7.3 htpasswd生成密码文件
指定用户为mortalz7,自己设定一个密码,并重新输入一下,出现Adding password for user mortalz7即表示成功。
htpasswd -c /www/.htpasswd mortalz7
查看,显示用户mortalz7,表示用户设置完成。
cat /www/.htpasswd
3.8 加载配置并启动
/usr/local/apache2/bin/apachectl graceful/usr/local/apache2/bin/apachectl start【问题解决】
一、问题:
httpd not running, trying to start
(98)Address already in use: AH00072: make_sock: could not bind to address [::]:80
(98)Address already in use: AH00072: make_sock: could not bind to address 0.0.0.0:80
no listening sockets available, shutting down
AH00015: Unable to open logs


二、原因:
httpd服务启动,占用80端口
三、解决方法:
先下载好psmisc
yum install psmisc杀死httpd
killall -9 httpd重新执行下面俩命令即可
- /usr/local/apache2/bin/apachectl graceful
- /usr/local/apache2/bin/apachectl start

3.9 测试
浏览器访问 ip地址+/www/abc
192.168.10.118/www/abc出现输入用户名和密码页面即表示成功。

4 Apache配置默认虚拟主机
4.1 编辑主配置文件
vi /usr/local/apache2/conf/httpd.conf:207Require all denied 修改为 Require all granted
修改前:

修改后:

4.2 开启模块
:/httpd-vhost将Include conf/extra/httpd-vhost.conf前面的#去掉
4.3 编辑文件
vi /usr/local/apache2/conf/extra/httpd-vhosts.conf全部删除,写入如下内容:
- <VirtualHost *:80>
- DocumentRoot "/tmp/111"
- ServerName 111.com
- </VirtualHost>
-
- <VirtualHost *:80>
- DocumentRoot "/data/www"
- ServerName www.test.com
- ServerAlias www.aaa.com
- </VirtualHost>
除了已作过设置的域名(aaa、test)外,其余访问的域名均跳转到/tmp/111下。
4.4 测试
4.4.1 准备
为了方便测试,我们先往index.html 文件中添加点内容。
cd /tmpmkdir 111cd 111/vi index.html写入如下内容:
mortalz7,hello i am www.111.comcd /data/wwwvi index.html写入如下内容:
mortalz7,hello i am www.aaa.com and www.test.com4.4.2 添加本地解析
vi /etc/hosts添加如下内容:
- 192.168.10.118 www.111.com
- 192.168.10.118 www.aaa.com
- 192.168.10.118 www.test.com

4.4.3 启动服务
/usr/local/apache2/bin/apachectl start如果显示
httpd(pid XXXX) already running
解决方法:
killall httpd再重新启动即可
4.4.4 测试(Ctrl+c终止进程)
ping www.111.com
ping www.aaa.com
ping www.test.com
- curl -x +ip地址:80 www.aaa.com
- curl -x +ip地址:80 www.test.com
- curl -x +ip地址:80 www.111.com
【切记加上端口号】
没有加:80会显示
curl: (7) Failed connect to 192.168.10.118:80; 拒绝连接/Connection refused

5 Apache配置rewrite规则
Apache中rewrite规则代码均写在<IfModule mod_rewrite.c>模块下(前提要在Apache主配置文件中前面#去掉,开启模块才能使用)
web服务可能会用到多个域名,域名有主有次,输入次域名会主动跳转到主域名进行访问。设定为301永久跳转,302是暂时跳转。
5.1 准备
创建好/data/www(创建过不用进行此操作)
mkdir -p /data/wwwcd /data/wwwvi index.html写入如下内容:
mortalz7,hello,this is test rewrite5.2 开启模块
vi /usr/local/apache2/conf/httpd.conf:/rewrite:156将LoadModule rewrite_module modules/mod_rewrite.so前面#去掉

:481:/httpd-vhosts 将Include conf/extra/httpd-vhost.conf前面的#去掉

5.3 编辑文件
vi /usr/local/apache2/conf/extra/httpd-vhosts.conf清空,添加如下内容:
- <VirtualHost *:80>
- DocumentRoot "/data/www"
- <IfModule mod_write.c>
- RewriteEngine on
- RewriteCond %{HTTP_HOST} ^www.aaa.com$ [OR]
- RewriteCond %{HTTP_HOST} ^www.bbb.com$
- RewriteRule ^/(.*)$ http://www.test.com/$1 [R=301,L]
- </IfModule>
- </VirtualHost>
调用rewrite模块:
RewriteEngine on #打开rewrite功能
RewriteCond #跳转条件
RewriteRule #跳转规则
5.4 检查配置文件有无语法错误
/usr/local/apache2/bin/apachectl -t 
5.5 添加本地解析
vi /etc/hosts添加如下内容:
- 192.168.10.118 www.aaa.com
- 192.168.10.118 www.bbb.com
- 192.168.10.118 www.test.com

5.6 重新加载下配置文件
/usr/local/apache2/bin/apachectl restart5.7 测试
curl www.aaa.com![]()
curl www.bbb.com![]()
curl www.test.com![]()
5.8 禁止指定user_agent
还是提前把模块开启【刚才做过,这次不再做,没做过请参考:】
修改文件
vi /usr/local/apache2/conf/extra/httpd-vhosts.conf清空,添加如下内容:
- <VirtualHost *:80>
- DocumentRoot "/data/www"
- <IfModule mod_write.c>
- RewriteEngine on
- RewriteCond %{HTTP_USER_AGENT} ^.*curl.* [NC,OR]
- RewriteCond %{HTTP_USER_AGENT} ^.*chrome.* [NC]
- RewriteRule .* - [F]
- </IfModule>
- </VirtualHost>
先不重新启动配置测试
curl www.test.com重新启动配置测试
/usr/local/apache2/bin/apachectl restartcurl www.test.com访问不成功,报403错误了。
5.9 通过rewrite限制某个目录
【相同做法,自行配置并测试】
- <VirtualHost *:80>
- DocumentRoot "/data/www"
- <IfModule mod_write.c>
- RewriteEngine on
- RewriteCond %{REQUEST_URL} ^.*/tmp/.* [NC]
- RewriteRule .* - [F]
- </IfModule>
- </VirtualHost>
RewriteCond %{REQUEST_URL} ^.*/tmp/.* [NC] #禁止访问tmp目录
RewriteRule .* - [F] #禁止
5.10 rewrite变量
%{HTTP_USER_AGENT} #表示访问的user_agent
%{HTTP_HOST} #表示当前访问的网址,只是指前缀部分,格式是www.xxx.com不包括”http://”和”/”
%{REQUEST_URL} #表示访问的相对根目录地址,就是域名/后面的成分,格式包括最前面的”/”
举例:
www.123.com/xiang/1.html #www.123.com表示HOST xiang/1.html表示URL
6 Apache配置日志切割与管理
web服务器出现大量的访问日志和错误日志,我们要对日志进行切割,方便管理人员的查询,一些不重要的记录,也可以规定日志中不显示这些。
虚拟主机配置文件日志路径:/usr/local/apache2/logs

6.1 Apache主配置文件日志相关格式规定
vi /usr/local/apache2/conf/httpd.conf:/log_config
【默认开启的】
:/LogFormatLogFormat "%h %l %u %t \"%r\" %>s %b \"%{Referer}i\" \"%{User-Agent}i\"" combined
LogFormat "%h %l %u %t \"%r\" %>s %b" common

%h #来源ip
%u #访问的user
%t #时间
%r #动作
6.2 日志切割
6.2.1 准备
创建好/data/www(创建过不用进行此操作)
mkdir -p /data/wwwcd /data/wwwvi index.html写入如下内容:
mortalz7,hello,this is test log6.2.2 修改文件
vi /usr/local/apache2/conf/extra/httpd-vhosts.conf清空,添加如下内容:
- <VirtualHost *:80>
- DocumentRoot "/data/www"
- ServerName www.test.com
- CustomLog "|/usr/local/apache2/bin/rotatelogs -l /usr/local/apache2/logs/test.com-access%y%m%d_log 86400" combined
- </VirtualHost>
%y%m%d规定年月日,86400秒即一天,一天切割一次。
6.2.3 重启配置
/usr/local/apache2/bin/apachectl restart6.2.4 修改时间
date查看时间
date![]()
修改时间
date +月日时分我将时间修改成一天后,为了简单,我直接修改为10月30号
![]()
6.2.5 测试
curl +ip地址![]()
cd /usr/local/apache2/logs/
多出 test.com-access231030_log,日志切割成功!
6.3 不记录制定文件类型的日志
【更刚才一样,配置文件重新编辑即可。】
vi /usr/local/apache2/conf/extra/httpd-vhosts.conf清空,添加如下内容:
- <VirtualHost *:80>
- DocumentRoot "/data/www"
- ServerName www.test.com
- ErrorLog "logs/test.com-error_log"
- SetEnvif Request_URL ".*\.gif$" image-request
- SetEnvif Request_URL ".*\.png$" image-request
- SetEnvif Request_URL ".*\.bmp$" image-request
- SetEnvif Request_URL ".*\.swf$" image-request
- SetEnvif Request_URL ".*\.js$" image-request
- SetEnvif Request_URL ".*\.css$" image-request
- CustomLog "|/usr/local/apache2/bin/rotatelogs -l /usr/local/apache2/logs/test.com-access%y%m%d_log 86400" combined env=!image-request
- </VirtualHost>
7 配置静态缓存
对于网站上一些静态资源(图片、html、css等),通过客户端缓存,减少请求,加快页面的加载速度,网站加载速度快了,用户体验感就会越好,需要提前确认是否支持 mod_expires.c模块。
7.1 开启模块
vi /usr/local/apache2/conf/httpd.conf搜索expires
:/expires 将LoadModule expires_module modules/mod_expires.so前的#去掉

:/httpd-vhosts 将Include conf/extra/httpd-vhost.conf前面的#去掉【前面开启请忽略】

7.2 编辑文件
vi /usr/local/apache2/conf/extra/httpd-vhosts.conf清空,添加如下内容:
- <VirtualHost *:80>
- DocumentRoot "/data/www"
- ServerName www.test.com
- <IfModule mod_expires.c>
- ExpiresActive on
- ExpiresBytype image/gif "access plus 1 days"
- ExpiresBytype image/jpeg "access plus 24 hours"
- ExpiresBytype image/png "access plus 24 hours"
- ExpiresBytype text/css "now plus 2 hours"
- ExpiresBytype application/x-javascript "now plus 2 hours"
- ExpiresBytype application/x-shockwave-flash "now plus 2 hours"
- ExpiresDeFault "now plus 0 min"
- </IfModule>
- </VirtualHost>
7.3 测试
cd /data/wwwyum -y install lrzszrz命令上传个图片
rz授权
chmod 777 lab.jpg重启配置
/usr/local/apache2/bin/apachectl restart【如果显示httpd not running, trying to start则使用/usr/local/apache2/bin/apachectl start启动即可。】

关闭防火墙和selinux【之前关掉请忽略此步骤】
- systemctl stop firewalld
- setenforce 0

网址输入:IP地址/图片名称访问
我的IP地址是192.168.10.119,上传的图片名称是lab.jpg
192.168.10.119/lab.jpg
curl -x 192.168.10.119:80 'http://www.test.com/lab.jpg' -I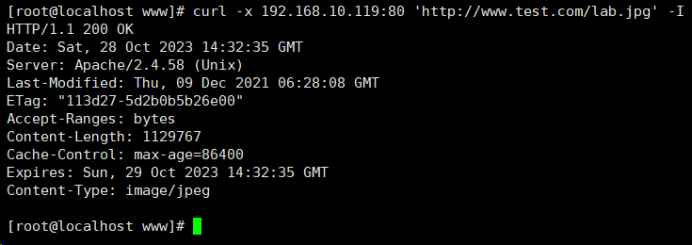
显示200 OK ,成功!
8 Apache配置防盗链
盗链:在自己的页面上展示一些并不在自己服务器上的一些内容,通过一些技术手段获得别人服务器上的一些资源,绕过别人的资源展示页面,在自己的页面上向用户提供内容。
准备: 两台虚拟机
IP地址:第一台虚拟机 192.168.10.119
第二台虚拟机 192.168.10.110
8.1 准备
第一台虚拟机:
编辑文件
vi /usr/local/apache2/conf/extra/httpd-vhosts.conf清空,添加如下内容:
- <VirtualHost *:80>
- DocumentRoot "/data/www"
- ServerName www.test.com
- </VirtualHost>
第二台虚拟机:
安装服务
yum -y install httpdcd /var/www/htmlvi index.html写入如下内容:
- <html>
- <title>test</title>
- <body>
- <h1>mortalz7</h1>
- <img src="http://www.test.com/lab.jpg">
- </body>
- </html>
添加本地解析
vi /etc/hosts添加如下内容:(IP地址是第一台机器的)
192.168.10.119 www.test.com
关闭防火墙和selinux
- systemctl stop firewalld
- setenforce 0
重启Apache服务
systemctl restart httpd测试:
浏览器输入第二台主机IP地址访问即可。
8.2 配置防盗链
第一台虚拟机:
vi /usr/local/apache2/conf/extra/httpd-vhosts.conf清空,添加如下内容:
- <VirtualHost *:80>
- DocumentRoot "/data/www"
- ServerName www.test.com
- SetEnvIfNoCase Referer "^http://.*\.test\.com" local_ref
- <filesmatch "\.(txt|png|gif|doc|mp3|zip|rar|jpg|css|js)">
- Order Allow,Deny
- Allow from env=local_ref
- </filesmatch>
- </VirtualHost>
SetEnvIfNoCase Referer "^http://.*\.test\.com" local_ref #给网站做标注
<filesmatch "\.(txt|png|gif|doc|mp3|zip|rar|jpg|css|js)"> #规定文件类型
Allow from env=local_ref #允许local_ref引用
重新加载下配置文件
/usr/local/apache2/bin/apachectl graceful重启配置
/usr/local/apache2/bin/apachectl restart测试:
浏览器输入第二台主机IP地址访问
192.168.10.110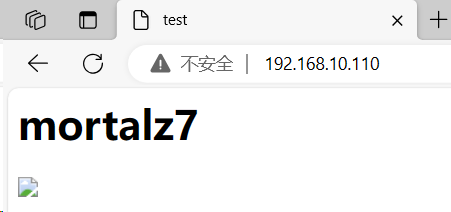
图片显示不出来,实验成功!
9 Apache访问控制
作用:控制对网站资源的访问,还可以对特定的网站目录添加访问权限。
准备:两台虚拟机
IP地址:第一台虚拟机 192.168.10.119
第二台虚拟机 192.168.10.110
禁止IP地址/网段进行访问
第一台虚拟机:
vi /usr/local/apache2/conf/extra/httpd-vhosts.conf清空,添加如下内容:
- <VirtualHost *:80>
- DocumentRoot "/data/www"
- ServerName www.test.com
- <Directory "/data/www">
- AllowOverride None
- options None
- order allow,deny
- Allow from all
- deny from 192.168.10.0/24
- </Directory>
- </VirtualHost>
order allow,deny #先允许后拒绝
Allow from all #允许所有人访问
deny from <ip地址> #禁止此IP地址访问
deny from 192.168.10.0/24 #禁止此网段(192.168.10.0/24)的IP地址访问
重新加载下配置文件
/usr/local/apache2/bin/apachectl graceful重启配置
/usr/local/apache2/bin/apachectl restart
测试:
第二台虚拟机:
curl -I <第一台虚拟机的IP地址>
curl -I 192.168.10.119
出现403 Forbidden访问错误,实验成功!
创作不易,给个三连吧~


