
- 1强化学习QLearning 进行迷宫游戏和代码_试着将q-learning的思想应用于迷宫问题。(用python代码) 请回答:当state=1时
- 2浙江大学计算机保研条件_记录一下我的保研之路
- 3Hive 初始化 Exception in thread “main“ java.lang.NoSuchMethodError: com.google.common.XXX_hive 4.0 log4j-slf4j-impl-2.18.0.jar
- 4ORB-SLAM3的运行与调试_运行oebslam3
- 5小华最多能得到多少克黄金(87.5%用例)C卷 (Java&&Python&&C++&&Node.js&&C语言)_小华按照地图去寻宝,地图上被划分成m行和n列
- 6达梦数据库管理工具使用_达梦管理工具使用方法
- 7unity移动游戏优化指南_application.targetframerate fixedupdate
- 8大数据毕业设计hadoop+spark+hive知识图谱医生推荐系统 医生数据分析可视化大屏 医生爬虫 医疗可视化 医生大数据 机器学习 计算机毕业设计 机器学习 深度学习 人工智能
- 9《MongoDB权威指南》读书笔记 —— PartⅥ:服务器管理_mongodb db.admincommand( { setparameter 只能在主上
- 10让你至少拿2份offer的软件测试面试题来了(100题带标准答案)_offer办公试题
06 SpringBoot_AJAX_springboot ajax
赞
踩
1 SpringBoot概述
1.1 什么是SpringBoot
Boot单词的意思是:开机,启动

SpringBoot是Spring系列框架开机引导器,内部已经合理配置,使用时候基本不用配置,就可以默认工作,也就是基本不用配置就能使用Spring,SpringMVC,MyBatis等。就是一个懒人神奇,程序员的最爱。
SpringBoot框架的核心思想是“约定大于配置”,具体的表现为:框架已经完成了相关配置,开发人员只需要遵守相关的“约定”即可,也就是了解某些配置值已经被配置为什么样了,并按照这样标准去使用即可。
1.2 创建SpringBoot项目
创建SpringBoot项目的方式与创建传统项目并不太相同,由于SpringBoot提供的项目默认配置,所以需要利用SpringBoot提供的资源创建项目,其创建方式主要有:
- 将SpringBoot作为父级项目,直接创建子级项目
- 在开发工具中直接创建SpringBoot项目,如果使用的是Eclipse,需要安装Spring Tools插件,如果使用的是IDEA,则直接有这个选项
- 从 https://start.spring.io 官网配置并下载项目,然后在本地的开发工具中直接引入项目
本次使用第3种做法,打开https://start.spring.io,使用2.1.x系列的SpringBoot,Group值为cn.tedu,Artifact的值为sample,展开Options,将Packaging选择为war,确定无误后,点击下方的Generate按钮,将生成项目,并且开始自动下载。

将下载得到的sample.zip解压,得到sample文件夹,该文件夹就是一个SpringBoot项目,先将该文件夹移动到WorkSpace中,便于管理项目。

打开Eclipse,通过File>Import>ExistingMaven Project导入项目,导入后,新项目的结构并不正常,并且项目会开始自动下载大量依赖,下载过程可能会消耗一定的时间,当下载完成后,项目的结构就会变成一个正常的结构。
如果Eclipse没有开始自动下载,可以对项目点击右键,选择Maven>Update Project,并在弹出的对话框中勾选Force Update选项后,开始强制更新。
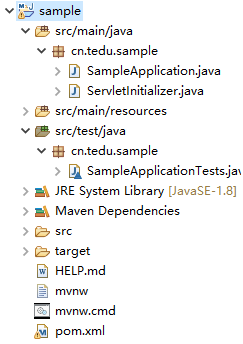
关于SpringBoot结构:
- 创建好的项目中,默认就存在cn.tedu.sample包:
- 这个包的名称是创建项目时填写的Group和Artifact值组合而成的,这个包是项目的根包;
- SpringBoot项目已经将这个包配置为组件扫描的根包,所以,在项目中创建的组件类(需要Spring,SpringMVC框架管理的类,例如控制器)都必须放在这个包或其子包中,否则就无法正常使用
- 建议的做法是将所有类都放在这个包或其子包中
- 在src/main/java下的根包下默认就存在SampleApplication类
- 这个类的名称是由创建项目时填写的Artifact值与Application单词组合而成的,这个类是整个项目的启动类,类中有main()方法,执行main()方法就会启动整个项目
- SpringBoot项目内置Tomcat,每次执行main()方法时,其实都会将当前项目部署到内置的Tomcat中,并启动这个Tomcat
- 如果SampleApplication能正常启动项目,则相关基础的环境和jar包都是正常的
- 在src/test/java 下的根包默认就存在SampleApplicationTests类
- 这个类名依然是由创建项目时填写的Artifact值决定的,这个类是一个单元测试类
- 在SpringBoot项目中,其他单元测试类也需要放在这个根包下,并且,需要添加和SampleApplicationTests相同的注解
- 在这个测试类中,默认还存在contextLoads()测试方法,如果能顺利执行该测试方法,则表示单元测试环境是正常的
- 执行SpringBoot的单元测试时,会加载整个项目的环境,包括加载一些配置文件,加载Spring容器等
1.3 静态资源HelloWorld
SpringBoot项目提供了非常多的默认配置,应该按照默认规则使用。其中规则之一就是静态资源需要部署在静态资源文件夹。
静态资源是指:客户端可以直接访问的资源,例如:html,css,js,图片等
在SpringBoot项目中,src/main/resources下有static文件夹,这个文件夹就是专门用于存放静态资源文件的,其作用相当于传统JavaEE项目中的webapp文件夹,但是,在SpringBoot项目中建议放在static中,在使用该文件夹时,还可以自行创建子级文件夹。
可以在static下创建index.html文件
<!DOCTYPE html>
<html>
<head>
<meta charset="UTF-8">
<title>静态资源</title>
</head>
<body>
	<h1>Spring Boot 静态网页</h1>
	<p>Hello World</p>
</body>
</html>
- 1
- 2
- 3
- 4
- 5
- 6
- 7
- 8
- 9
- 10
- 11
由于SpringBoot内嵌了Tomcat,所以部署后,启动项目,执行SampleApplication中的main()方法),在启动项目的日志中有这样一句话:

可以发现,SpringBoot框架将项目部署到Tomcat时,默认端口是8080,设置的Context Path值为‘’,也就是没有值,所以在访问资源时,URL中不需要添加项目的名称。
可以打开浏览器,输入http://localhost:8080/ 访问这个index.html默认欢迎页面。

其默认配置是可以修改的,比如修改端口号:
在src/main/resources下,默认就存在application.properties文件,这个文件就是整个项目的配置文件,可以自定义配置,也可以配置某些SpringBoot框架默认就识别的属性,所以在配置框架默认识别的属性时,千万不能出现拼写错误,否则,就等同于一个自定义配置,在具体执行时,项目可能根本不会报错,但是却没有执行效果。
例如,可以在这个配置文件中添加Tomcat端口号配置:

则后续在访问当前Tomcat服务器时,URL中的端口号就必须使用以上配置的9999.


如果使用的是Windows系统,还可以将端口号改成80,这是HTTP协议的默认端口,改完后,要访问刚才的页面,直接输入http://localhost即可。
如果使用Linux和MacOS系统,这些操作对于80端口的管理更严格,需要在操作系统中进行权限的设置才可以正常访问。
1.4 控制器HelloWorld
由于SpringBoot项目默认已经配置了组件扫描,所以控制器类必须放在cn.tedu.sample根包或其子包中,否则就无法识别。
在cn.tedu.sample下创建子级的controller包,并在这个包中创建DemoController控制器类,然后,像使用SpringMVC框架一样,处理某个请求:
package cn.tedu.sample.controller;

import org.springframework.web.bind.annotation.GetMapping;
import org.springframework.web.bind.annotation.RestController;

@RestController
public class DemoController {

	@GetMapping("/hello")
	public String hello() {
		return"Hello World!";
	}

}
- 1
- 2
- 3
- 4
- 5
- 6
- 7
- 8
- 9
- 10
- 11
- 12
- 13
- 14
- 15
SpringBoot的默认规则:
- 在SpringBoot项目中,没有web.xml文件,在SpringMVC中核心的DispatcherServlet是SpringBoot框架通过类的方法进行配置的
- 并且映射的路径是/*也就是所有请求,所以,在设计请求路径时,不需要使用.do作为后缀,例如以上代码中设计为hello即可,并不需要设计为hello.do
- 由于映射的路径是/*,所以,其他资源也会被SpringMVC框架处理,例如,使用了拦截器以后,处理拦截用户的数据请求以外,静态资源也是可以拦截的
- 在SpringBoot项目中,默认已经将所有直接完成的配置中的字符编码全部改成了utf-8,所以通常不需要自行设置编码
打开浏览器,输入http://localhost:9999/hello 访问到这个控制器:

2 用户注册案例
2.1 添加MyBatis Starter
本次案例依然使用之前创建的tedu_ums数据库中的t_user表。
由于涉及数据库编程,所以,在当前项目中,需要添加mysql和MyBatis的依赖,这些依赖是SpringBoot框架默认没有集成的,因为每个项目使用的数据库及数据库编程框架可能都不相同,所以需要自行添加:
		<dependency>
			<groupId>org.mybatis.spring.boot</groupId>
			<artifactId>mybatis-spring-boot-starter</artifactId>
			<version>2.1.3</version>
		</dependency>
		<dependency>
			<groupId>mysql</groupId>
			<artifactId>mysql-connector-java</artifactId>
			<version>runtime</version>
		</dependency>
- 1
- 2
- 3
- 4
- 5
- 6
- 7
- 8
- 9
- 10
当添加依赖后,项目会自动下载以上2个依赖的jar包文件。
SpringBoot框架会自动管理依赖的版本,所以,例如以上添加的mysql-connector-java的依赖就不需要指定版本号,SpringBoot会自动选择较新得到且稳定的版本,当然,如果SpringBoot管理的版本不兼容当前项目或服务器的环境,也可以自行添加节点来指定使用的版本号。
当添加依赖后,当前项目是不可以正常启动的,启动时会报错:

一旦添加这2个依赖以后,启动项目时,就会自动读取连接数据库的配置信息,而当前没有配置,所以,就会出现错误,需要在application,properties文件中添加配置:
spring.datasource.driver-class-name=com.mysql.jdbc.Driver
spring.datasource.url=jdbc:mysql://localhost:3306/tedu_ums?characterEncoding=utf8&useSSL=false&serverTimezone=Asia/Shanghai&rewriteBatchedStatements=true
spring.datasource.username=root
spring.datasource.password=root
- 1
- 2
- 3
- 4
当添加以上配置后,其实,启动项目时,也只是读取以上配置,并不会执行连接数据库的操作,所以,即使配置信息有误,也不会提示错误,则需要通过单元测试,尝试连接数据库,才能知道配置信息及相关涉及的jar包文件是否正确。
在SampleApplicationTests中添加连接数据库的测试方法:
	@Autowired
	DataSource dataSourcea;

	@Test
	public void contextLoads() throws Exception {
		System.out.println(dataSourcea.getConnection());
	}
- 1
- 2
- 3
- 4
- 5
- 6
- 7
在传统的基于Spring框架的项目中,能够通过getBean()方法获取对象的,在SpringBoot中,都可以通过自动装配为属性赋值。
完成后执行测试方法,如果配置无误,则会输出例如:

2.2 使用Mapper接口
MyBatis强大的功能在于提供了自动创建Mapper接口的具体实例。SpringBoot和MyBatis Starter配合提供了非常简洁的支持。只需要在SpringBoot的启动类中使用注解@MapperScan就可以开始Mapper接口扫描功能,自动创建Mapper接口实现类的对象。
在启动类之前添加注解配置:
package cn.tedu.sample;

import org.mybatis.spring.annotation.MapperScan;
import org.springframework.boot.SpringApplication;
import org.springframework.boot.autoconfigure.SpringBootApplication;

@SpringBootApplication
@MapperScan("cn.tedu.sample.mapper")//打开mybatis的Mapper接口扫描功能
public class SampleApplication {

	public static void main(String[] args) {
		SpringApplication.run(SampleApplication.class, args);
	}

}
- 1
- 2
- 3
- 4
- 5
- 6
- 7
- 8
- 9
- 10
- 11
- 12
- 13
- 14
- 15
启动类SampleApplication之前添加了@SpringBootApplication,该注解是基于@SpringBootConfiguration注解的,而@SpringBootConfiguration注解是基于@Configuration注解的,所以其实启动类SampleApplication就是一个配置类。
使用了@MapperScan(“cn.tedu.sample.mapper”)注解后,就可以声明Mapper接口访问数据库了。
以注册功能为例,在系统中注册用户本质就是将用户信息保存到数据库的功能,其SQL为:
INSERT INTO t_user (username,password,age,phone,email) VALUES (?,?,?,?,?);
- 1
首先编写实体类封装用户相关信息,在cn.tedu.sample.entity包下创建与数据表对应的User类,在类中声明与数据表中一致的属性:
package cn.tedu.sample.entity;

import java.io.Serializable;

public class User implements Serializable{

	private Integer id;
	private String username;
	private String password;
	private Integer age;
	private String phone;
	private String email;

	public User() {

	}


	public User(Integer id, String username, String password, Integer age, String phone, String email) {
		super();
		this.id = id;
		this.username = username;
		this.password = password;
		this.age = age;
		this.phone = phone;
		this.email = email;
	}


	public Integer getId() {
		return id;
	}
	public void setId(Integer id) {
		this.id = id;
	}
	public String getUsername() {
		return username;
	}
	public void setUsername(String username) {
		this.username = username;
	}
	public String getPassword() {
		return password;
	}
	public void setPassword(String password) {
		this.password = password;
	}
	public Integer getAge() {
		return age;
	}
	public void setAge(Integer age) {
		this.age = age;
	}
	public String getPhone() {
		return phone;
	}
	public void setPhone(String phone) {
		this.phone = phone;
	}
	public String getEmail() {
		return email;
	}
	public void setEmail(String email) {
		this.email = email;
	}


	@Override
	public String toString() {
		return "User [id=" + id + ", username=" + username + ", password=" + password + ", age=" + age + ", phone="
				+ phone + ", email=" + email + "]";
	}
	@Override
	public int hashCode() {
		final int prime = 31;
		int result = 1;
		result = prime * result + ((id == null) ? 0 : id.hashCode());
		return result;
	}
	@Override
	public boolean equals(Object obj) {
		if (this == obj)
			return true;
		if (obj == null)
			return false;
		if (getClass() != obj.getClass())
			return false;
		User other = (User) obj;
		if (id == null) {
			if (other.id != null)
				return false;
		} else if (!id.equals(other.id))
			return false;
		return true;
	}
}

- 1
- 2
- 3
- 4
- 5
- 6
- 7
- 8
- 9
- 10
- 11
- 12
- 13
- 14
- 15
- 16
- 17
- 18
- 19
- 20
- 21
- 22
- 23
- 24
- 25
- 26
- 27
- 28
- 29
- 30
- 31
- 32
- 33
- 34
- 35
- 36
- 37
- 38
- 39
- 40
- 41
- 42
- 43
- 44
- 45
- 46
- 47
- 48
- 49
- 50
- 51
- 52
- 53
- 54
- 55
- 56
- 57
- 58
- 59
- 60
- 61
- 62
- 63
- 64
- 65
- 66
- 67
- 68
- 69
- 70
- 71
- 72
- 73
- 74
- 75
- 76
- 77
- 78
- 79
- 80
- 81
- 82
- 83
- 84
- 85
- 86
- 87
- 88
- 89
- 90
- 91
- 92
- 93
- 94
- 95
- 96
- 97
- 98
接下来,需要在cn.tedu.sample.mapper包下创建UserMapper接口,并在接口中添加“插入用户数据”的抽象方法:
package cn.tedu.sample.mapper;

import org.apache.ibatis.annotations.Insert;
import org.apache.ibatis.annotations.Options;

import cn.tedu.sample.entity.User;

public interface UserMapper {

	@Insert("INSERT INTO t_user (username,password,age,phone,email)"
			+ " VALUES (#{username},#{password},#{age},#{phone},#{email})")
	@Options(useGeneratedKeys = true,keyProperty = "id")//返回自增id
	Integer addnew(User user);

}
- 1
- 2
- 3
- 4
- 5
- 6
- 7
- 8
- 9
- 10
- 11
- 12
- 13
- 14
- 15
这里package cn.tedu.smaple.mapper 与标注在启动类上的Mapper扫描注解@MapperScan(cn.tedu.sample.mapper")对应,这样SpringBoot在启动时候就能够自动扫描Mapper接口,创建接口实现类的实例。
然后,可以测试以上开发的功能是否正常。先在src/test/java下创建cn.tedu.sample.mapper包,并在包中创建UserMapper测试类,并且在测试类的声明之前添加必要的注解,在测试类中编写测试方法:
package cn.tedu.sample;

import org.junit.Test;
import org.junit.runner.RunWith;
import org.springframework.beans.factory.annotation.Autowired;
import org.springframework.boot.test.context.SpringBootTest;
import org.springframework.test.context.junit4.SpringRunner;

import cn.tedu.sample.entity.User;
import cn.tedu.sample.mapper.UserMapper;

/*
 *	测试mapper接口
 */

@RunWith(SpringRunner.class)
@SpringBootTest
public class UserMapperTests {

	@Autowired
	UserMapper userMapper;

	@Test
	public void addnew() {
		User user = new User();
		user.setUsername("springboot");
		user.setPassword("888888");
		user.setAge(10);
		user.setPhone("18881888188");
		user.setEmail("123@163.com");

		Integer rows = userMapper.addnew(user);
		System.out.println(rows);
	}

}
- 1
- 2
- 3
- 4
- 5
- 6
- 7
- 8
- 9
- 10
- 11
- 12
- 13
- 14
- 15
- 16
- 17
- 18
- 19
- 20
- 21
- 22
- 23
- 24
- 25
- 26
- 27
- 28
- 29
- 30
- 31
- 32
- 33
- 34
- 35
- 36
在数据中查看增加的数据:

如何输出MyBatis执行的SQL语句呢?SpringBoot也提供了封装,只需要在系统配置文件application.properties中增加一行,设定输出cn.tedu.sample.mapper中的全部接口的SQL就可以了:
logging.level.cn.tedu.sample.mapper=TRACE
- 1
SpringBoot和MyBatis Starter也支持利用XML声明Mapper接口对应的SQL语句。比如实现一个动态更新功能,首先在UserMapper接口中创建抽象方法:
Integer updateUserInfo(User user);
- 1
接下来,与此前使用MyBatis一样,先在src/main/resources下创建mappers文件夹,专门用于存放配置SQL语句的XML文件,利用Mapper文件模板创建UserMapper.xml,然后在UserMapper.xml中配置抽象映射的SQL语句:
<?xml version="1.0" encoding="UTF-8" ?>
<!DOCTYPE mapper
  PUBLIC "-//mybatis.org//DTD Mapper 3.0//EN"
  "http://mybatis.org/dtd/mybatis-3-mapper.dtd">
<mapper namespace="cn.tedu.sample.mapper.UserMapper">
	<update id="updataUserInfo" parameterType="cn.tedu.entity.User">
		UPDATE t_user
		<set>
			<if test="username != null">
				username = #{username},
			</if>
			<if test="password != null">
				password = #{password},
			</if>
			<if test="age != null">
				age = #{age},
			</if>
			<if test="phone != null">
				phone = #{phone},
			</if>
			<if test="email != null">
				email = #{email},
			</if>
		</set>
		WHERE ID=#{id}
	</update>
</mapper>
- 1
- 2
- 3
- 4
- 5
- 6
- 7
- 8
- 9
- 10
- 11
- 12
- 13
- 14
- 15
- 16
- 17
- 18
- 19
- 20
- 21
- 22
- 23
- 24
- 25
- 26
- 27
当使用XML文件配置SQL语句后,还需要配置这些XML文件的位置,则在application.properties中添加配置:
mybatis.mapper-locations=classpath:mappers/*.xml
- 1
然后编写测试案例,测试更新功能:
	@Test
	public void updateUserInfo() {
		User user = new User();
		user.setId(3);
		user.setPassword("ok123");
		Integer rows = userMapper.updateUserInfo(user);
		System.out.println(rows);
	}
- 1
- 2
- 3
- 4
- 5
- 6
- 7
- 8
2.3 用户注册功能
上述案例已经可以利用Mapper接口向数据库增加数据,在增加一个注册页面和控制器就可以实现注册功能了:

在static文件夹下粘贴得到注册的HTML页面 reg.html:
<!DOCTYPE html>
<html>
<head>
<meta charset="UTF-8">
<title>用户注册</title>
</head>
<body>
	<h1>用户注册</h1>
	<from method="post" action="handle_reg">
		<div>
			<lable>用户</lable>
			<input type="text" name="username">
		</div>
				<div>
			<lable>密码</lable>
			<input type="password" name="password">
		</div>
				<div>
			<lable>年龄</lable>
			<input type="number" name="age">
		</div>
				<div>
			<lable>电话</lable>
			<input type="tel" name="phone">
		</div>
				<div>
			<lable>电邮</lable>
			<input type="email" name="email">
		</div>
		<div>
			<input type="submit" value="提交">
		</div>
	</from>
</body>
</html>
- 1
- 2
- 3
- 4
- 5
- 6
- 7
- 8
- 9
- 10
- 11
- 12
- 13
- 14
- 15
- 16
- 17
- 18
- 19
- 20
- 21
- 22
- 23
- 24
- 25
- 26
- 27
- 28
- 29
- 30
- 31
- 32
- 33
- 34
- 35
启动SpringBoot进行测试。
接下来编写控制器处理reg.html的表单提交的注册数据:
<!DOCTYPE html>
<html>
<head>
<meta charset="UTF-8">
<title>用户注册</title>
</head>
<body>
	<h1>用户注册</h1>
	<form method="post" action="handle_reg">
	<div>
		<lable>用户</lable>
		<input type="text" name="username">
	</div>
	<div>
		<lable>密码</lable>
		<input type="password" name="password">
	</div>
	<div>
		<lable>年龄</lable>
		<input type="number" name="age">
	</div>
	<div>
		<lable>电话</lable>
		<input type="tel" name="phone">
	</div>
	<div>
		<lable>电邮</lable>
		<input type="email" name="email">
	</div>
	<div>
		<input type="submit" value="提交">
	</div>
	</form>
</body>
</html>
- 1
- 2
- 3
- 4
- 5
- 6
- 7
- 8
- 9
- 10
- 11
- 12
- 13
- 14
- 15
- 16
- 17
- 18
- 19
- 20
- 21
- 22
- 23
- 24
- 25
- 26
- 27
- 28
- 29
- 30
- 31
- 32
- 33
- 34
- 35
使用浏览器测试:

3 AJAX
3.1 什么是Ajax

Ajax即Asynchronous(异步) JavaScript and XML。目前广泛采用的浏览器和服务器直接的交互编程方式。相对于创痛form提交数据的方式,Ajax可以减少数据流量提供网站性能,提升用户体验。
Ajax核心的特点是:
- 浏览器和服务器进行少量数据异步通信,简称:异步通信
- 对html界面进行局部刷新,简称:局部刷新
传统的Web应用采用用户端填写表达(form),当提交表单时就向网页服务器发送一个请求。服务器接收并处理传来的表单,然后送回一个新的网页,但这个做法浪费了许多宽带,因为在前后俩个页面中的大部分HTML码往往是相同的。由于每次应用的通信都需要向服务器发送请求,应用的回应时间依赖于服务器的回应时间。这导致了用户界面的回应比本机应用慢很多。
与此不同,Ajax应用可以仅向服务器发送并取回必须的数据,并在客户端采用JavaScript处理来自服务器的回应,只刷新网页的局部。因为在服务器和浏览器之间交换的数据大量减少,服务器回应更快了。同时,很多处理工作可以在发出请求的客户端机器上完成,因此Web服务器的负荷也减少了。虽然其名称包含XML,但实际上数据格式可以由Json代替,进一步减少数据量。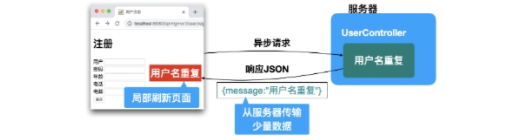
Ajax的优点
- 响应到客户端的数据量会明显的减少,节省流量费用
- 进而导致服务器端的流量消耗变小,提高服务器响应性能
- 传输耗时短,用户界面部分刷新延迟少,界面反应快,用户的体验会更好
3.2 JSON
JSON(JavaScript Object Notation,JavaScript对象表示法)是一种以易于让人阅读的文字数据格式,用来传输由属性值组成的数据对象,即便他源自JavaScript,但当前很多编程语言都支持JSON格式数据的生成和解析。JSON的官方MIME类型是application/json,文件拓展名是.json。如下JSON数据存储了一个用户信息。

关于JSON语法:
- 每个JSON对象必须使用一对大括号{}框住
- 整个JSON数据就是一个JSON对象
- 每个JSON对象中可以配置若干个属性与值的对应关系,每一组属性与值的配置之间使用逗号,分隔
- 每组属性与值的对应关系,属性与值使用冒号:分隔
- 属性名称都是字符串,需要使用一对双引号“”框住
- 属性值可以是任意简单的类型,如果是字符串类型,也需要使用一对双引号“”框住,如果是数值或布尔值,则不需要使用符号
- 属性值也可以是其他复杂的类型,例如数组类型,则应该使用中括号【】框住多个值,且在中括号内部,各个值之间使用逗号,分割;
- 属性值还可以是另一个对象

Java和JS都支持JSON格式,都提供了JSON API,Java的Jackson API是最常用的JSON API,也是Spring Boot内嵌的JSON API,利用Jackson API将JavaBean转化为JSON文本。下面就进行一个转换试验,首先定义被转化的Java Bean:
package cn.tedu.sample.vo;

public class JsonResult {

	private int state;

	private String message;

	public JsonResult() {

	}

	public JsonResult(int state, String message) {
		super();
		this.state = state;
		this.message = message;
	}

	public int getState() {
		return state;
	}

	public void setState(int state) {
		this.state = state;
	}

	public String getMessage() {
		return message;
	}

	public void setMessage(String message) {
		this.message = message;
	}

	@Override
	public String toString() {
		return "JsonResult [state=" + state + ", message=" + message + "]";
	}
}
- 1
- 2
- 3
- 4
- 5
- 6
- 7
- 8
- 9
- 10
- 11
- 12
- 13
- 14
- 15
- 16
- 17
- 18
- 19
- 20
- 21
- 22
- 23
- 24
- 25
- 26
- 27
- 28
- 29
- 30
- 31
- 32
- 33
- 34
- 35
- 36
- 37
- 38
- 39
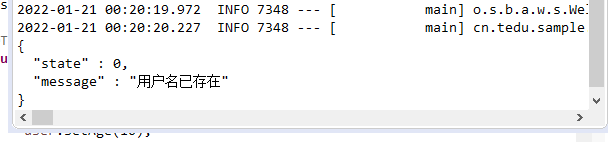
测试案例:
	@Test
	public void testJackson() throws JsonProcessingException {
		JsonResult result = new JsonResult(0,"用户名已存在");
		//利用Jackson API将JavaBean 转化为Json
		ObjectMapper mapper = new ObjectMapper();
		String json = mapper.writerWithDefaultPrettyPrinter().writeValueAsString(result);
		System.out.println(json);
	}
- 1
- 2
- 3
- 4
- 5
- 6
- 7
- 8
输出结果:
在HTML中使用编程语言就是JavaScript,这门语言可以直接识别JSON对象。也就是说,JSON数据在JavaScript中本来就是一支可以直接使用的数据类型。
示例代码:
<!DOCTYPE html>
<html>
<head>
<meta charset="UTF-8">
<title>演示Json</title>
</head>
<body>
	<h1>演示Json</h1>
	<script type="text/javascript">
	let json = {
			"username":"root",
			"password":"123456",
			"age":20,
			"phone":"19999999999",
			"email":"root@123.com",
			"skills":["java","python","javaScript"],
			"department":{
				"id":12,
				"name":"javaScript"
			}
	};

	console.log(json.username);
	console.log(json.password);
	console.log(json.age);
	console.log(json.phone);
	console.log(json.email);
	console.log(json.skills);
	for(let i = 0;i<json.skills.length;i++){
		console.log(json.skills[i]);
	}
	console.log(json.department);
	console.log(json.department.id);
	console.log(json.department.name);

	</script>

</body>
</html>
- 1
- 2
- 3
- 4
- 5
- 6
- 7
- 8
- 9
- 10
- 11
- 12
- 13
- 14
- 15
- 16
- 17
- 18
- 19
- 20
- 21
- 22
- 23
- 24
- 25
- 26
- 27
- 28
- 29
- 30
- 31
- 32
- 33
- 34
- 35
- 36
- 37
- 38
- 39
测试:在浏览器的控制台中查看数据

3.3 SPringBoot 支持Ajax
SpringBoot 对Ajax 提供了支持,本质上是SpringMVC提供的对Ajax的支持,这个功能也是“零”配置,就可以使用。
SpringMVC如何对Ajax提供的支持呢?
服务器支持方式就是,当收到用户Ajax请求后,将JSON类型数据作为HTTP响应的结果,发送给浏览器。
SpringMVC使用@RestController声明的控制器就支持JSON数据,如果控制器方法返回值是JavaBean对象,Spring就会利用底层的MessageConverter将JavaBean转化为Json,然后将JSON作为HTTP响应结果发送到浏览器,比如:
package cn.tedu.sample.controller;

import org.springframework.web.bind.annotation.GetMapping;
import org.springframework.web.bind.annotation.RestController;
import cn.tedu.sample.vo.JsonResult;

@RestController
public class DemoController {

	@GetMapping("/hello")
	public String hello() {
		return "Hello World!! 这是一个演示!";
	}

	@GetMapping("ajax")
	//当前类型使用了@RestController以后,如果控制器方法返回的是JavaBean对象
	//SpringBoot底层就会调用MessageConvert(Jackson),将JavaBean转化为
	//Json作为HTTP请求是响应Body,会自动设置ContentType 为application/json
	public JsonResult demo() {
		return new JsonResult(1,"测试JSON返回值");
	}

}
- 1
- 2
- 3
- 4
- 5
- 6
- 7
- 8
- 9
- 10
- 11
- 12
- 13
- 14
- 15
- 16
- 17
- 18
- 19
- 20
- 21
- 22
- 23
测试:用浏览器请求:http://localhost:8080/ ajax
如果使用浏览器工具中的调试工具检查可以看到当前的ContenntType为:application/json。
3.4 JQuery AJAX请求
JQuery中提供发送Ajax请求方法。调用这个方法就可以向服务器发起异步请求。在请求成功以后就会自动执行回调方法,回调方法参数就是服务器传递回来的JSON对象。在这个方法中编写JS脚本局部更新网页了。

在static文件夹中导入Jquery API,并编写ajax.html:
<!DOCTYPE html>
<html>
<head>
<meta charset="UTF-8">
<title>Ajax演示</title>
<script type="text/javascript"  src="js/jquery-3.4.1.min.js"></script>
</head>
<body>
	<h1>Ajax功能演示</h1>
	<input id="btn" type="button" value="Ajax测试">
	<script type="text/javascript">
		$("#btn").click(function() {
			//sucess 方法会在服务器成功返回信息时候执行
			//方法在执行时候,方法参数都是服务器传递回来的JSON对象
			$.ajax({
				type : "GET",
				url : "ajax",
				dataType : "json",
				success : function(result) {
					console.log(result.message);
				}
			});
		});
	</script>


</body>
</html>
- 1
- 2
- 3
- 4
- 5
- 6
- 7
- 8
- 9
- 10
- 11
- 12
- 13
- 14
- 15
- 16
- 17
- 18
- 19
- 20
- 21
- 22
- 23
- 24
- 25
- 26
- 27
- 28
测试,启动SpringBoot,打开网页ajax.html,点击按钮以后在浏览器的控制台上能够看到:测试JSON返回值。


3.5 利用Ajax完成注册功能
利用Ajax实现注册功能,可以提升用户体验,首先重构控制器,将注册控制器方法返回值更新为JsonResult,这就支持了Ajax:
package cn.tedu.sample.controller;


import org.springframework.beans.factory.annotation.Autowired;
import org.springframework.web.bind.annotation.PostMapping;
import org.springframework.web.bind.annotation.RestController;

import cn.tedu.sample.entity.User;
import cn.tedu.sample.mapper.UserMapper;
import cn.tedu.sample.vo.JsonResult;

@RestController
public class UserController {

	@Autowired
	private UserMapper userMapper;

	@PostMapping("handle_reg")
	public JsonResult handleReg(User user) {
		try {
			int n = userMapper.addnew(user);
			if (n==1) {
				return new JsonResult(1,"注册成功");
			}else {
				return new JsonResult(0,"注册失败");
			}
		} catch (Exception e) {
			e.printStackTrace();
			return new JsonResult(0,"注册失败");
		}
	}
}
- 1
- 2
- 3
- 4
- 5
- 6
- 7
- 8
- 9
- 10
- 11
- 12
- 13
- 14
- 15
- 16
- 17
- 18
- 19
- 20
- 21
- 22
- 23
- 24
- 25
- 26
- 27
- 28
- 29
- 30
- 31
- 32
然后在更新注册页面reg.html:
<!DOCTYPE html>
<html>
<head>
<meta charset="UTF-8">
<title>用户注册</title>
</head>
<body>
	<h1>用户注册</h1>
	<div id="message"></div>
	<form id="reg_form" method="post" action="handle_reg">
		<div>
			<lable>用户</lable>
			<input type="text" name="username">
		</div>
		<div>
			<lable>密码</lable>
			<input type="password" name="password">
		</div>
		<div>
			<lable>年龄</lable>
			<input type="number" name="age">
		</div>
		<div>
			<lable>电话</lable>
			<input type="tel" name="phone">
		</div>
		<div>
			<lable>电邮</lable>
			<input type="email" name="email">
		</div>
		<div>
			<input id="reg" type="submit" value="提交">
		</div>
	</form>
	<script type="text/javascript">
	$("#reg").click(function(){
		$.ajax({
			type:"post",
			url:"handle_reg",
			data:$("reg_form").serialize(),
			dateType:"json",
			success:function(result){
			console.log(result);
			//局部更新
			$('#message').text(result.message);
			}
		});
		returnfalse;//返回false阻止传统表单提交
	});
</script>
</body>
</html>
- 1
- 2
- 3
- 4
- 5
- 6
- 7
- 8
- 9
- 10
- 11
- 12
- 13
- 14
- 15
- 16
- 17
- 18
- 19
- 20
- 21
- 22
- 23
- 24
- 25
- 26
- 27
- 28
- 29
- 30
- 31
- 32
- 33
- 34
- 35
- 36
- 37
- 38
- 39
- 40
- 41
- 42
- 43
- 44
- 45
- 46
- 47
- 48
- 49
- 50
- 51
- 52
上述编码的说明:
- 用于显示Ajax请求以后得到的成功或失败消息
- $("#reg_form").sertalize()方法可以将表单中全部数据自动获取到,拼接为向服务器发送的参数;
- data:$("#reg_form").serialize()用于声明向服务器发送post请求的参数
- $(’#message’).text(result.message);语句将从服务器接收的处理结果显示到网页上。
测试:

测试时候显然发现,当用户已经被注册时候,界面当前提示效果不够友好,这个问题只需要在控制器中利用数据访问层判断一下用户名是否已经存在了即可。具体操作步骤如下:
- 首先重构UserMapper接口,增加根据用户查询用户信息的方法:
	@Select("SELECT id,username,password,age,phone,email FROM t_user "
			+ "WHERE username = #{username}")
	User findUserByUsername(String username);
- 1
- 2
- 3
- 然后重构控制器的注册方法,在注册方法中利用findUserByUsername检查用户名是否被注册过,如果注册过就立即返回错误消息:
package cn.tedu.sample.controller;


import org.springframework.beans.factory.annotation.Autowired;
import org.springframework.web.bind.annotation.PostMapping;
import org.springframework.web.bind.annotation.RestController;

import cn.tedu.sample.entity.User;
import cn.tedu.sample.mapper.UserMapper;
import cn.tedu.sample.vo.JsonResult;

@RestController
public class UserController {

	@Autowired
	private UserMapper userMapper;

	@PostMapping("handle_reg")
	public JsonResult handleReg(User user) {
		try {
			User u = userMapper.findUserByUsername(user.getUsername());
			if (u!=null) {
				return new JsonResult(-1,"用户名已经注册!");
			}
			int n = userMapper.addnew(user);
			if (n==1) {
				return new JsonResult(1,"注册成功");
			}else {
				return new JsonResult(0,"注册失败");
			}
		} catch (Exception e) {
			e.printStackTrace();
			return new JsonResult(0,"注册失败");
		}
	}
}
- 1
- 2
- 3
- 4
- 5
- 6
- 7
- 8
- 9
- 10
- 11
- 12
- 13
- 14
- 15
- 16
- 17
- 18
- 19
- 20
- 21
- 22
- 23
- 24
- 25
- 26
- 27
- 28
- 29
- 30
- 31
- 32
- 33
- 34
- 35
- 36
- 37
这样再次测试就能看到用户重复的时候,在界面显示:用户名已经注册!的错误消息。


