
- 1神经网络语言模型基本原理和实践_文本向量化的原理
- 2关于Linux中的管道重定向_简述管道重定向的概念
- 3深入浅出完整解析Stable Diffusion(SD)核心基础知识_sd模型训练
- 4PostgreSQL15 16 编译安装+问题解决_pg编译安装
- 5【python】爬取杭州市二手房销售数据做数据分析【附源码】(1)
- 6hive中的lateral view 与 explode函数的使用 行转列_hive:explode和lateral view函数实现行转列
- 7[PyQt5]打开Excel、CSV,tableWidget转换为dataframe,listWidget添加选项,for循环列表推导式--list/dict_pyqt excel
- 8python paramiko连跳板机_proxy_client.connect
- 9一个低代码前端框架,使用JSON配置来生成页面,可以减少开发工作量,提升效率_首页可配置化布局json
- 10Linux 远程管理工具(SecureCRT)_远程crt
单人的姿态检测|tensorflow singlepose_tensorlflow 姿态分析 模型
赞
踩
单人姿态检测-图片
特此声明非本人图片,如果侵权,联系我,我会删掉。
安装所用的包
!pip install tensorflow==2.4.1 tensorflow-gpu==2.4.1 tensorflow-hub opencv-python matplotlib导入下面包
tensorflow_hub: 加载模型
CV2: 利用openCV的包,画点,直线,或者其它图片和视频相关的东西
- import tensorflow as tf
- import tensorflow_hub as hub
- import cv2
- from matplotlib import pyplot as plt
- import numpy as np
加载和执行模型, 返回17个姿态的结果
- def movenet(input_image):
- """Runs detection on an input image.
- Args:
- input_image: A [1, height, width, 3] tensor represents the input image
- pixels. Note that the height/width should already be resized and match the
- expected input resolution of the model before passing into this function.
- Returns:
- A [1, 1, 17, 3] float numpy array representing the predicted keypoint
- coordinates and scores.
- """
- # Download the model from TF Hub.
- model = hub.load("https://tfhub.dev/google/movenet/singlepose/lightning/4")
- model = model.signatures['serving_default']
-
- # SavedModel format expects tensor type of int32.
- input_image = tf.cast(input_image, dtype=tf.int32)
- # Run model inference.
- outputs = model(input_image)
- # Output is a [1, 1, 17, 3] tensor.
- keypoints_with_scores = outputs['output_0'].numpy()
-
- keypoints_with_scores = keypoints_with_scores.reshape((1, 17, 3))
-
- return keypoints_with_scores

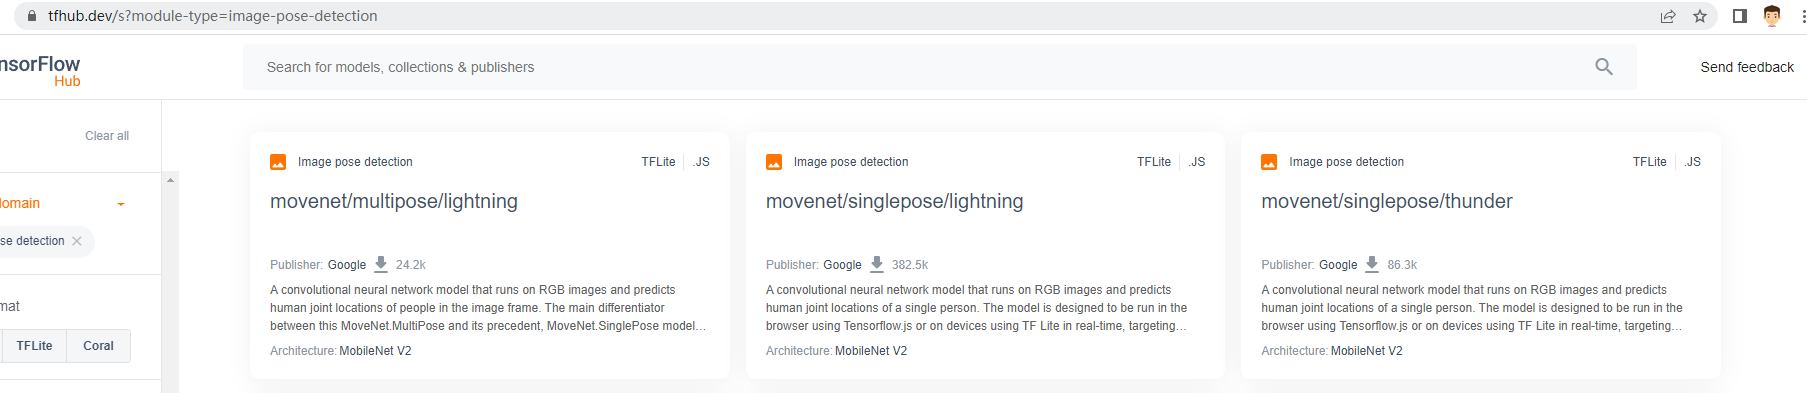
可以访问Tensorflow的官网,下载singlepose和Multipose相关的模型或查看例子程序
https://tfhub.dev/s?module-type=image-pose-detection
画17个姿态的点
- def draw_keypoints(frame, keypoints, confidence_threshold):
- y, x, c = frame.shape
- shaped = np.squeeze(np.multiply(keypoints, [y, x, 1]))
- print("shaped in draw_keypoints:", shaped)
- for kp in shaped:
- ky, kx, kp_conf = kp
- if kp_conf > confidence_threshold:
- cv2.circle(frame, (int(kx), int(ky)), 6, (0, 255, 0), -1)
画姿态点之间的直线
下面的值告诉我们如何连接人体姿态点。例如,第一个值 (0, 1): 'm' 告诉我们鼻子如何连接到左眼,最后一个值 (14, 16): 'c' 告诉我们右膝如何连接连接到右脚踝。
下面是17个人体姿态点顺序,从0到16。
nose, left eye, right eye, left ear, right ear, left shoulder, right shoulder, left elbow, right elbow, left wrist, right wrist, left hip, right hip, left knee, right knee, left ankle, right ankle
- EDGES = {
- (0, 1): 'm',
- (0, 2): 'c',
- (1, 3): 'm',
- (2, 4): 'c',
- (0, 5): 'm',
- (0, 6): 'c',
- (5, 7): 'm',
- (7, 9): 'm',
- (6, 8): 'c',
- (8, 10): 'c',
- (5, 6): 'y',
- (5, 11): 'm',
- (6, 12): 'c',
- (11, 12): 'y',
- (11, 13): 'm',
- (13, 15): 'm',
- (12, 14): 'c',
- (14, 16): 'c'
- }
函数draw_connections是17个姿态之间怎么连接
- def draw_connections(frame, keypoints, edges, confidence_threshold):
- print('frame', frame)
- y, x, c = frame.shape
- shaped = np.squeeze(np.multiply(keypoints, [y, x, 1]))
-
- for edge, color in edges.items():
- p1, p2 = edge
- y1, x1, c1 = shaped[p1]
- y2, x2, c2 = shaped[p2]
-
- if (c1 > confidence_threshold) & (c2 > confidence_threshold):
- cv2.line(frame, (int(x1), int(y1)), (int(x2), int(y2)), (0, 0, 255), 4)
画人的每一个姿态点和线
- def loop_through_people(frame, keypoints_with_scores, edges, confidence_threshold):
- for person in keypoints_with_scores:
- draw_connections(frame, person, edges, confidence_threshold)
- draw_keypoints(frame, person, confidence_threshold)
加载自己的图片
- image_path = 'fitness_pic.jpg'
-
- image = tf.io.read_file(image_path)
- image = tf.compat.v1.image.decode_jpeg(image)
把它转成(192,192)大小
注意:
1. 高度和宽度是32个倍数。
2. 高度和宽度的比例要尽可能接近原图片的比例。
3. 高度和宽度不能大于256. 例如,应调整 720p 图像(即 720x1280 (HxW))的大小并填充为 160x256 图像。
我们这个例子简单点,大小就是的(192, 192)
- # Resize and pad the image to keep the aspect ratio and fit the expected size.
- input_size = 192
- input_image = tf.expand_dims(image, axis=0)
- input_image = tf.image.resize_with_pad(input_image, input_size, input_size)
运行模型推理。得出的keypoints_with_scores是[1, 17, 3].
第一个维度是批次维度,始终等于 1。
第二个维度表示预测的边界框/关键点位置和分数。前 17 * 3 个元素是关键点位置和分数,格式为:[y_0, x_0, s_0, y_1, x_1, s_1, ..., y_16, x_16, s_16],其中 y_i, x_i, s_i 是 yx 坐标 (归一化到图像帧,例如[0.0, 1.0]中的范围)和相应的第i个关节的置信度分数。 17个关键点关节的顺序为:[鼻子、左眼、右眼、左耳、右耳、左肩、右肩、左肘、右肘、左腕、右腕、左髋、右髋、左膝、右膝、左脚踝、右脚踝]。
- # Run model inference.
- keypoints_with_scores = movenet(input_image)
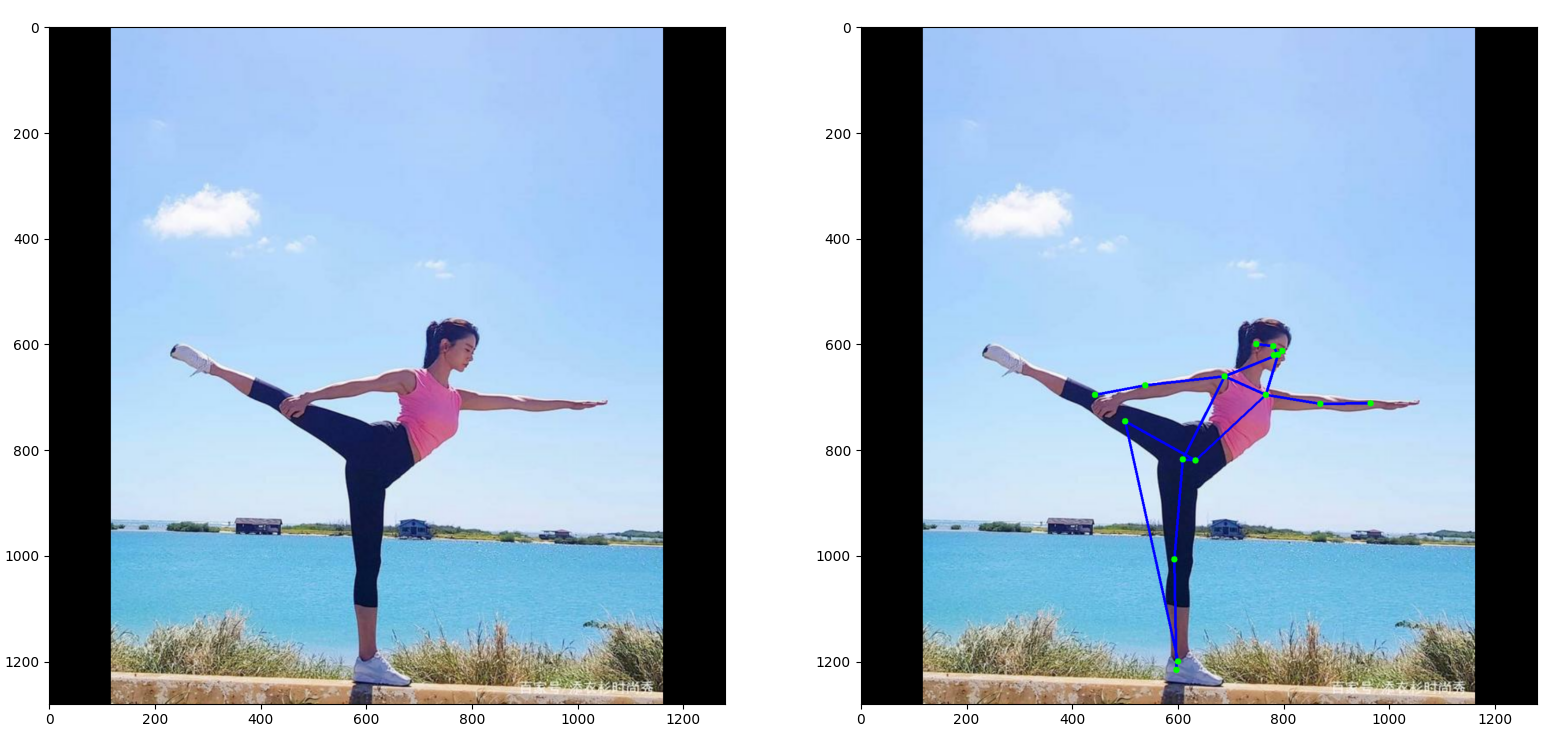
显示原始图片和标记了每个姿态点的图片
- display_image = tf.cast(tf.image.resize_with_pad(image, 1280, 1280), dtype = tf.int32)
- display_image = np.array(display_image)
- origin_image = np.copy(display_image)
-
- loop_through_people(display_image, keypoints_with_scores, EDGES, 0.1)
-
- plt.subplot(1, 2, 1)
- plt.imshow(origin_image)
- plt.subplot(1, 2, 2)
- plt.imshow(display_image)
- plt.show()

完整代码
- import tensorflow as tf
- import tensorflow_hub as hub
- import cv2
- from matplotlib import pyplot as plt
- import numpy as np
-
- def movenet(input_image):
- """Runs detection on an input image.
- Args:
- input_image: A [1, height, width, 3] tensor represents the input image
- pixels. Note that the height/width should already be resized and match the
- expected input resolution of the model before passing into this function.
- Returns:
- A [1, 1, 17, 3] float numpy array representing the predicted keypoint
- coordinates and scores.
- """
- # Download the model from TF Hub.
- model = hub.load("https://tfhub.dev/google/movenet/singlepose/lightning/4")
- model = model.signatures['serving_default']
-
- # SavedModel format expects tensor type of int32.
- input_image = tf.cast(input_image, dtype=tf.int32)
- # Run model inference.
- outputs = model(input_image)
- # Output is a [1, 1, 17, 3] tensor.
- keypoints_with_scores = outputs['output_0'].numpy()
-
- keypoints_with_scores = keypoints_with_scores.reshape((1, 17, 3))
-
- return keypoints_with_scores
-
- def draw_keypoints(frame, keypoints, confidence_threshold):
- y, x, c = frame.shape
- shaped = np.squeeze(np.multiply(keypoints, [y, x, 1]))
- print("shaped in draw_keypoints:", shaped)
- for kp in shaped:
- ky, kx, kp_conf = kp
- if kp_conf > confidence_threshold:
- cv2.circle(frame, (int(kx), int(ky)), 6, (0, 255, 0), -1)
-
-
- EDGES = {
- (0, 1): 'm',
- (0, 2): 'c',
- (1, 3): 'm',
- (2, 4): 'c',
- (0, 5): 'm',
- (0, 6): 'c',
- (5, 7): 'm',
- (7, 9): 'm',
- (6, 8): 'c',
- (8, 10): 'c',
- (5, 6): 'y',
- (5, 11): 'm',
- (6, 12): 'c',
- (11, 12): 'y',
- (11, 13): 'm',
- (13, 15): 'm',
- (12, 14): 'c',
- (14, 16): 'c'
- }
-
- def draw_connections(frame, keypoints, edges, confidence_threshold):
- print('frame', frame)
- y, x, c = frame.shape
- shaped = np.squeeze(np.multiply(keypoints, [y, x, 1]))
-
- for edge, color in edges.items():
- p1, p2 = edge
- y1, x1, c1 = shaped[p1]
- y2, x2, c2 = shaped[p2]
-
- if (c1 > confidence_threshold) & (c2 > confidence_threshold):
- cv2.line(frame, (int(x1), int(y1)), (int(x2), int(y2)), (0, 0, 255), 4)
-
- def loop_through_people(frame, keypoints_with_scores, edges, confidence_threshold):
- for person in keypoints_with_scores:
- draw_connections(frame, person, edges, confidence_threshold)
- draw_keypoints(frame, person, confidence_threshold)
-
-
- image_path = 'C:/Users/Harry/Desktop/fitness.jpeg'
-
- image = tf.io.read_file(image_path)
- # image = tf.compat.v1.image.decode_image(image)
- image = tf.compat.v1.image.decode_jpeg(image)
-
-
- # Resize and pad the image to keep the aspect ratio and fit the expected size.
- input_size = 192
- input_image = tf.expand_dims(image, axis=0)
- input_image = tf.image.resize_with_pad(input_image, input_size, input_size)
-
- # Run model inference.
- keypoints_with_scores = movenet(input_image)
-
-
- display_image = tf.cast(tf.image.resize_with_pad(image, 1280, 1280), dtype = tf.int32)
- display_image = np.array(display_image)
- origin_image = np.copy(display_image)
-
- loop_through_people(display_image, keypoints_with_scores, EDGES, 0.1)
-
- plt.subplot(1, 2, 1)
- plt.imshow(origin_image)
- plt.subplot(1, 2, 2)
- plt.imshow(display_image)
- plt.show()
参考资料

