- 1销毁该对象的根父级_unity 删掉父节点
- 2Android视角看鸿蒙第八课(module.json5中的各字段含义之abilities)下
- 3Android Studio 实现图片日记本(非常简单易懂)_androidstudio日记本
- 4分布式数据库技术的演进和发展方向
- 5[论文阅读]Vit(Vision Transformer)及代码_vit算法代码传参
- 6云计算Spark环境搭建并搭建conda环境_hive和spark能不能安装在conda环境
- 7C语言:用联合体数据结构来判断计算机内存存储的大小端方式_使用联合体证明pct是大端存储还是小端存储
- 8分享为小程序添加自动回复消息的好方法_小程序客服设置快捷回复
- 9【PyTorch】获取特征图并可视化_pytorch可视化特征图
- 10第11章 Tkinter 概述_51:/##y6h6ubdyl##1:/$wbsmkqt$11:/¥ubsd5akboofpxgpk
YOLOV5从零开始使用OBS/FFmpeg+RTMP推流至腾讯云服务器_yolo视频推流
赞
踩
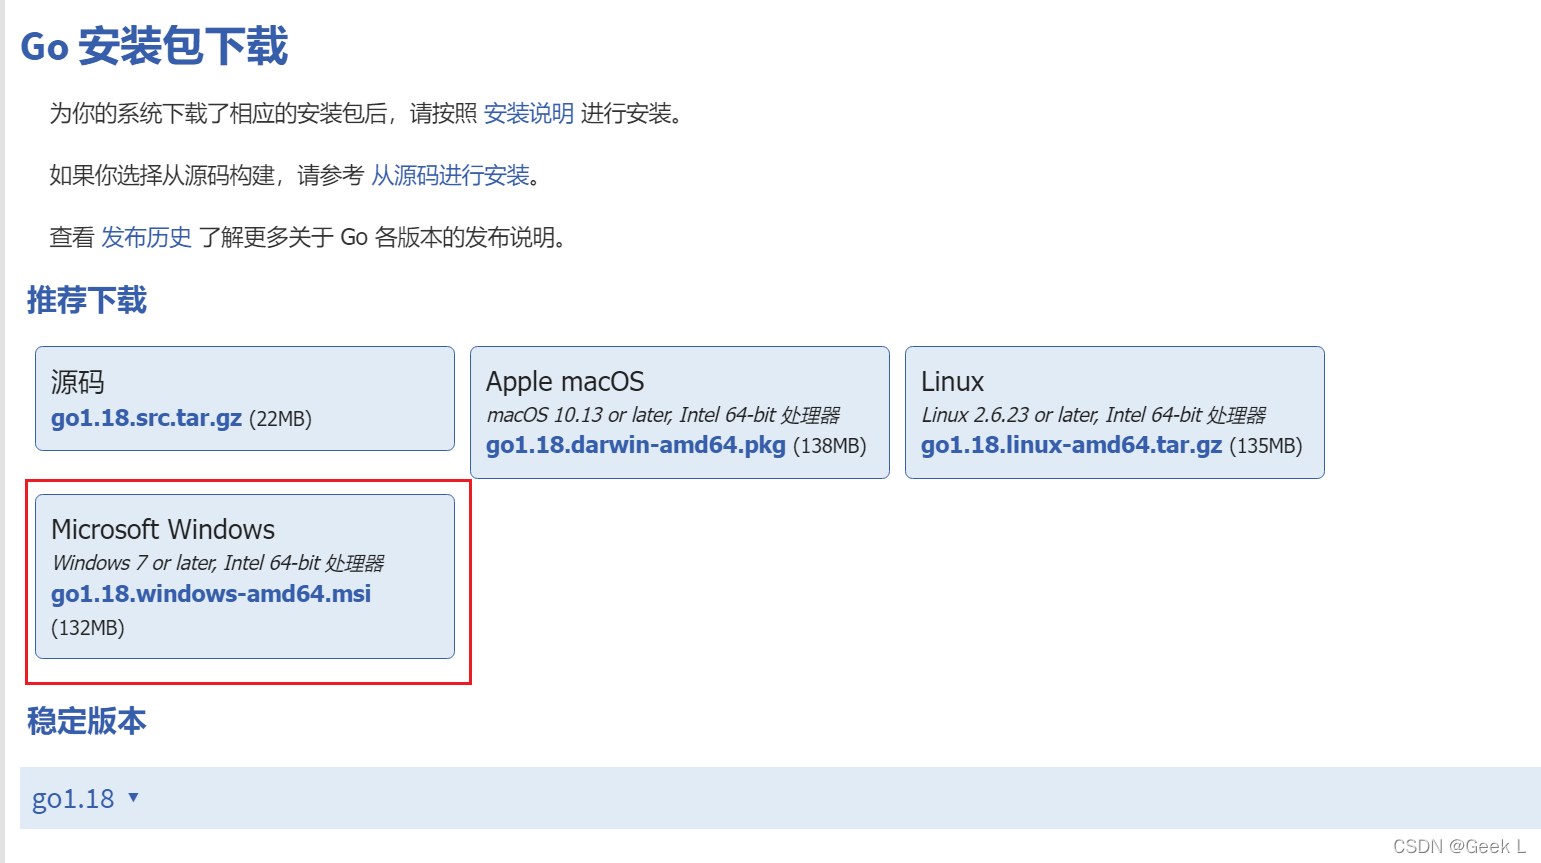
一. 安装Golang(GO)
二. 使用xshell远程登录
使用腾讯云不像阿里云那么傻瓜式,需要额外配置用户密钥连接啥的。为了便于使用,这里改为密码方式连接,配置步骤如下:
2.1 服务器修改ssh配置
进入服务器后,输入:
sudo vim /etc/ssh/sshd_config
- 1
打开配置页面,定位到:
#Authentication:
#LoginGraceTime 120
#PermitRootLogin without passwd  #去掉这里的注释
#StrictModes yes
- 1
- 2
- 3
- 4
改为
#Authentication:
#LoginGraceTime 120
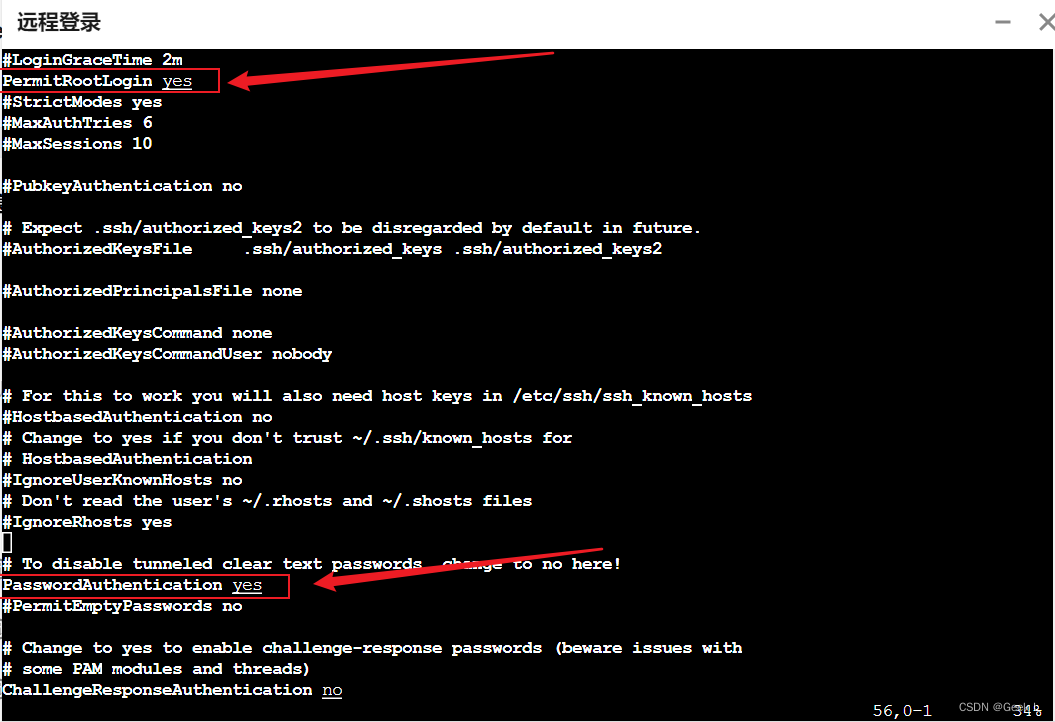
PermitRootLogin yes   #这行改一改,也要去掉‘#’,如果直接就是yes直接去掉注释
#StrictModes yes
- 1
- 2
- 3
- 4
同理这个地方也要改一下:
最后服务器端重启ssh:
sudo service ssh restart
- 1
如果想保险的话,这边开启一下各种权限再重启ssh:
sudo chmod 700 .ssh
cd .ssh
sudo chmod 600 *
sudo service sshd restart
- 1
- 2
- 3
- 4
2.2 xshell配置
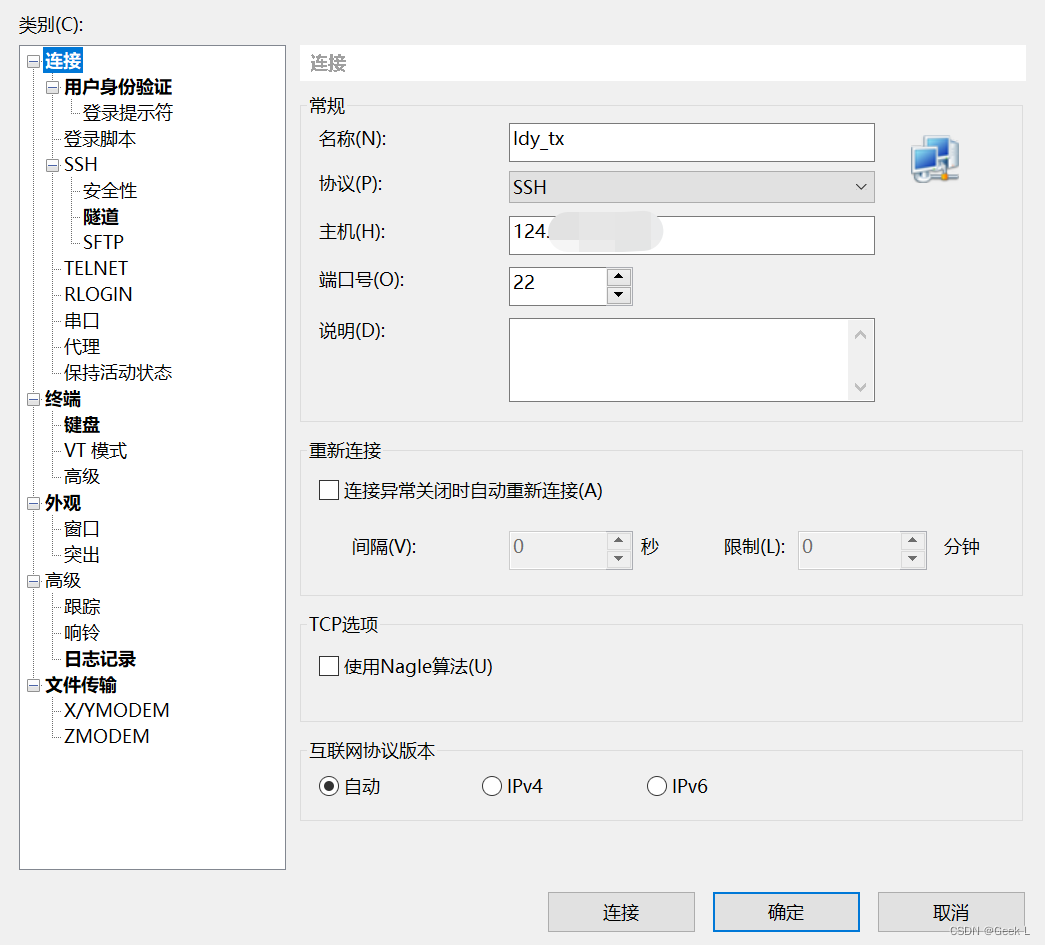
然后点击登录。
如果还是显示拒绝了密码,要好好检查一下用户名和密码是否错误,比如我这边虽然显示用户名为lighthouse,实际上名字还是root,因此需要使用'root'作为用户名登录而非'lighthouse'。所以用户名如果不是root,改为root试试,毕竟登录的是root用户,就不要用其他用户名了。
事实上,我还发现一个问题,如果使用密码方式登录,貌似只能登录root用户,在Xshell中即使选择其他用户并且输入正确的密码也会报错:
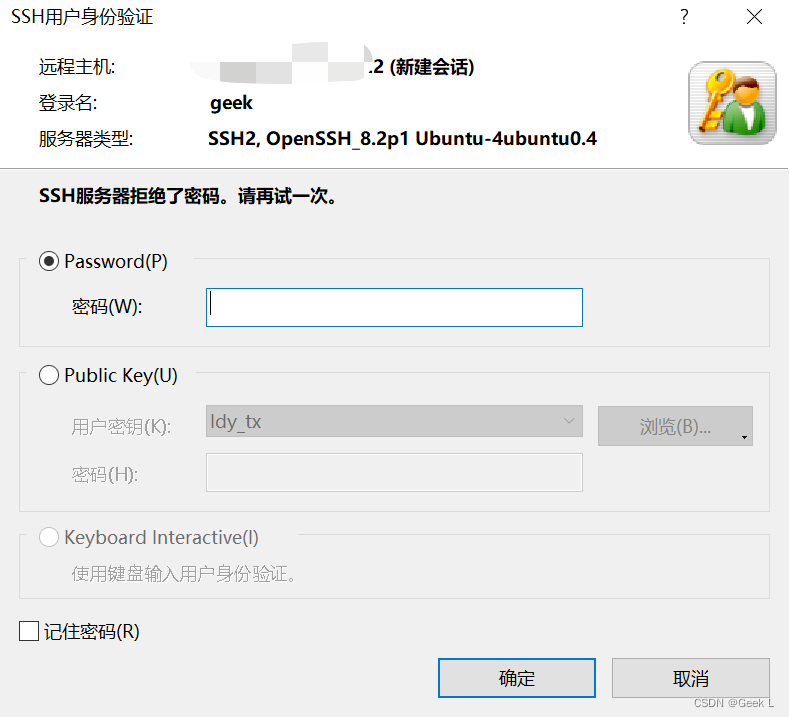
ssh服务器拒绝密码,原因未知,希望懂行的大佬在评论区指点一下。
2.3 普通用户sudo权限配置
首先切换到root用户:
su root
- 1
赋予所有者sudo 写权限
chmod u+w /etc/sudoers
- 1
sudo vim /etc/sudoers
- 1
找到这行 root ALL=(ALL) ALL,在他下面添加xxx ALL=(ALL) ALL (这里的xxx是你的用户名):
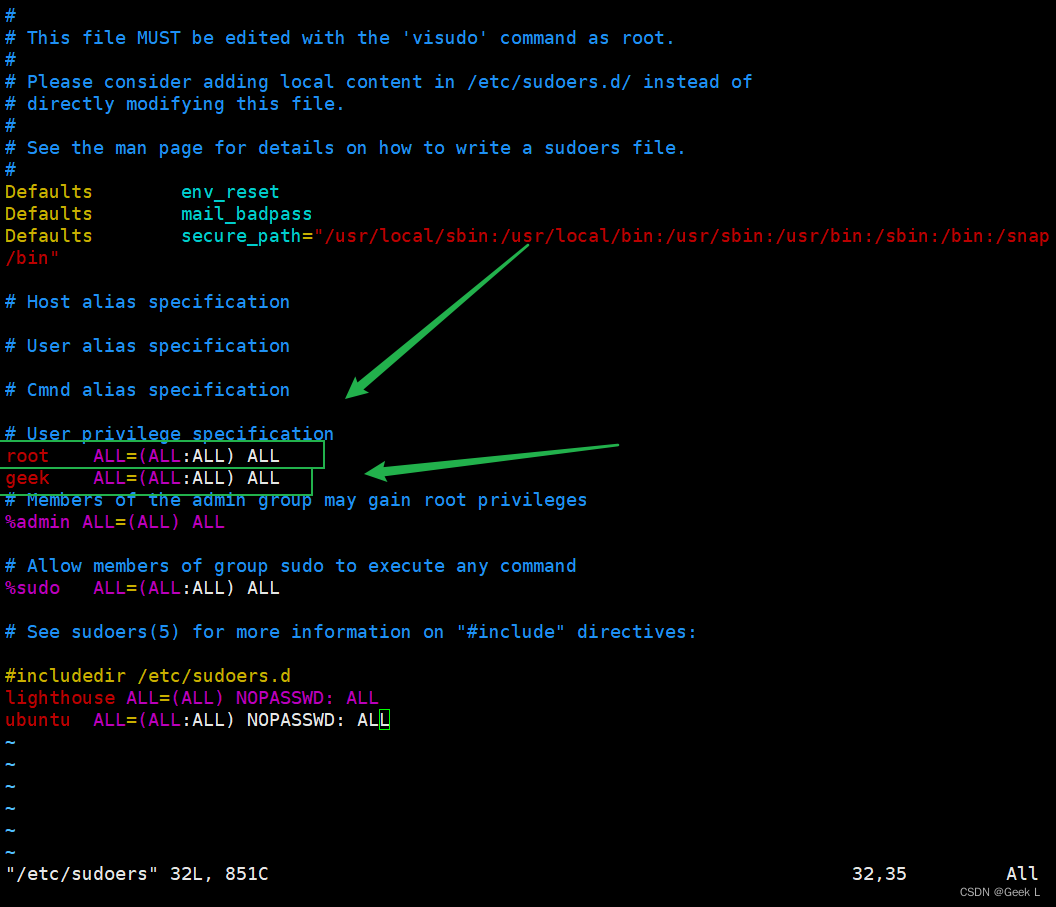
为了保险的话,最后再撤销一下sudoers的写权限:
chmod u-w /etc/sudoers
- 1
这样就可以让普通用户geek使用sudo命令了!
三. 安装liveGo
LiveGo
1.简单高效的直播服务器:
2.安装和使用非常简单;
3.纯 Golang 编写,性能高,跨平台;
4.支持常用的传输协议、文件格式、编码格式;
直接进入目录下,执行以下命令进行编译:
go build
- 1

3.1 安装Mingw
执行以下命令运行liveGo:
make run
- 1
发现报错,说没有make工具:

安装windows下的make工具mingw32-make:
https://sourceforge.net/projects/mingw/postdownload
安装完成:

添加环境变量MinGW\bin。
cmd安装package:
mingw-get install mingw32-make
- 1

3.2 运行liveGo
再次执行以下命令运行liveGo:
mingw32-make run
- 1

运行后如图所示:

浏览器输入该URL,获取串流密钥 :
http://localhost:8090/control/get?room=movie
- 1
3.3 win10 OBS推流
打开OBS,设置推流选项:

OBS自定义推流到livego的推流地址。推流服务器地址填入:
rtmp://localhost:1935/live
- 1
使用带拉流的视频播放器,如plotplayer,填入拉取播放地址:
rtmp://localhost:1935/live/movie
- 1
打开plotplayer,填入URL,发现推流成功:

OBS上选择采集摄像头还是显示器,然后开始推流 :

运行以下命令,使用Yolov5进行推流:
python detect.py --source rtmp://localhost:1935/live/movie --view-img --weights weights/best.pt
- 1
四. ffmpeg推流
4.1 windows推流
- 推摄像头:
ffmpeg -r 20 -f vfwcap -i 0 -vcodec h264 -max_delay 100 -f flv -g 5 -b 700000 rtmp://push.luoying.space/live/test
- 1
- 推视频源
ffmpeg.exe -re -i yes.mp4 -f flv rtmp://push.luoying.space/live/test
- 1
4.2 Ubuntu推流
- 推摄像头:
ffmpeg -r 30 -i /dev/video0 -vcodec h264 -max_delay 100 -f flv -g 5 -b 700000 rtmp://push.luoying.space/live/test
- 1
- 推视频
ffmpeg -r 30 -i new.mp4 -vcodec h264 -max_delay 100 -f flv -g 5 -b 700000 rtmp://push.luoying.space/live/test
- 1
五. 在Ubuntu使用Python+OpenCV+ffmpeg+rtmp推流
5.1 环境说明
以上代码仅仅能在Linux中运行,windows上运行该代码会报关于管道的错误:

按照网上的说明修改了自带的subprocess.py里面__init__.py的shell=False改为 shell=True后,发现运行还是报错,说明此条道路目前在windows上行不通。
5.2 编写基础推流代码
代码段1:
import subprocess as sp
import cv2 as cv
rtmpUrl = "rtmp://push.luoying.space/live/test"
# camera_path = "Source_cress_corner.mp4"
camera_path = 0
cap = cv.VideoCapture(camera_path)

# Get video information
fps = int(cap.get(cv.CAP_PROP_FPS))
width = int(cap.get(cv.CAP_PROP_FRAME_WIDTH))
height = int(cap.get(cv.CAP_PROP_FRAME_HEIGHT))

# ffmpeg command
command = ['ffmpeg',
           '-y',
           '-f', 'rawvideo',
           '-vcodec', 'rawvideo',
           '-pix_fmt', 'bgr24',
           '-s', "{}x{}".format(width, height),
           '-r', str(fps),
           '-i', '-',
           '-c:v', 'libx264',
           '-pix_fmt', 'yuv420p',
           '-preset', 'ultrafast',
           '-f', 'flv',
           rtmpUrl]

# 管道配置
p = sp.Popen(command, stdin=sp.PIPE)

# read webcamera
while (cap.isOpened()):
    ret, frame = cap.read()
    if not ret:
        print("Opening camera is failed")
        break

    # process frame
    # your code
    # process frame

    # write to pipe
    p.stdin.write(frame.tostring())
- 1
- 2
- 3
- 4
- 5
- 6
- 7
- 8
- 9
- 10
- 11
- 12
- 13
- 14
- 15
- 16
- 17
- 18
- 19
- 20
- 21
- 22
- 23
- 24
- 25
- 26
- 27
- 28
- 29
- 30
- 31
- 32
- 33
- 34
- 35
- 36
- 37
- 38
- 39
- 40
- 41
- 42
- 43
代码段2:
rtmpUrl = 'rtmp://39.107.26.100:1935/myapp/test1'

mycv = CvHelp()#我本身的opencv工具类,提供绘图识别工具

# 视频来源 地址须要替换本身的可识别文件地址
filePath='/mnt/e/nginx-rtmp/'
camera = cv2.VideoCapture(filePath+"test2.mp4") # 从文件读取视频
#这里的摄像头能够在树莓派3b上使用
# camera = cv2.VideoCapture(0) # 参数0表示第一个摄像头 摄像头读取视频
# if (camera.isOpened()):# 判断视频是否打开
#     print 'Open camera'
# else:
#     print 'Fail to open camera!'
#     return
# camera.set(cv2.CAP_PROP_FRAME_WIDTH, 1280)  # 2560x1920 2217x2217 2952×1944 1920x1080
# camera.set(cv2.CAP_PROP_FRAME_HEIGHT, 720)
# camera.set(cv2.CAP_PROP_FPS, 5)

# 视频属性
size = (int(camera.get(cv2.CAP_PROP_FRAME_WIDTH)), int(camera.get(cv2.CAP_PROP_FRAME_HEIGHT)))
sizeStr = str(size[0]) + 'x' + str(size[1])
fps = camera.get(cv2.CAP_PROP_FPS)  # 30p/self
fps = int(fps)
hz = int(1000.0 / fps)
print 'size:'+ sizeStr + ' fps:' + str(fps) + ' hz:' + str(hz)

# 视频文件输出
fourcc = cv2.VideoWriter_fourcc(*'XVID')
out = cv2.VideoWriter(filePath+'res_mv.avi',fourcc, fps, size)
# 直播管道输出
# ffmpeg推送rtmp 重点 : 经过管道 共享数据的方式
command = ['ffmpeg',
    '-y',
    '-f', 'rawvideo',
    '-vcodec','rawvideo',
    '-pix_fmt', 'bgr24',
    '-s', sizeStr,
    '-r', str(fps),
    '-i', '-',
    '-c:v', 'libx264',
    '-pix_fmt', 'yuv420p',
    '-preset', 'ultrafast',
    '-f', 'flv',
    rtmpUrl]
#管道特性配置
# pipe = sp.Popen(command, stdout = sp.PIPE, bufsize=10**8)
pipe = sp.Popen(command, stdin=sp.PIPE) #,shell=False
# pipe.stdin.write(frame.tostring())

#业务数据计算
lineWidth = 1 + int((size[1]-400) / 400)# 400 1 800 2 1080 3
textSize = size[1] / 1000.0# 400 0.45
heightDeta = size[1] / 20 + 10# 400 20
count = 0
faces = []
while True:
    ###########################图片采集
    count = count + 1
    ret, frame = camera.read() # 逐帧采集视频流
    if not ret:
        break

    if(count % fps == 0):#隔帧处理
    	###########################图片识别检测
        # 探测图片中的人脸 延帧检测 很基本的通用性人脸检测 网上攻略一大把
        faces = mycv.classfier.detectMultiScale(frame,scaleFactor=1.1,minNeighbors=5,minSize=(5,5))
        pass

    for (x, y, w, h) in faces:#绘制矩形框出人脸区域
        pass
        # cv2.rectangle(frame, (x, y), (x+w, y+h), (0, 255, 0), 2)
        mycv.drawRect(frame, (x, y), (x+w, y+h), (128, 64, 255), line_width=lineWidth )
        # 当发现人脸 进行 操做
        # 保存图片文件
        # 记录数据库
        # 推送提醒socket

        pass

    # 绘制推送图片帧信息
    # print(len(faces))
    fpsshow = "Fps  :" + str(int(fps)) + "  Frame:" + str(count)
    nframe  = "Play :" + str(int(count / fps))
    ntime   = "Time :" + time.strftime("%Y-%m-%d %H:%M:%S", time.localtime())
    if(count % fps == 0):
        print(fpsshow + " " + ntime)
    mycv.drawText(frame, (0, heightDeta * 1), fpsshow, textSize=textSize, lineWidth=lineWidth )
    mycv.drawText(frame, (0, heightDeta * 2), nframe, textSize=textSize, lineWidth=lineWidth )
    mycv.drawText(frame, (0, heightDeta * 3), ntime, textSize=textSize, lineWidth=lineWidth )

    ############################图片输出
    # 结果帧处理 存入文件 / 推流 / ffmpeg 再处理
    pipe.stdin.write(frame.tostring())  # 存入管道用于直播
    out.write(frame)    #同时 存入视频文件 记录直播帧数据
    pass
camera.release()
# Release everything if job is finished
out.release()
print("Over!")
pass
- 1
- 2
- 3
- 4
- 5
- 6
- 7
- 8
- 9
- 10
- 11
- 12
- 13
- 14
- 15
- 16
- 17
- 18
- 19
- 20
- 21
- 22
- 23
- 24
- 25
- 26
- 27
- 28
- 29
- 30
- 31
- 32
- 33
- 34
- 35
- 36
- 37
- 38
- 39
- 40
- 41
- 42
- 43
- 44
- 45
- 46
- 47
- 48
- 49
- 50
- 51
- 52
- 53
- 54
- 55
- 56
- 57
- 58
- 59
- 60
- 61
- 62
- 63
- 64
- 65
- 66
- 67
- 68
- 69
- 70
- 71
- 72
- 73
- 74
- 75
- 76
- 77
- 78
- 79
- 80
- 81
- 82
- 83
- 84
- 85
- 86
- 87
- 88
- 89
- 90
- 91
- 92
- 93
- 94
- 95
- 96
- 97
- 98
- 99
- 100
上述代码在linux系统中可以直接运行,只需填入RTMP地址和视频源(视频文件路径或设备摄像头编号),运行后,发现推流正常。
5.3 拓展
读取的视频是rtsp网络摄像头的视频流, 但是一旦运行没多久就会出现 pipe broke 的报错(1080p视频),改为720就没问题。
发现“FFMPEG Lib对在rtsp协议中的H264 vidos不支持”的问题, 解决方法: 程序开启两个线程, 一个线程读取摄像头的帧, 另一个线程处理这帧图片, 这里还推荐一个大佬用队列处理视频的方法:
import queue
import threading
import cv2 as cv
import subprocess as sp

class Live(object):
    def __init__(self):
        self.frame_queue = queue.Queue()
        self.command = ""
        # 自行设置
        self.rtmpUrl = ""
        self.camera_path = ""

    def read_frame(self):
        print("开启推流")
        cap = cv.VideoCapture(self.camera_path)

        # Get video information
        fps = int(cap.get(cv.CAP_PROP_FPS))
        width = int(cap.get(cv.CAP_PROP_FRAME_WIDTH))
        height = int(cap.get(cv.CAP_PROP_FRAME_HEIGHT))

        # ffmpeg command
        self.command = ['ffmpeg',
                '-y',
                '-f', 'rawvideo',
                '-vcodec','rawvideo',
                '-pix_fmt', 'bgr24',
                '-s', "{}x{}".format(width, height),
                '-r', str(fps),
                '-i', '-',
                '-c:v', 'libx264',
                '-pix_fmt', 'yuv420p',
                '-preset', 'ultrafast',
                '-f', 'flv',
                self.rtmpUrl]

        # read webcamera
        while(cap.isOpened()):
            ret, frame = cap.read()
            if not ret:
                print("Opening camera is failed")
                break

            # put frame into queue
            self.frame_queue.put(frame)

    def push_frame(self):
        # 防止多线程时 command 未被设置
        while True:
            if len(self.command) > 0:
                # 管道配置
                p = sp.Popen(self.command, stdin=sp.PIPE)
                break

        while True:
            if self.frame_queue.empty() != True:
                frame = self.frame_queue.get()
                # process frame
                # 你处理图片的代码
                # write to pipe
                p.stdin.write(frame.tostring())

    def run(self):
        threads = [
            threading.Thread(target=Live.read_frame, args=(self,)),
            threading.Thread(target=Live.push_frame, args=(self,))
        ]
        [thread.setDaemon(True) for thread in threads]
        [thread.start() for thread in threads]
- 1
- 2
- 3
- 4
- 5
- 6
- 7
- 8
- 9
- 10
- 11
- 12
- 13
- 14
- 15
- 16
- 17
- 18
- 19
- 20
- 21
- 22
- 23
- 24
- 25
- 26
- 27
- 28
- 29
- 30
- 31
- 32
- 33
- 34
- 35
- 36
- 37
- 38
- 39
- 40
- 41
- 42
- 43
- 44
- 45
- 46
- 47
- 48
- 49
- 50
- 51
- 52
- 53
- 54
- 55
- 56
- 57
- 58
- 59
- 60
- 61
- 62
- 63
- 64
- 65
- 66
- 67
- 68
- 69
- 70


