- 1ELK之elastalert告警篇
- 2jQuery 基础教程 (三)之jQuery的选择器_选择每一个clads为one的div元素下的第二个子元素
- 3python 5行代码 求 对称数 Strobogrammatic Number_python比较对称指数的代码
- 4android ndk开发
- 5代码随想录算法练习Day4:长度最小的子数组
- 6第一次 git 上传的完整流程_git 初始上传项目
- 7特征构造系列2:聚合特征构造以及转换特征构造_特征聚合
- 8day30 -算法练习
- 9【C语言课设】经典植物大战僵尸丨完整开发教程+笔记+源码_植物大战僵尸c语言源代码
- 10Quartus-II利用两个半加器实现简单全加器_如何用半加器实现全加器
详解AP3216C(三合一sensor: 光照、距离、照射强度)驱动开发
赞
踩
目录
概述
本文详细介绍AP3216C的特性,内部结构,操作时序和寄存器的参数意义,并使用linux platform tree 下i2c 驱动接口,实现了AP3216C的驱动程序。并且编写了一个测试范例,验证该驱动程序的性能。 其可以正确的读出sensor内部的数据。
源代码下载地址: AP3216Clinux环境下的驱动程序资源-CSDN文库
1 认识AP3216C
1.1 AP3216C特性
AP3216C是敦南科技出品的一款集成sensor, 其中包括 :ALS(数字型环境光线感应 sensor),PS(测距sensor)IR(照射sensor)。这款sensor主要用在手机、平板电脑、电视、显示器、数码相机等产品上。
1)驱动方式: 采用标准的I2C接口,且工作在快速模式(400K Hz)
2)输出模块可选: ALS, PS+IR, ALS+PS+IR, PD,ALS once, SW Reset, PS+IR once and ALS+PS+IR once.
3) 高分辨率:
数字型环境光线感应 sensor ,采用 16-bit 有效数据输出,数据采集范围( 0~65535 )
测距sensor,采用 10-bit 有效数据输出, 数据采集范围( 0~1023 )
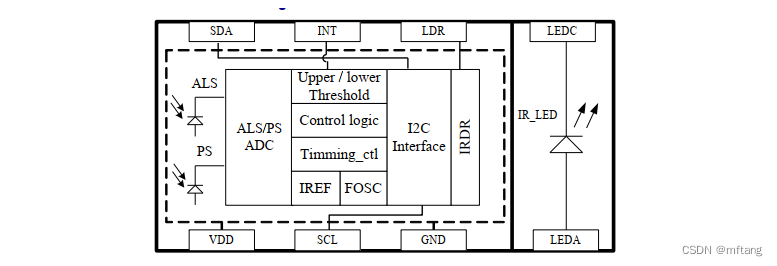
1.2 AP3216C内部结构
由下结构图可以看见: ALS和PS分别和ADC模块连接,以采集外部数据 。IR本分隔在一个单独的模块。
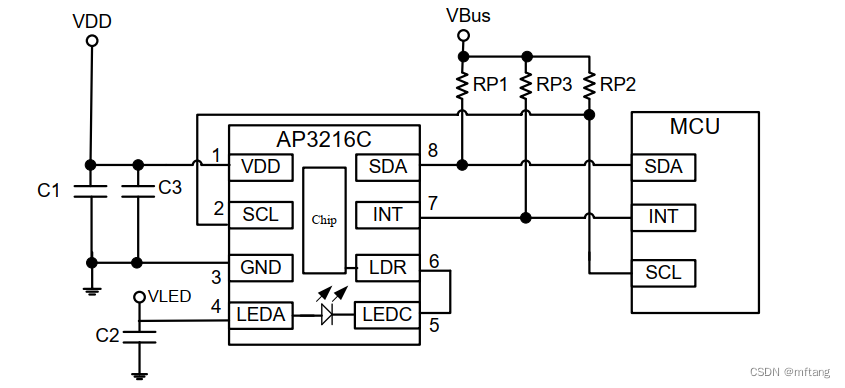
1.3 AP3216C 硬件电路
AP3216C采用标准的i2c驱动模式,其和MCU之间通过3个线连接,SDA和SCL是I2C的驱动线,还提供一个中断引脚INT
1.4 AP3216C工作时序
AP3216C采用标准的i2c驱动接口,其slave 设备地址为:0x1e
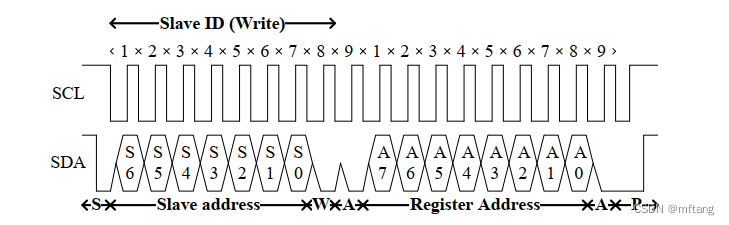
1.4.1 I2C 写数据协议
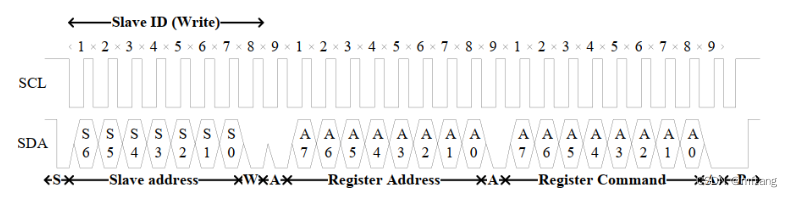
1) 写方式一: 写寄存器地址
S: start 信号
Slave address : 7 bit
W: 写数据bit
A: ACK信号
Register Address: 寄存器地址
P: Stop信号

详细时序图:
2) 写方式二: 写寄存器地址 和数据
S: start 信号
Slave address : 7 bit
W: 使能写数据bit
A: ACK信号
Register Address: 寄存器地址
register Command: 写寄存器数据
P: Stop信号

详细时序图:
1.4.2 I2C 读数据协议
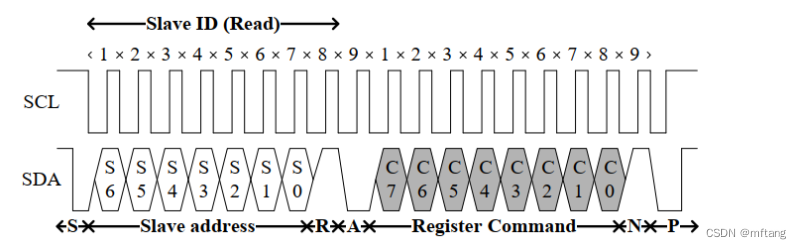
1) 读方式一: 读寄存器地址
S: start 信号
Slave address : 7 bit
R: 使能读数据bit
A: ACK信号
Register command: 寄存器数据
N: NACK信号
P: Stop信号

详细时序图:
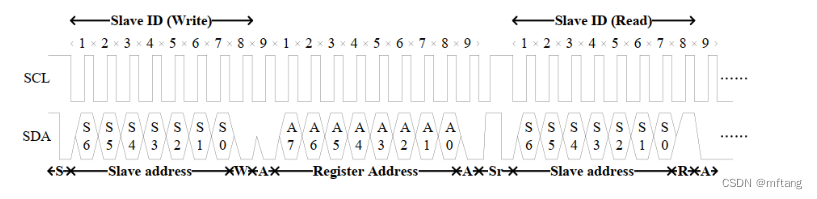
2) 读方式二: 读寄存器地址的数据
S: start 信号
Slave address : 7 bit
R: 使能读数据bit
W: 使能写数据bit
A: ACK信号
Register command: 寄存器数据
N: NACK信号
P: Stop信号

详细时序图:
1.5 重要的寄存器
AP3216C内部有许多寄存器,其地址空间(0x00 ~ 0x2d ),由于篇幅所限,这里不对每个寄存器做一一介绍。如需了解,可参看文档:AP3216C Rev0.86. pdf。 本文主要介绍系统寄存器部分,地址空间(0x00 ~ 0x0f。各个寄存器的功能,看下表:
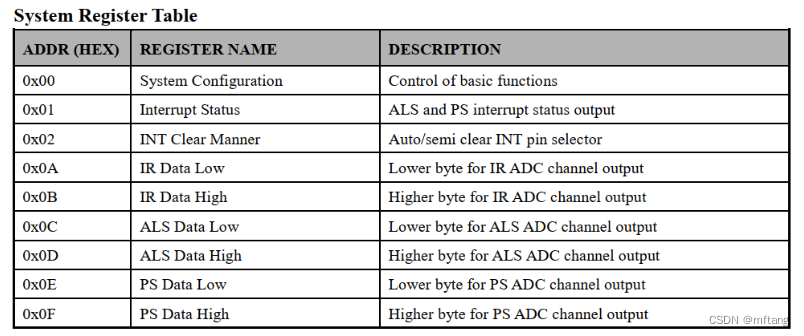
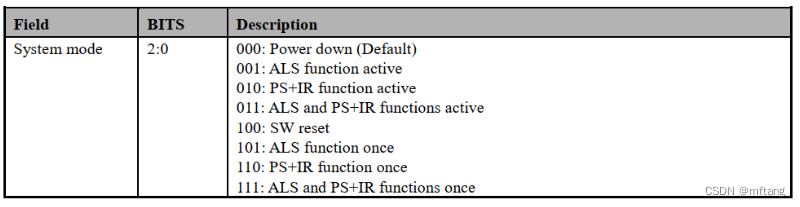
1.5.1 系统配置寄存器
该寄存器地址位0x00, 低位3个bit(bit-0 bit-1,bit-2)用于配置系统工作模式

具体模式如下表:
1.5.2 和中断相关寄存器
中断状态寄存器: address = 0x01

BIT-0: ALS-INT 用来表示中断是否发生, B0=1 表示ALS中断被触发, B0 =0 示ALS中断未被被触发
BIT-1: PS-INT 用来表示中断是否发生, B0=1 表示PS中断被触发, B0 =0 示PS中断未被被触发
中断清除寄存器: address = 0x02

当配置CLR_MNR = 0时, 在读取寄存器(0x0C, 0x0D, 0x0E, 0x0F)的值后,芯片会自动清除中断;
当配置CLR_MNR = 1时,需要软件强制把寄存器0x01的对应位置位为1,清除中断;
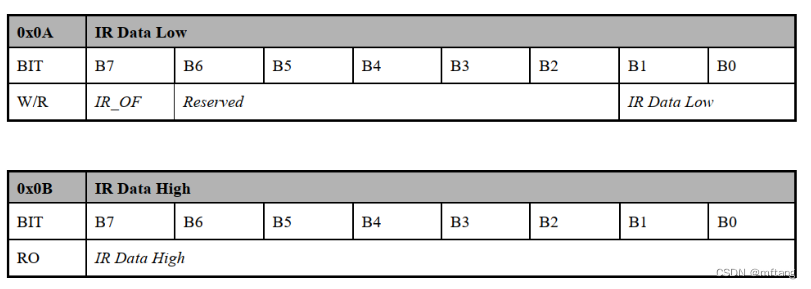
1.5.3 IR数据寄存器
对应地址: 0x0a 和0x0b
0x0a地址中,bit0和bit1 为数据位,表示低字节位, IR_OF为数据溢出标记,当IR_OF=1, 表明IR值过高,其会影响PS的数据的有效性
0x0b地址中,为IR 数据高字节位
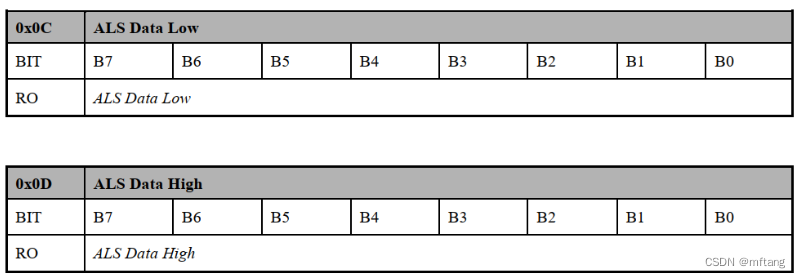
1.5.4 ALS 数据寄存器
对应地址: 0x0c 和0x0d
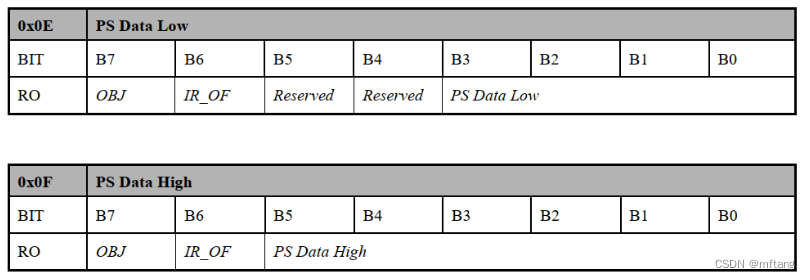
1.5.5 PS 数据寄存器
对应地址: 0x0E 和0x0F
IR_OF = 1,表示读取的数据有效。IR_OF = 0,表示读取的数据无效。
2 驱动开发
2.1 查看i2c总线下的设备
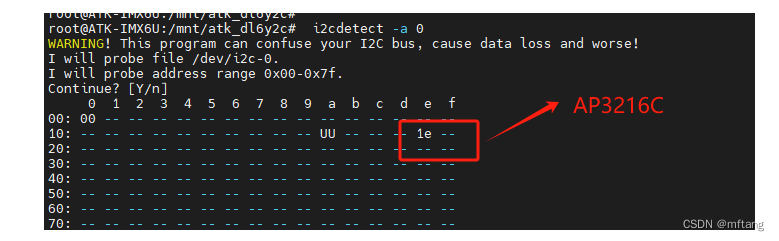
i2c总线上可以挂载多个device,其要求在同一条总线上,每个设备的地址必须唯一性。如果两个设备的地址一样,会出现时序混乱。 下面通过命令来探测一下i2c总线下的设备情况。
查看i2c-0下设备情况
使用命令
i2cdetect -a 0
执行该命令后,列出设备地址信息: 该总线下有两个设备,其地址分别为:0x1a和0x1e
2.2 编写驱动代码
创建drv_ap3216c.c,编写如下代码
- /***************************************************************
- Copyright 2024-2029. All rights reserved.
- 文件名 : drv_ap3216c.c
- 作者 : tangmingfei2013@126.com
- 版本 : V1.0
- 描述 : ap3216c 驱动程序
- 其他 : 无
- 日志 : 初版V1.0 2024/02/01
- ***************************************************************/
- #include <sys/types.h>
- #include <sys/stat.h>
- #include <linux/types.h>
- #include <linux/i2c-dev.h>
- #include <linux/i2c.h>
- #include <sys/ioctl.h>
- #include <unistd.h>
- #include <stdio.h>
- #include <string.h>
- #include <fcntl.h>
- #include <stdlib.h>
- #include <linux/fs.h>
- #include <errno.h>
- #include <assert.h>
- #include <string.h>
- #include <time.h>
- #include "drv_ap3216.h"
-
- #define DEV_FILE "/dev/i2c-0"
-
-
- static int fd = -1;
-
- static void msleep(unsigned int time)
- {
- struct timespec sleeper, temp;
-
- sleeper.tv_sec = (time_t)(time/1000);
- sleeper.tv_nsec = (long)(time%1000)*1000000;
- nanosleep(&sleeper, &temp);
- }
-
- static int ap3216c_write_reg( unsigned char reg, unsigned char cmd)
- {
- int ret = -1;
- unsigned char buf[2] = {0};
-
- buf[0] = reg;
- buf[1] = cmd;
-
- ret = write(fd, buf, 2);
- if( ret < 0 )
- {
- printf("write cmd to ap3216c register failure.\n");
- return -1;
- }
-
- return 0;
- }
-
- static int ap3216c_read_reg( unsigned char reg, unsigned char *val)
- {
- int ret = -1;
- unsigned char buf[1] = {0};
-
- buf[0] = reg; //send register address
- ret = write( fd, buf, 1);
- if( ret < 0 )
- {
- printf("write cmd to ap3216c register failure.\n");
- return -1;
- }
-
- ret = read(fd, buf, 1); //read data from the register
- if( ret < 0 )
- {
- printf("get the humidy failure.\n");
- return -1;
- }
- *val = buf[0];
-
- return 0;
- }
-
- void ap3216c_read_datas(ap3216c_data *pdata)
- {
- unsigned char i =0;
- unsigned char buf[6], val = 0;
-
- /* read all sensor‘ data */
- for( i = 0; i < 6; i++)
- {
- ap3216c_read_reg( AP3216C_IRDATALOW + i, &val);
- buf[i] = val;
- }
-
- /* IR */
- if(buf[0] & 0X80){ /* IR_OF位为1,则数据无效 */
- pdata->ir = 0;
- }
- else {
- pdata->ir = ((unsigned short)buf[1] << 2) | (buf[0] & 0X03);
- }
-
- /* ALS */
- pdata->als = ((unsigned short)buf[3] << 8) | buf[2];
-
- /* PS */
- if(buf[4] & 0x40){ /* IR_OF位为1,则数据无效 */
- pdata->ps = 0;
- }
- else{
- pdata->ps = ((unsigned short)(buf[5] & 0X3F) << 4) | (buf[4] & 0X0F);
- }
- }
-
- void ap3216c_release( void )
- {
- close( fd );
- }
-
- int ap3216c_init(void)
- {
- // init i2c
- fd = open(DEV_FILE, O_RDWR);
- if( fd < 0 )
- {
- close( fd );
- printf("%s %s i2c device open failure: %s\n", __FILE__, __FUNCTION__, strerror(errno));
- return -1;
- }
-
- ioctl(fd, I2C_TENBIT, 0);
- ioctl(fd, I2C_SLAVE, AP3216C_ADDR);
-
- // reset sensor
- ap3216c_write_reg( AP3216C_SYSTEMCONG, 0x04);
- msleep(2);
-
- // enable ALS、PS+IR
- ap3216c_write_reg( AP3216C_SYSTEMCONG, 0X03);
- msleep(2);
-
- return fd;
- }

在drv_ap3216c.h中,编写如下代码:
- #ifndef __DRV__AP3216_H
- #define __DRV__AP3216_H
-
- #ifdef __cplusplus
- extern "C" {
- #endif
-
- #define AP3216C_ADDR 0X1E
-
- /* AP3316C寄存器 */
- #define AP3216C_SYSTEMCONG 0x00 /* 配置寄存器 */
- #define AP3216C_INTSTATUS 0X01 /* 中断状态寄存器 */
- #define AP3216C_INTCLEAR 0X02 /* 中断清除寄存器 */
- #define AP3216C_IRDATALOW 0x0A /* IR数据低字节 */
- #define AP3216C_IRDATAHIGH 0x0B /* IR数据高字节 */
- #define AP3216C_ALSDATALOW 0x0C /* ALS数据低字节 */
- #define AP3216C_ALSDATAHIGH 0X0D /* ALS数据高字节 */
- #define AP3216C_PSDATALOW 0X0E /* PS数据低字节 */
- #define AP3216C_PSDATAHIGH 0X0F /* PS数据高字节 */
-
- typedef struct _ap3216c_data{
- unsigned short ir;
- unsigned short als;
- unsigned short ps; /* */
- }ap3216c_data;
-
- void ap3216c_read_datas(ap3216c_data *pdata);
- int ap3216c_init(void);
-
-
- #ifdef __cplusplus
- }
- #endif
-
- #endif /* __DRV__AP3216_H */
3 编写测试代码
测试主要实现,调用驱动程序接口,读取ALS,PS,IR数据,并打印出来
3.1 测试代码实现
创建一个test_ap3216.c,编写如下代码:
- /***************************************************************
- Copyright 2024-2029. All rights reserved.
- 文件名 : test_ap3216.c
- 作者 : tangmingfei2013@126.com
- 版本 : V1.0
- 描述 : 验证dev_ap3216.c
- 其他 : 无
- 日志 : 初版V1.0 2024/02/1
- ***************************************************************/
- #include <sys/types.h>
- #include <sys/stat.h>
- #include <linux/types.h>
- #include <linux/i2c-dev.h>
- #include <linux/i2c.h>
- #include <unistd.h>
- #include <stdio.h>
- #include <string.h>
- #include <fcntl.h>
- #include <stdlib.h>
- #include <linux/fs.h>
- #include <sys/ioctl.h>
- #include <errno.h>
- #include <assert.h>
- #include <string.h>
- #include <time.h>
- #include "drv_ap3216.h"
-
- int main(void)
- {
- ap3216c_data stru_data;
- int count_run = 100;
- int set;
-
- set = ap3216c_init();
- if( set < 0){
- printf("initial ap3216c failure.\n");
- return -1;
- }
-
- while( count_run > 0){
- ap3216c_read_datas( &stru_data );
-
- printf("ir = %d, als = %d, ps = %d \r\n",
- stru_data.ir, stru_data.als, stru_data.ps);
- count_run--;
- sleep(1);
- }
-
- ap3216c_release();
-
- return 0;
- }
3.2 Makefile
在测试程序的目录下,创建一个makefile文件,编写如下代码
- CFLAGS= -Wall -O2
- CC=/home/ctools/gcc-linaro-4.9.4-arm-linux-gnueabihf/bin/arm-linux-gnueabihf-gcc
- STRIP=/home/ctools/gcc-linaro-4.9.4-arm-linux-gnueabihf/bin/arm-linux-gnueabihf-strip
-
- test_ap3216: test_ap3216.o drv_ap3216.o
- $(CC) $(CFLAGS) -o test_ap3216 test_ap3216.o drv_ap3216.o
- $(STRIP) -s test_ap3216
-
- clean:
- rm -f test_ap3216 test_ap3216.o drv_ap3216.o
4 测试
4.1 编译代码
使用Make命令编译代码,然后将生成的可执行文件copy到NFS的共享目录下,方便在板卡中运行程序。

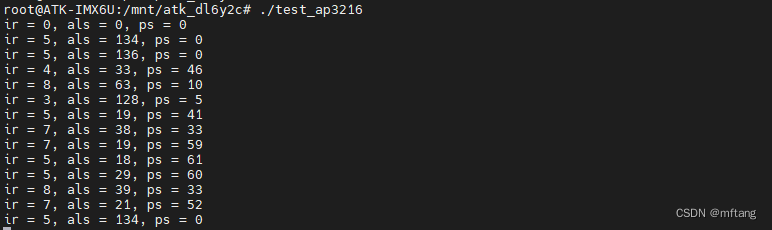
4.2 运行测试程序
运行测试程序,可以看见在终端上打印出来sensor的数据