- 1李宏毅机器学习2016 第十五讲 无监督学习 生成模型之 VAE_vae 李宏毅 ppt
- 2基于Java的剧本杀预约系统设计与实现(源码+lw+部署文档+讲解等)_剧本杀预约系统java
- 3鸿蒙系统app开发语言_华为高管宣布,开发鸿蒙App编程语言确认,或取代安卓系统?...
- 4人眼定位python代码_使用dlib,OpenCV和Python进行人脸识别—人眼眨眼检测
- 5山东移动CM311-5-ZG_国科GK6323V100C_安卓4.4.2_免拆U盘卡刷刷机固件包_cm311-5 刷机
- 6Pytorch简介和安装_pytorch preview
- 7关于docker-Engine使用的存储驱动devicemapper的常识
- 8网络七层模型之会话层:理解网络通信的架构(五)
- 9Python界面 可视化开发(python3+PyQt5+Qt Designer)_基于python和pyqt5的快速开发模板系统
- 10微信小程序的使用_上传成功后,需要联系管理员在小程序管理后台将本次上传设置为体验版本.
【Flutter从入门到实战】 ⑥、Flutter的StatefulWidget的生命周期didUpdateWidget调用机制、基础的Widget-普通文本Text、富文本Rich、按钮、图片的使用_flutter didupdatewidget
赞
踩
Flutter从入门到实战
一共分为23个系列
①(Flutter、Dart环境搭建篇) 共3个内容 已更新
②(Dart语法1 篇) 共4个内容 已更新
③(Dart语法2 篇) 共2个内容 已更新
④(Flutter案例开发篇) 共4个内容 已更新
⑤(Flutter的StatelessWidget 共3个内容 已更新
⑥(Flutter的基础Widget篇) 共2个内容 已更新
⑦(布局Widget篇) 共1个内容 已更新
⑧(Flex、Row、Column以及Flexible、Stack篇) 共1个内容 已更新
⑨(滚动的Widget篇) 共4个内容 已更新
⑩(Dart的Future和网络篇) 共3个内容 已更新
⑪(豆瓣案例-1篇) 共3个内容 已更新
⑫(豆瓣案例-2篇) 共3个内容 已更新
官方文档说明
官方视频教程
Flutter的YouTube视频教程-小部件

⑥Flutter的基础Widget篇
小贴士
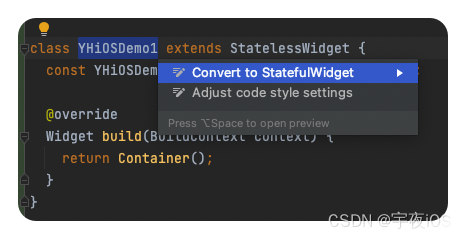
1.将Stateless 转成 Stateful 快捷键
选中 Stateless的类 按住 option + enter
2. 将一个widget 抽取出来 快捷键
option + enter + w
我这里修改 了 option + command + 2
①、Flutter的StatefulWidget的生命周期 didUpdateWidget
1.先找到官方文档的API 搜索widget并且找到State


状态对象具有以下生命周期:
框架通过调用 StatefulWidget.createState创建一个State对象。
新创建的State对象与BuildContext相关联。这种关联是永久的:State对象永远不会改变它的 BuildContext。但是,BuildContext本身可以与它的子树一
起在树周围移动。此时,State对象被视为已安装。
框架调用initState。State的子类应该重写 initState以执行依赖于BuildContext或小部件的一次性初始化,当调用initState方法时,它们分别可用作上下
文和 小部件属性。
框架调用didChangeDependencies。State的子类应该覆盖didChangeDependencies以执行涉及 InheritedWidget的初始化。如果调用了
BuildContext.dependOninheritedWidgetofExactType,如果继承的小部件随后发生变化或小部件在树中移动,则将再次调用didChangeDependencies
方法。
此时,State对象已完全初始化,框架可能会多次调用其build方法来获取此子树的用户界面描述。状态对象可以通过调用它们的setState方法自发地请求
重建它们的子树,这表明它们的某些内部状态已经以可能影响该子树中的用户界面的方式发生了变化。
在此期间,父小部件可能会重建并请求更新树中的此位置以显示具有相同 runtimeType和Widget.key的新小部件。发生这种情况时,框架将更新小部件
属性以引用新小部件,然后 以先前的小部件作为參数调用didUpdateWidget方法。状态 对象应覆盖didUpdatewidget以响应其关联小部件中的更改(例
如,启动隐式动画)。框架总是在调用didUpdateWidget之后调用build,这意味着在didUpdateWidget中对setState的任何调用是多余的。
在开发过程中,如果发生热重载(无论是从命令行flutter工具按启动r,还是从 IDE 启动),都会调用reassemble方法。这提供了重新初始化在
initState方法中准备的任何数据的机会。
如果包含State对象的子树从树中移除(例如,因为父级构建了具有不同runtimeType 或Widget.key的小部件),则框架调用deactivate方法。子类应该
重写此方法以清除此对象与树中其他元素之间的任何链接(例如,如果您为祖先提供了指向后代RenderObject的指针),
此时,框架可能会将此子树重新插入树的另一部分。如果发生这种情况,框架将确保调用build以使State对象有机会适应其在树中的新位置。如果框架
确实重新插入此子树,它将在从树中删除子树的动画帧结束之前执行此操作。因此,State对象可以推迟释放大部分资源,直到框架调用它们的dispose
方法。
如果框架在当前动画帧结束时没有重新插入这个子树,框架将调用dispose,这表明这个State对象将永远不会再次构建。子类应覆盖此方法以释放此对
象保留的任何资源(例如,停止任何活动动画)。
在框架调用dispose后,State对象被认为是未挂载的,mounted属性为 false。此时调用setState是错误的。生命周期的这个阶段是终端:无法重新挂载
已释放的State对象。
- 1
- 2
- 3
- 4
- 5
- 6
- 7
- 8
- 9
- 10
- 11
- 12
- 13
- 14
- 15
- 16
- 17
- 18
- 19
- 20
- 21
- 22
- 23
- 24
- 25
didUpdateWidget 是需要
重新创建widget对象才会调用
②、基础的Widget
1、 普通文本 Text
/**
 * 1、普通文本 Text
 *   const Text(
    String this.data, {
    Key? key,
    this.style,
    this.strutStyle,
    this.textAlign,
    this.textDirection,
    this.locale,
    this.softWrap,
    this.overflow,
    this.textScaleFactor,
    this.maxLines,
    this.semanticsLabel,
    this.textWidthBasis,
    this.textHeightBehavior,
    })
 */
class TextDemoWidget extends StatelessWidget {
  const TextDemoWidget({
    Key? key,
  }) : super(key: key);

  @override
  Widget build(BuildContext context) {
    return Text(
        "早发白帝城\n朝辞白帝彩云间,千里江陵一日还。\n两岸猿声啼不住,轻舟已过万重山。\n",
      textAlign: TextAlign.center,
      maxLines: 2,
      overflow: TextOverflow.ellipsis, // 显示省略号
      textScaleFactor: 2.0, // 缩放 比原来的是多少倍
      style: TextStyle(
        fontSize: 30,
        color: Colors.red,
        fontWeight: FontWeight.bold
      ),
    );
  }
}
- 1
- 2
- 3
- 4
- 5
- 6
- 7
- 8
- 9
- 10
- 11
- 12
- 13
- 14
- 15
- 16
- 17
- 18
- 19
- 20
- 21
- 22
- 23
- 24
- 25
- 26
- 27
- 28
- 29
- 30
- 31
- 32
- 33
- 34
- 35
- 36
- 37
- 38
- 39
- 40
- 41
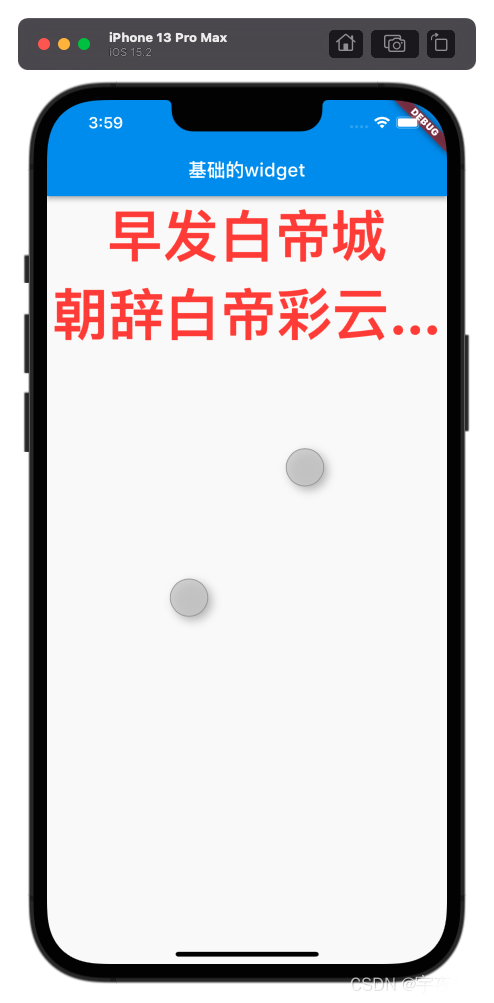
1、 效果图
main.dart代码
import 'package:flutter/material.dart'; // runApp在这个material库里面
main() => runApp(MyApp());

class MyApp extends StatelessWidget {
  const MyApp({Key? key}) : super(key: key);

  @override
  Widget build(BuildContext context) {
    return MaterialApp(
      home:YHiOSHomePage() ,
    );
  }
}

class YHiOSHomePage extends StatelessWidget {
  @override
  Widget build(BuildContext context) {
    return Scaffold(
      appBar: AppBar(
        title: Text("基础的widget"),
      ),
      // body: YHiOSHomeContent("你好呀 宇夜iOS"),
      body: HYiOSContentState(),

    );
  }
}

class HYiOSContentState extends StatefulWidget {
  const HYiOSContentState({Key? key}) : super(key: key);

  @override
  State<HYiOSContentState> createState() => _HYiOSContentStateState();
}

class _HYiOSContentStateState extends State<HYiOSContentState> {
  @override
  Widget build(BuildContext context) {
    return TextDemoWidget();
  }
}

/**
 * 1、普通文本 Text
 *   const Text(
    String this.data, {
    Key? key,
    this.style,
    this.strutStyle,
    this.textAlign,
    this.textDirection,
    this.locale,
    this.softWrap,
    this.overflow,
    this.textScaleFactor,
    this.maxLines,
    this.semanticsLabel,
    this.textWidthBasis,
    this.textHeightBehavior,
    })
 */
class TextDemoWidget extends StatelessWidget {
  const TextDemoWidget({
    Key? key,
  }) : super(key: key);

  @override
  Widget build(BuildContext context) {
    return Text(
        "早发白帝城\n朝辞白帝彩云间,千里江陵一日还。\n两岸猿声啼不住,轻舟已过万重山。\n",
      textAlign: TextAlign.center,
      maxLines: 2,
      overflow: TextOverflow.ellipsis, // 显示省略号
      textScaleFactor: 2.0, // 缩放 比原来的是多少倍
      style: TextStyle(
        fontSize: 30,
        color: Colors.red,
        fontWeight: FontWeight.bold
      ),
    );

  }
}
- 1
- 2
- 3
- 4
- 5
- 6
- 7
- 8
- 9
- 10
- 11
- 12
- 13
- 14
- 15
- 16
- 17
- 18
- 19
- 20
- 21
- 22
- 23
- 24
- 25
- 26
- 27
- 28
- 29
- 30
- 31
- 32
- 33
- 34
- 35
- 36
- 37
- 38
- 39
- 40
- 41
- 42
- 43
- 44
- 45
- 46
- 47
- 48
- 49
- 50
- 51
- 52
- 53
- 54
- 55
- 56
- 57
- 58
- 59
- 60
- 61
- 62
- 63
- 64
- 65
- 66
- 67
- 68
- 69
- 70
- 71
- 72
- 73
- 74
- 75
- 76
- 77
- 78
- 79
- 80
- 81
- 82
- 83
- 84

1.2、 富文本 Text.rich
查看类的子类 使用快捷键是 option + command + b
1.2.1、 Text.rich的使用
// 2.富文本
class TextRichDemoWidget extends StatelessWidget {
  const TextRichDemoWidget({
    Key? key,
  }) : super(key: key);

  @override
  Widget build(BuildContext context) {
    return Text.rich(
      TextSpan(
        // text: "hello world",
        // style: TextStyle(color: Colors.orange, fontSize: 30),
        children: [
          TextSpan(text: "hello world", style: TextStyle(color: Colors.orange, fontSize: 30)),
          TextSpan(text: "hello world", style: TextStyle(color: Colors.red, fontSize: 30)),
          WidgetSpan(child: Icon(Icons.favorite,color: Colors.red)),
          TextSpan(text: "hello world", style: TextStyle(color: Colors.green, fontSize: 30))

        ]
      )
    );
  }
}
- 1
- 2
- 3
- 4
- 5
- 6
- 7
- 8
- 9
- 10
- 11
- 12
- 13
- 14
- 15
- 16
- 17
- 18
- 19
- 20
- 21
- 22
- 23
- 24
1.2、 富文本 效果图

2、按钮
2.1、按钮 RaisedButton
  RaisedButton(
          child: Text("RaisedButton"),
          textColor: Colors.white,
          color: Colors.orange,
          onPressed: () => print("RaisedButton Click"),
        )
- 1
- 2
- 3
- 4
- 5
- 6
2.2、 按钮 FlatButton
 FlatButton(
          onPressed:() => print("FlatButton Click"),
          color: Colors.purple,
          child:Text("FlatButton"),
        ),
- 1
- 2
- 3
- 4
- 5
2.3、按钮 OutlineButton
OutlineButton(
          child: Text("OutlineButton"),
          color: Colors.green,
          onPressed:() => print("OutlineButton Click"),
        )
- 1
- 2
- 3
- 4
- 5
2.4、按钮 FloatingActionButton
放在App下面的floatingActionButton 类似全局按钮
class YHiOSHomePage extends StatelessWidget {
  @override
  Widget build(BuildContext context) {
    return Scaffold(
      appBar: AppBar(
        title: Text("基础的widget"),
      ),
      // body: YHiOSHomeContent("你好呀 宇夜iOS"),
      body: HYiOSContentState(),
      floatingActionButton:FloatingActionButton(
        child: Icon(Icons.add),
        onPressed: () => print("FloatingActionButton Click"),
      ),
      floatingActionButtonLocation: FloatingActionButtonLocation.centerDocked,

    );
  }
}
- 1
- 2
- 3
- 4
- 5
- 6
- 7
- 8
- 9
- 10
- 11
- 12
- 13
- 14
- 15
- 16
- 17
- 18
2.5、自定义Button 图标 文字 背景 圆角
        FlatButton(
          color: Colors.amberAccent,
            // 设置圆角
            shape: RoundedRectangleBorder(
              borderRadius: BorderRadius.circular(15)
            ),
            child: Row(
              // 内容占多少就显示多少
              mainAxisSize: MainAxisSize.min,
              children: [
                Icon(Icons.favorite,color: Colors.red),
                Text("喜欢宇夜iOS")
              ],
        ),
            onPressed:() {},
        ),
- 1
- 2
- 3
- 4
- 5
- 6
- 7
- 8
- 9
- 10
- 11
- 12
- 13
- 14
- 15
- 16
- 17
2、 各种按钮的效果图及demo代码
class ButtonDemoWidget extends StatelessWidget {
  const ButtonDemoWidget({
    Key? key,
  }) : super(key: key);

  @override
  Widget build(BuildContext context) {
    return Column(
      crossAxisAlignment: CrossAxisAlignment.start,
      children: [
        RaisedButton(
          child: Text("RaisedButton"),
          textColor: Colors.white,
          color: Colors.orange,
          onPressed: () => print("RaisedButton Click"),
        ),
        // 2. FlatButton
        FlatButton(
          onPressed:() => print("FlatButton Click"),
          color: Colors.purple,
          child:Text("FlatButton"),
        ),
        // 3. OutlineButton
        OutlineButton(
          child: Text("OutlineButton"),
          color: Colors.green,
          onPressed:() => print("OutlineButton Click"),
        ),
        // 4.
        // FloatingActionButton(
        //   child: Text("FloatingActionButton"),
        //   onPressed: () => print("FloatingActionButton Click"),
        // )

        // 5.自定义Button : 图标-文字-背景-圆角
        FlatButton(
          color: Colors.amberAccent,
            // 设置圆角
            shape: RoundedRectangleBorder(
              borderRadius: BorderRadius.circular(15)
            ),
            child: Row(
              // 内容占多少就显示多少
              mainAxisSize: MainAxisSize.min,
              children: [
                Icon(Icons.favorite,color: Colors.red),
                Text("喜欢宇夜iOS")
              ],
        ),
            onPressed:() {},
        ),
      ],

    );
  }
}
- 1
- 2
- 3
- 4
- 5
- 6
- 7
- 8
- 9
- 10
- 11
- 12
- 13
- 14
- 15
- 16
- 17
- 18
- 19
- 20
- 21
- 22
- 23
- 24
- 25
- 26
- 27
- 28
- 29
- 30
- 31
- 32
- 33
- 34
- 35
- 36
- 37
- 38
- 39
- 40
- 41
- 42
- 43
- 44
- 45
- 46
- 47
- 48
- 49
- 50
- 51
- 52
- 53
- 54
- 55
- 56
- 57

3、图片
3.1 图片 Image加载网络图片
// 图片 Image
class ImageDemoWidget extends StatelessWidget {
  const ImageDemoWidget({
    Key? key,
    required this.imageUrl,
  }) : super(key: key);

  final String imageUrl;

  @override
  Widget build(BuildContext context) {
    return Image(
      color:Colors.red,
      // 混入模式
      colorBlendMode: BlendMode.colorDodge,
      image: NetworkImage(imageUrl),
      height: 200,
      width: 200,
      fit:BoxFit.contain, // contain 默认  cover 沾满
      // fitWidth 宽度一定 高度自适应  fitHeight : 高度一定 宽度自适应
      // alignment: Alignment.bottomCenter,
      // Alignment 范围 -1 到 1
      alignment: Alignment(-1,0),
      // 不断重复
      repeat: ImageRepeat.repeatY,

    );
  }
}
- 1
- 2
- 3
- 4
- 5
- 6
- 7
- 8
- 9
- 10
- 11
- 12
- 13
- 14
- 15
- 16
- 17
- 18
- 19
- 20
- 21
- 22
- 23
- 24
- 25
- 26
- 27
- 28
- 29
- 30
3.1 图片效果图及基本属性说明
colorBlendMode : 混入模式
image: 图片
color : 颜色 设置颜色会遮挡图片
width、height : 宽高
fit : 适应模式: 默认、铺满、宽度一定、高度一定
repeat : 图片铺不满情况 图片不断重复叠加
alignment:对齐方式 范围是 -1到1

3.2 图片 Image加载本地图片
加载本地图片的注意事项
- 需要创建一个
assets文件夹- 在
assets文件夹下面 创建一个images文件夹- 把图片存放在
images中- 在
pubspec.yaml
将assets注释打开·
代码如下
assets:
- assets/images/
-
3.2.1 第一种加载本地图片方式
Image(
      // 1.在Flutter项目中创建一个文件夹,存储图片
      // 2. 在pubspec.yaml进行配置
      // 3. 使用图片
        image: AssetImage("assets/images/ty.jpeg"),
    )
- 1
- 2
- 3
- 4
- 5
- 6
3.2.2 第二种加载本地图片方式
Image.asset("assets/images/tk.jpeg");
- 1
3.2 加载本地图片效果图


